Engine – 3.2L Duratorq-TDCi (148kW/200PS) - Puma
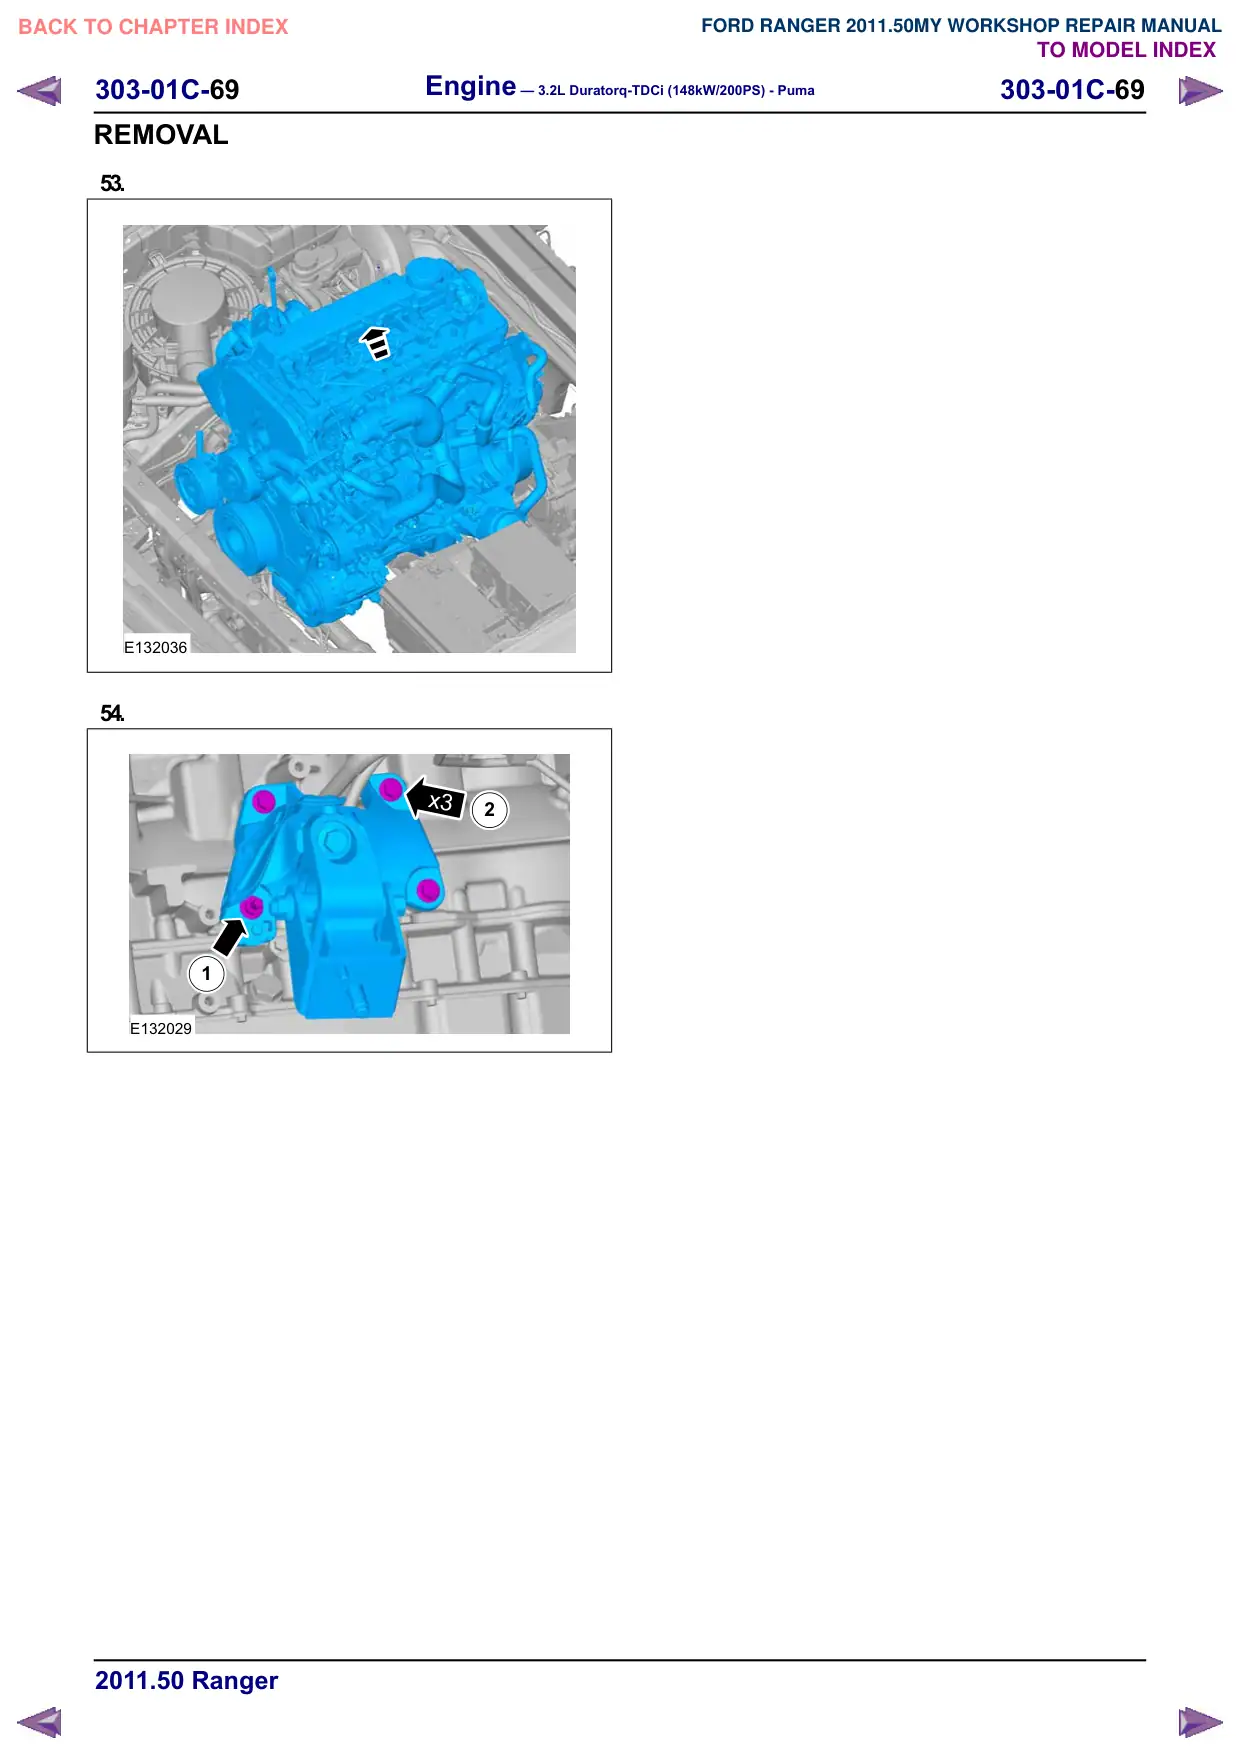
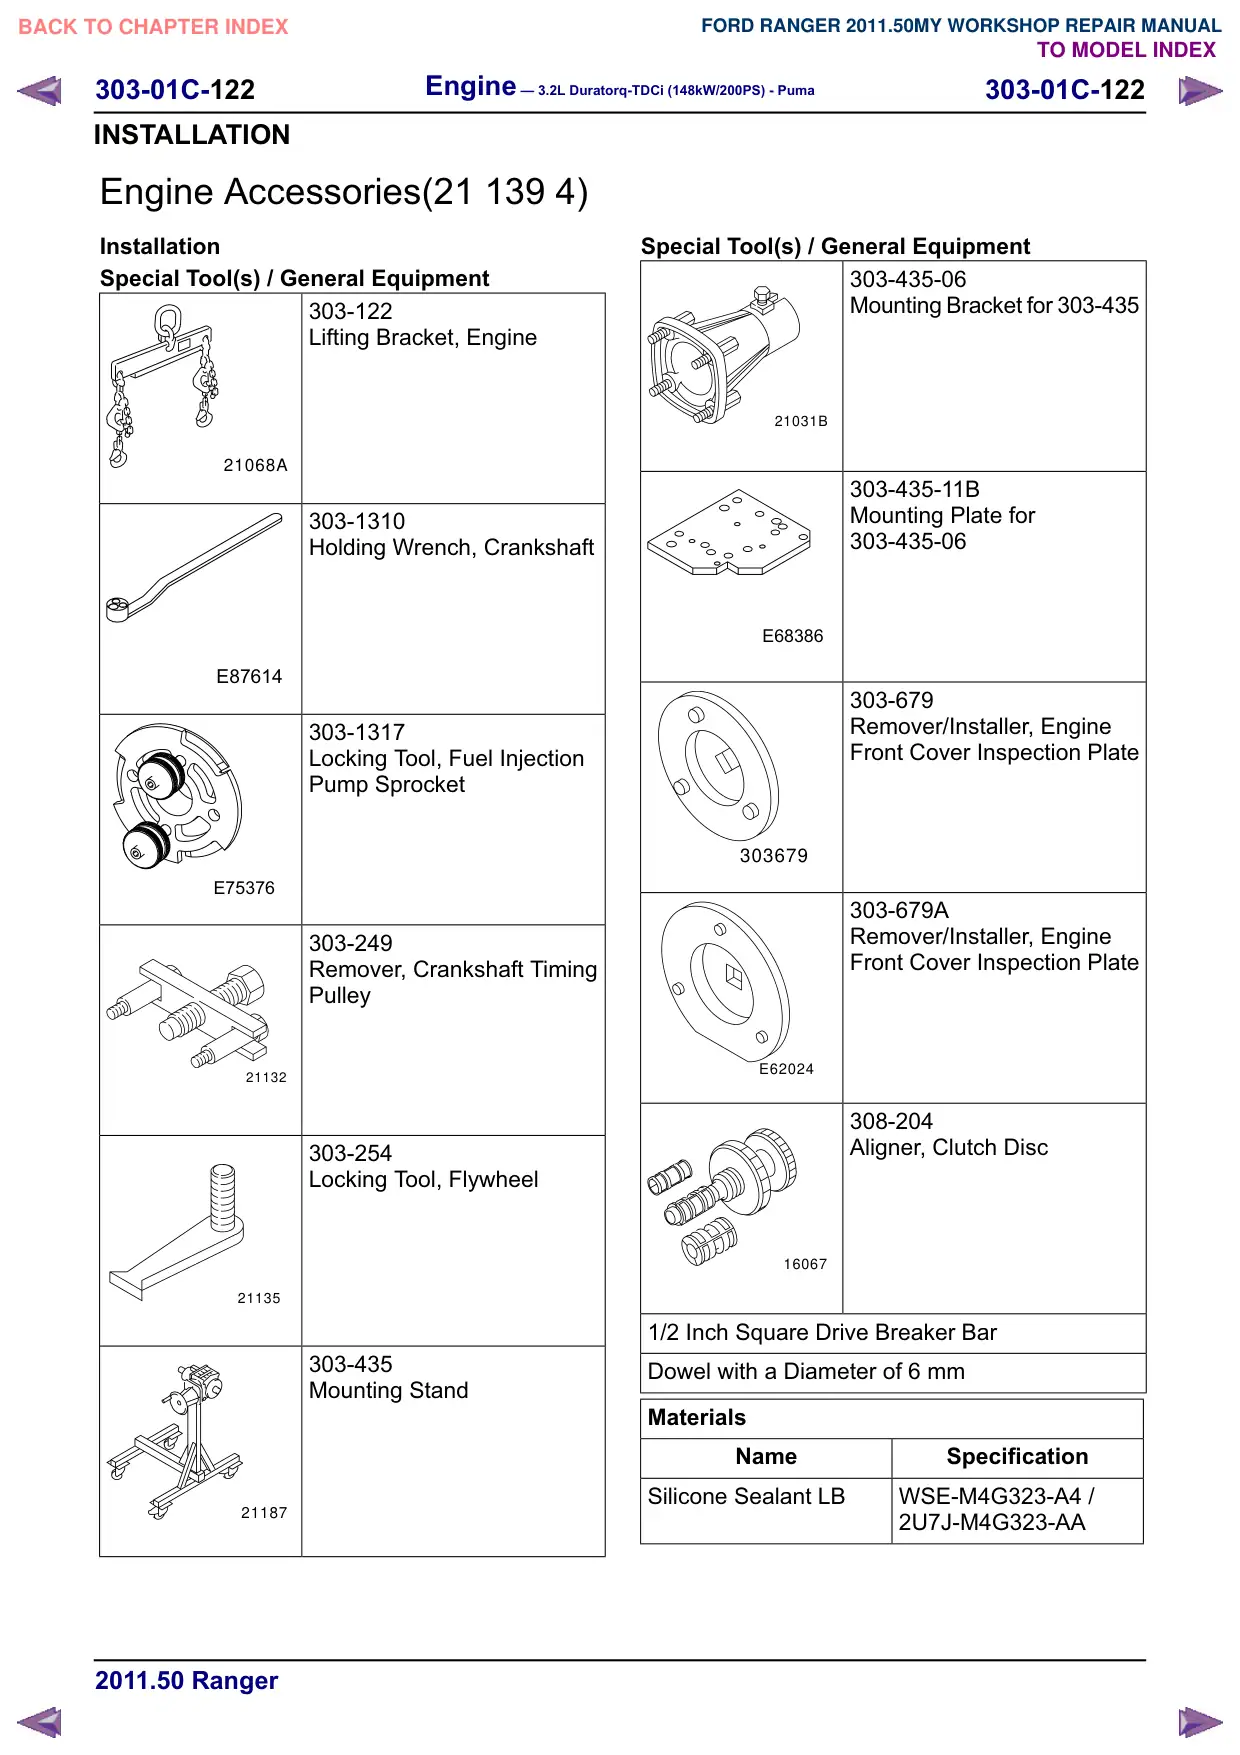
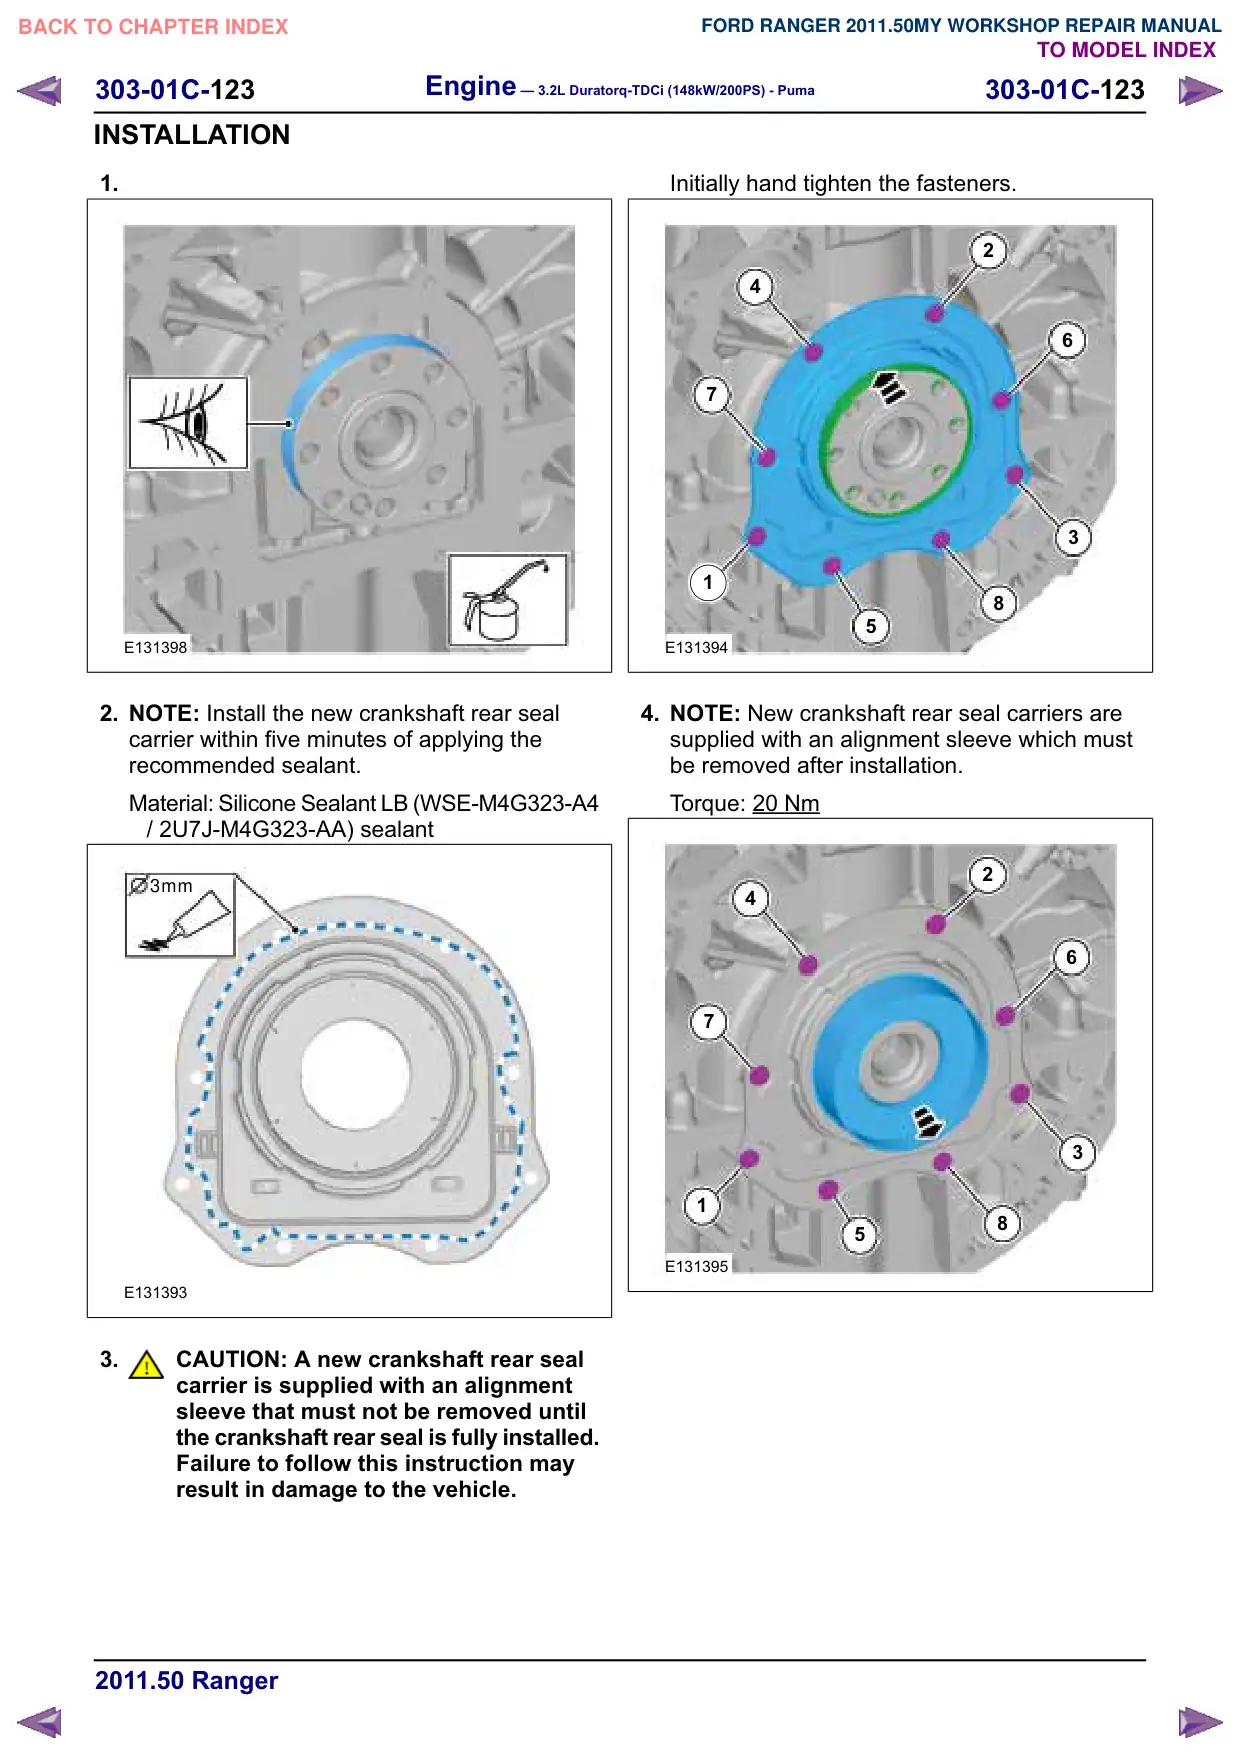
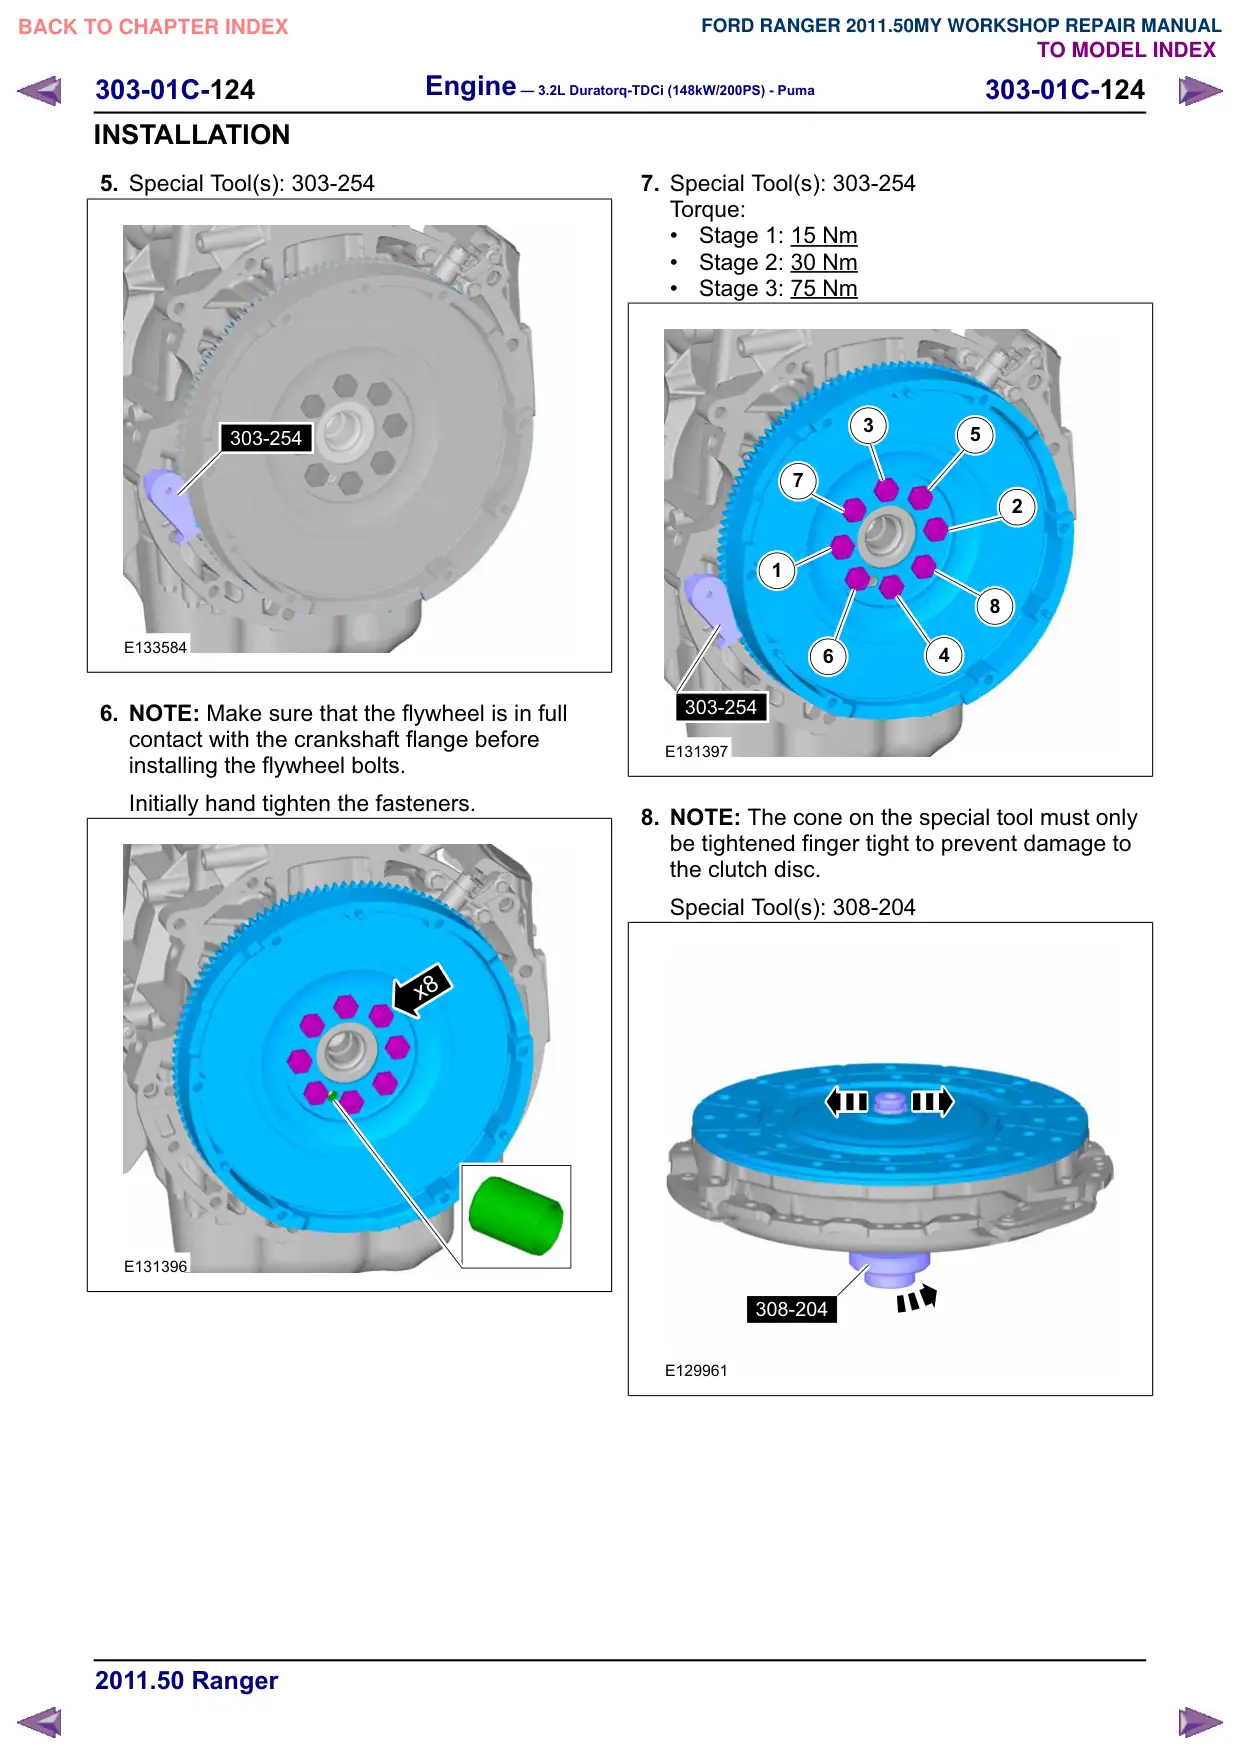
303-01C-4
303-01C-4
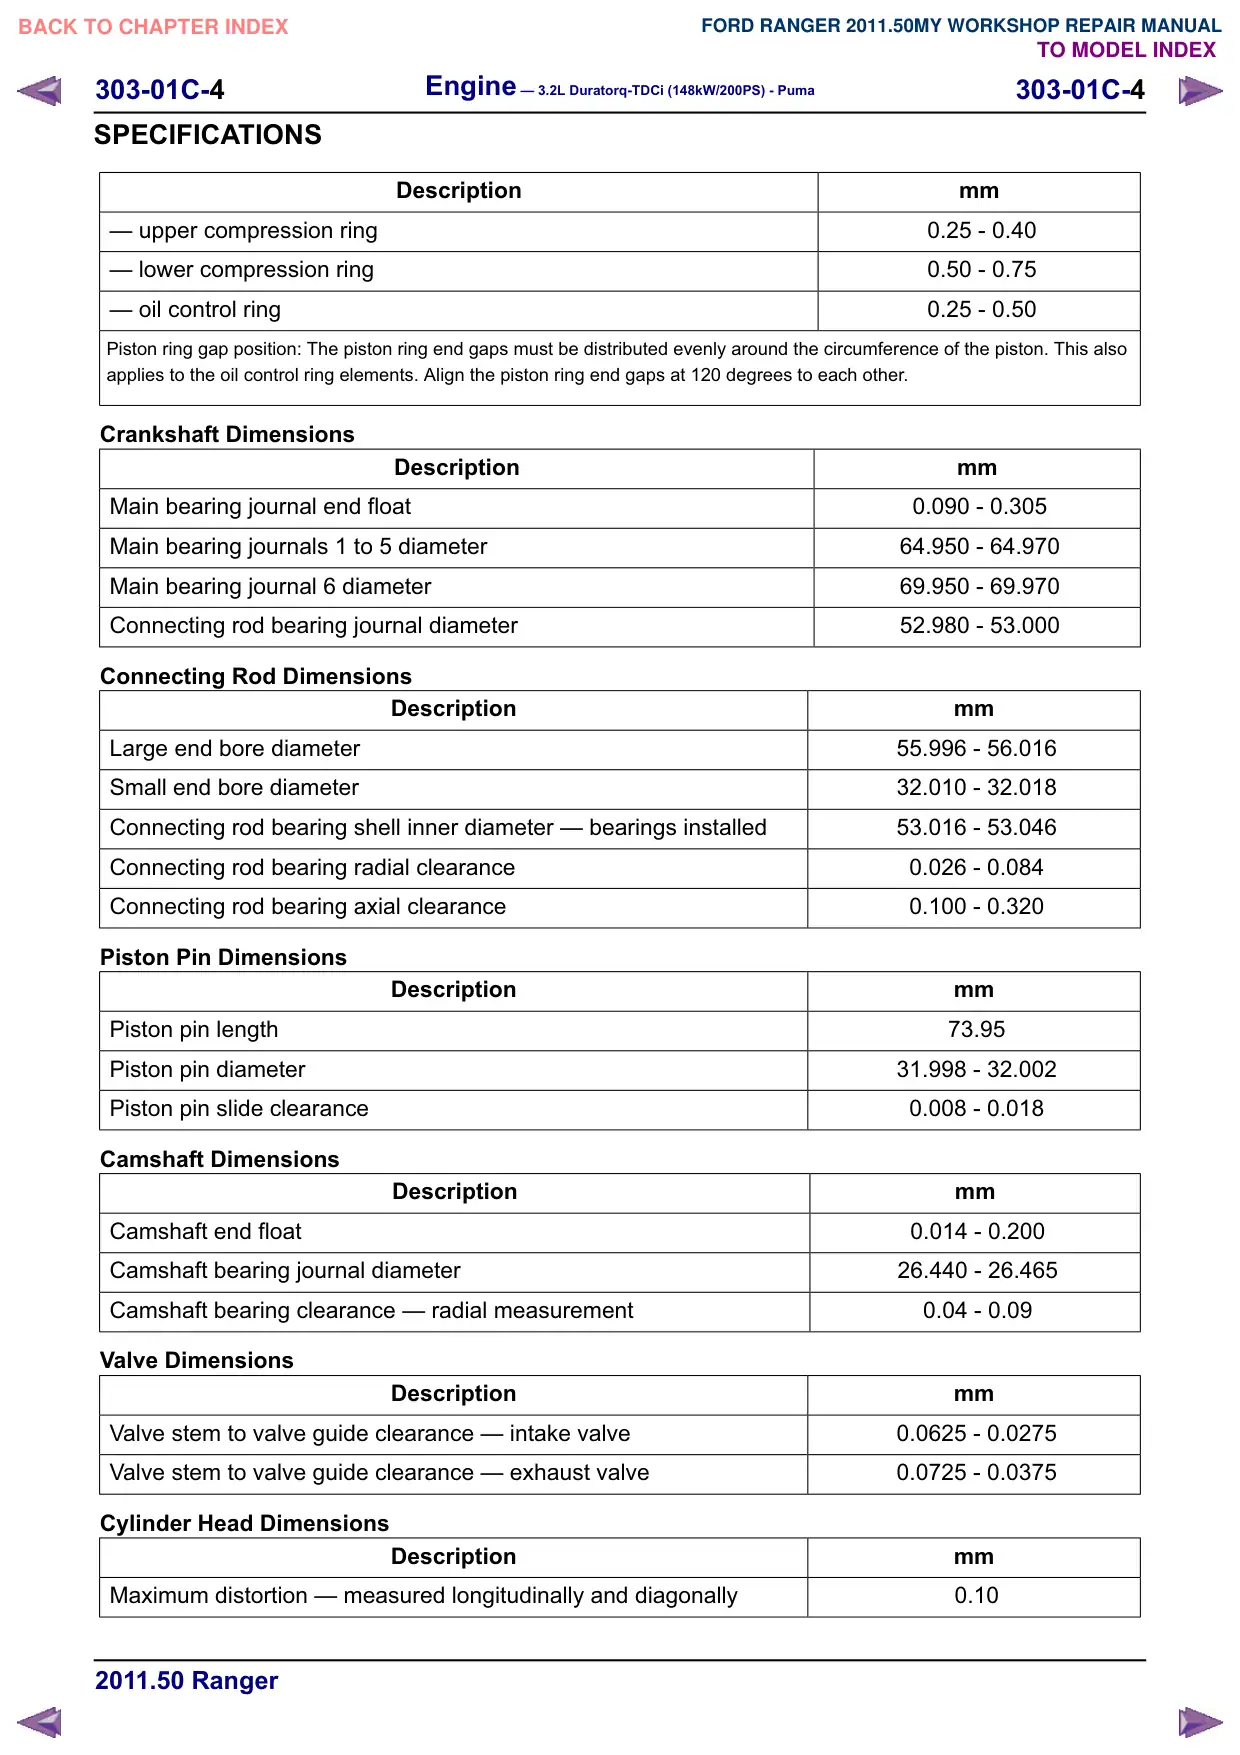
SPECIFICATIONS
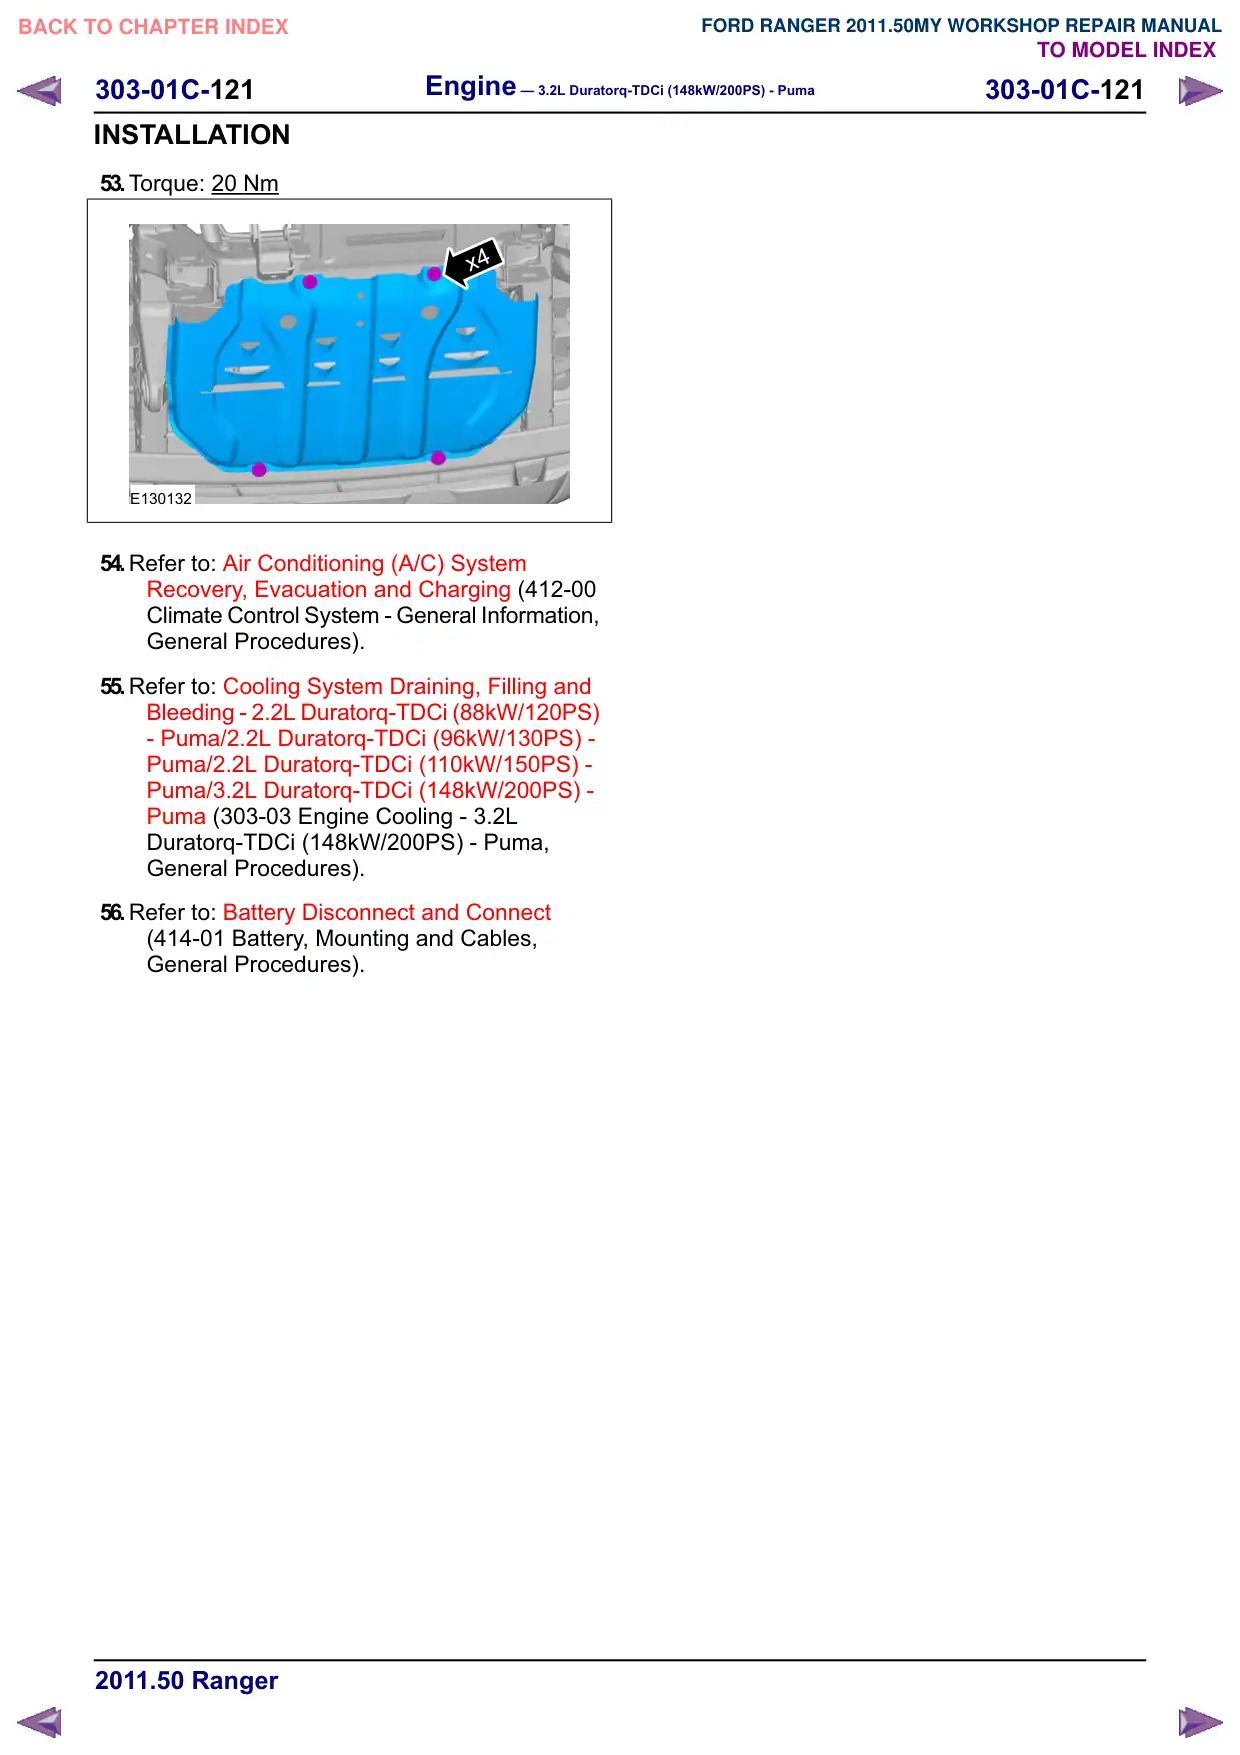
Description
– upper compression ring
– lower compression ring
– oil control ring
Piston ring gap position: The piston ring end gaps must be distributed evenly around the circumference of the piston. This also
applies to the oil control ring elements. Align the piston ring end gaps at 120 degrees to each other.
Crankshaft Dimensions
Description
Main bearing journal end float
Main bearing journals 1 to 5 diameter
Main bearing journal 6 diameter
Connecting rod bearing journal diameter
Connecting Rod Dimensions
Description
Large end bore diameter
Small end bore diameter
Connecting rod bearing shell inner diameter – bearings installed
Connecting rod bearing radial clearance
Connecting rod bearing axial clearance
Piston Pin Dimensions
Description
Piston pin length
Piston pin diameter
Piston pin slide clearance
Camshaft Dimensions
Description
Camshaft end float
Camshaft bearing journal diameter
Camshaft bearing clearance – radial measurement
Valve Dimensions
Description
Valve stem to valve guide clearance – intake valve
Valve stem to valve guide clearance – exhaust valve
Cylinder Head Dimensions
Description
Maximum distortion – measured longitudinally and diagonally
mm
0.25 - 0.40
0.50 - 0.75
0.25 - 0.50
mm
0.090 - 0.305
64.950 - 64.970
69.950 - 69.970
52.980 - 53.000
mm
55.996 - 56.016
32.010 - 32.018
53.016 - 53.046
0.026 - 0.084
0.100 - 0.320
mm
73.95
31.998 - 32.002
0.008 - 0.018
mm
0.014 - 0.200
26.440 - 26.465
0.04 - 0.09
mm
0.0625 - 0.0275
0.0725 - 0.0375
mm
0.10
Engine – 3.2L Duratorq-TDCi (148kW/200PS) - Puma
303-01C-5
303-01C-5
SPECIFICATIONS
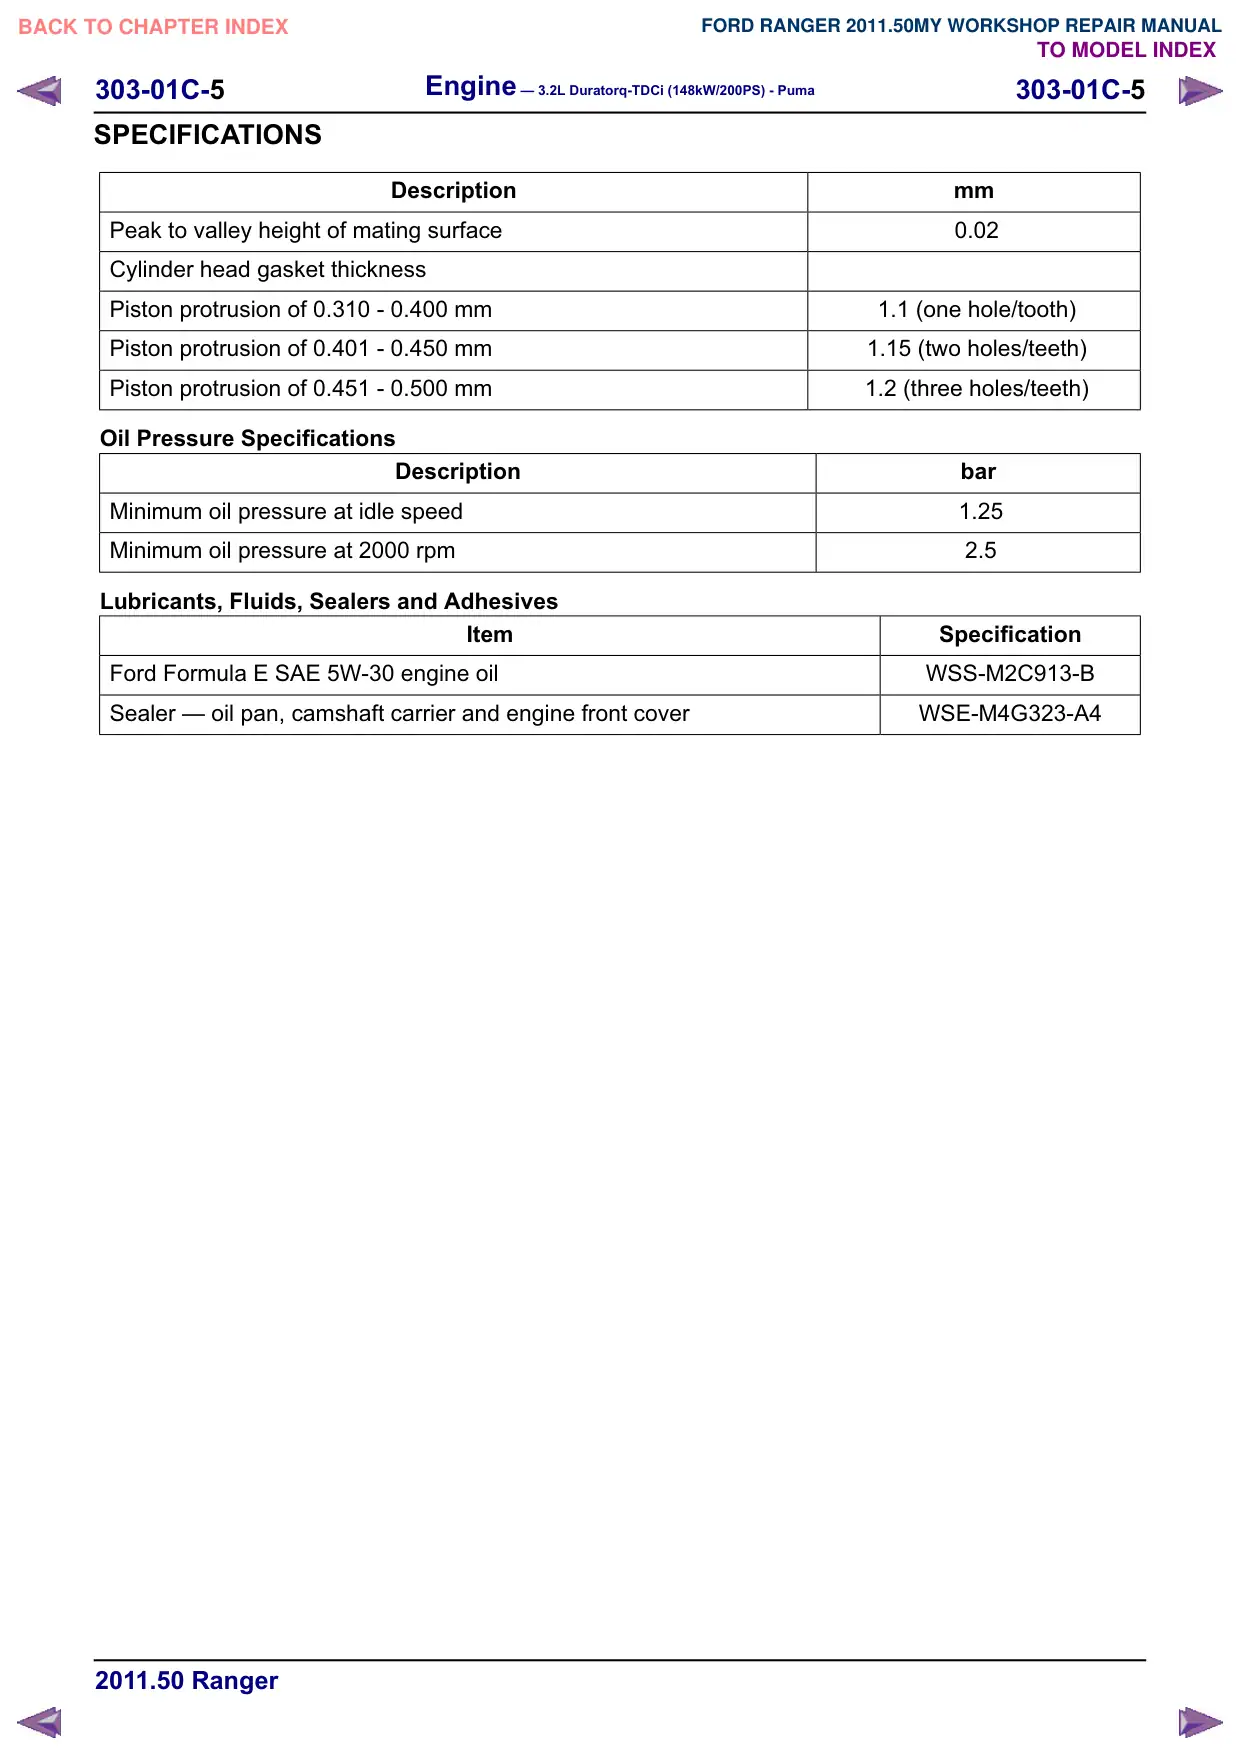
Description
Peak to valley height of mating surface
Cylinder head gasket thickness
Piston protrusion of 0.310 - 0.400 mm
Piston protrusion of 0.401 - 0.450 mm
Piston protrusion of 0.451 - 0.500 mm
Oil Pressure Specifications
Description
Minimum oil pressure at idle speed
Minimum oil pressure at 2000 rpm
Lubricants, Fluids, Sealers and Adhesives
Item
Ford Formula E SAE 5W-30 engine oil
Sealer – oil pan, camshaft carrier and engine front cover
mm
0.02
1.1 (one hole/tooth)
1.15 (two holes/teeth)
1.2 (three holes/teeth)
bar
1.25
2.5
Specification
WSS-M2C913-B
WSE-M4G323-A4
Engine – 3.2L Duratorq-TDCi (148kW/200PS) - Puma
303-01C-6
303-01C-6
DESCRIPTION AND OPERATION
Engine œ Overview
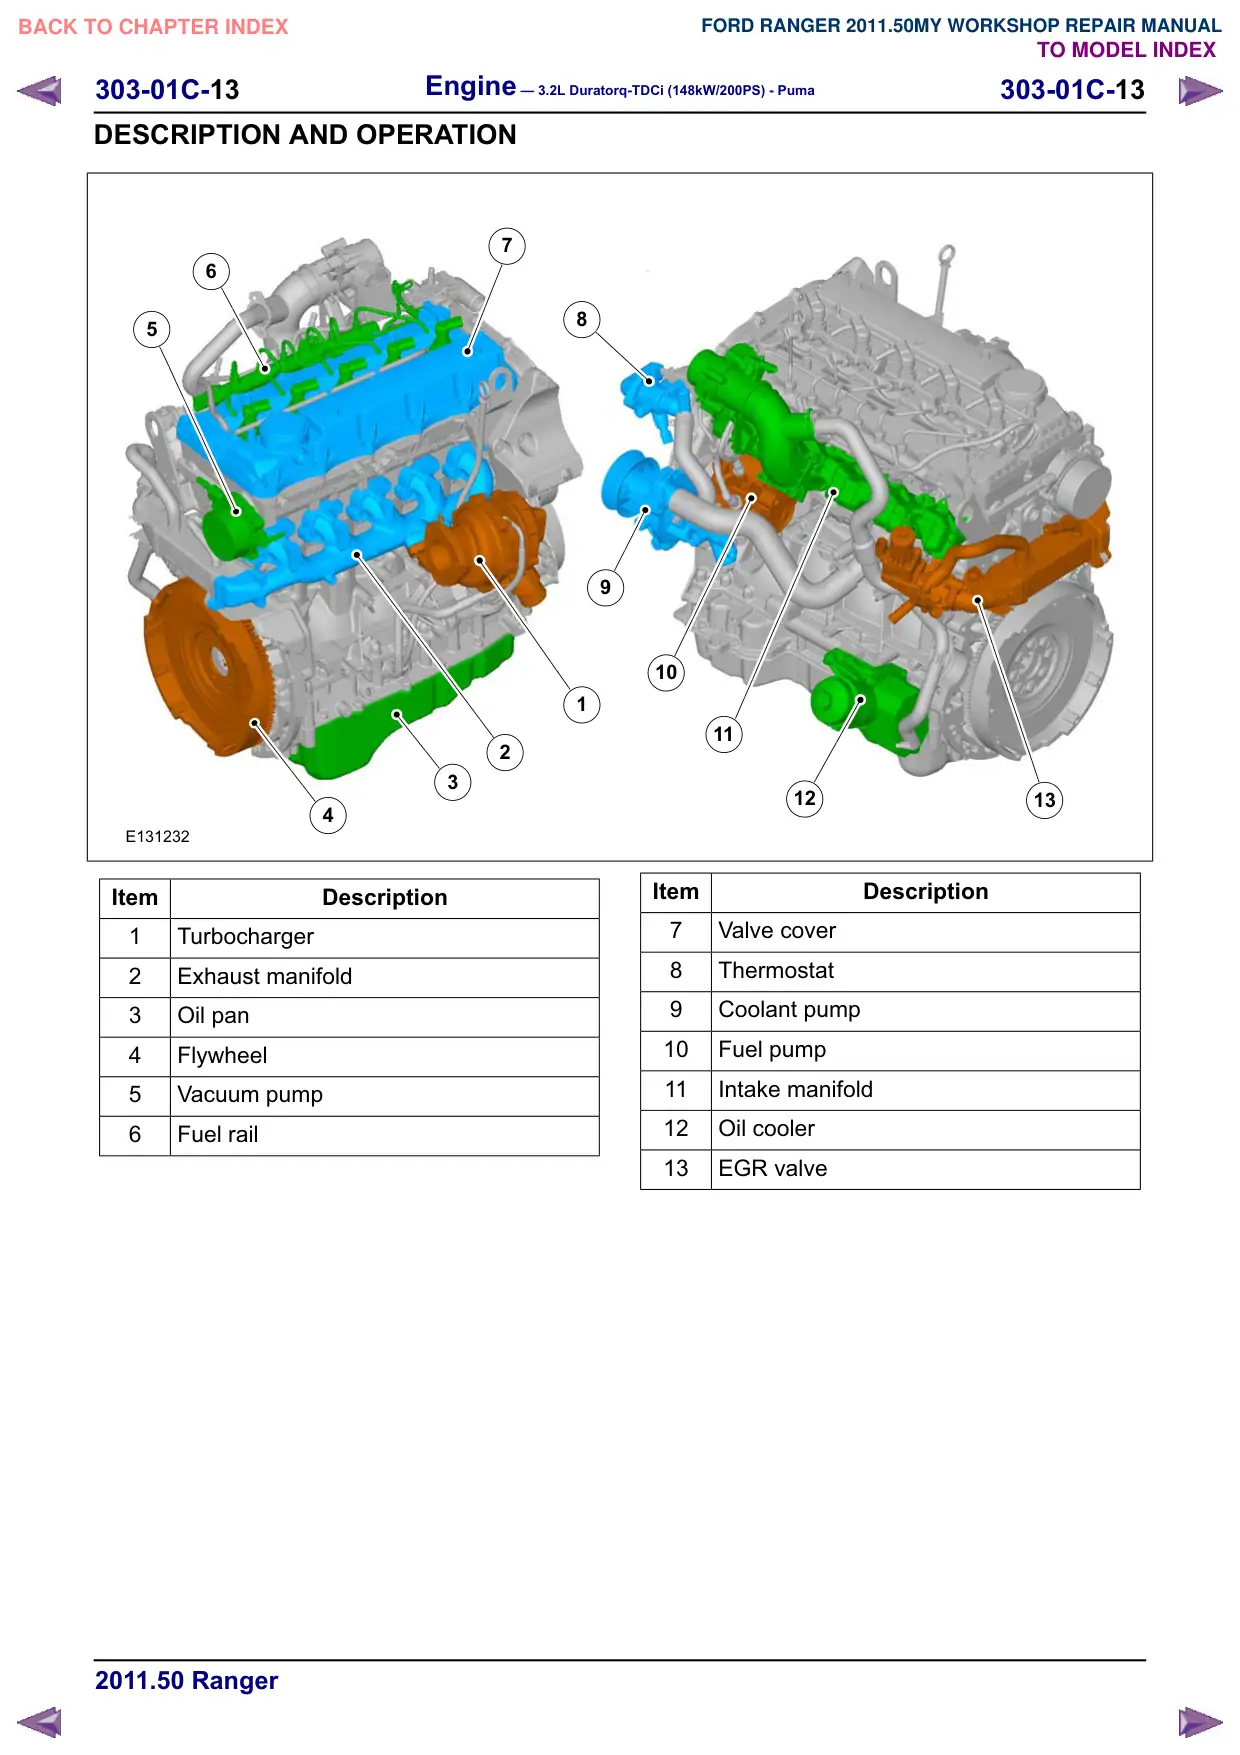
General View
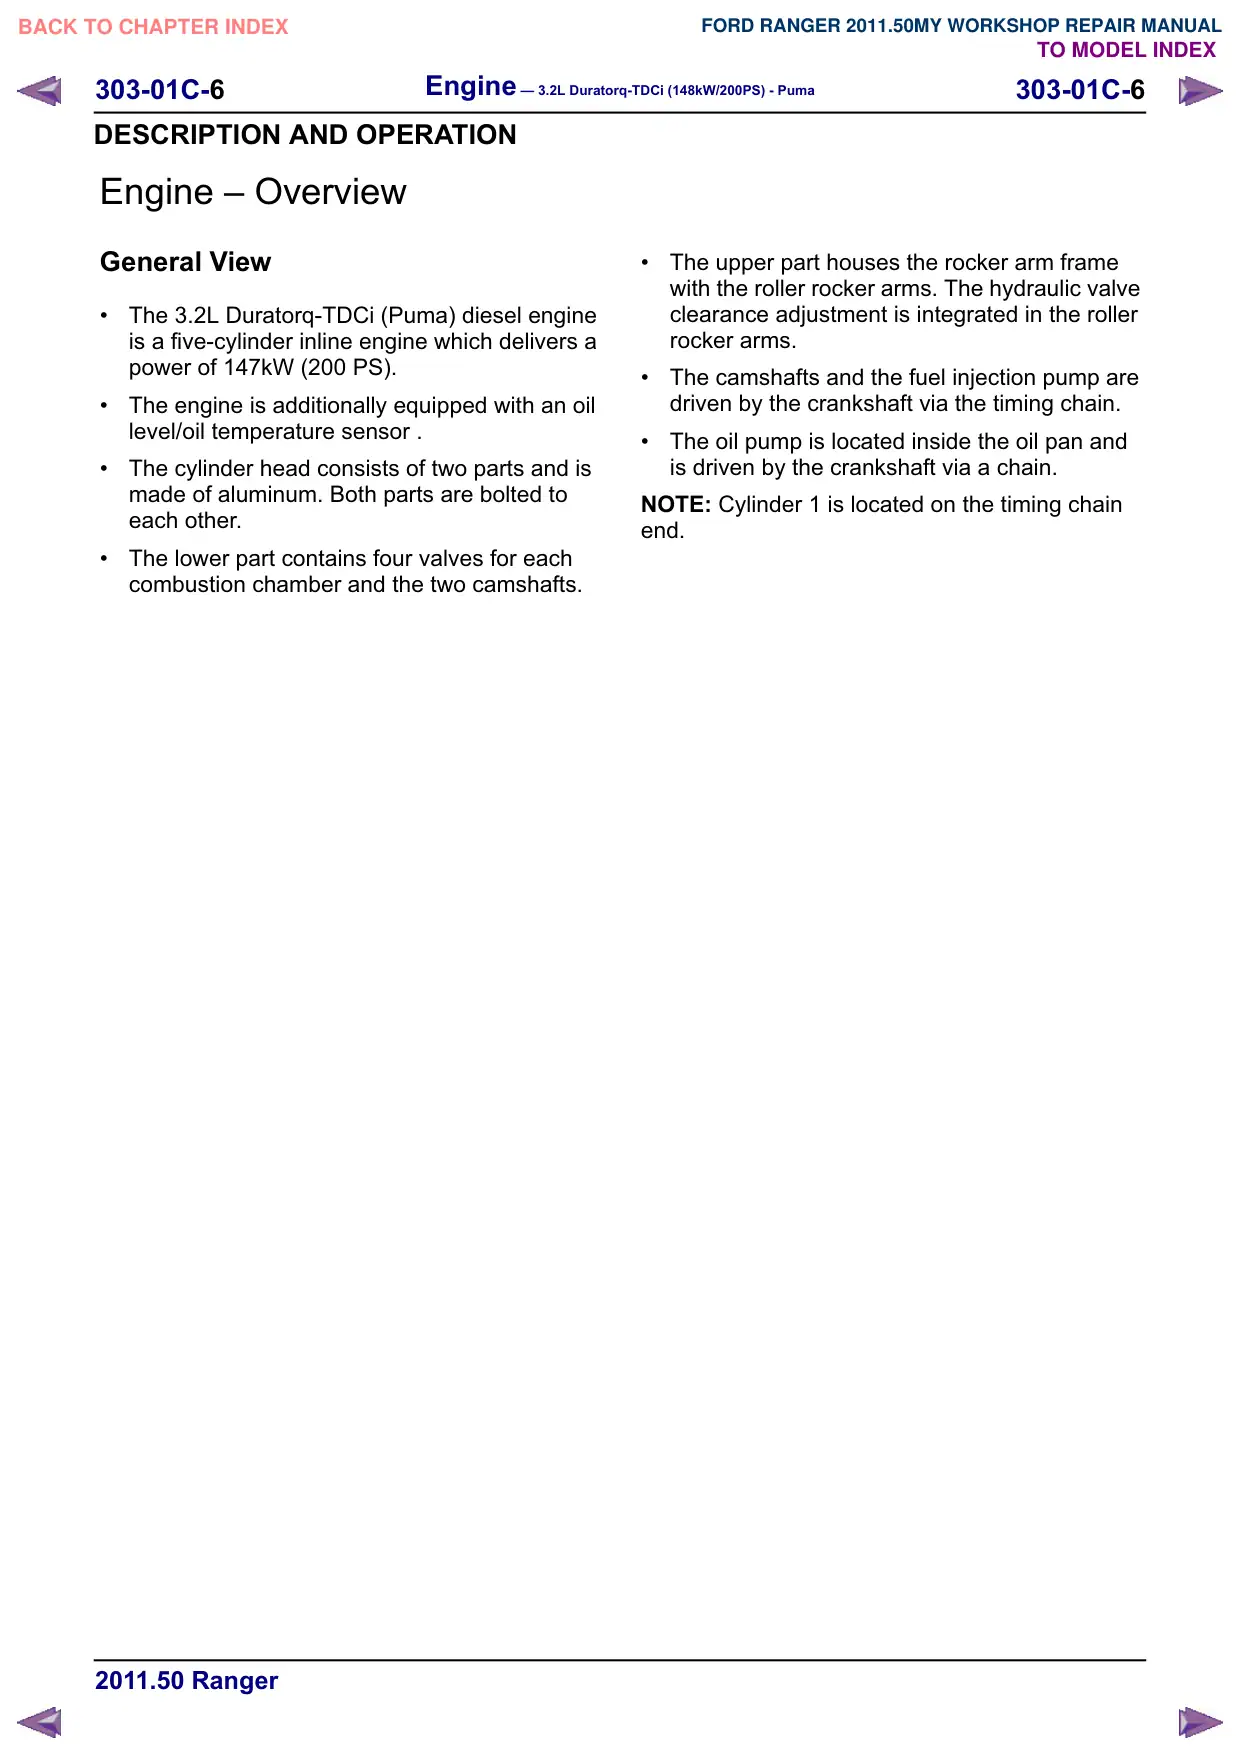
The 3.2L Duratorq-TDCi (Puma) diesel engine
is a five-cylinder inline engine which delivers a
power of 147kW (200 PS).
The engine is additionally equipped with an oil
level/oil temperature sensor .
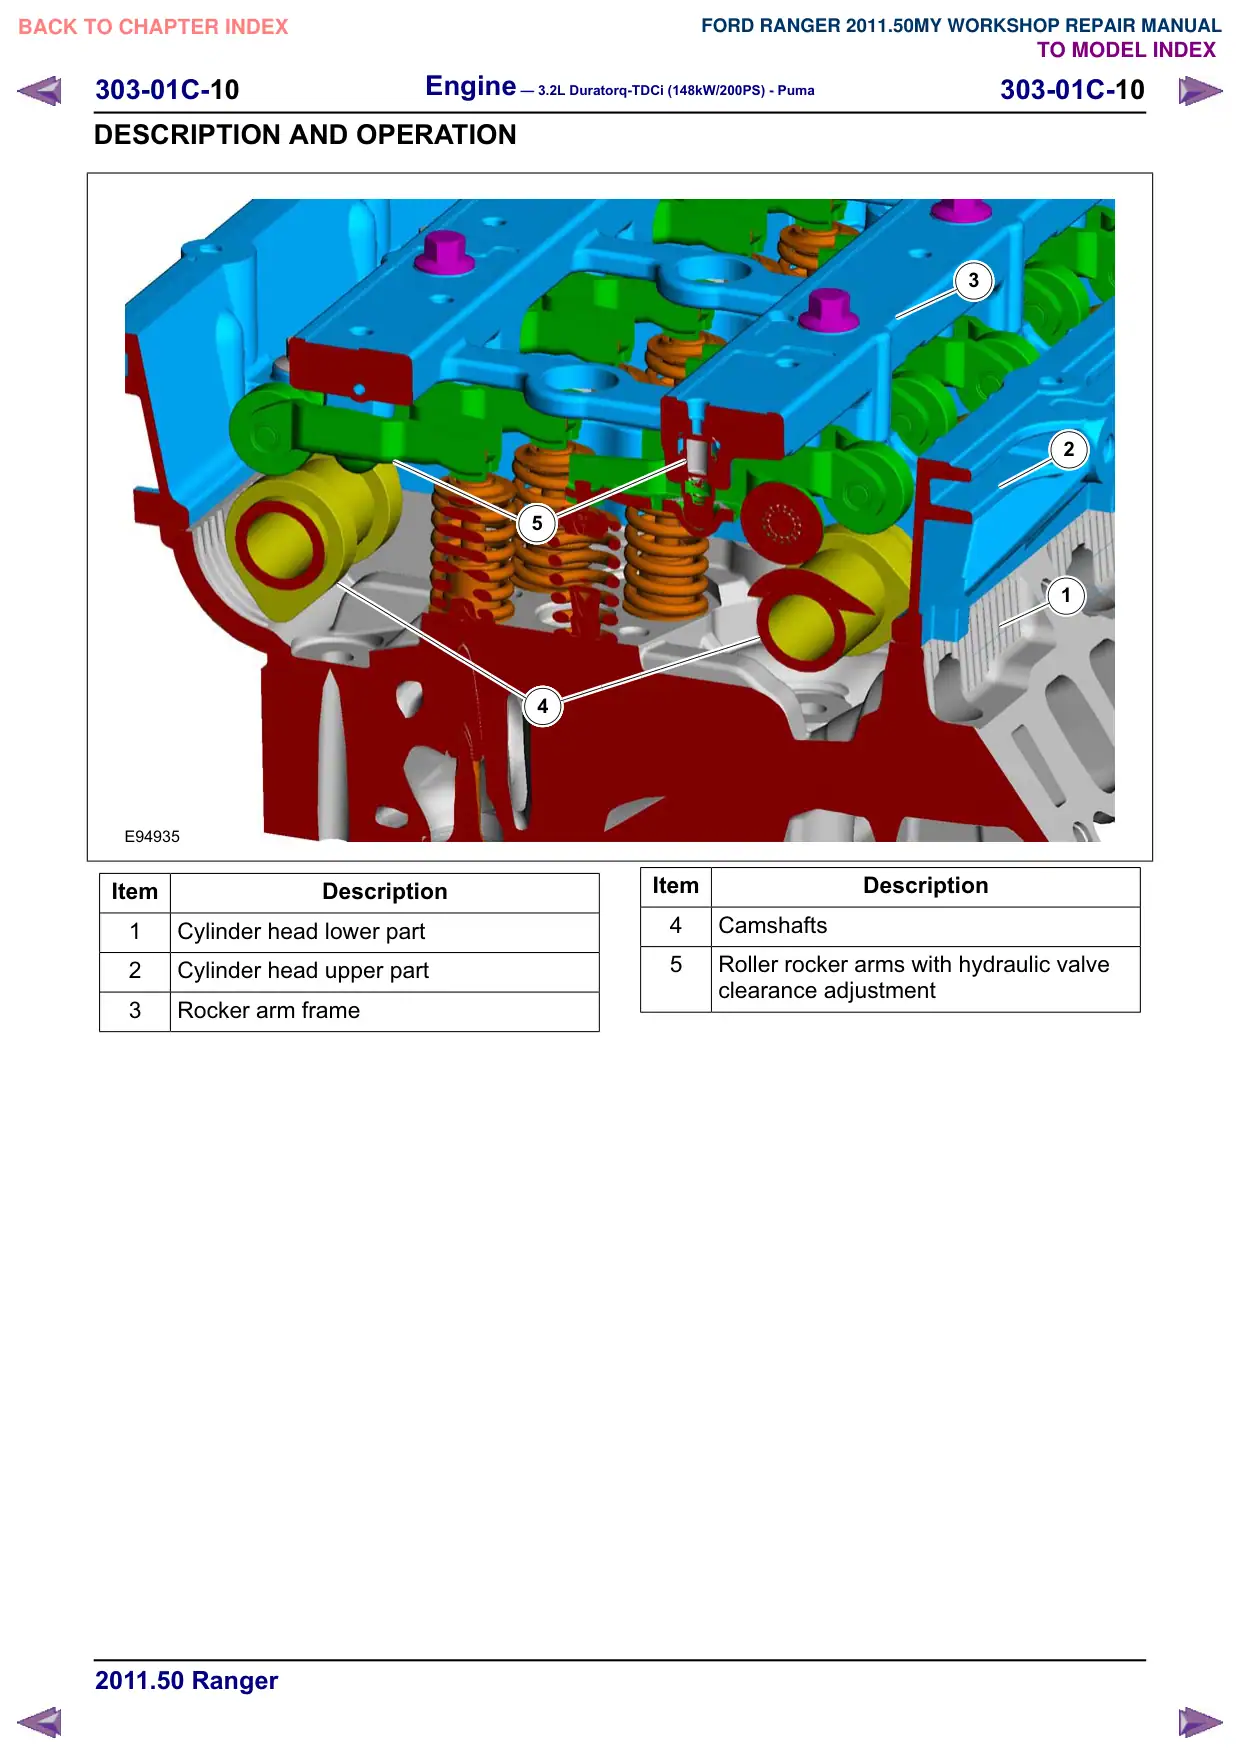
The cylinder head consists of two parts and is
made of aluminum. Both parts are bolted to
each other.
The lower part contains four valves for each
combustion chamber and the two camshafts.
The upper part houses the rocker arm frame
with the roller rocker arms. The hydraulic valve
clearance adjustment is integrated in the roller
rocker arms.
The camshafts and the fuel injection pump are
driven by the crankshaft via the timing chain.
The oil pump is located inside the oil pan and
is driven by the crankshaft via a chain.
NOTE: Cylinder 1 is located on the timing chain
end.
303-01C-
Engine – 3.2L Duratorq-TDCi (148kW/200PS) - Puma
303-01C-
DESCRIPTION AND OPERATION
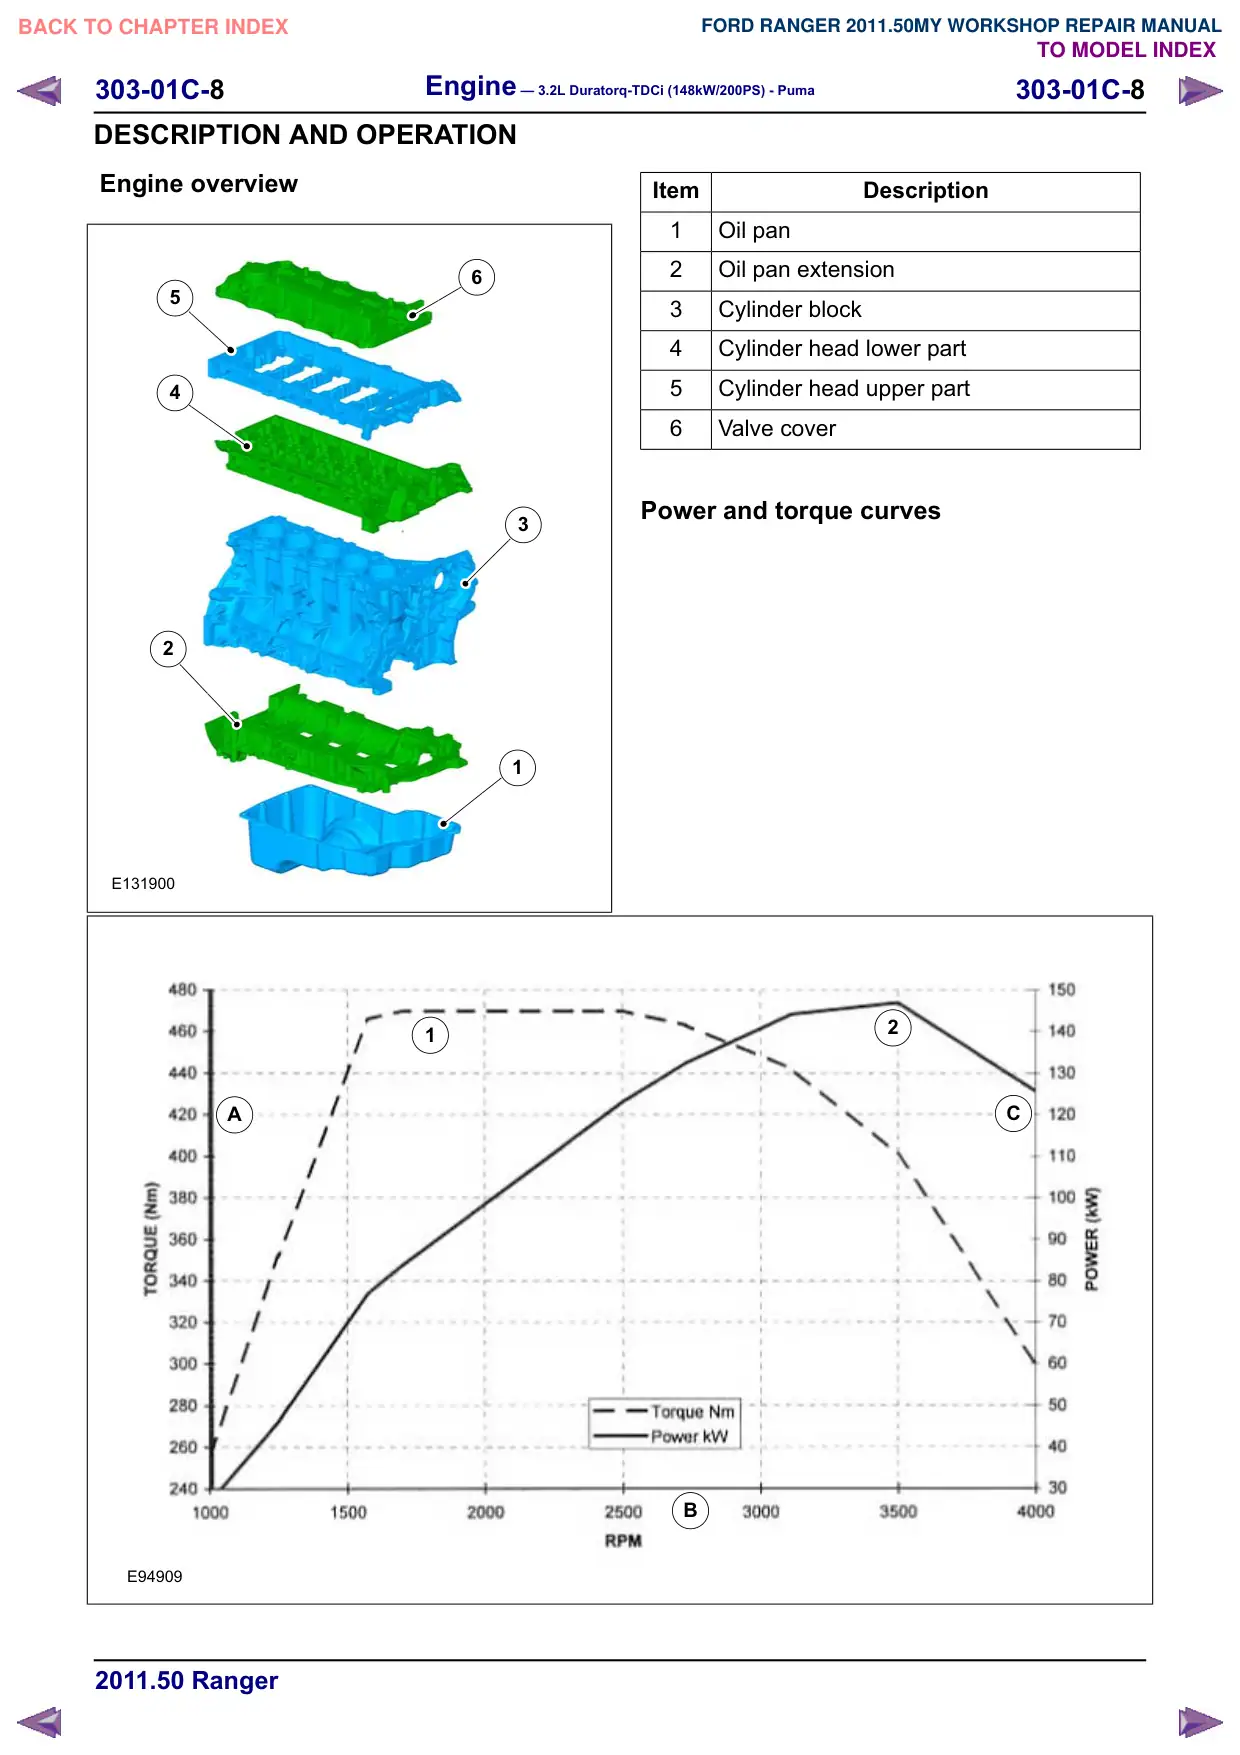
Item
Description
$
Torque (Nm)
%
Engine speed (rpm)
&
Power (kW)
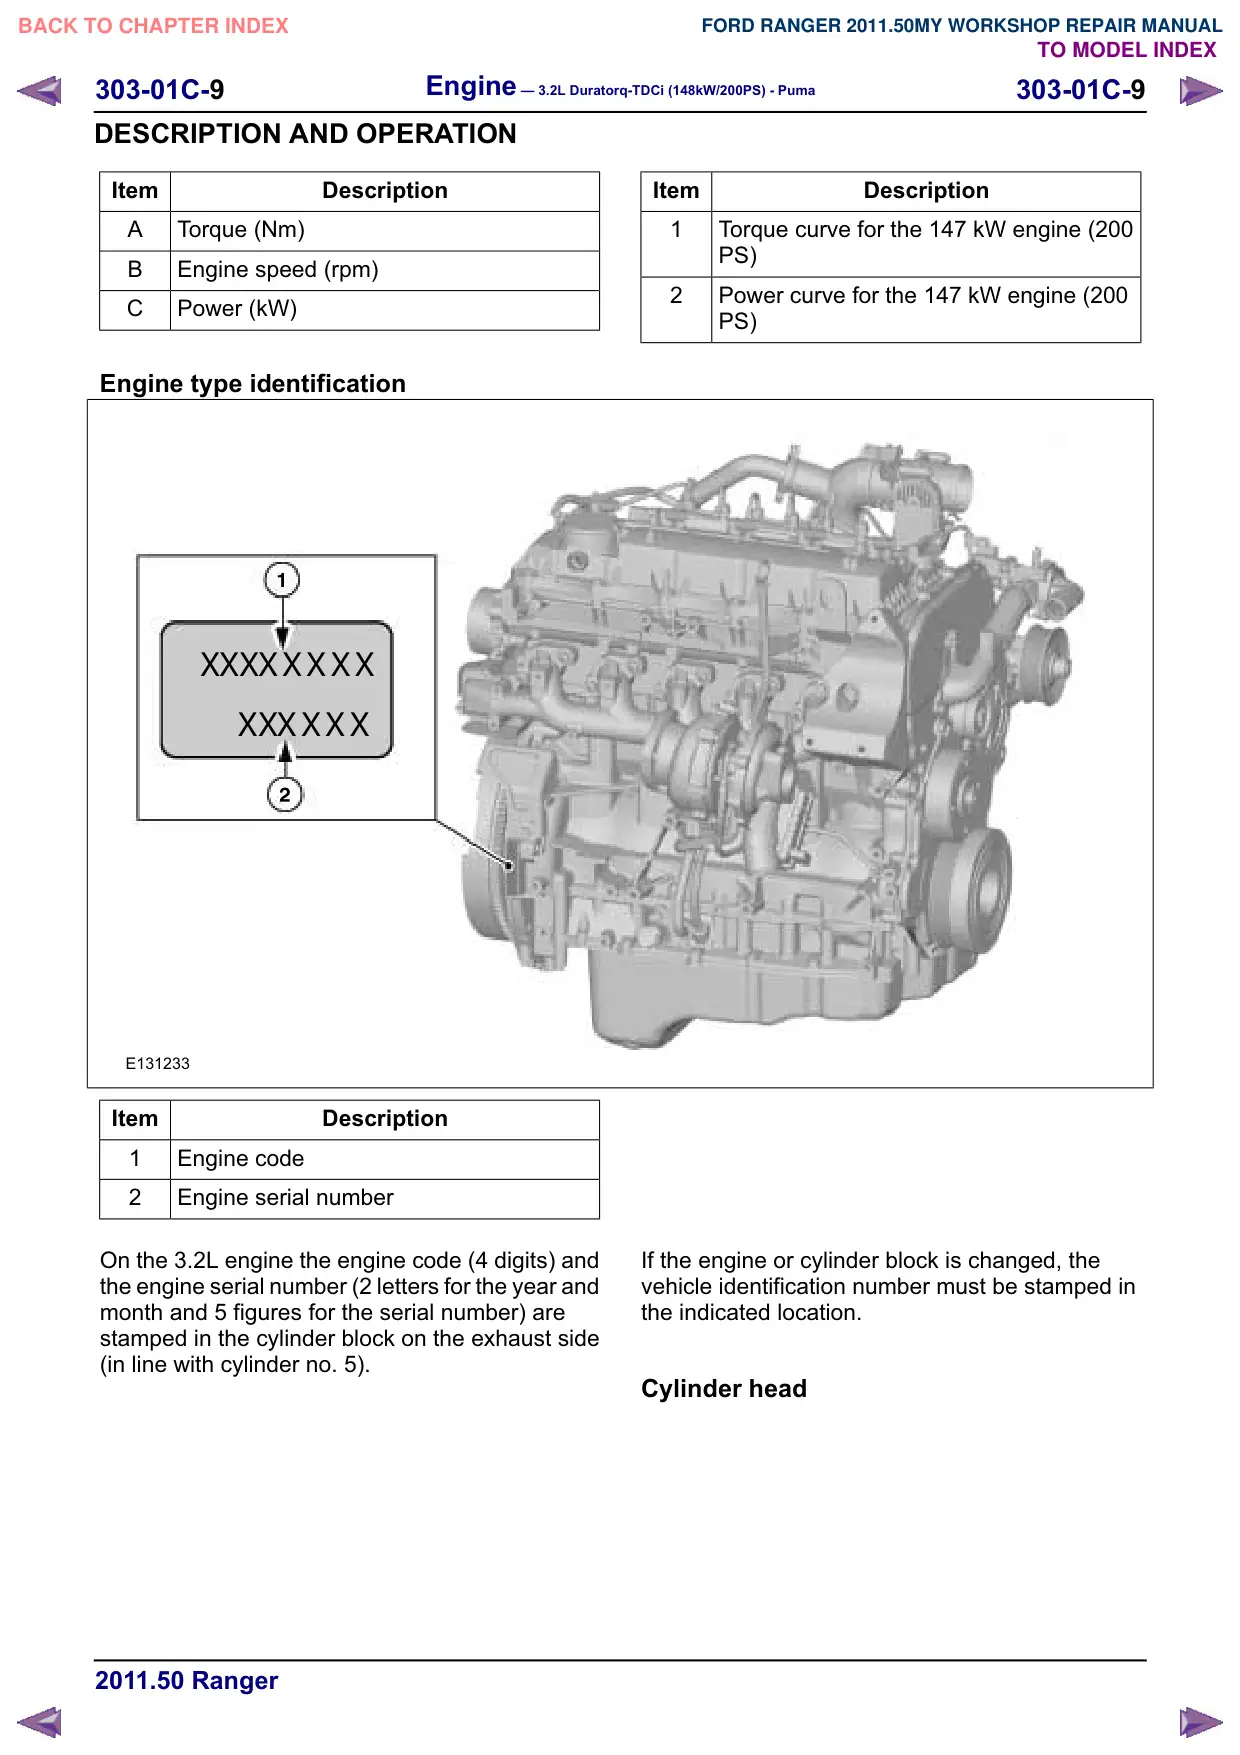
Engine type identification
X
X
X
XXXXX
X
X
XXXX
E131233
Item
Description
1
Engine code
2
Engine serial number
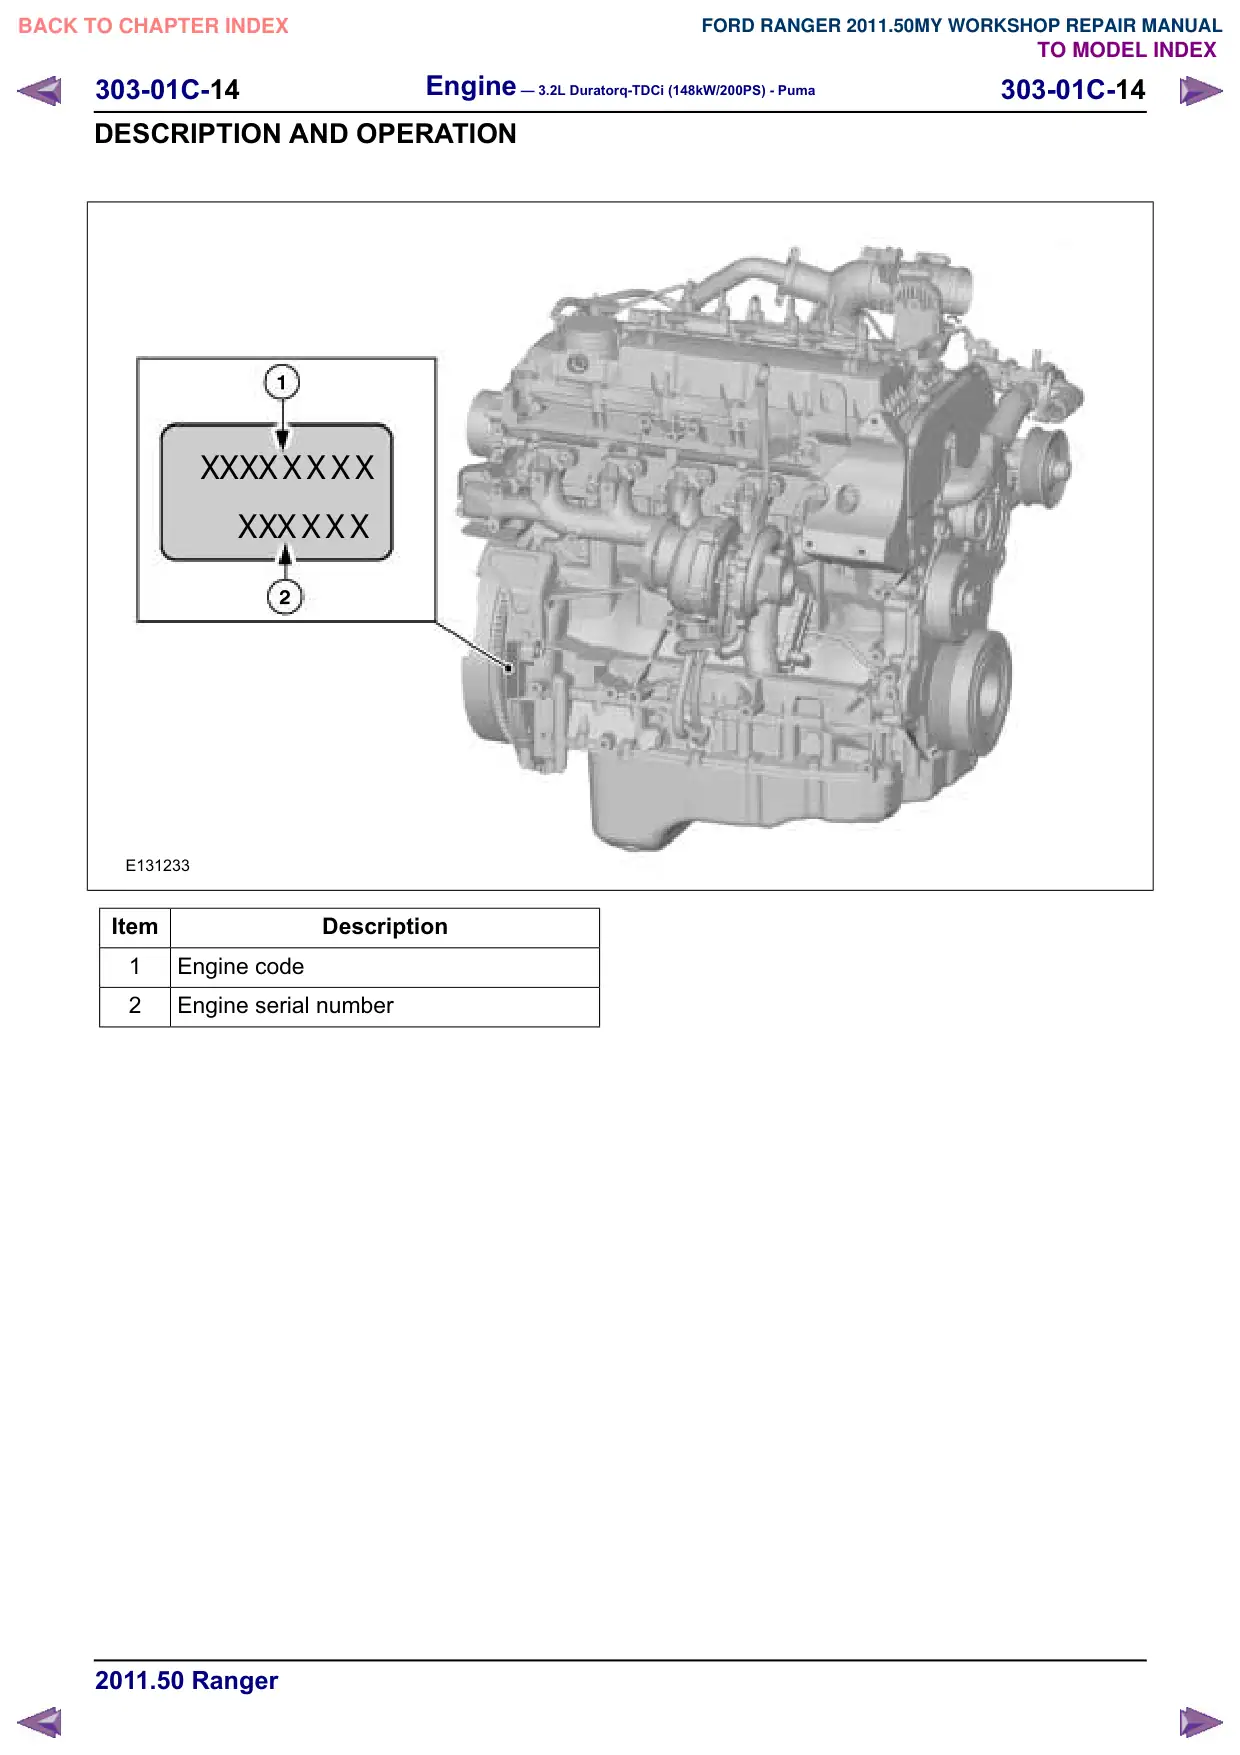
On the 3.2L engine the engine code (4 digits) and
the engine serial number (2 letters for the year and
month and 5 figures for the serial number) are
stamped in the cylinder block on the exhaust side
(in line with cylinder no. 5).
Item
Description
1
Torque curve for the 147 kW engine (200
PS)
2
Power curve for the 147 kW engine (200
PS)
If the engine or cylinder block is changed, the
vehicle identification number must be stamped in
the indicated location.
Cylinder head
Engine – 3.2L Duratorq-TDCi (148kW/200PS) - Puma
303-01C-11
303-01C-11
DESCRIPTION AND OPERATION
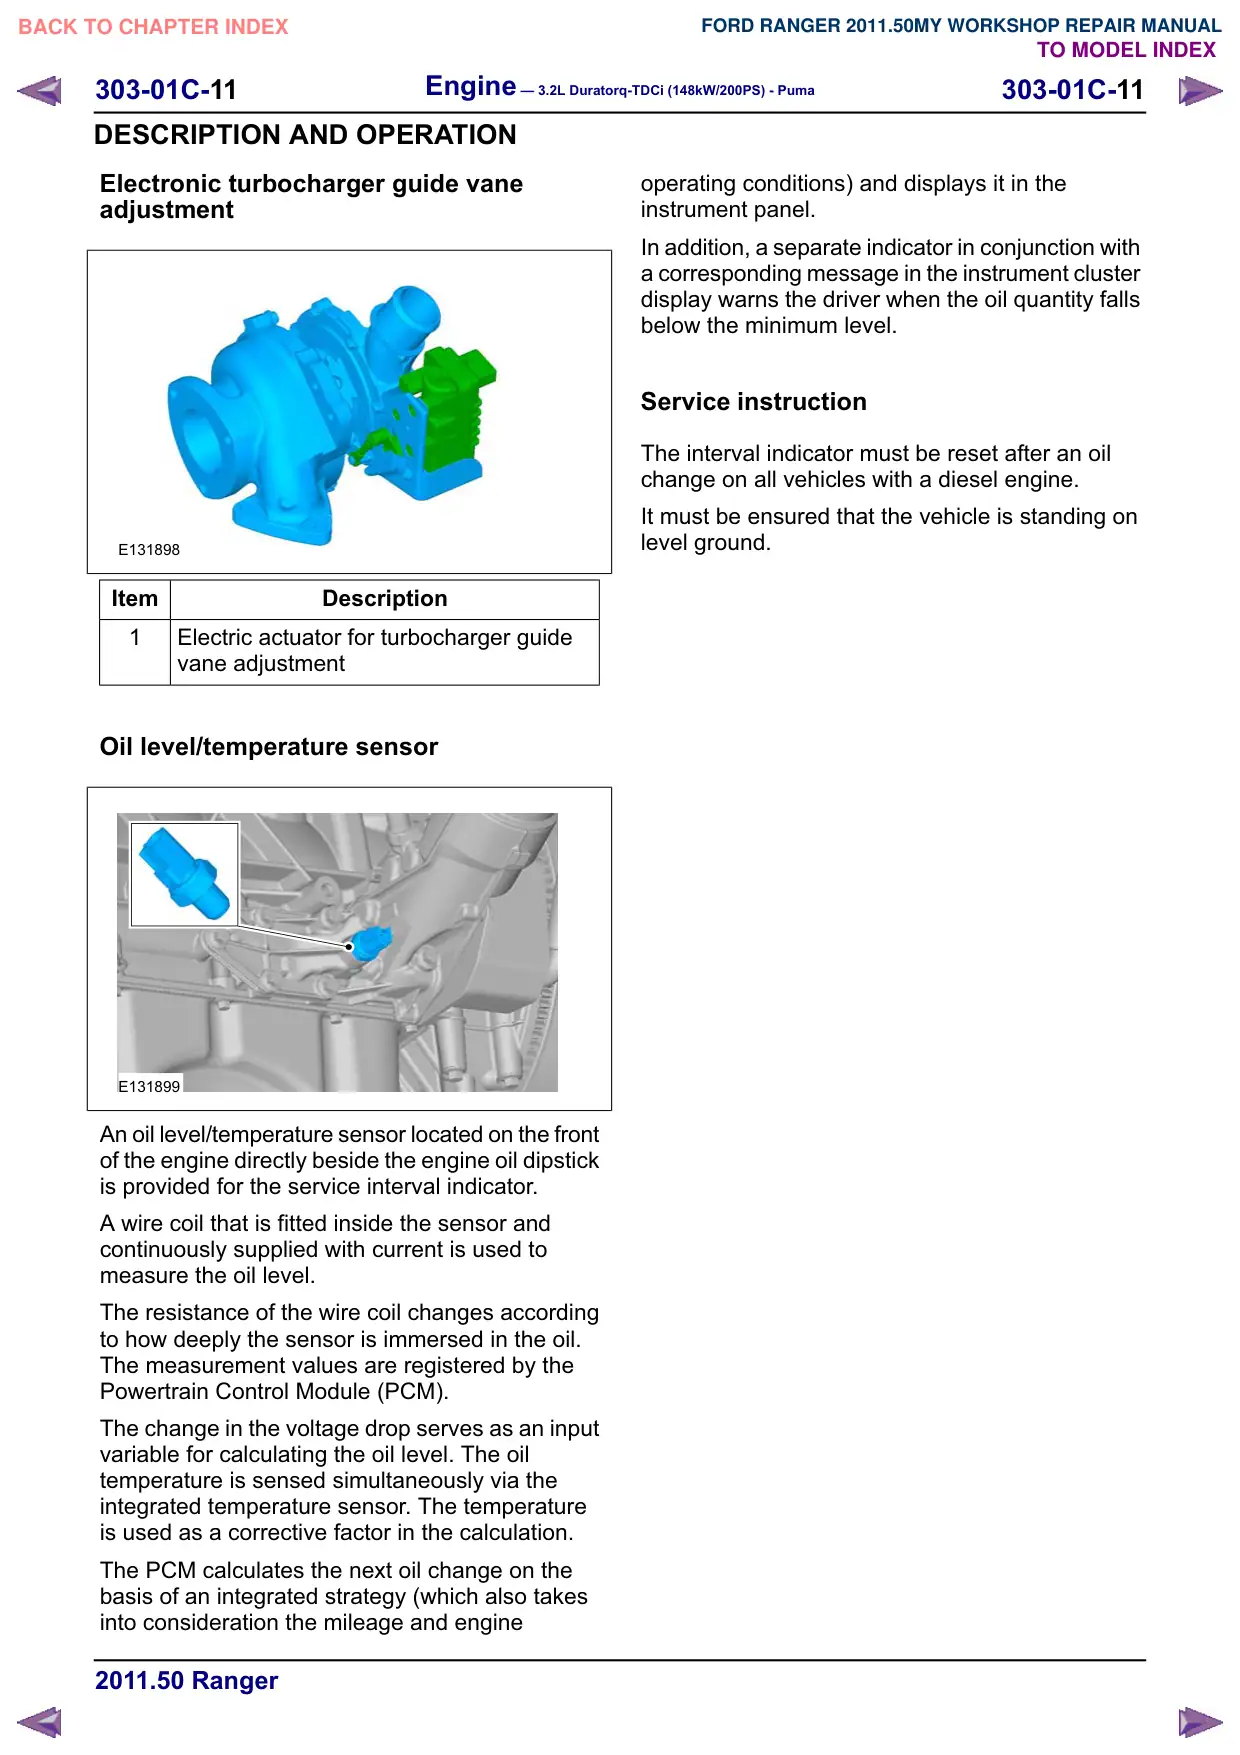
Electronic turbocharger guide vane
adjustment
E131898
Item
Description
1
Electric actuator for turbocharger guide
vane adjustment
Oil level/temperature sensor
E131899
An oil level/temperature sensor located on the front
of the engine directly beside the engine oil dipstick
is provided for the service interval indicator.
A wire coil that is fitted inside the sensor and
continuously supplied with current is used to
measure the oil level.
The resistance of the wire coil changes according
to how deeply the sensor is immersed in the oil.
The measurement values are registered by the
Powertrain Control Module (PCM).
The change in the voltage drop serves as an input
variable for calculating the oil level. The oil
temperature is sensed simultaneously via the
integrated temperature sensor. The temperature
is used as a corrective factor in the calculation.
The PCM calculates the next oil change on the
basis of an integrated strategy (which also takes
into consideration the mileage and engine
operating conditions) and displays it in the
instrument panel.
In addition, a separate indicator in conjunction with
a corresponding message in the instrument cluster
display warns the driver when the oil quantity falls
below the minimum level.
Service instruction
The interval indicator must be reset after an oil
change on all vehicles with a diesel engine.
It must be ensured that the vehicle is standing on
level ground.
303-01C-14
Engine – 3.2L Duratorq-TDCi (148kW/200PS) - Puma
303-01C-14
DESCRIPTION AND OPERATION
X
X
X
XXXXX
X
X
XXXX
E131233
Item
Description
1
Engine code
2
Engine serial number
Engine – 3.2L Duratorq-TDCi (148kW/200PS) - Puma
303-01C-15
303-01C-15
REMOVAL AND INSTALLATION
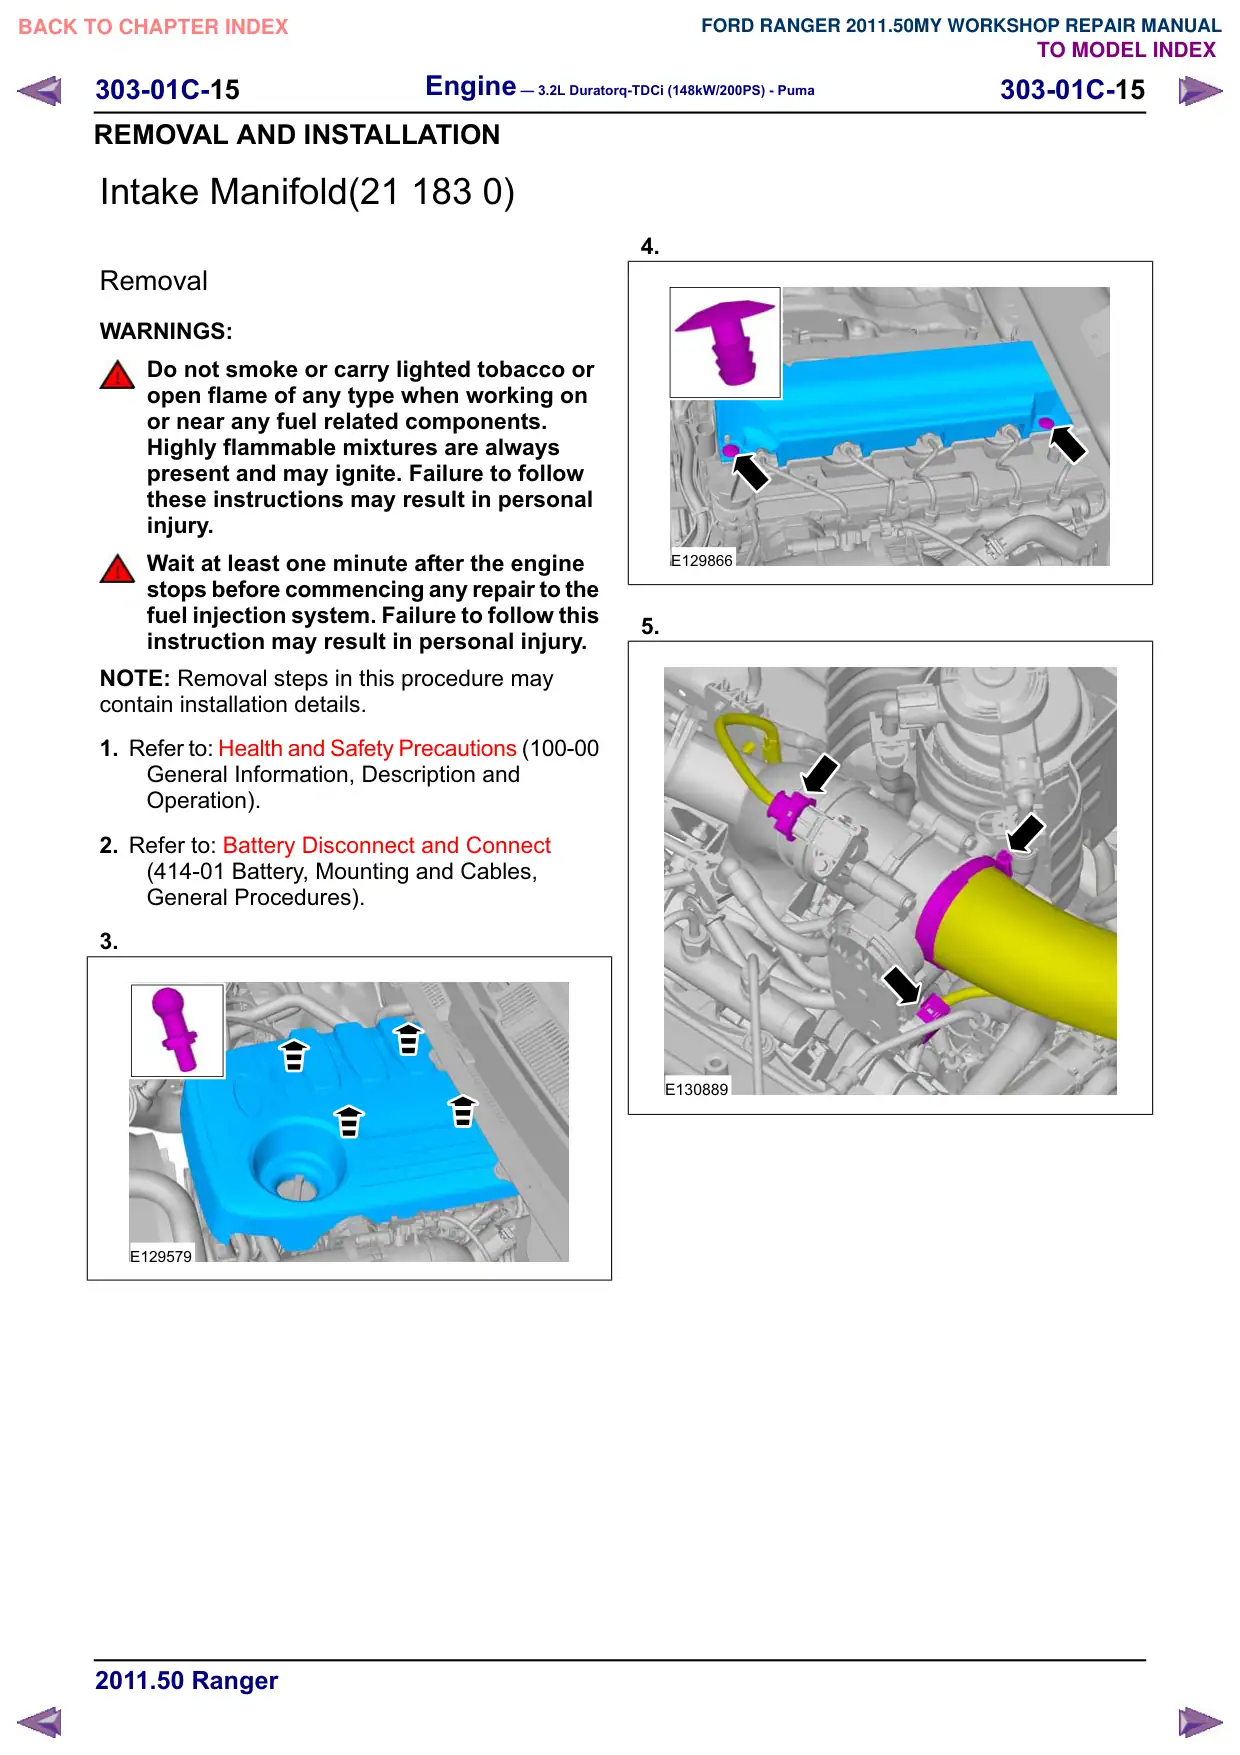
Intake Manifold(21 183 0)
Removal
WARNINGS:
Do not smoke or carry lighted tobacco or
open flame of any type when working on
or near any fuel related components.
Highly flammable mixtures are always
present and may ignite. Failure to follow
these instructions may result in personal
injury.
Wait at least one minute after the engine
stops before commencing any repair to the
fuel injection system. Failure to follow this
instruction may result in personal injury.
NOTE: Removal steps in this procedure may
contain installation details.
1. Refer to: Health and Safety Precautions (100-00
General Information, Description and
Operation).
2. Refer to: Battery Disconnect and Connect
(414-01 Battery, Mounting and Cables,
General Procedures).
3.
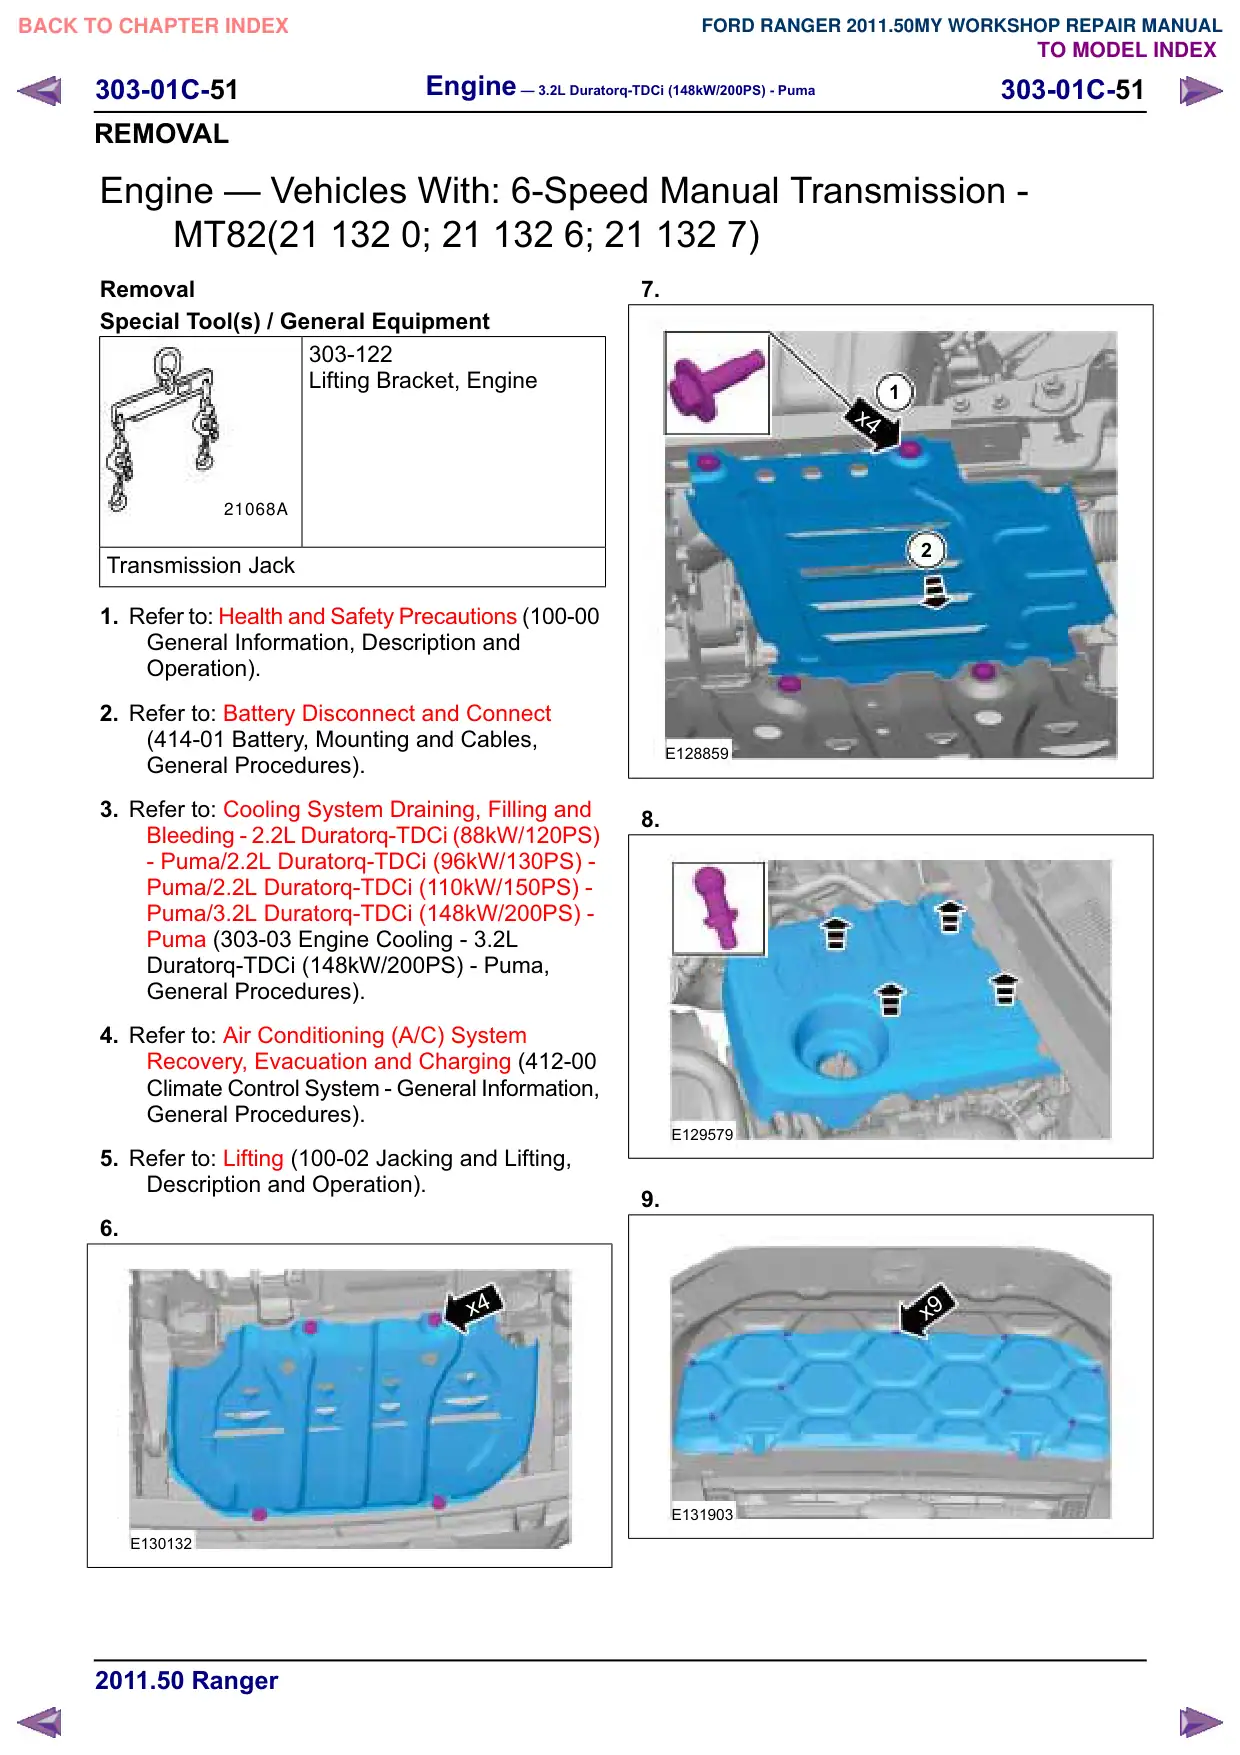
E129579
4.
E129866
5.
E130889
Engine – 3.2L Duratorq-TDCi (148kW/200PS) - Puma
303-01C-17
303-01C-17
REMOVAL AND INSTALLATION
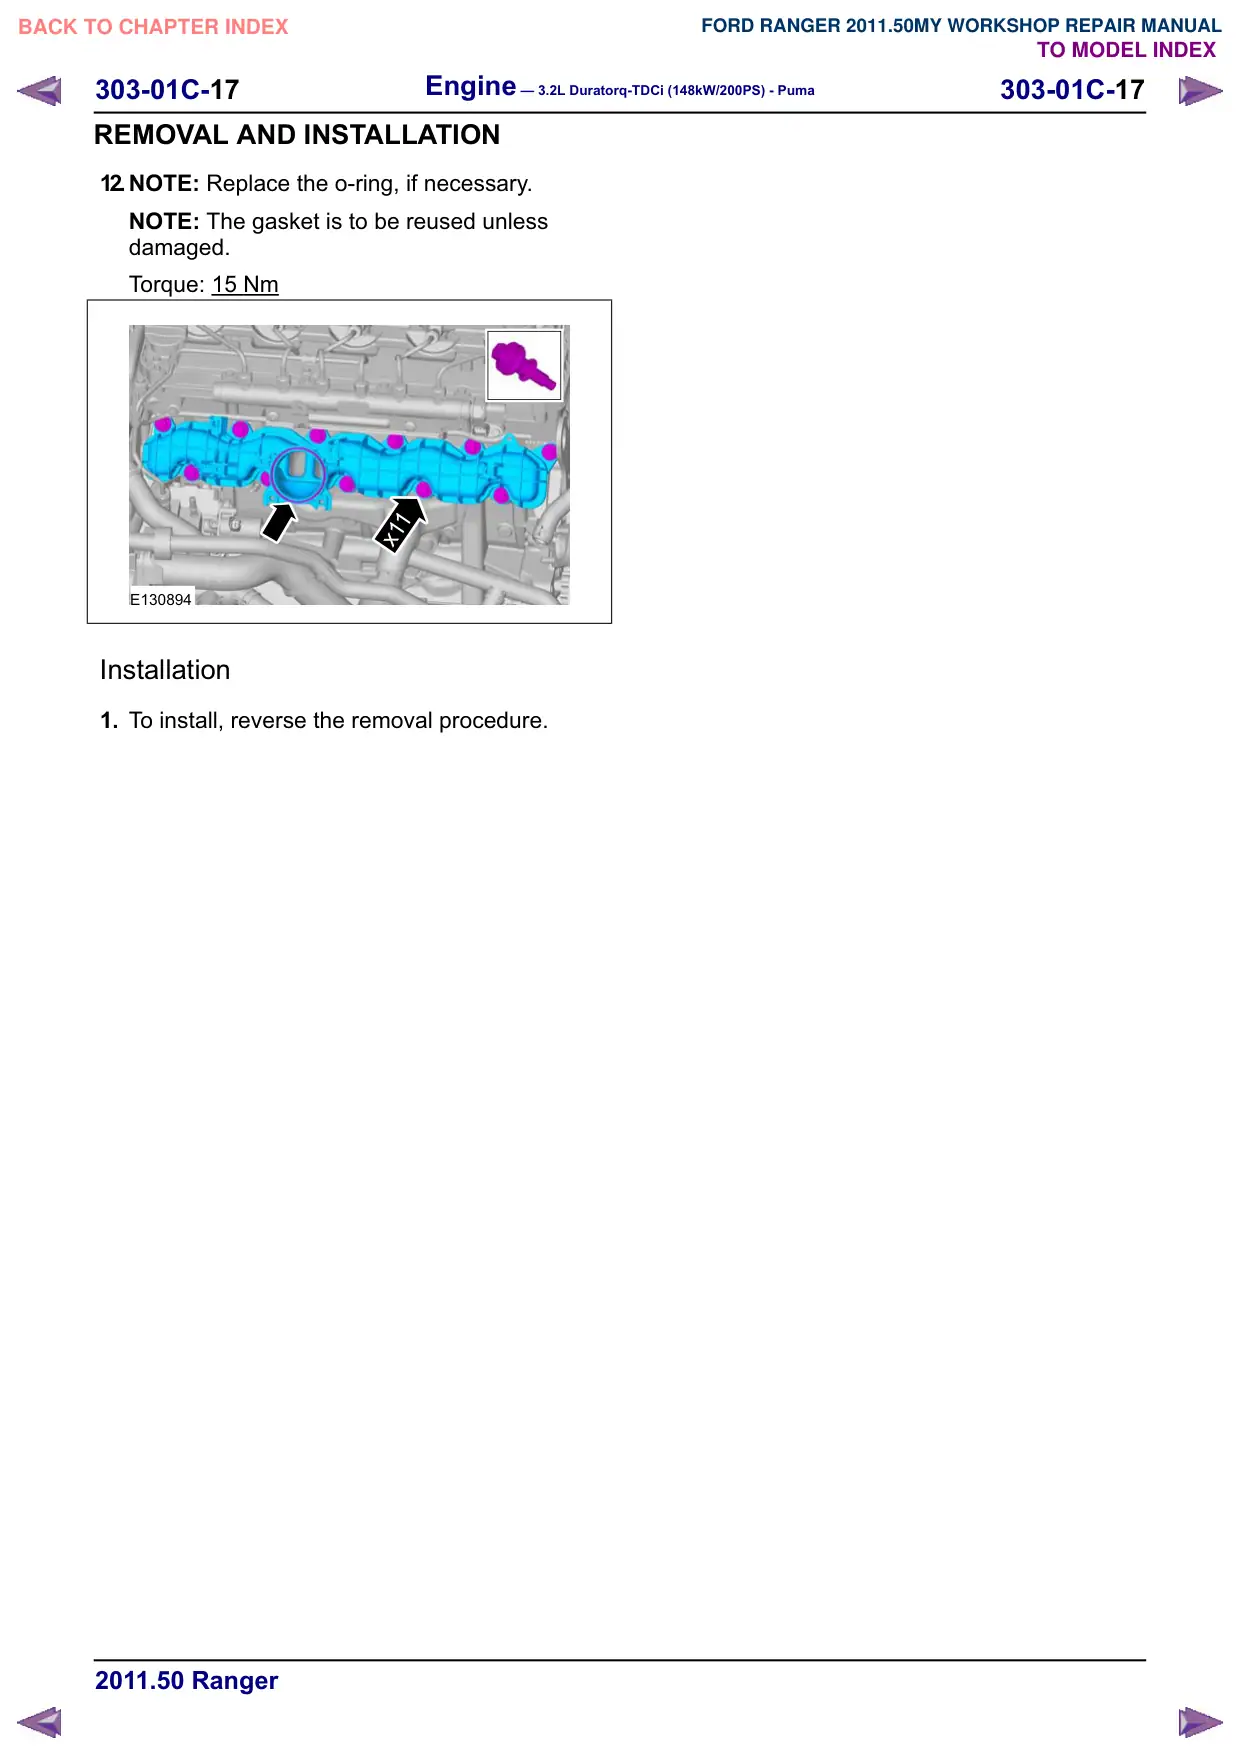
12.NOTE: Replace the o-ring, if necessary.
NOTE: The gasket is to be reused unless
damaged.
Torque: 15 Nm
x11
E130894
Installation
1. To install, reverse the removal procedure.
Engine – 3.2L Duratorq-TDCi (148kW/200PS) - Puma
303-01C-19
303-01C-19
REMOVAL AND INSTALLATION
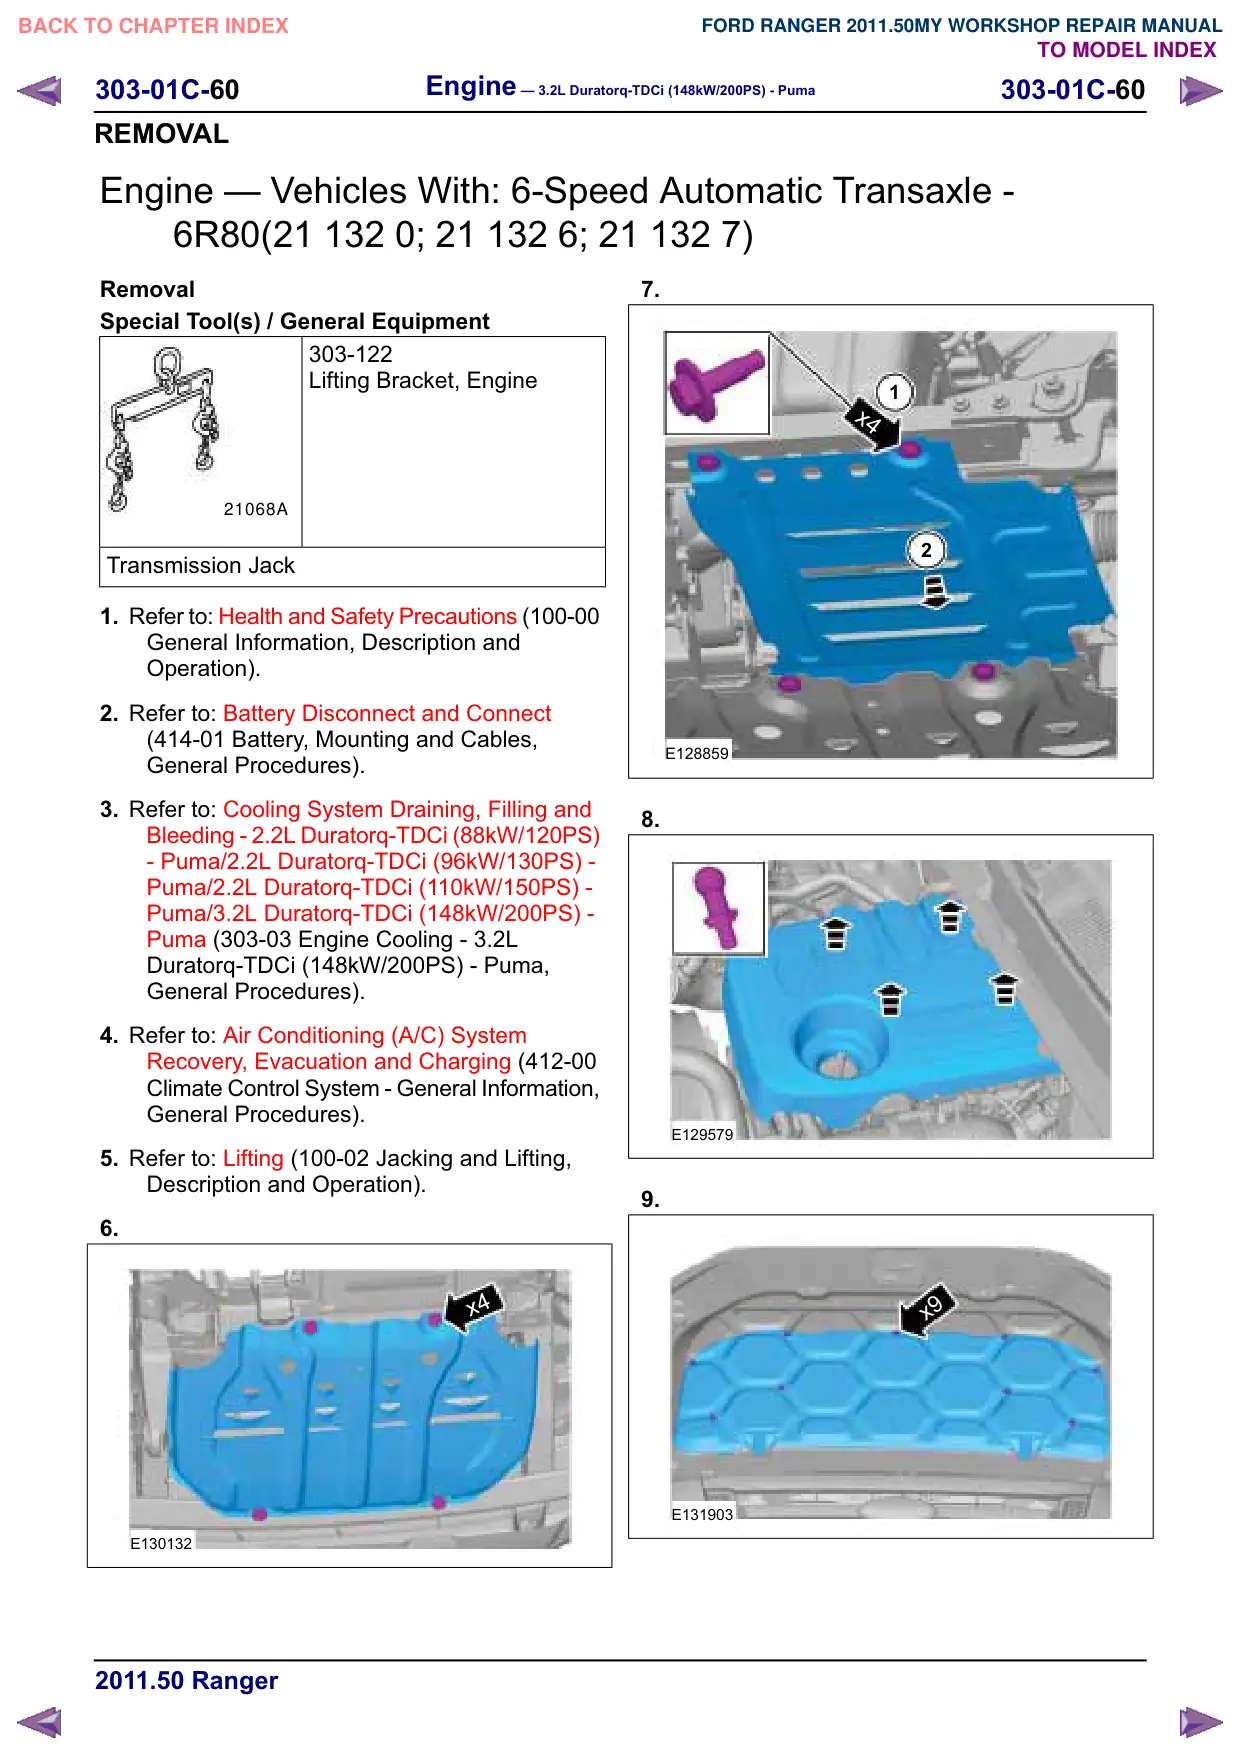
7. Refer to: Lifting (100-02 Jacking and Lifting,
Description and Operation).
8. Remove front RH side wheel only.
Refer to: Wheel and Tire (204-04 Wheels and
Tires, Removal and Installation).
9. Torque: 10 Nm
E132699
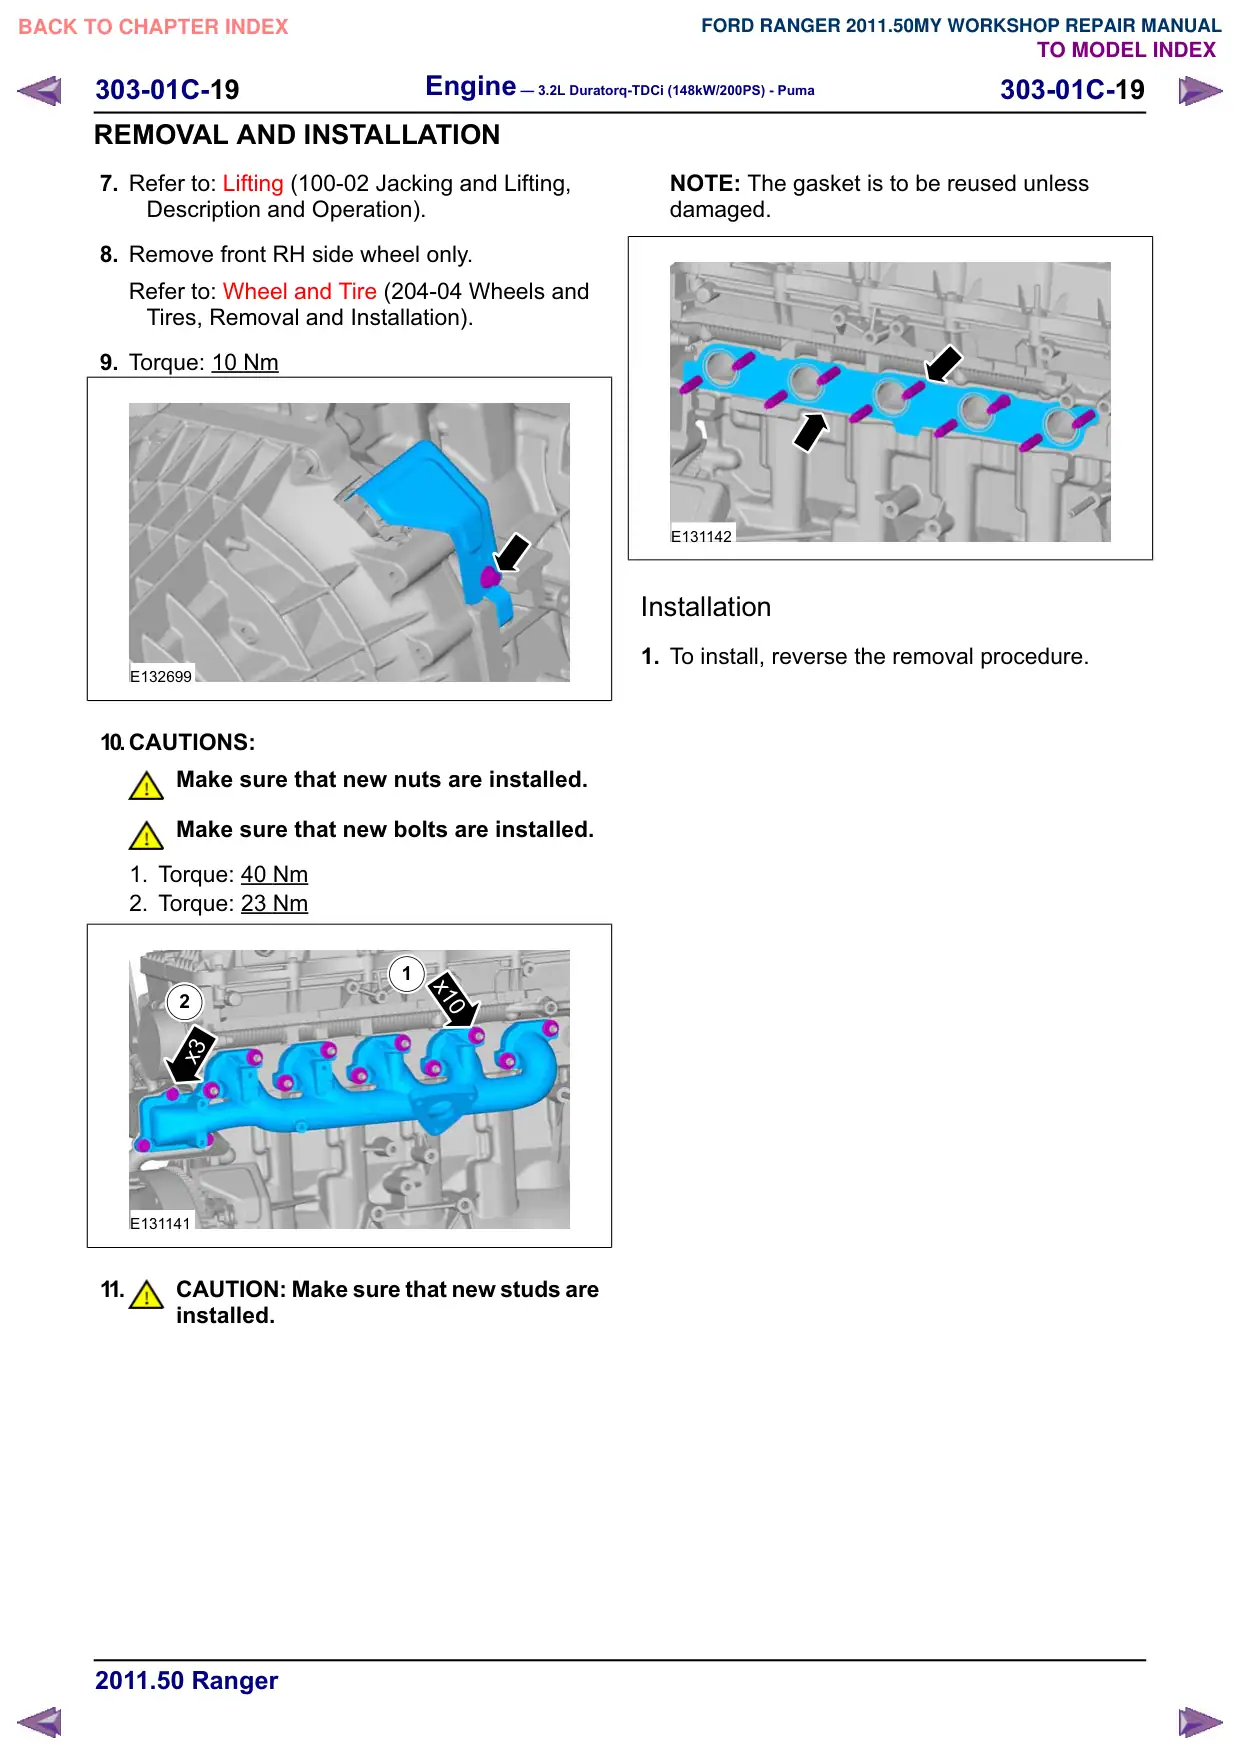
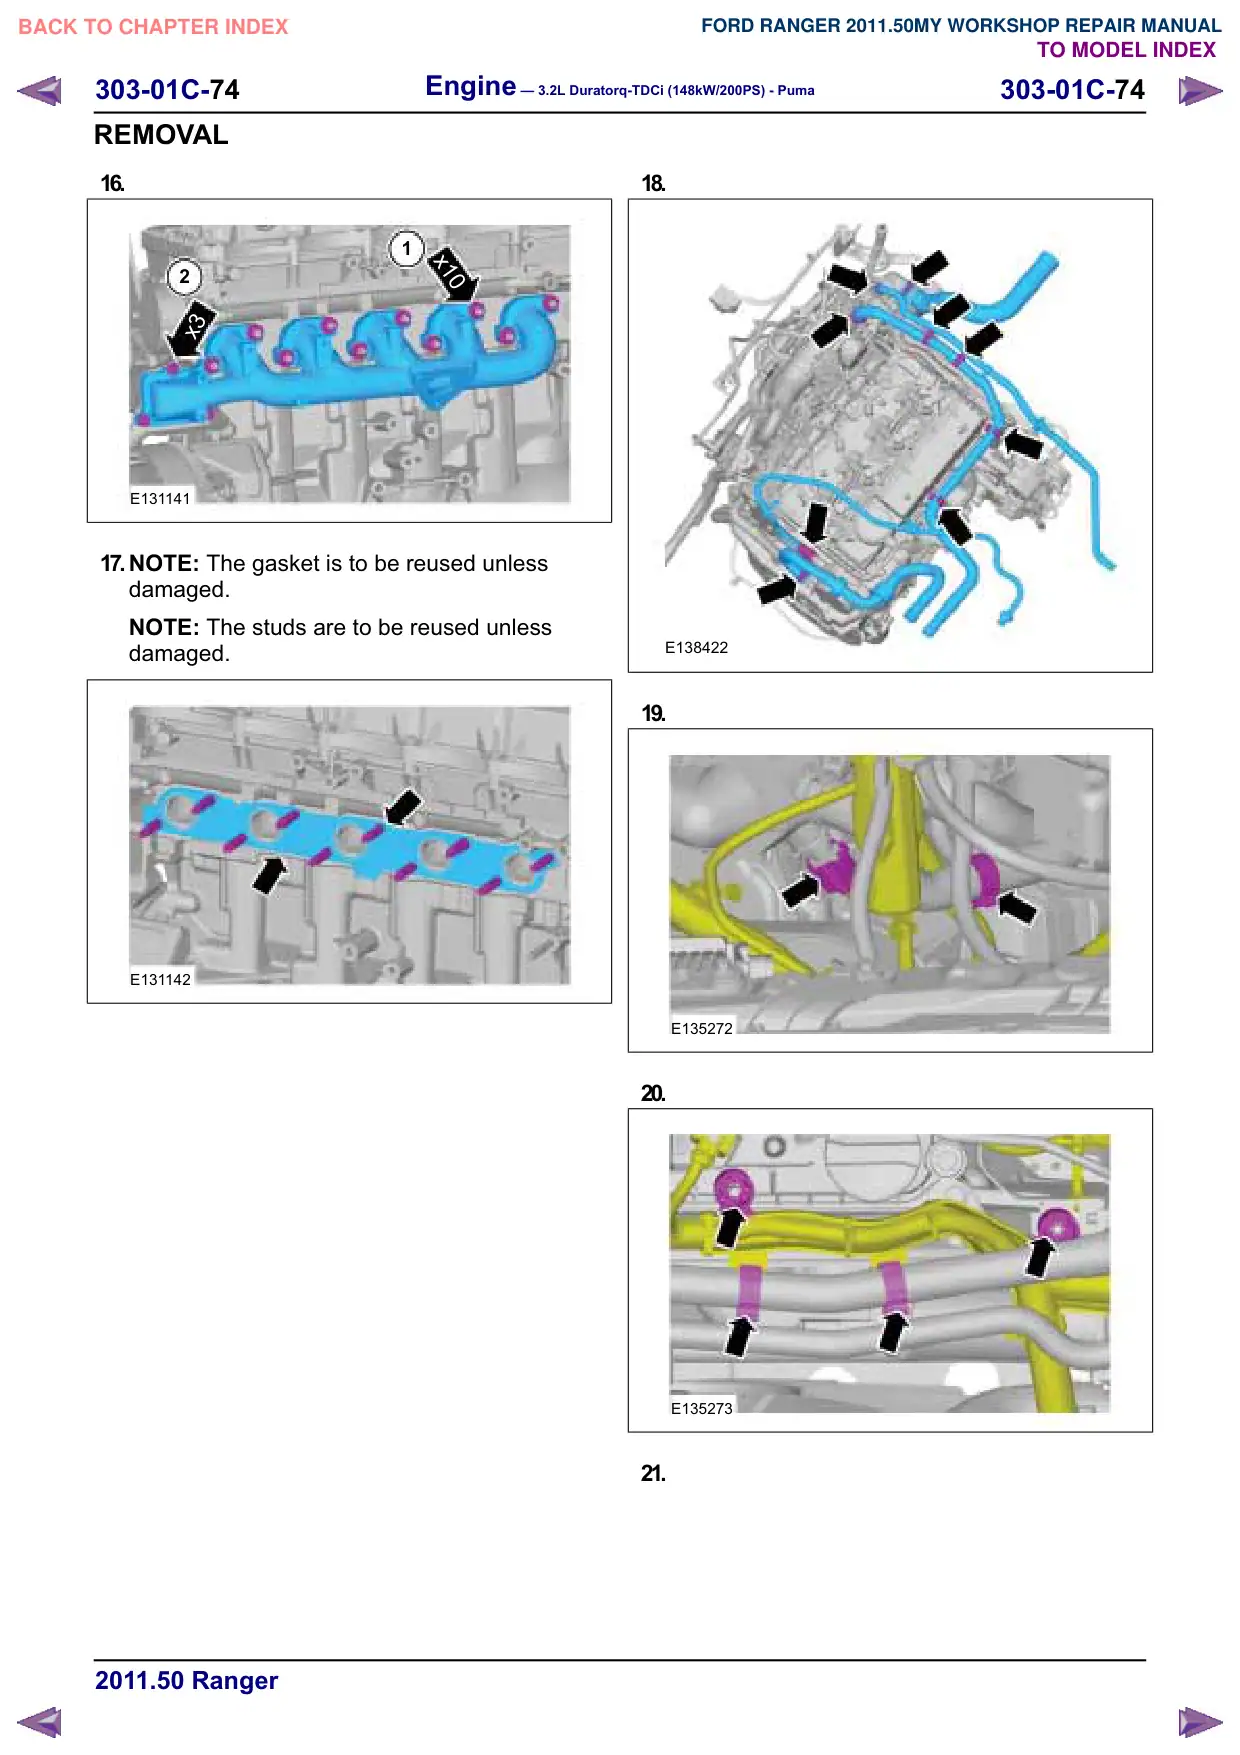
10.CAUTIONS:
Make sure that new nuts are installed.
Make sure that new bolts are installed.
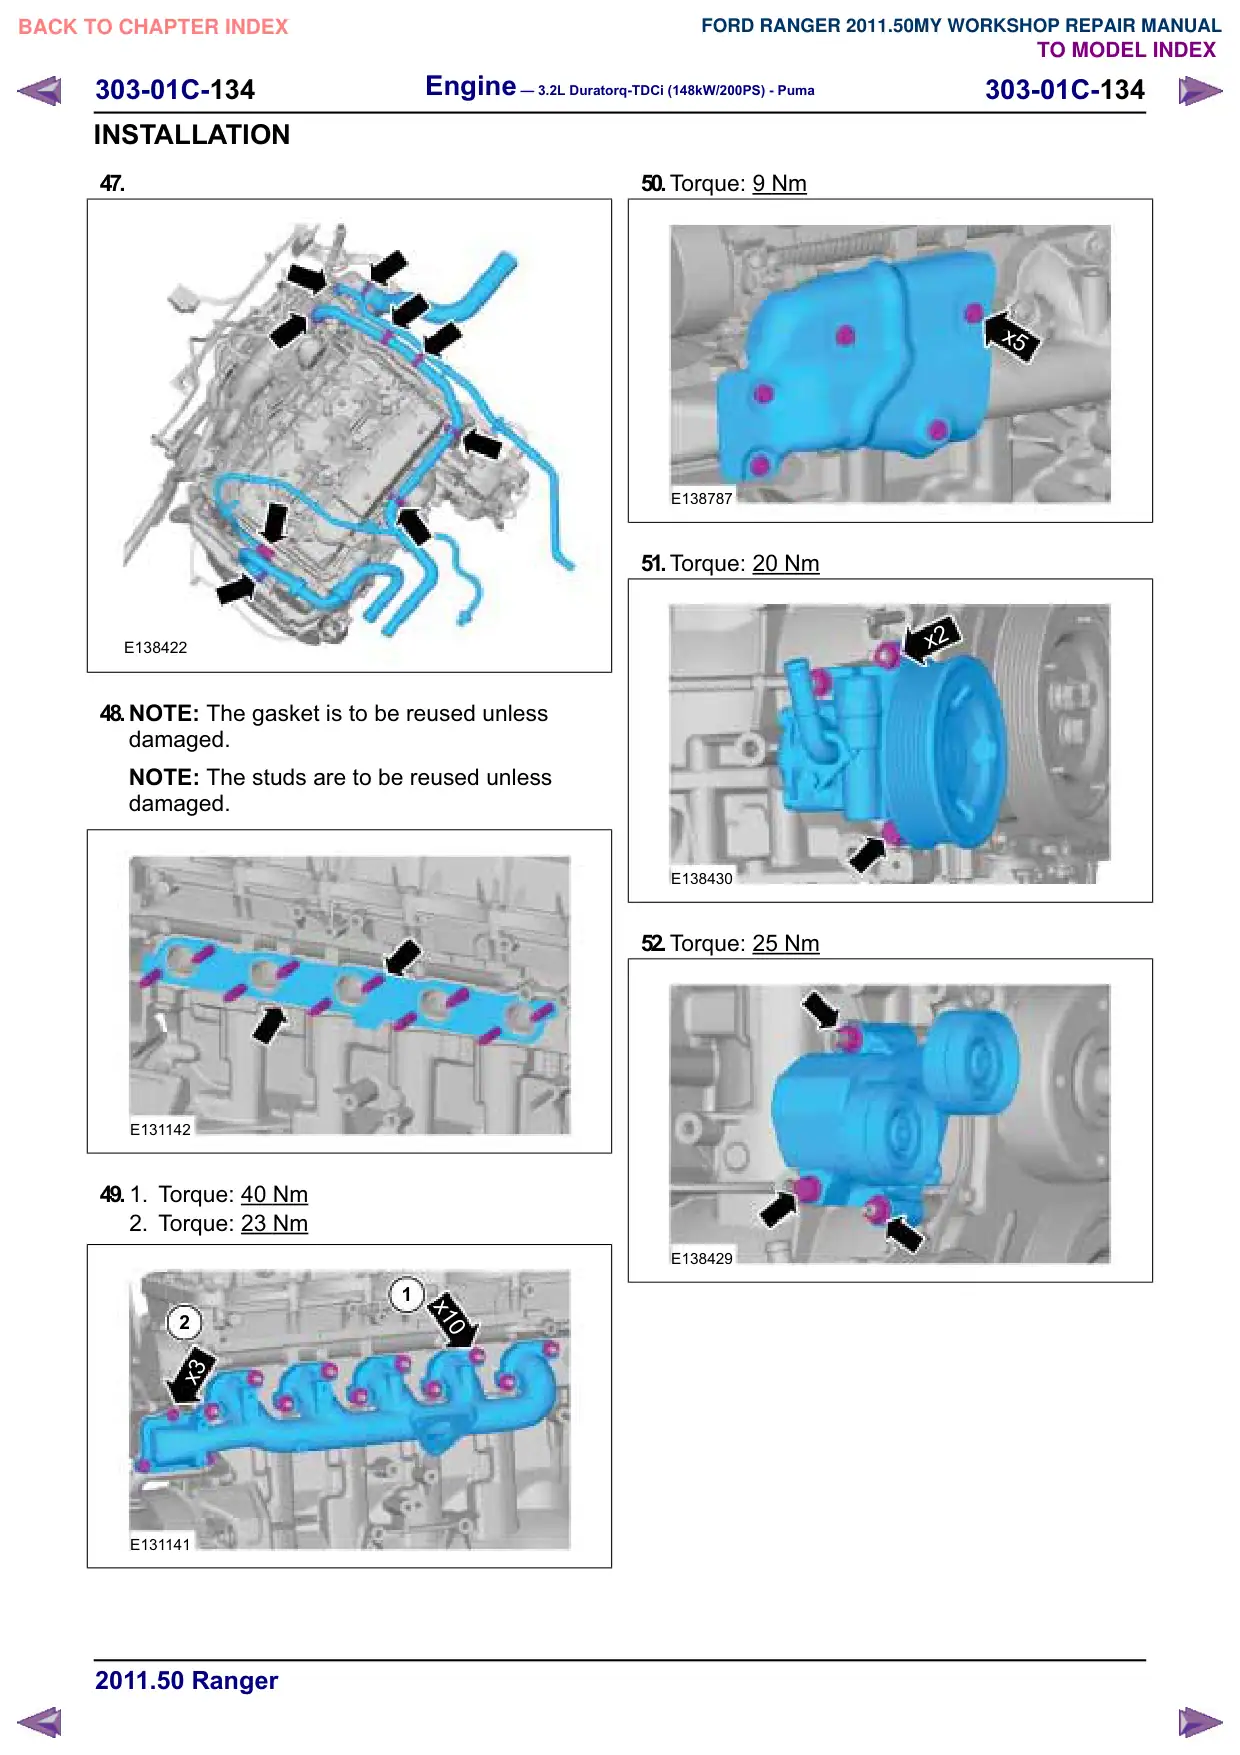
1. Torque: 40 Nm
2. Torque: 23 Nm
1
x10
2
x3
E131141
11.
CAUTION: Make sure that new studs are
installed.
NOTE: The gasket is to be reused unless
damaged.
E131142
Installation
1. To install, reverse the removal procedure.
Engine – 3.2L Duratorq-TDCi (148kW/200PS) - Puma
303-01C-21
303-01C-21
REMOVAL AND INSTALLATION
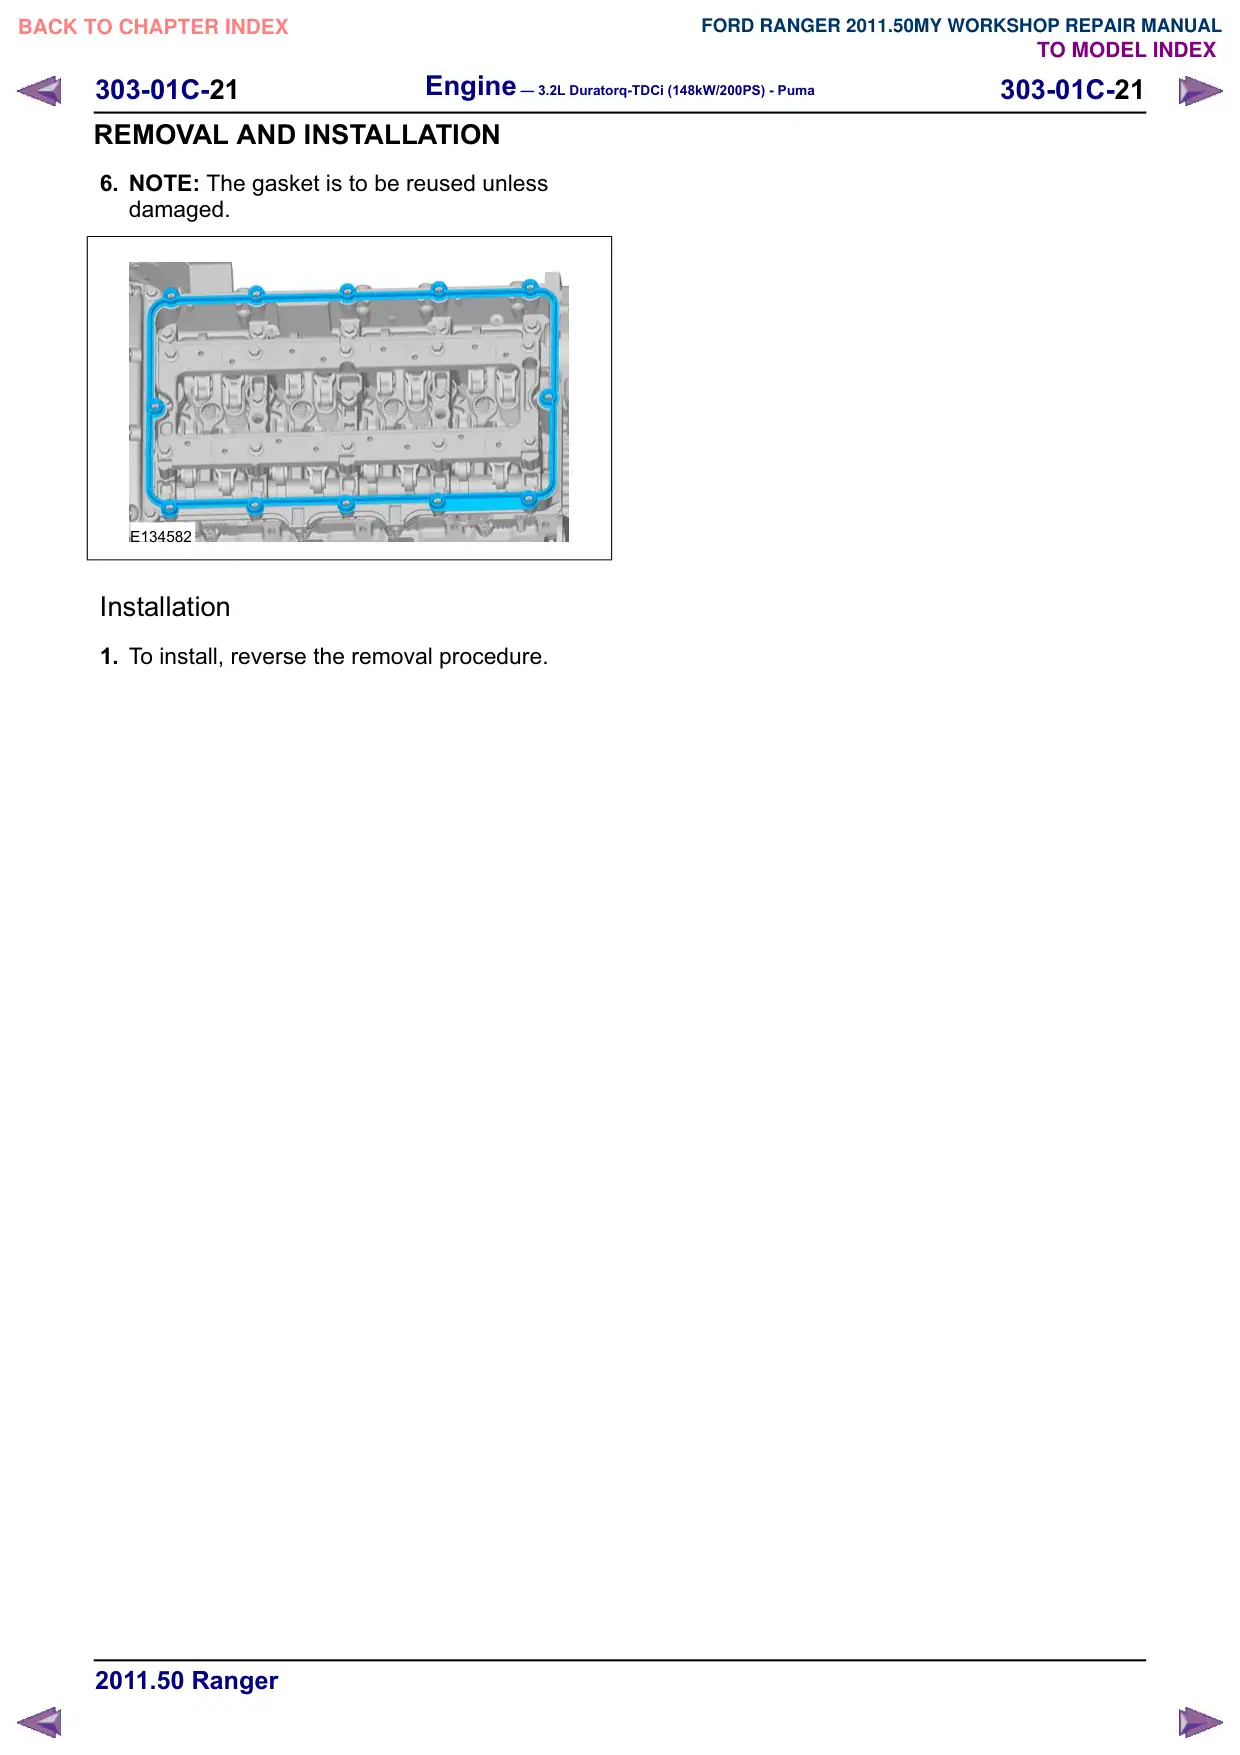
6. NOTE: The gasket is to be reused unless
damaged.
E134582
Installation
1. To install, reverse the removal procedure.
Engine – 3.2L Duratorq-TDCi (148kW/200PS) - Puma
303-01C-22
303-01C-22
REMOVAL AND INSTALLATION
Camshafts(21 284 0)
Special Tool(s) / General Equipment
100-010
Remover, O-Ring Seal
17063
303-1562
Timing Tool
E131853
2 mm Punch
6 mm Drill Bit
Removal
WARNING: Do not smoke or carry lighted
tobacco or open flame of any type when
working on or near any fuel related
components. Highly flammable mixtures
are always present and may ignite. Failure
to follow these instructions may result in
personal injury.
NOTE: Removal steps in this procedure may
contain installation details.
1. Refer to: Fuel Rail (303-04 Fuel Charging and
Controls - 3.2L Duratorq-TDCi (148kW/200PS)
- Puma, Removal and Installation).
Refer to: Valve Cover (303-01 Engine - 3.2L
Duratorq-TDCi (148kW/200PS) - Puma,
Removal and Installation).
Refer to: Timing Cover (303-01 Engine - 3.2L
Duratorq-TDCi (148kW/200PS) - Puma,
Removal and Installation).
Refer to: Brake Vacuum Pump - 3.2L
Duratorq-TDCi (148kW/200PS) - Puma
(206-07 Power Brake Actuation, Removal and
Installation).
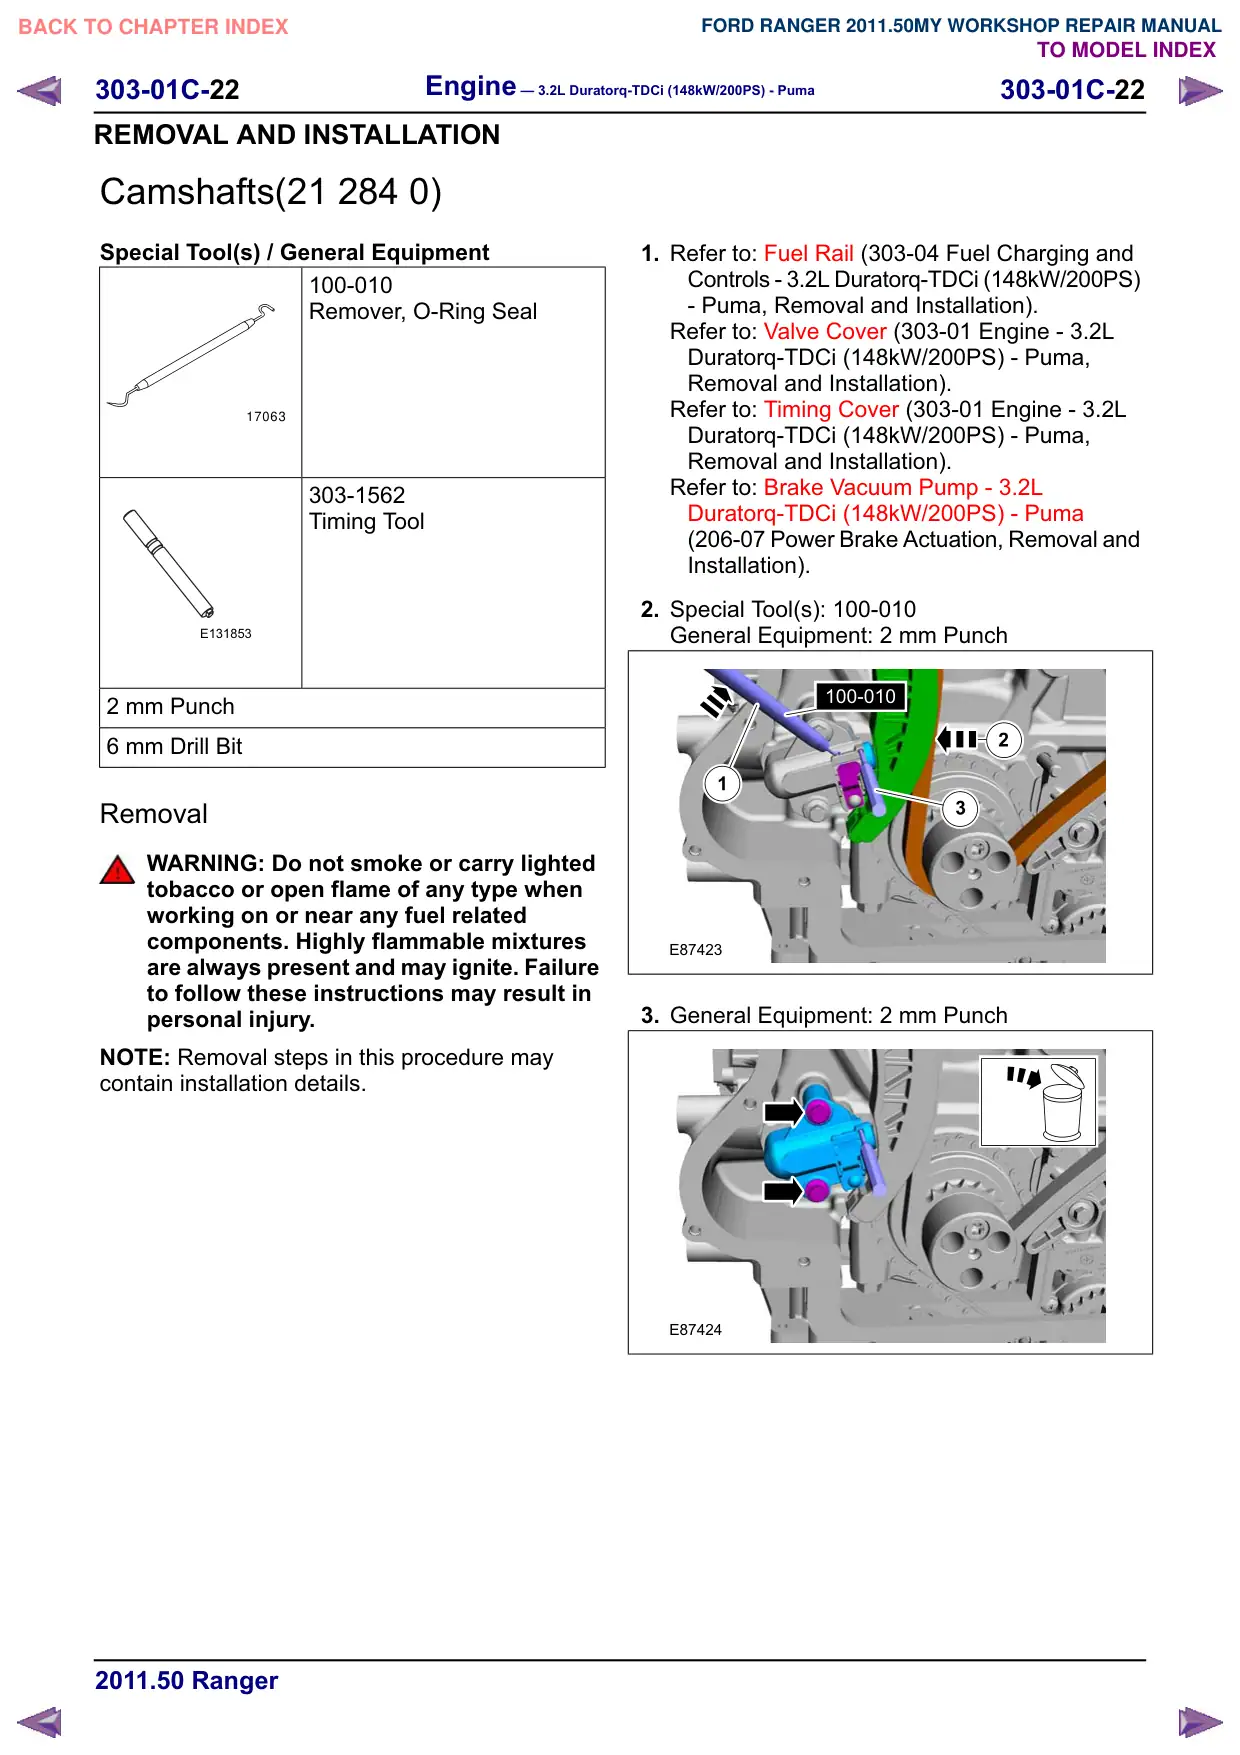
2. Special Tool(s): 100-010
General Equipment: 2 mm Punch
100-010
100-010
2
2
1
1
3
3
E87423
3. General Equipment: 2 mm Punch
E87424
303-01C-24
Engine – 3.2L Duratorq-TDCi (148kW/200PS) - Puma
303-01C-24
REMOVAL AND INSTALLATION
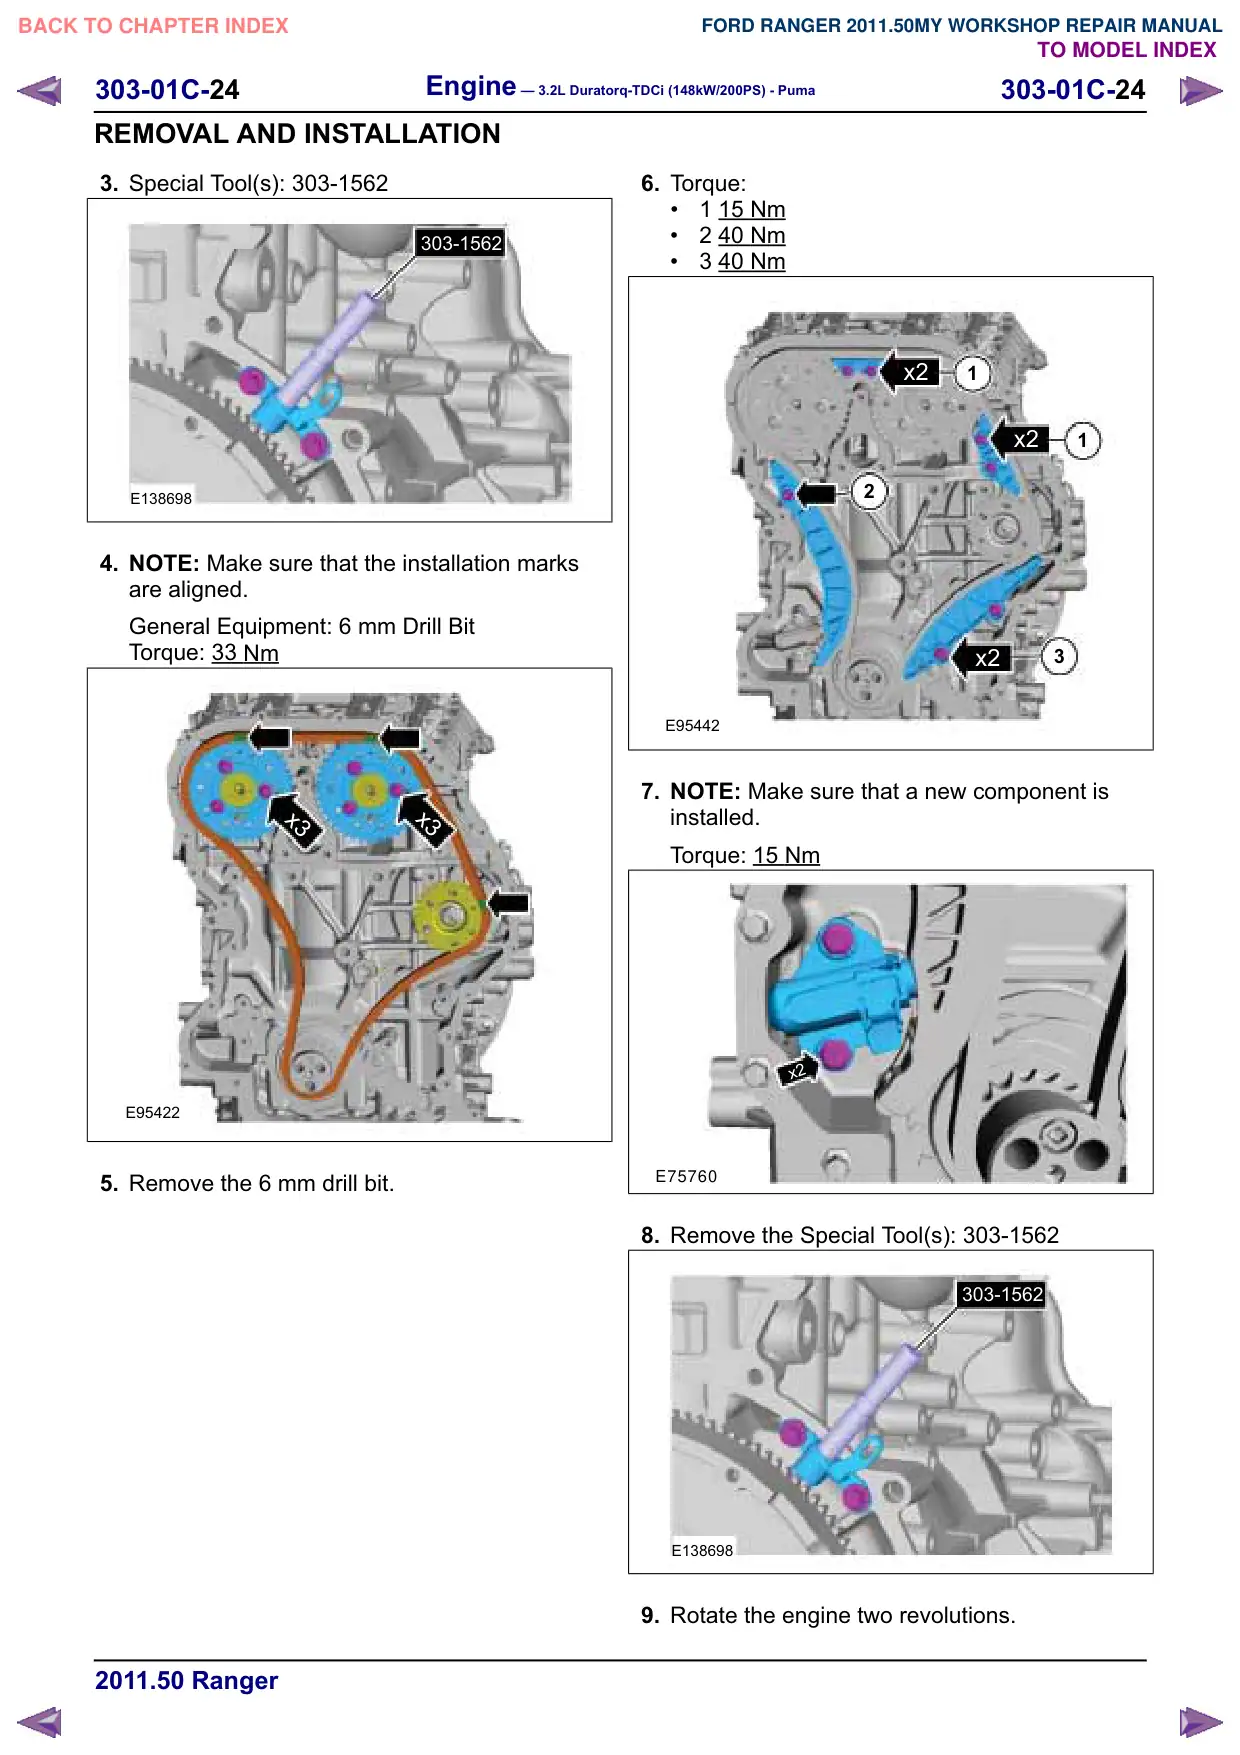
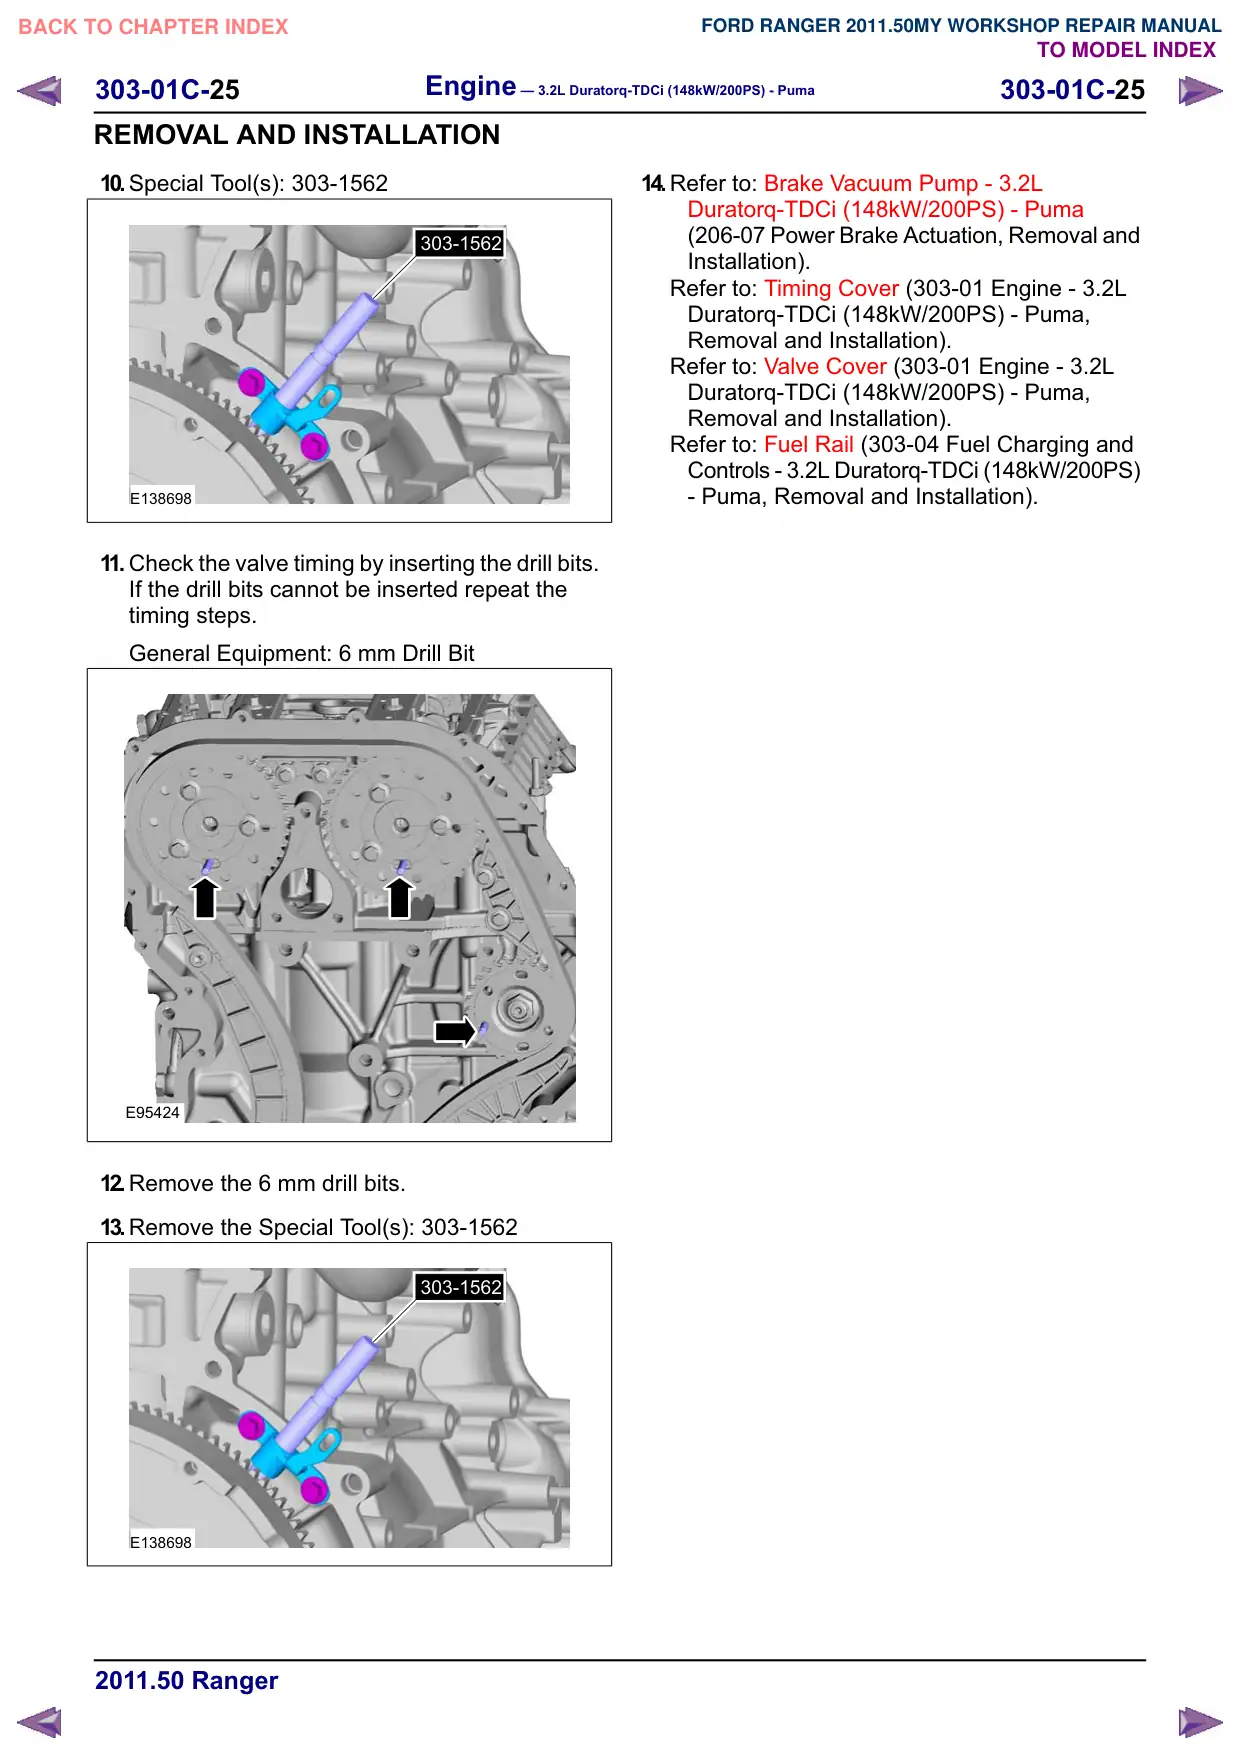
3. Special Tool(s): 303-1562
303-1562
E138698
4. NOTE: Make sure that the installation marks
are aligned.
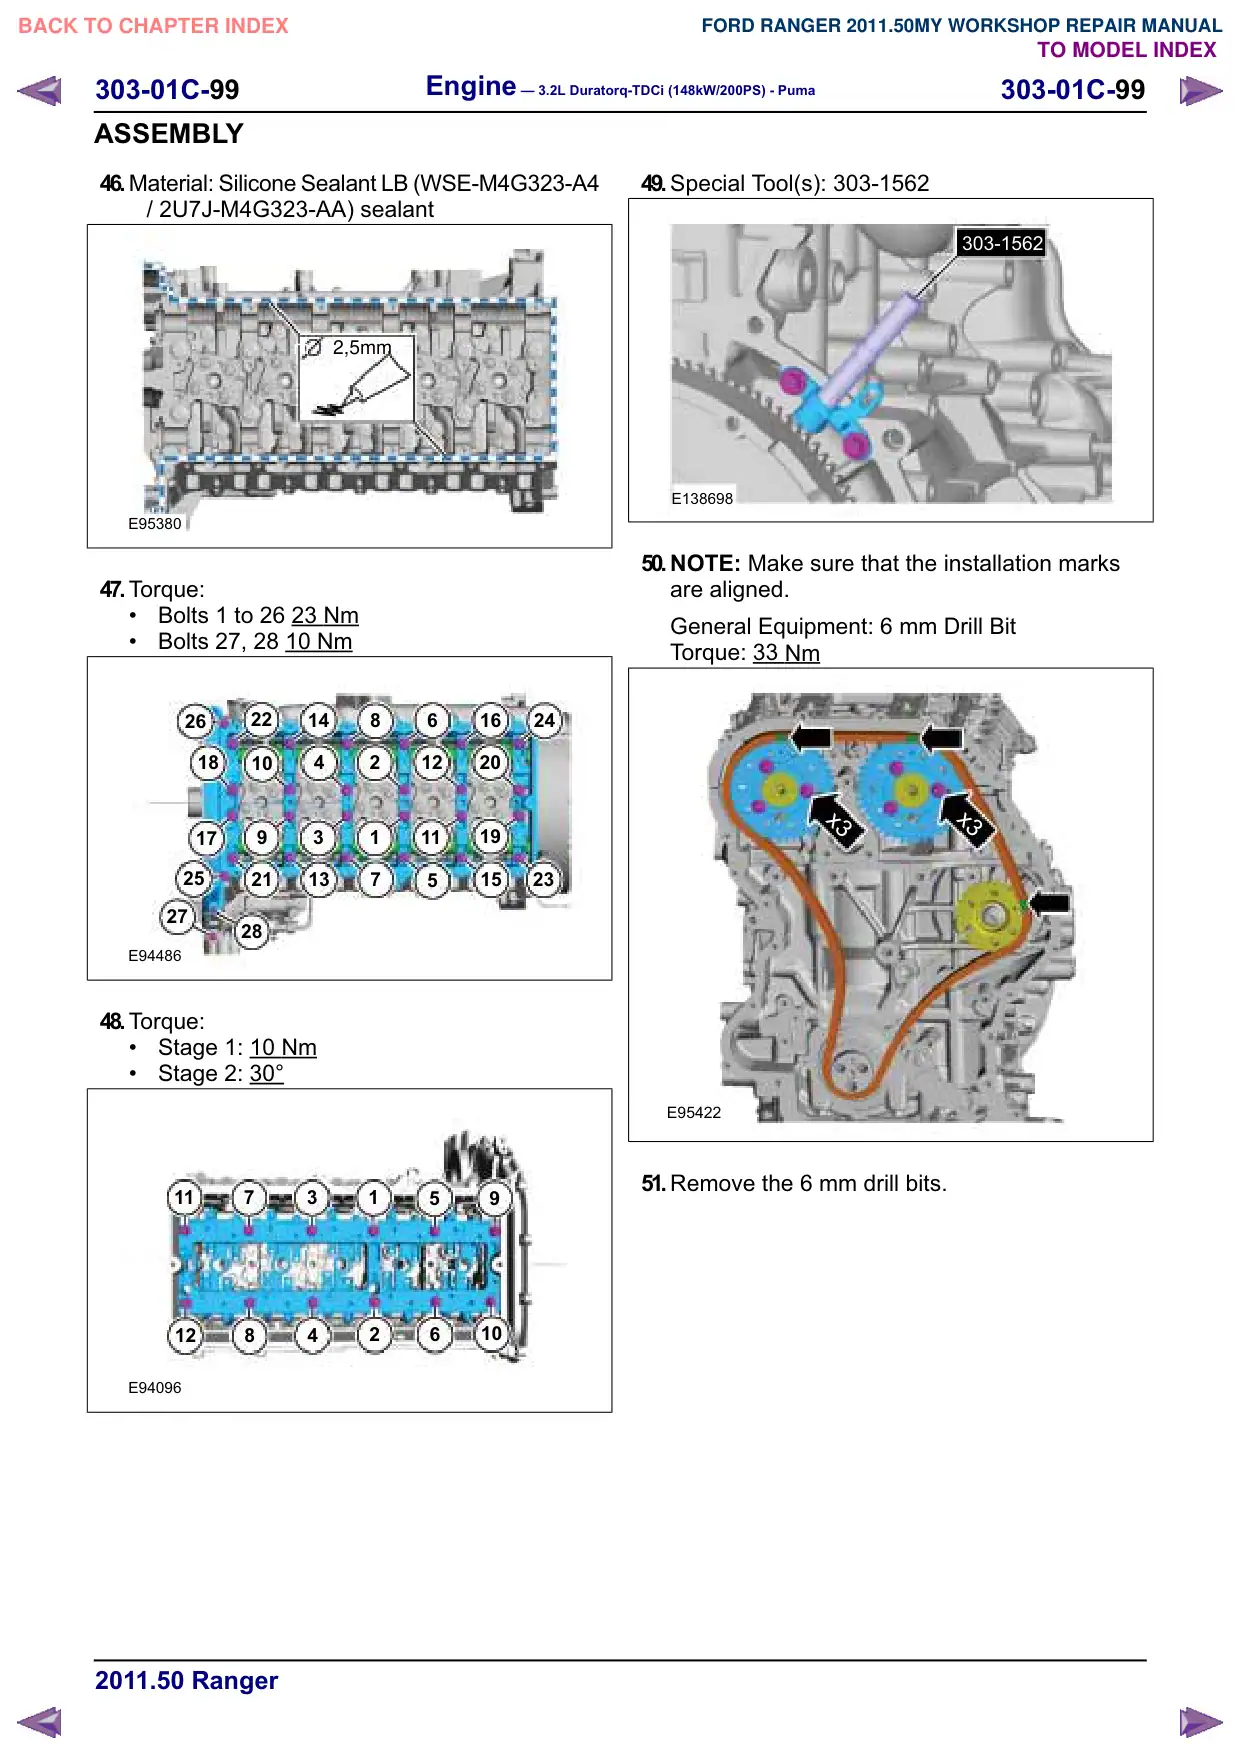
General Equipment: 6 mm Drill Bit
Torque: 33 Nm
x3
x3
E95422
5. Remove the 6 mm drill bit.
6. Torque:
1 15 Nm
2 40 Nm
3 40 Nm
x2
1
x2
1
2
x2
3
E95442
7. NOTE: Make sure that a new component is
installed.
Torque: 15 Nm
x2
E75760
8. Remove the Special Tool(s): 303-1562
303-1562
E138698
9. Rotate the engine two revolutions.
Engine – 3.2L Duratorq-TDCi (148kW/200PS) - Puma
303-01C-25
303-01C-25
REMOVAL AND INSTALLATION
10.Special Tool(s): 303-1562
303-1562
E138698
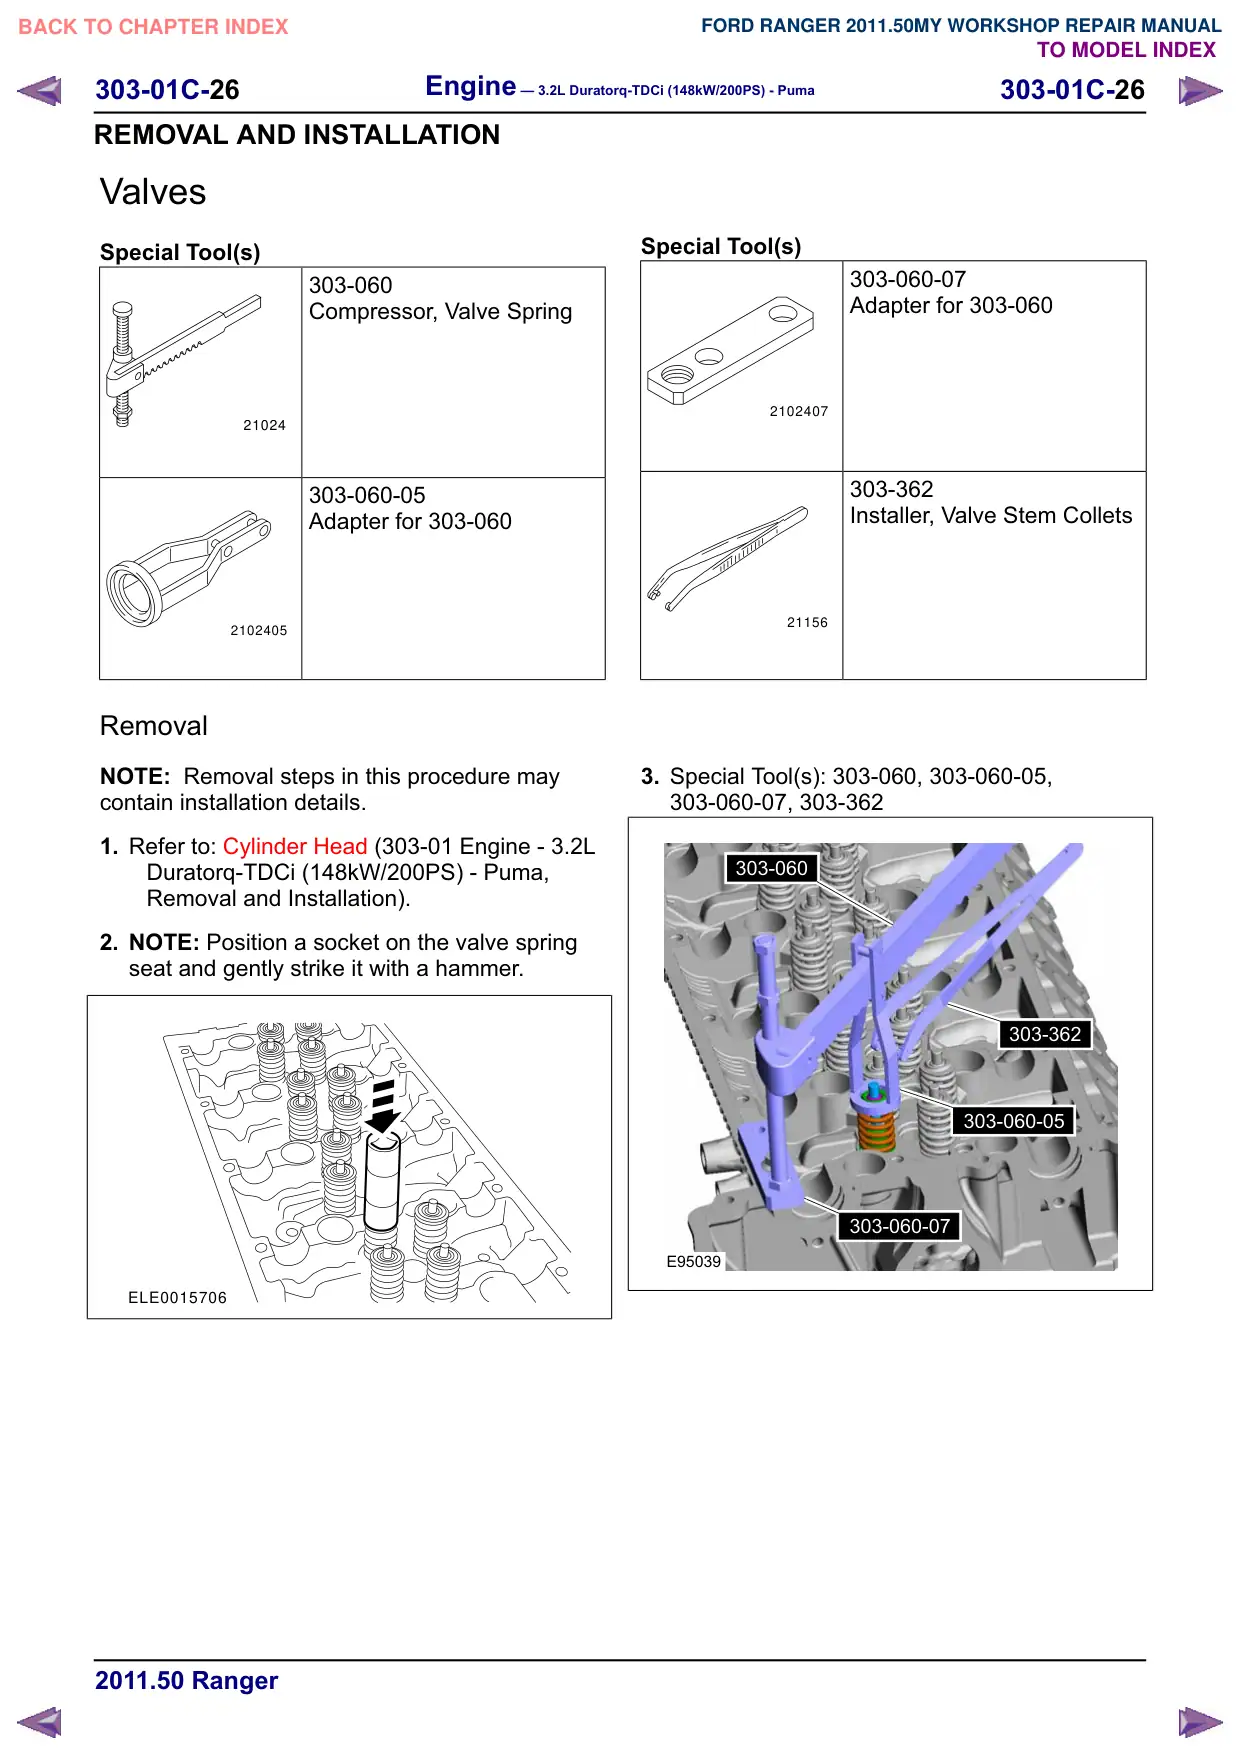
11. Check the valve timing by inserting the drill bits.
If the drill bits cannot be inserted repeat the
timing steps.
General Equipment: 6 mm Drill Bit
E95424
12.Remove the 6 mm drill bits.
13.Remove the Special Tool(s): 303-1562
303-1562
E138698
14.Refer to: Brake Vacuum Pump - 3.2L
Duratorq-TDCi (148kW/200PS) - Puma
(206-07 Power Brake Actuation, Removal and
Installation).
Refer to: Timing Cover (303-01 Engine - 3.2L
Duratorq-TDCi (148kW/200PS) - Puma,
Removal and Installation).
Refer to: Valve Cover (303-01 Engine - 3.2L
Duratorq-TDCi (148kW/200PS) - Puma,
Removal and Installation).
Refer to: Fuel Rail (303-04 Fuel Charging and
Controls - 3.2L Duratorq-TDCi (148kW/200PS)
- Puma, Removal and Installation).
Engine – 3.2L Duratorq-TDCi (148kW/200PS) - Puma
303-01C-26
303-01C-26
REMOVAL AND INSTALLATION
Valves
Special Tool(s)
303-060
Compressor, Valve Spring
21024
303-060-05
Adapter for 303-060
2102405
Removal
NOTE: Removal steps in this procedure may
contain installation details.
1. Refer to: Cylinder Head (303-01 Engine - 3.2L
Duratorq-TDCi (148kW/200PS) - Puma,
Removal and Installation).
2. NOTE: Position a socket on the valve spring
seat and gently strike it with a hammer.
ELE0015706
Special Tool(s)
303-060-07
Adapter for 303-060
2102407
303-362
Installer, Valve Stem Collets
21156
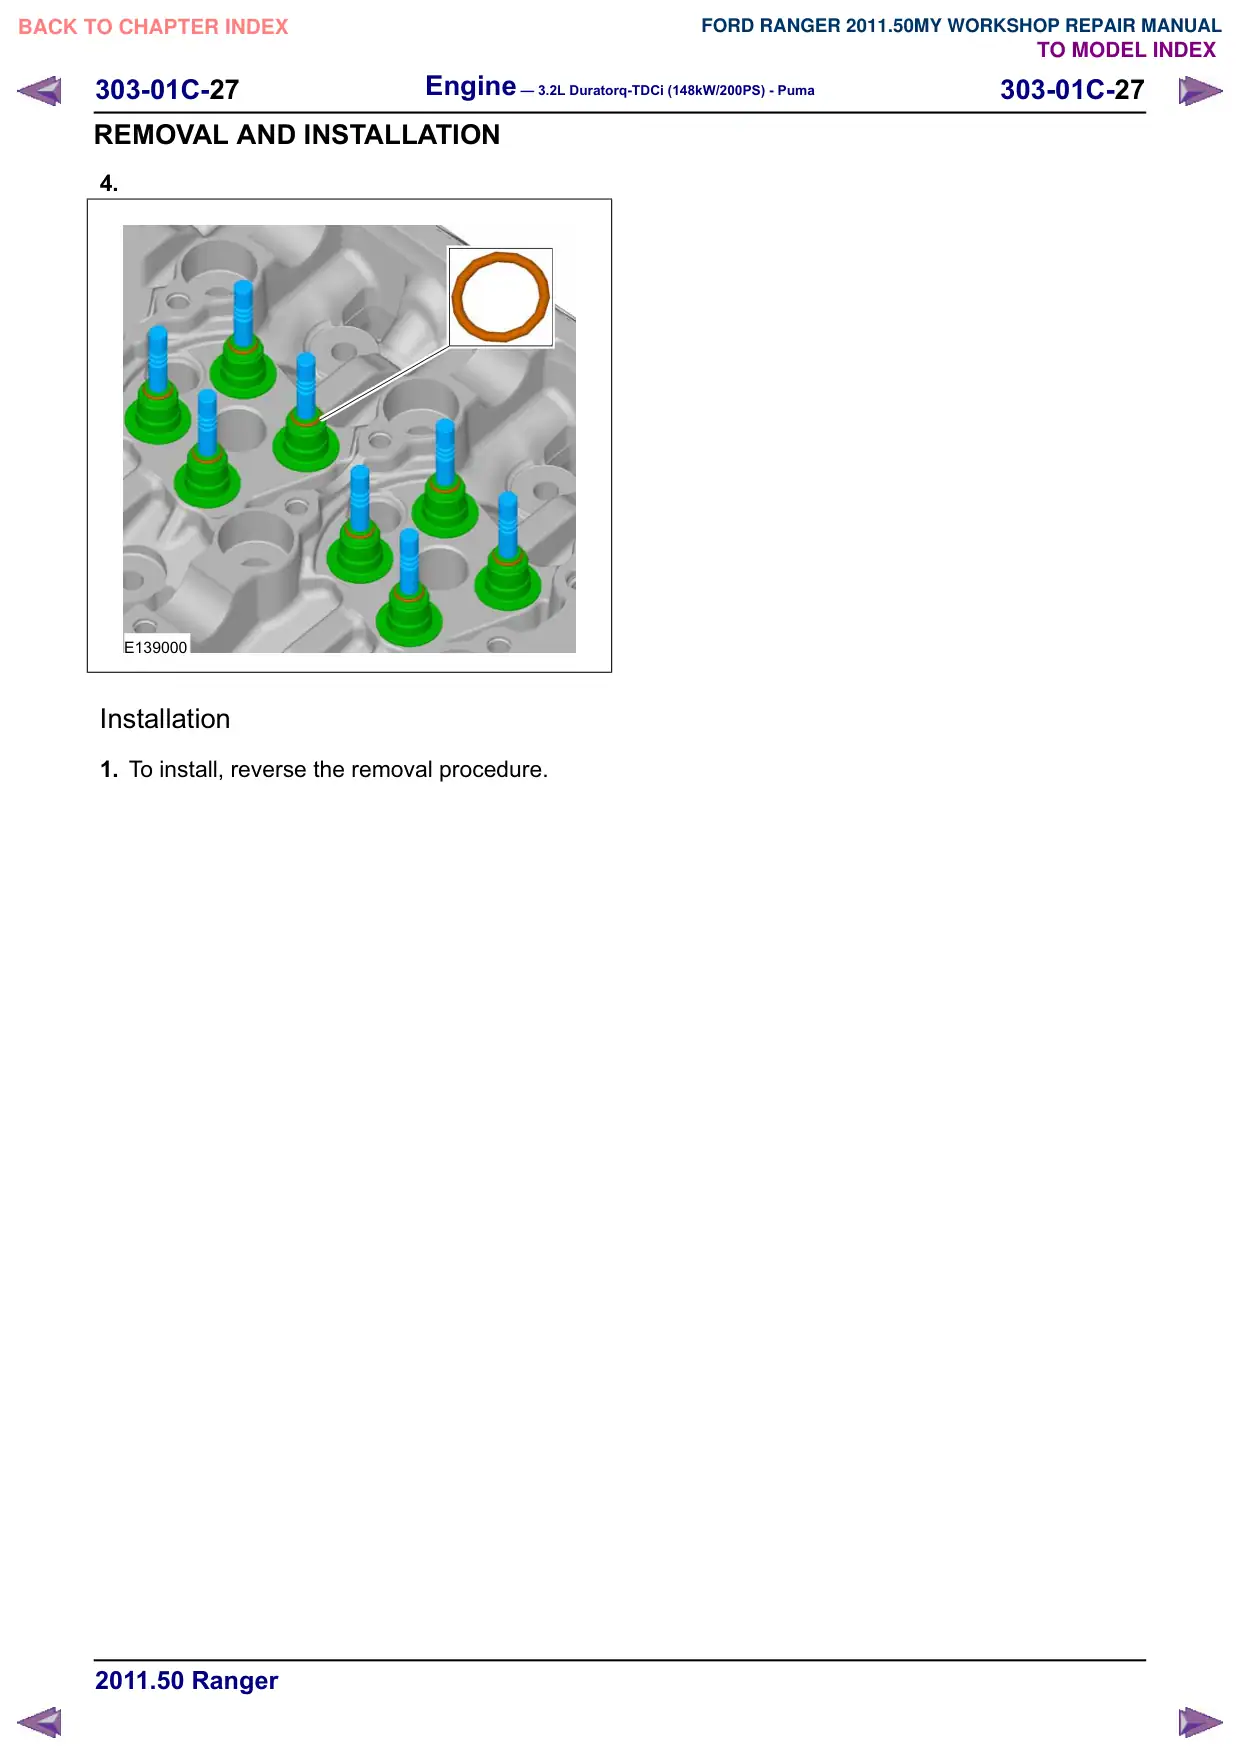
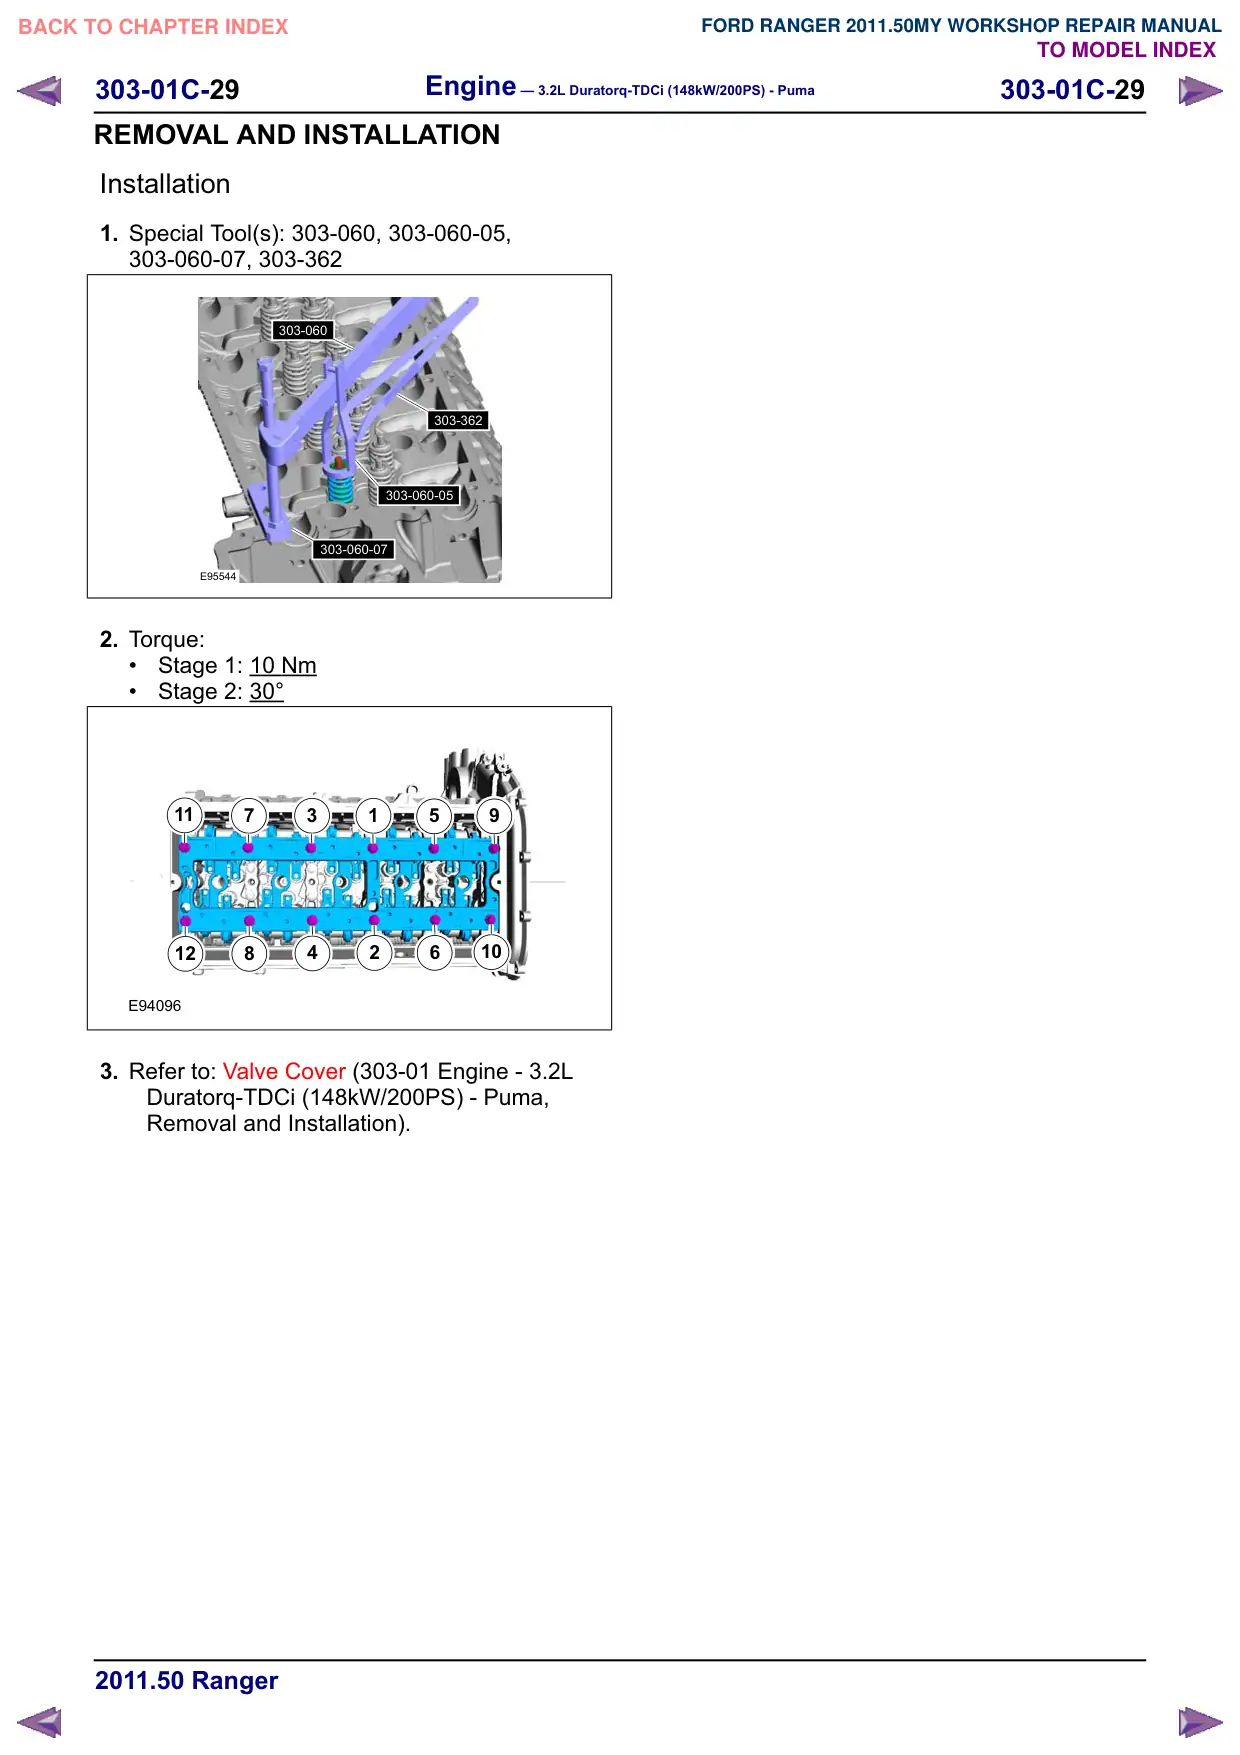
3. Special Tool(s): 303-060, 303-060-05,
303-060-07, 303-362
303-060
303-060
303-362
303-060-05
303-060-05
303-060-07
303-060-07
E95039
303-01C-32
Engine – 3.2L Duratorq-TDCi (148kW/200PS) - Puma
303-01C-32
REMOVAL AND INSTALLATION
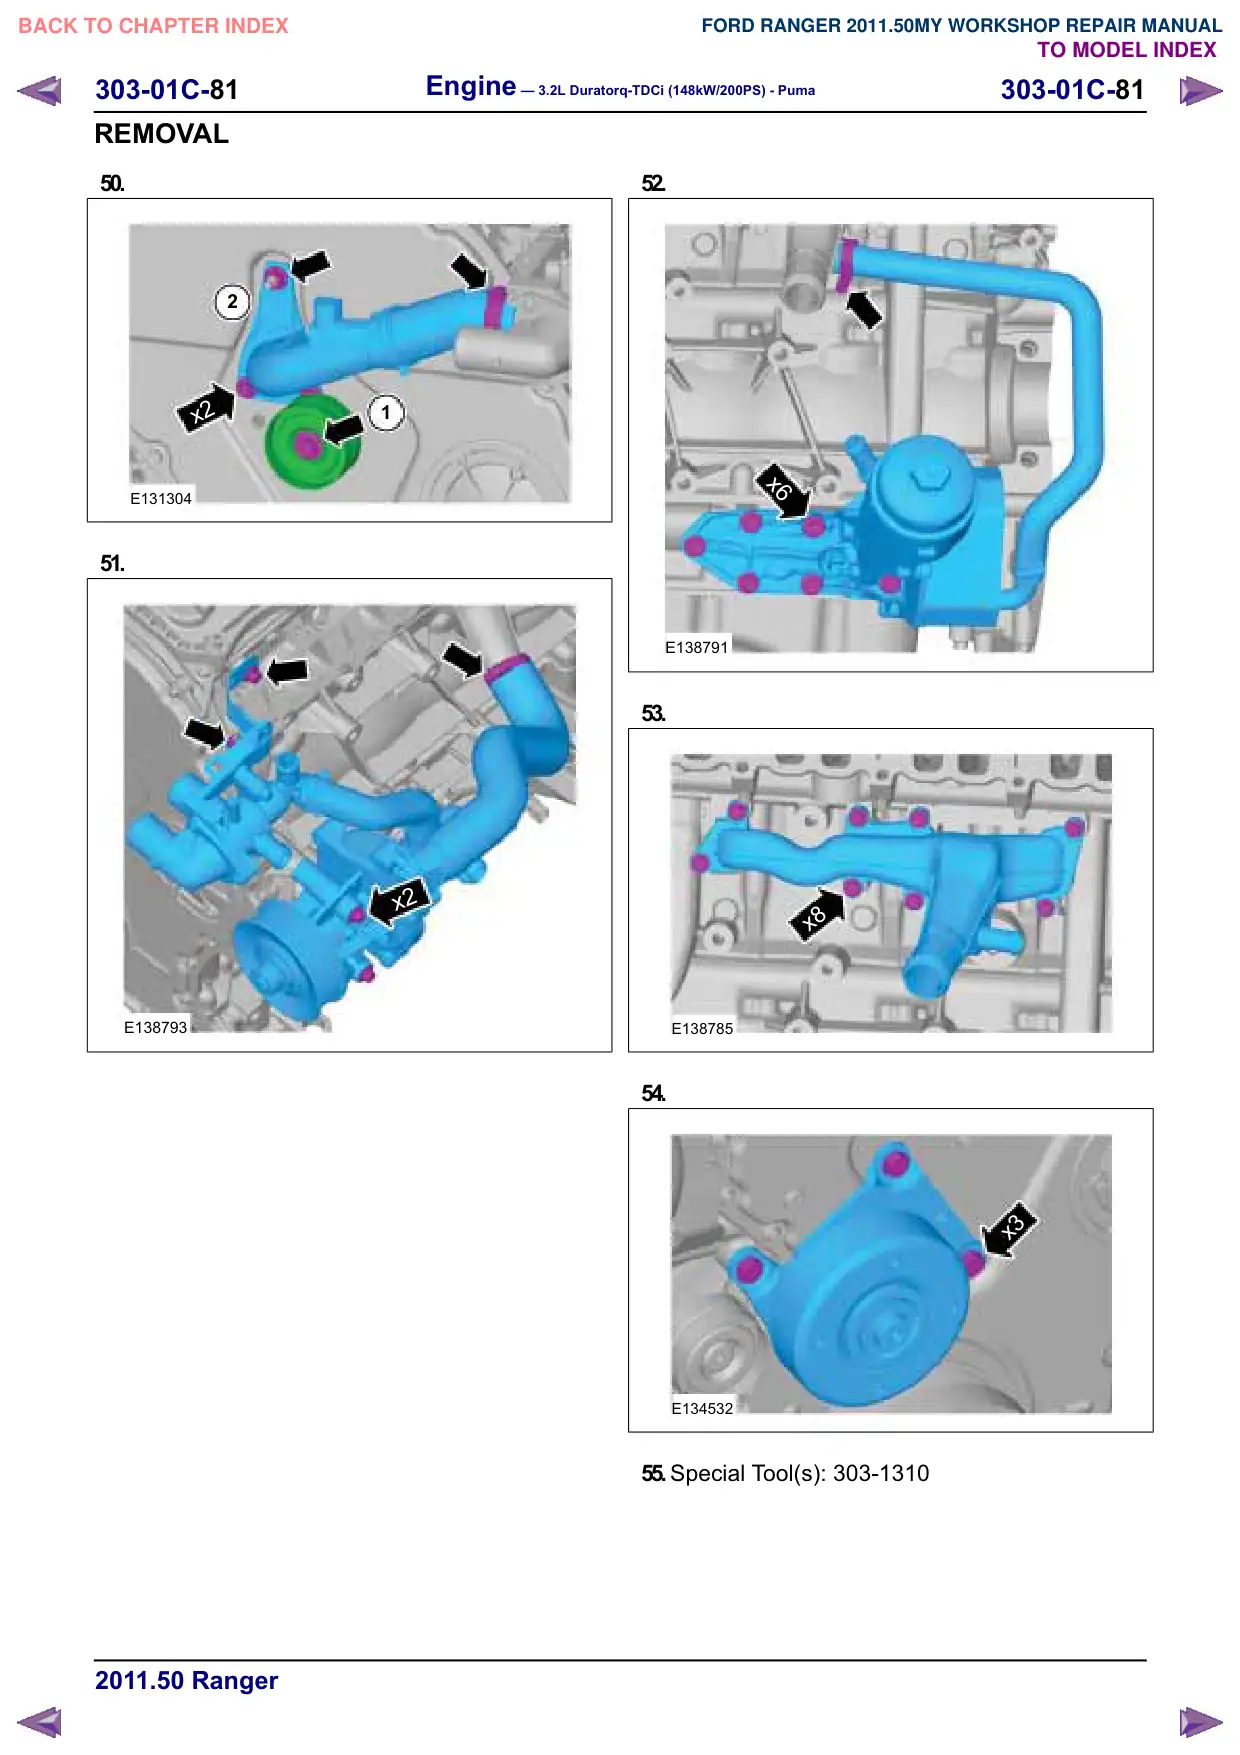
6. Torque: 48 Nm
x3
E134532
7. Refer to: Lifting (100-02 Jacking and Lifting,
Description and Operation).
8. Torque: 30
Nm
x4
E130132
9. NOTE: Remove front RH side wheel only.
Refer to: Wheel and Tire (204-04 Wheels and
Tires, Removal and Installation).
10.
x8
E132537
11.
CAUTION: Cap the power steering line
to prevent fluid loss or dirt ingress.
Torque: 7
Nm
3
2
1
E133691
12.
x4
E133940
303-01C-37
Engine – 3.2L Duratorq-TDCi (148kW/200PS) - Puma
303-01C-37
REMOVAL AND INSTALLATION
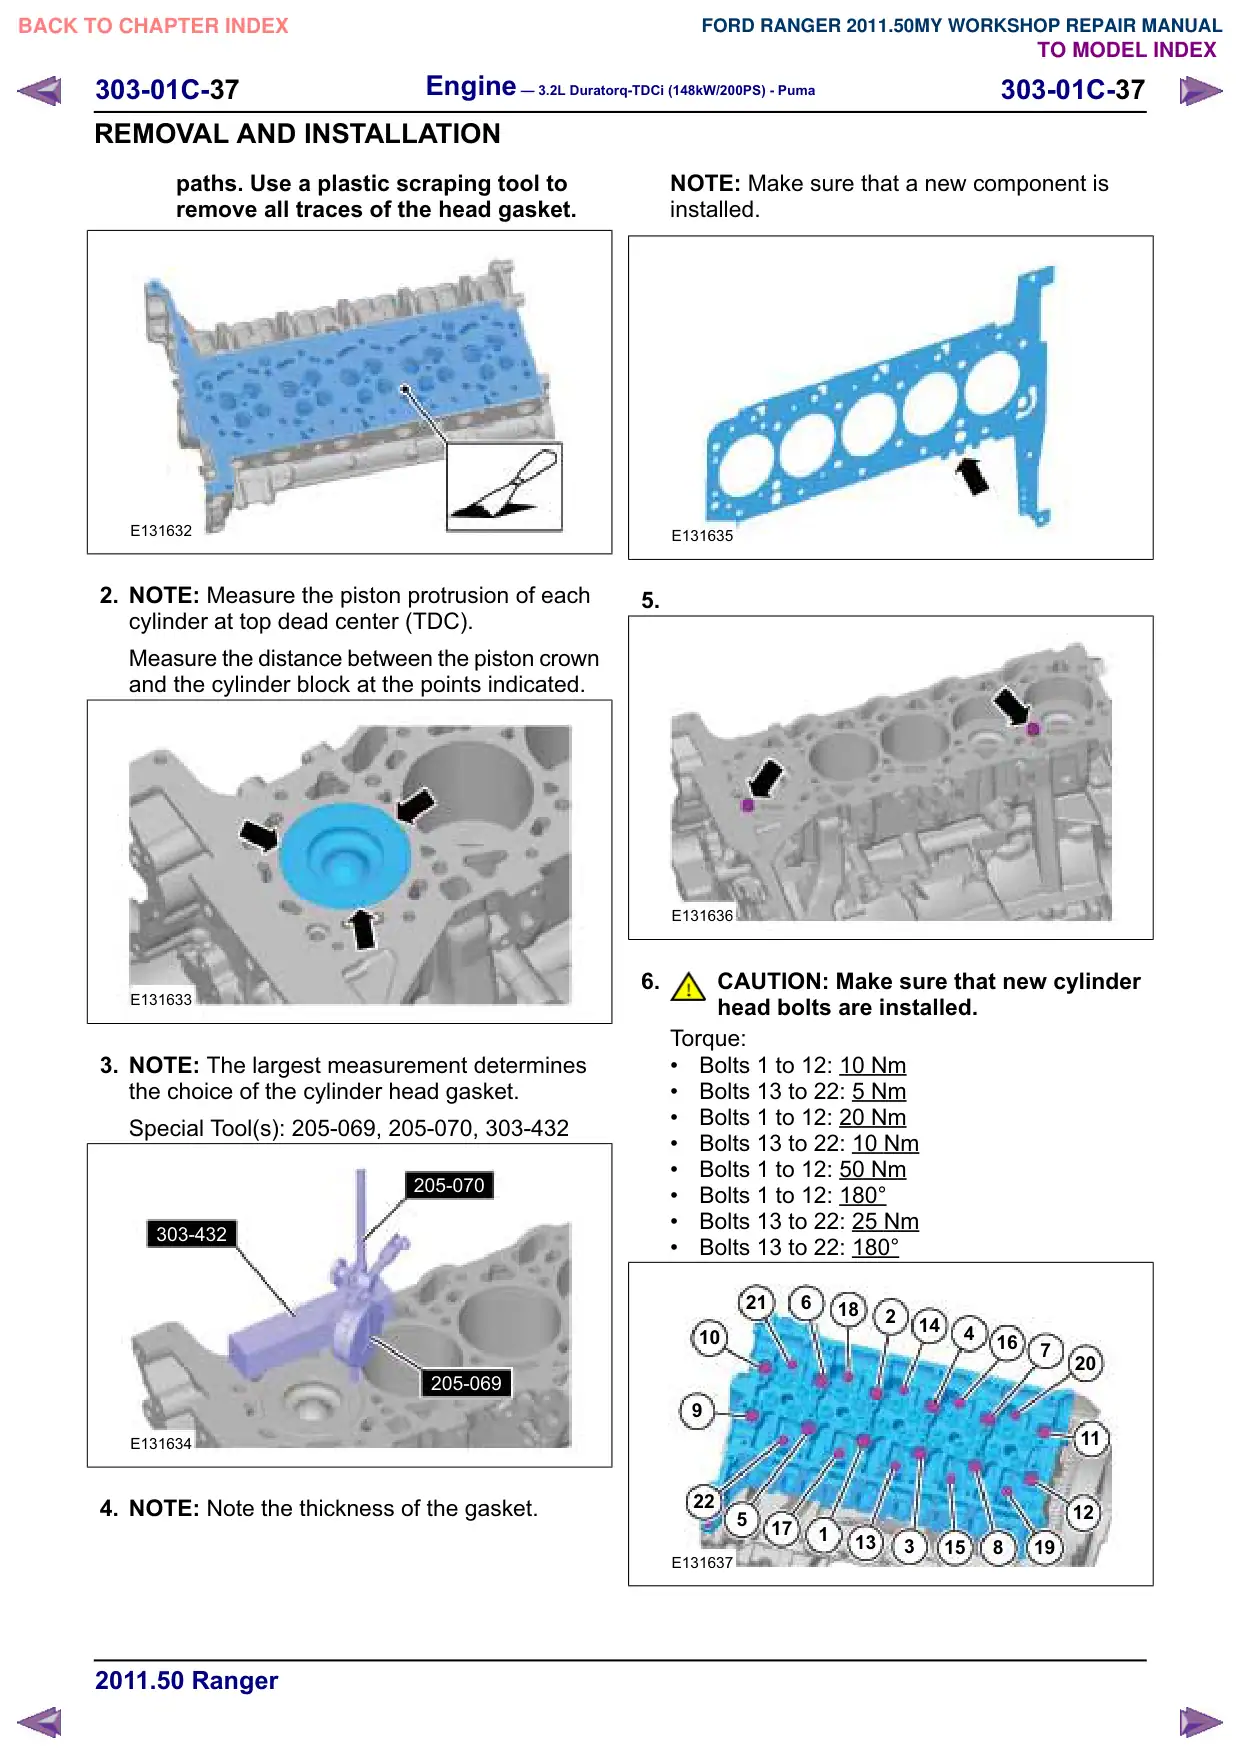
paths. Use a plastic scraping tool to
remove all traces of the head gasket.
E131632
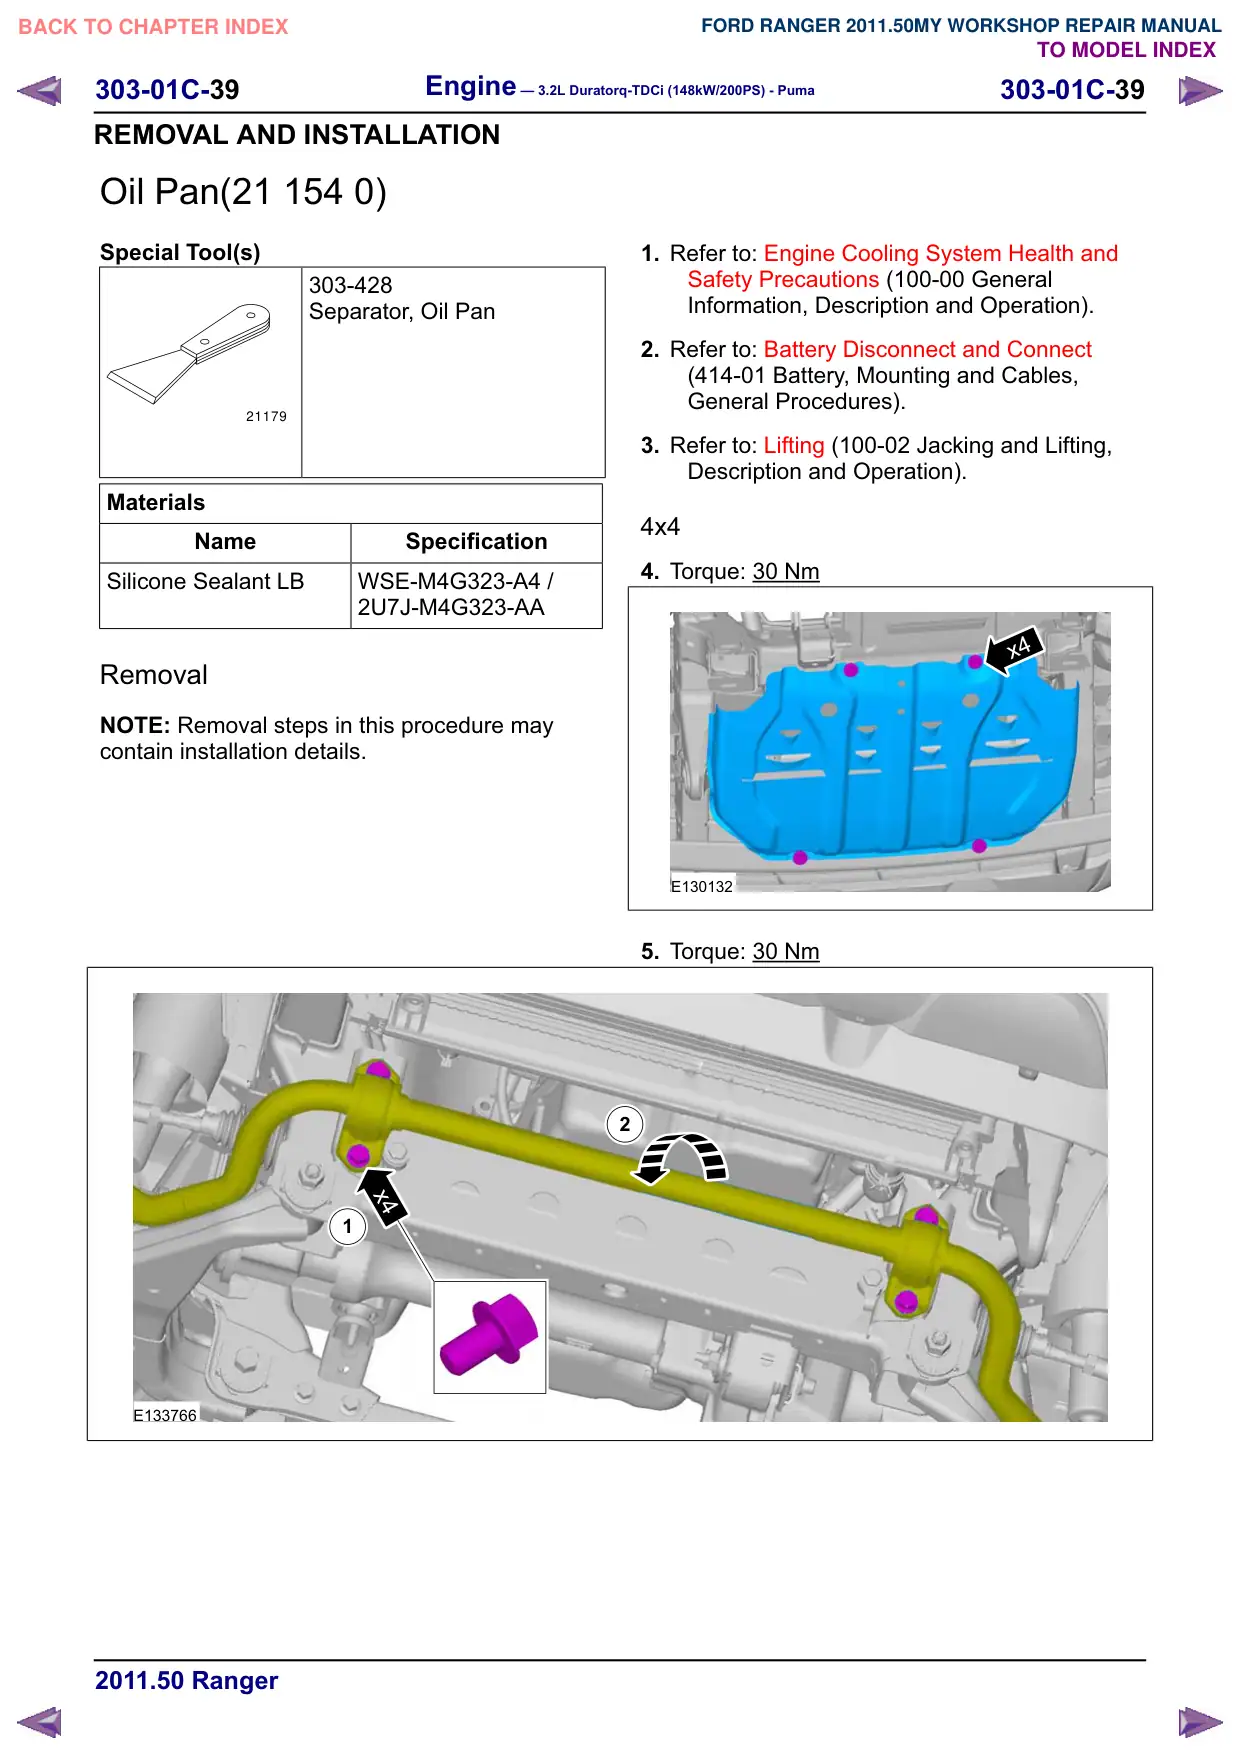
2. NOTE: Measure the piston protrusion of each
cylinder at top dead center (TDC).
Measure the distance between the piston crown
and the cylinder block at the points indicated.
E131633
3. NOTE: The largest measurement determines
the choice of the cylinder head gasket.
Special Tool(s): 205-069, 205-070, 303-432
205-070
303-432
205-069
E131634
4. NOTE: Note the thickness of the gasket.
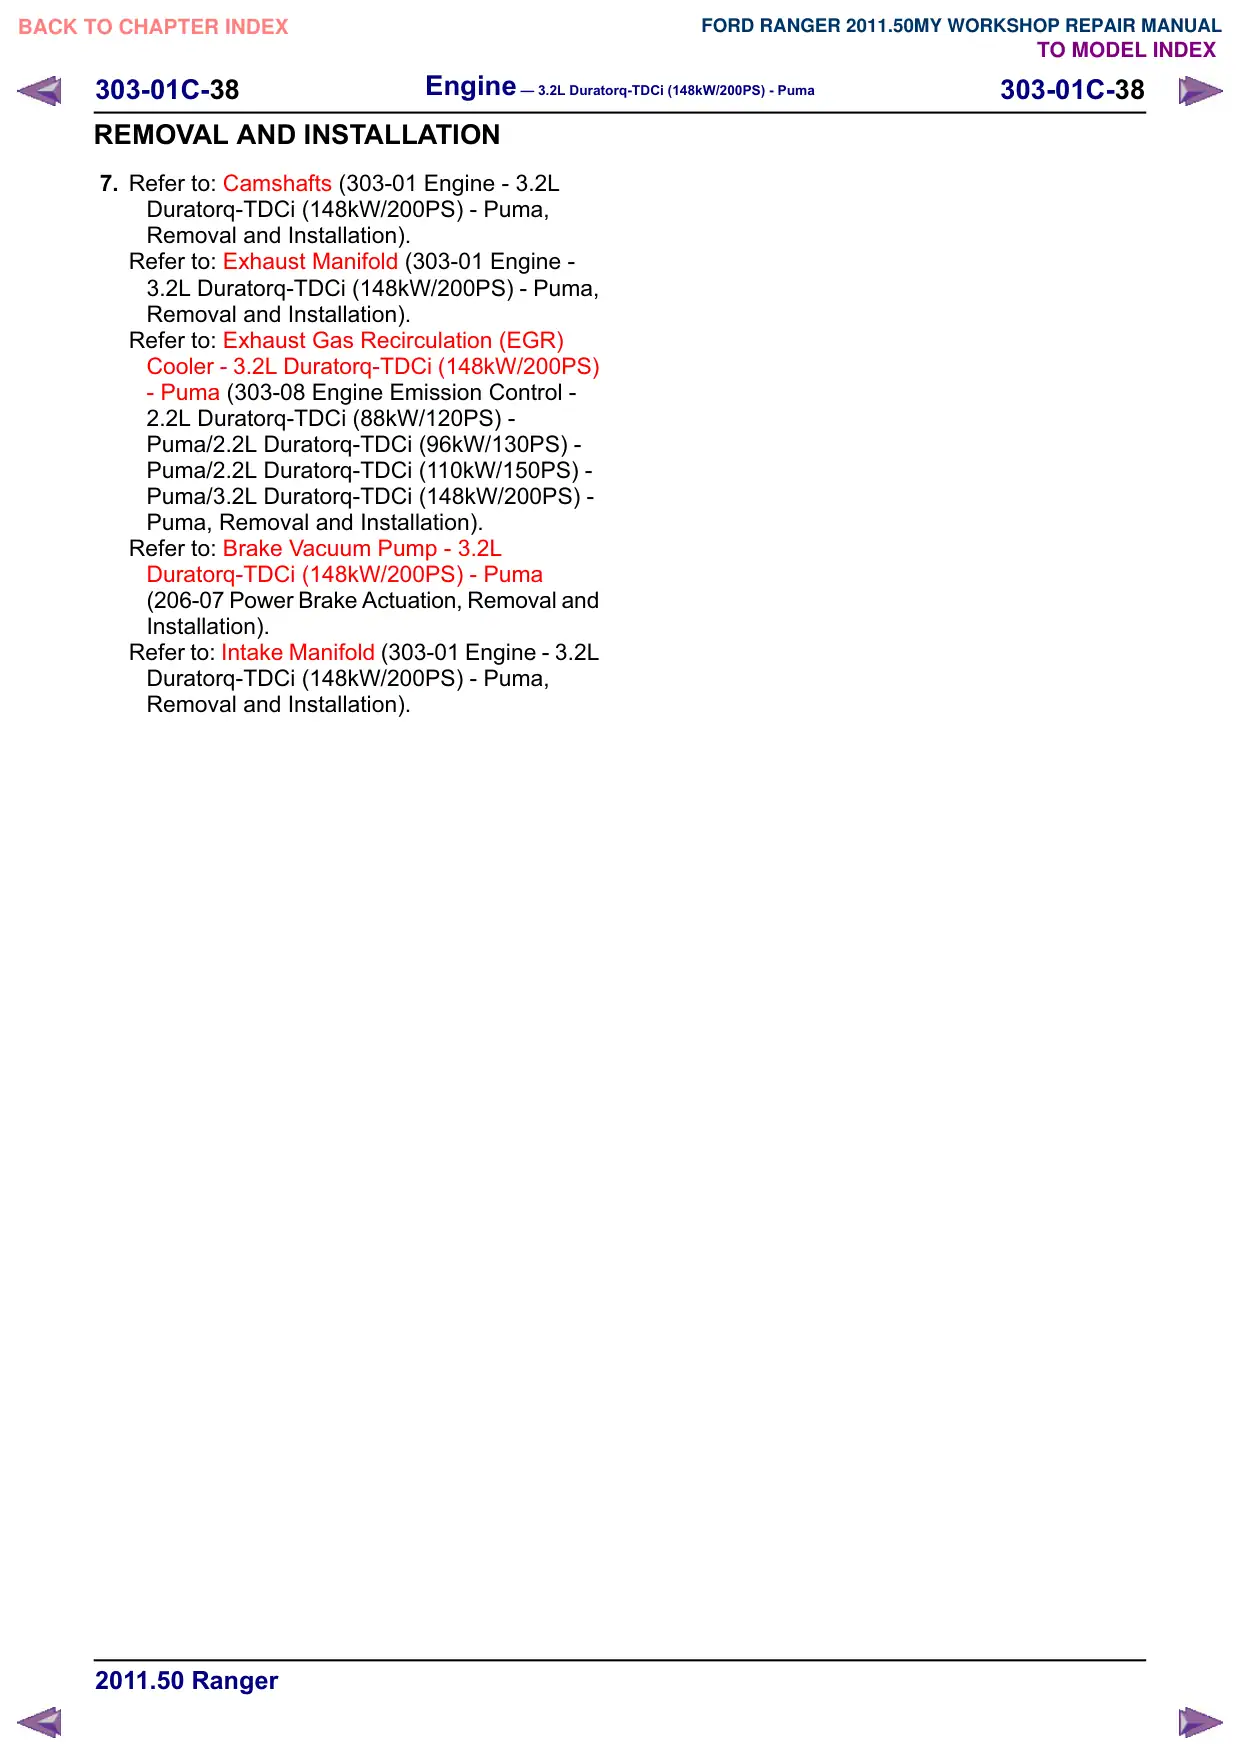
NOTE: Make sure that a new component is
installed.
E131635
5.
E131636
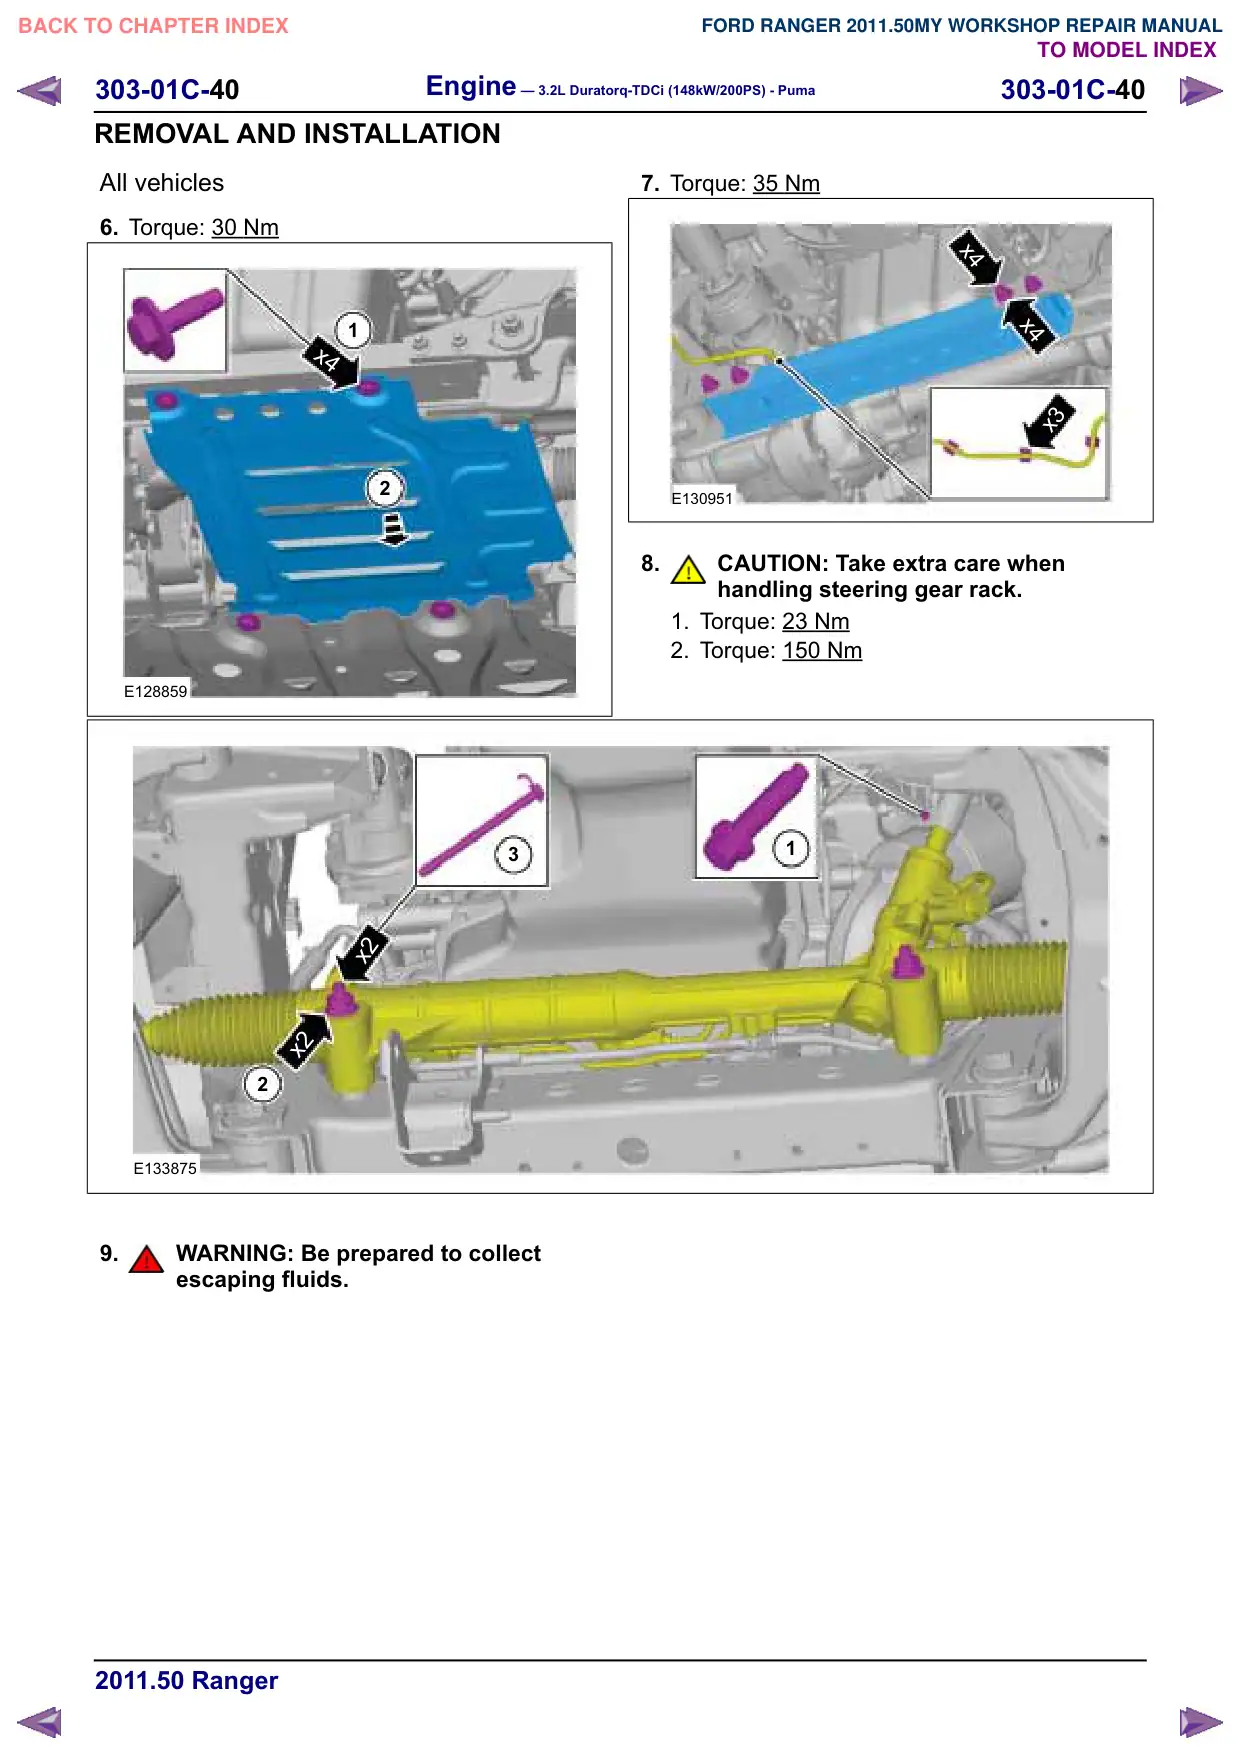
6.
CAUTION: Make sure that new cylinder
head bolts are installed.
Torque:
Bolts 1 to 12: 10
Nm
Bolts 13 to 22: 5
Nm
Bolts 1 to 12: 20
Nm
Bolts 13 to 22: 10
Nm
Bolts 1 to 12: 50
Nm
Bolts 1 to 12: 180°
Bolts 13 to 22: 25
Nm
Bolts 13 to 22: 180°
21
6
18
2
14
4
10
16
7
20
11
22
12
5
17
1
13
3
15
8
19
E131637
Engine – 3.2L Duratorq-TDCi (148kW/200PS) - Puma
303-01C-39
303-01C-39
REMOVAL AND INSTALLATION
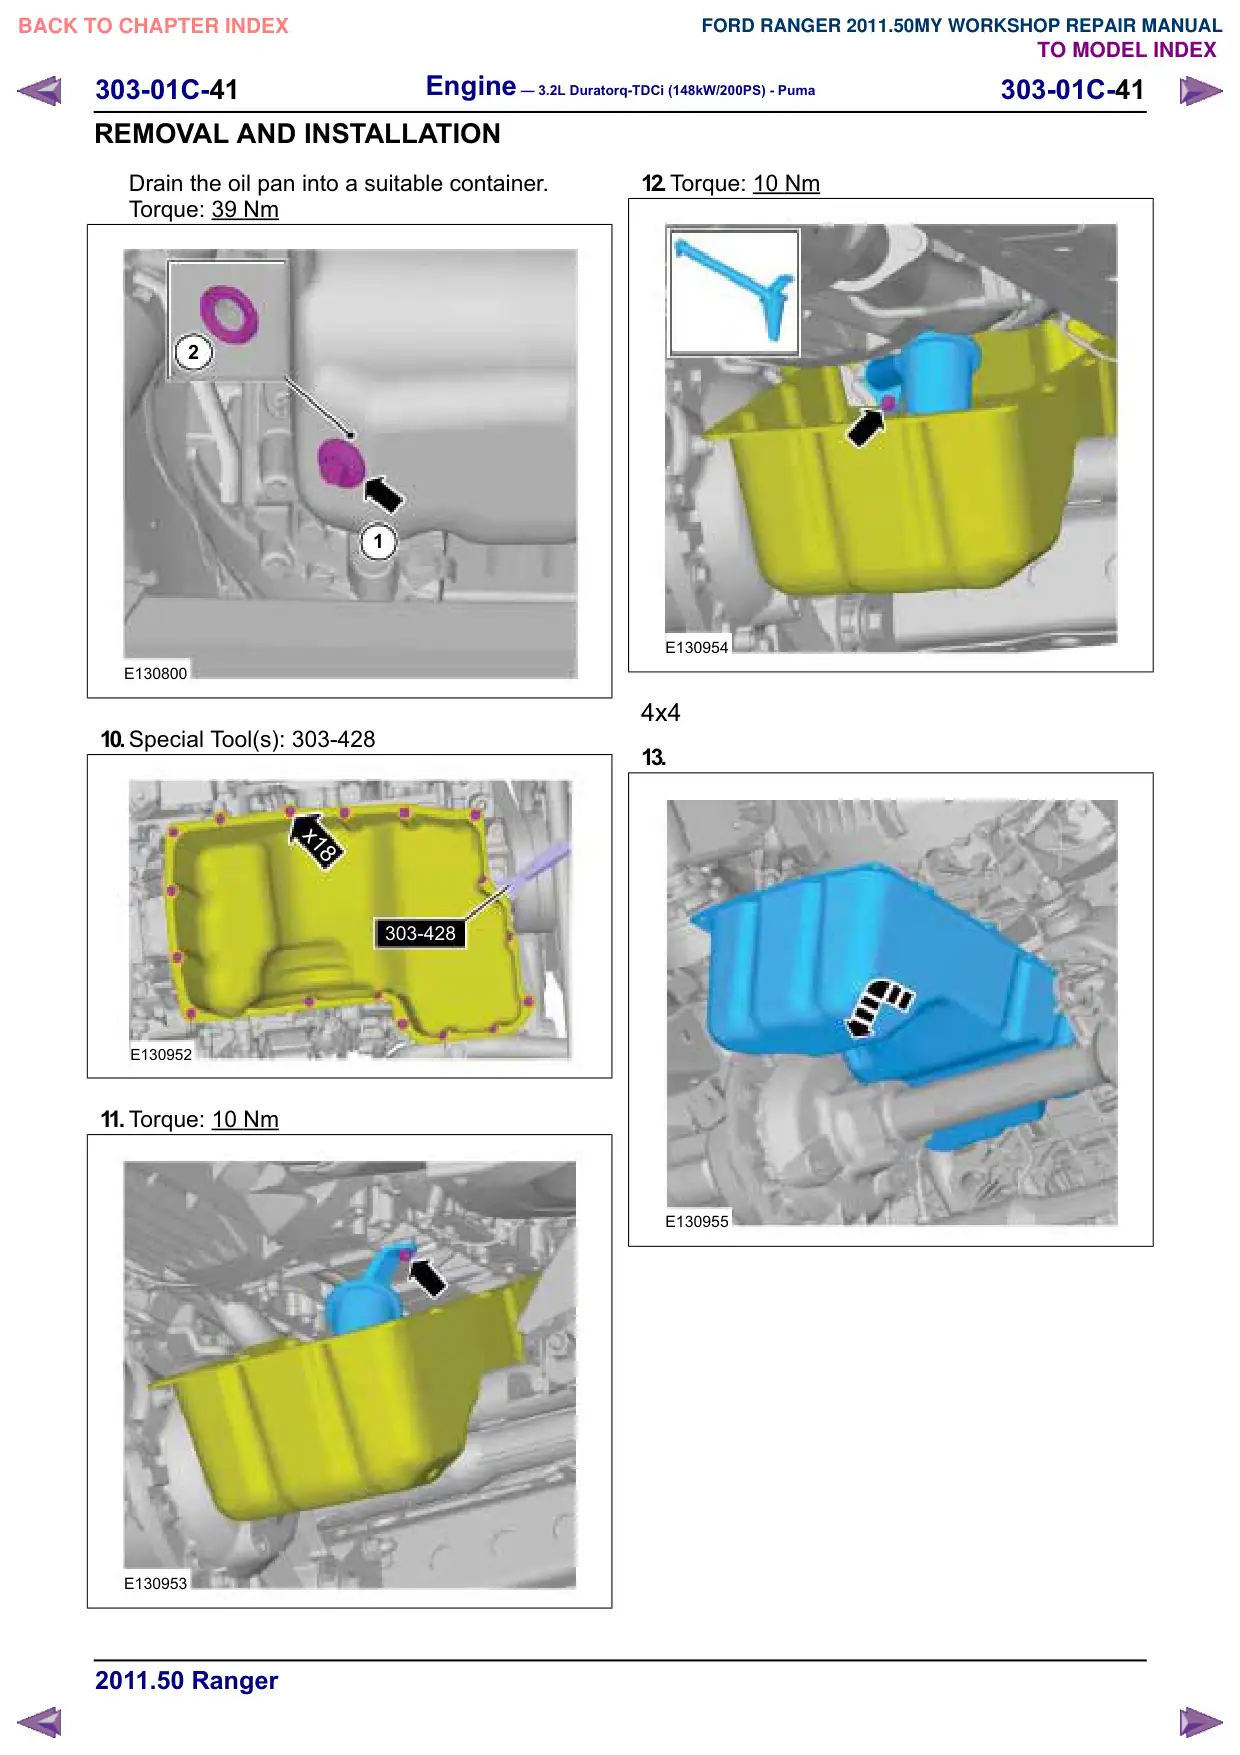
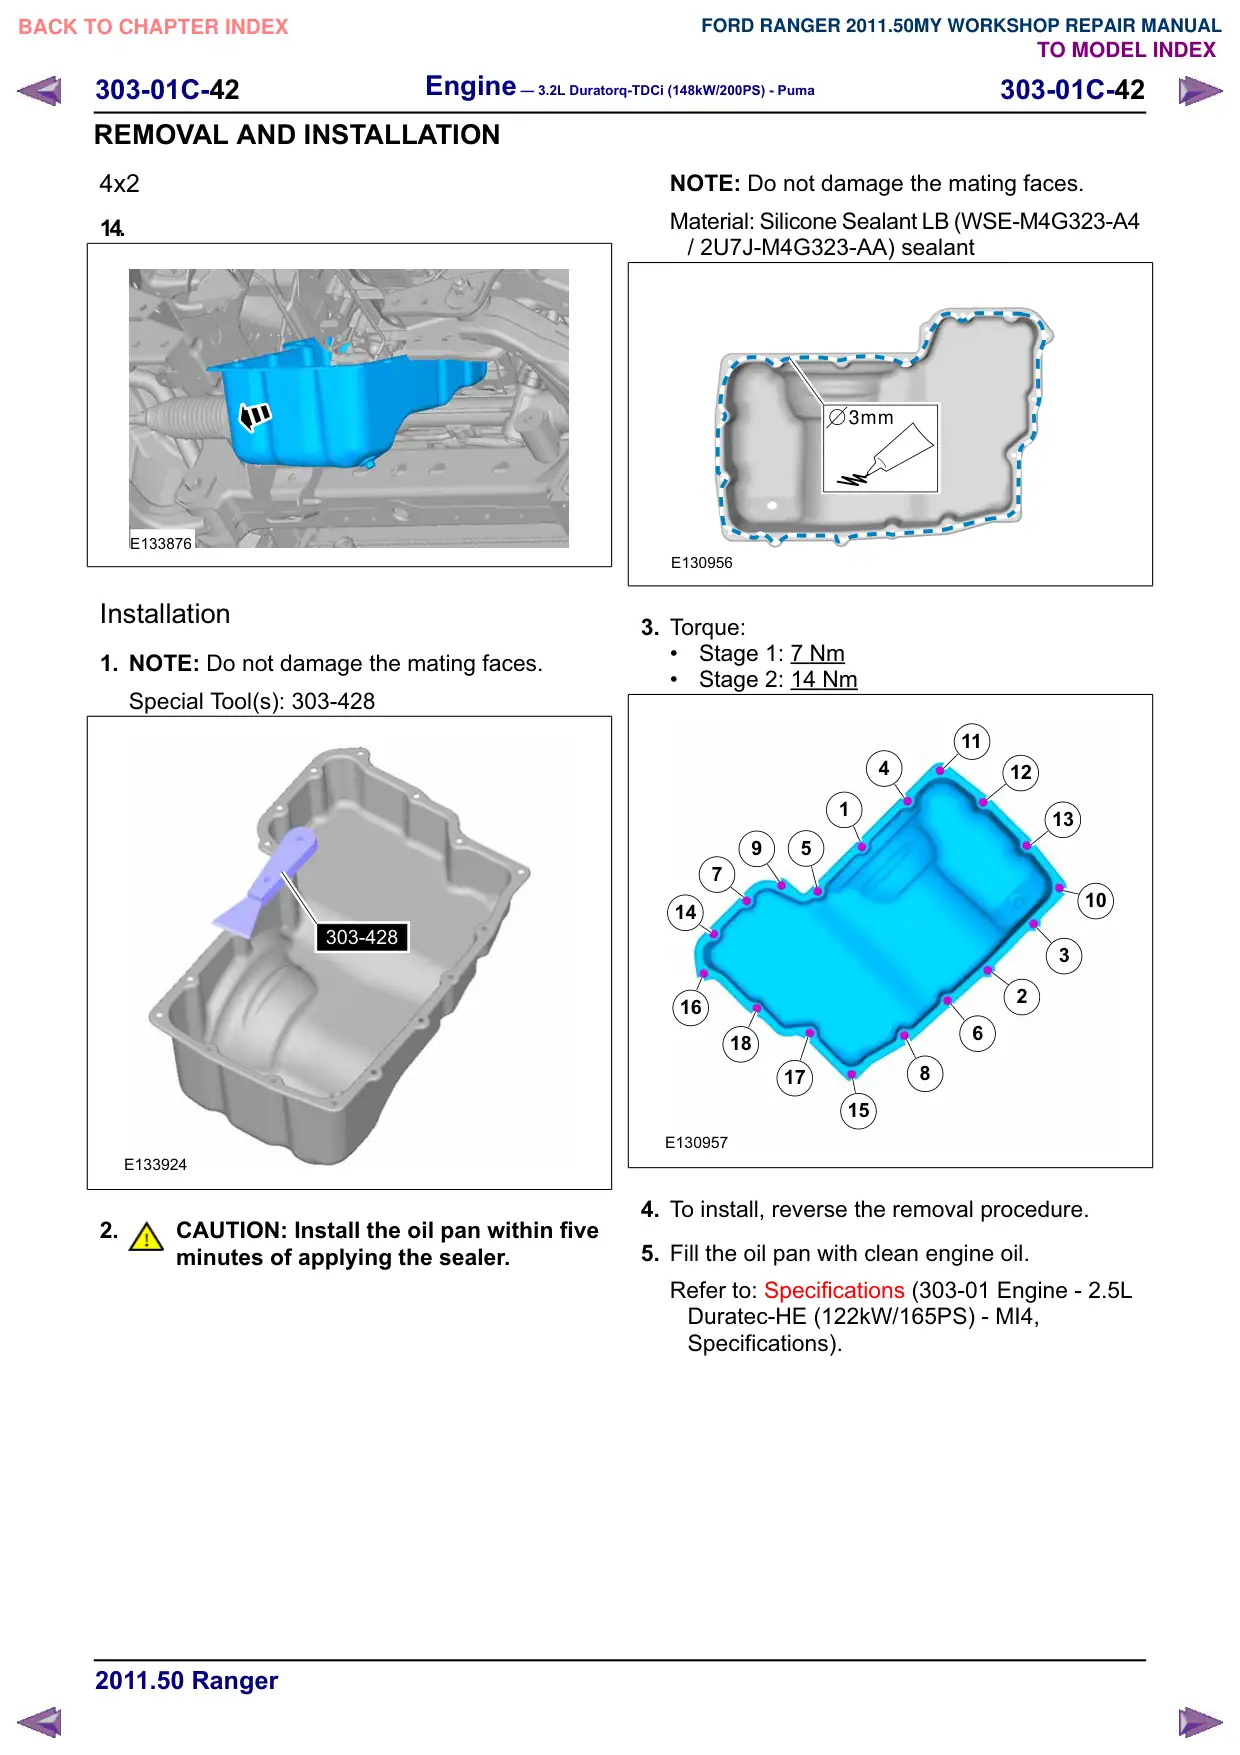
Oil Pan(21 154 0)
Special Tool(s)
303-428
Separator, Oil Pan
21179
Materials
Name
Specification
Silicone Sealant LB
WSE-M4G323-A4 /
2U7J-M4G323-AA
Removal
NOTE: Removal steps in this procedure may
contain installation details.
x4
1
E133766
1. Refer to: Engine Cooling System Health and
Safety Precautions (100-00 General
Information, Description and Operation).
2. Refer to: Battery Disconnect and Connect
(414-01 Battery, Mounting and Cables,
General Procedures).
3. Refer to: Lifting (100-02 Jacking and Lifting,
Description and Operation).
4x4
4. Torque: 30 Nm
x4
E130132
5. Torque: 30 Nm
2
Engine – 3.2L Duratorq-TDCi (148kW/200PS) - Puma
303-01C-43
303-01C-43
REMOVAL AND INSTALLATION
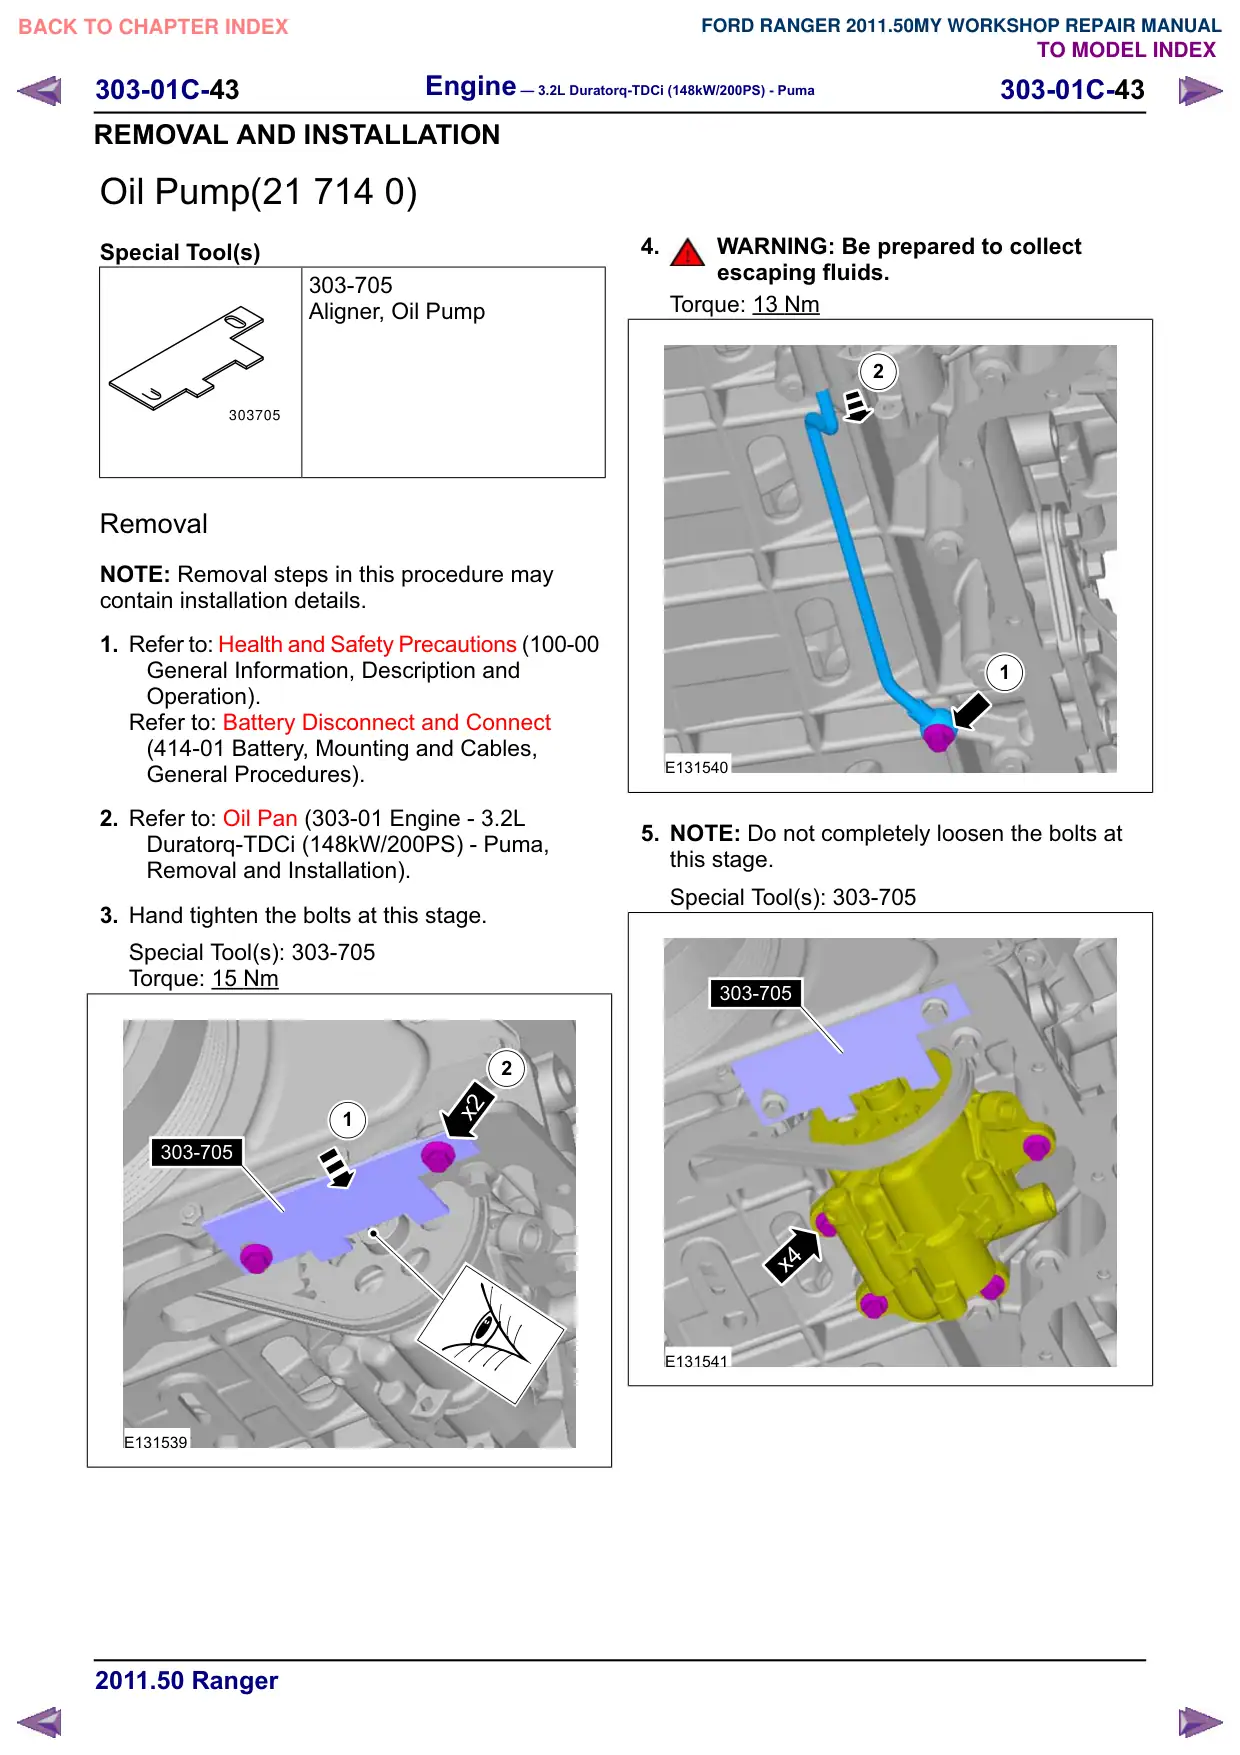
Oil Pump(21 714 0)
Special Tool(s)
303-705
Aligner, Oil Pump
303705
Removal
NOTE: Removal steps in this procedure may
contain installation details.
1. Refer to: Health and Safety Precautions (100-00
General Information, Description and
Operation).
Refer to: Battery Disconnect and Connect
(414-01 Battery, Mounting and Cables,
General Procedures).
2. Refer to: Oil Pan (303-01 Engine - 3.2L
Duratorq-TDCi (148kW/200PS) - Puma,
Removal and Installation).
3. Hand tighten the bolts at this stage.
Special Tool(s): 303-705
Torque: 15 Nm
2
x2
1
303-705
E131539
4.
WARNING: Be prepared to collect
escaping fluids.
Torque: 13 Nm
2
1
E131540
5. NOTE: Do not completely loosen the bolts at
this stage.
Special Tool(s): 303-705
303-705
x4
E131541
303-01C-44
Engine – 3.2L Duratorq-TDCi (148kW/200PS) - Puma
303-01C-44
REMOVAL AND INSTALLATION
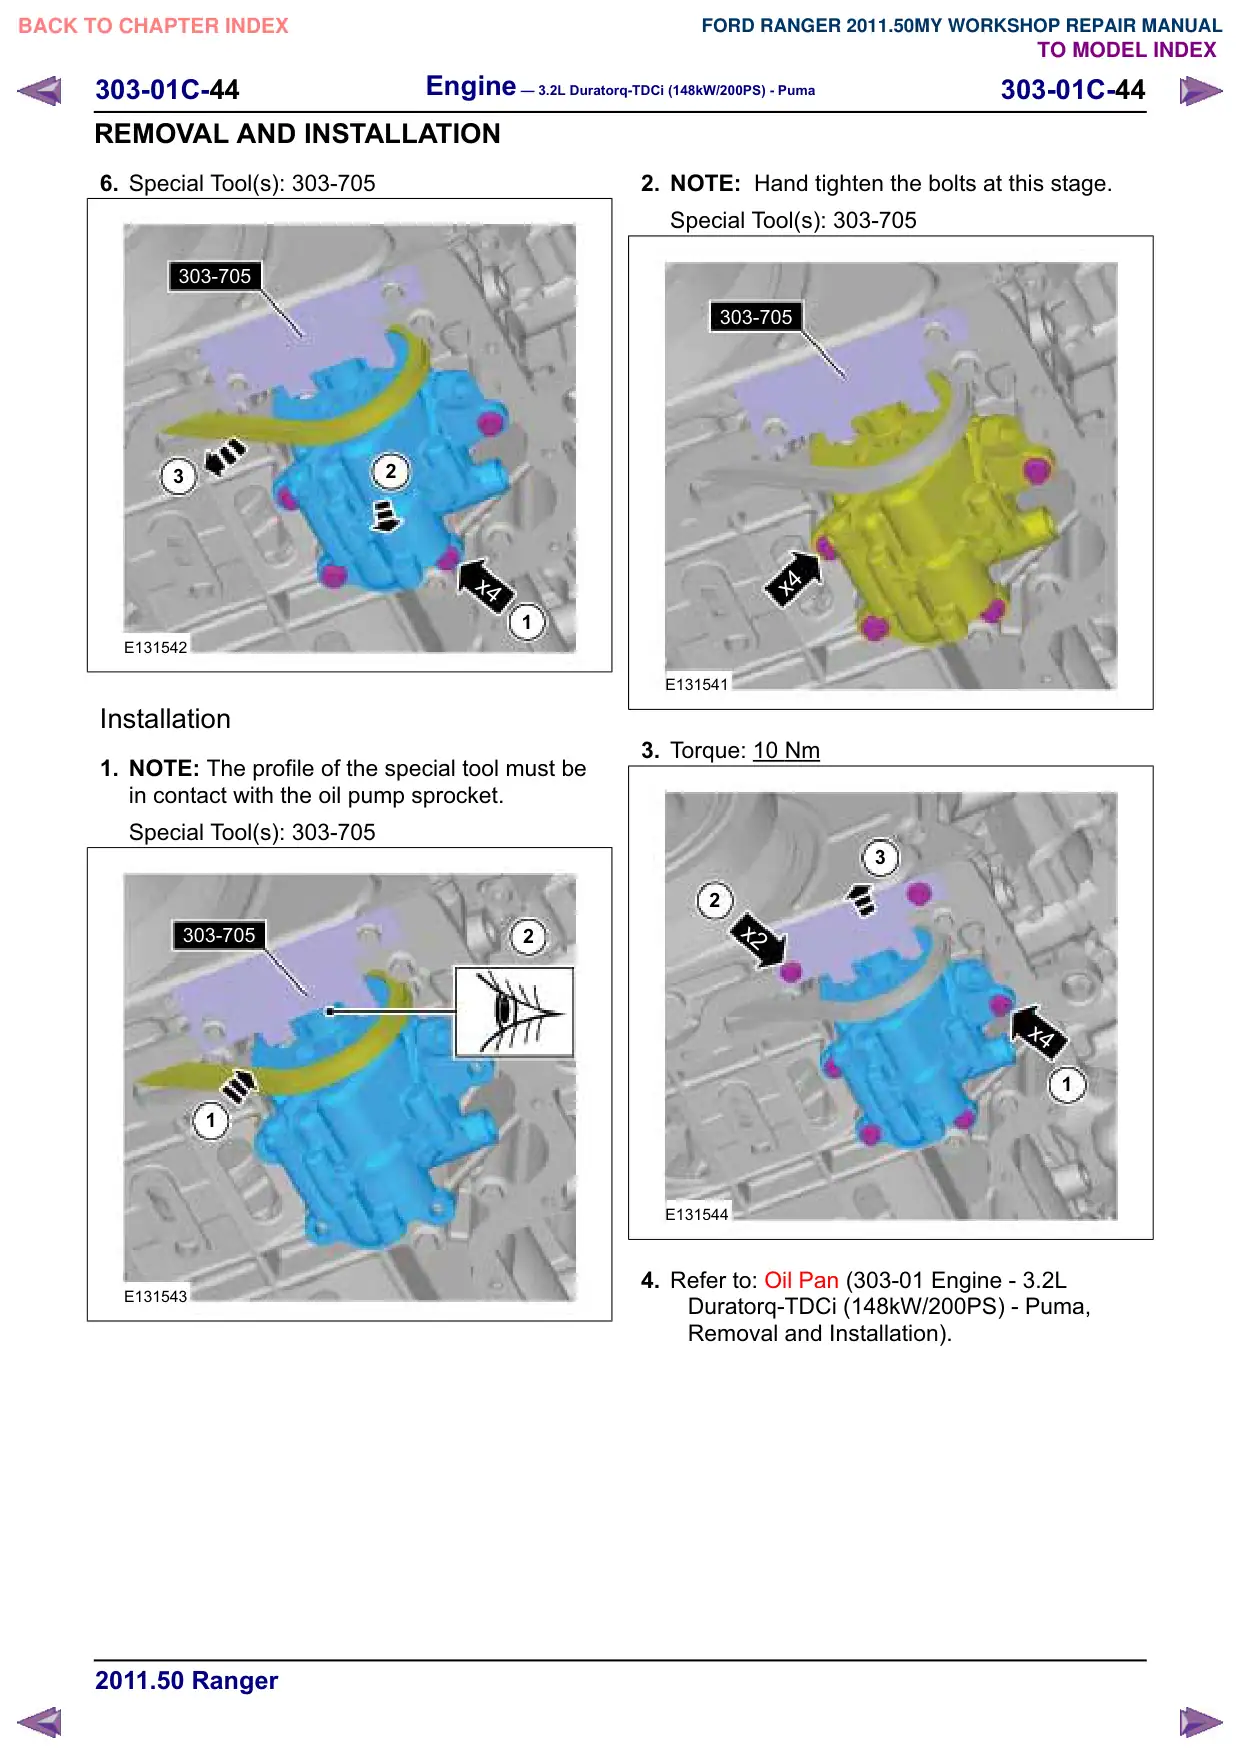
6. Special Tool(s): 303-705
303-705
2
3
x4
1
E131542
Installation
1. NOTE: The profile of the special tool must be
in contact with the oil pump sprocket.
Special Tool(s): 303-705
303-705
2
1
E131543
2. NOTE: Hand tighten the bolts at this stage.
Special Tool(s): 303-705
303-705
x4
E131541
3. Torque: 10 Nm
3
2
x2
x4
1
E131544
4. Refer to: Oil Pan (303-01 Engine - 3.2L
Duratorq-TDCi (148kW/200PS) - Puma,
Removal and Installation).
Engine – 3.2L Duratorq-TDCi (148kW/200PS) - Puma
303-01C-45
303-01C-45
REMOVAL AND INSTALLATION
Engine Front Seal
Special Tool(s)
303-1310
Holding Wrench, Crankshaft
E87614
Removal
NOTE: Removal steps in this procedure may
contain installation details.
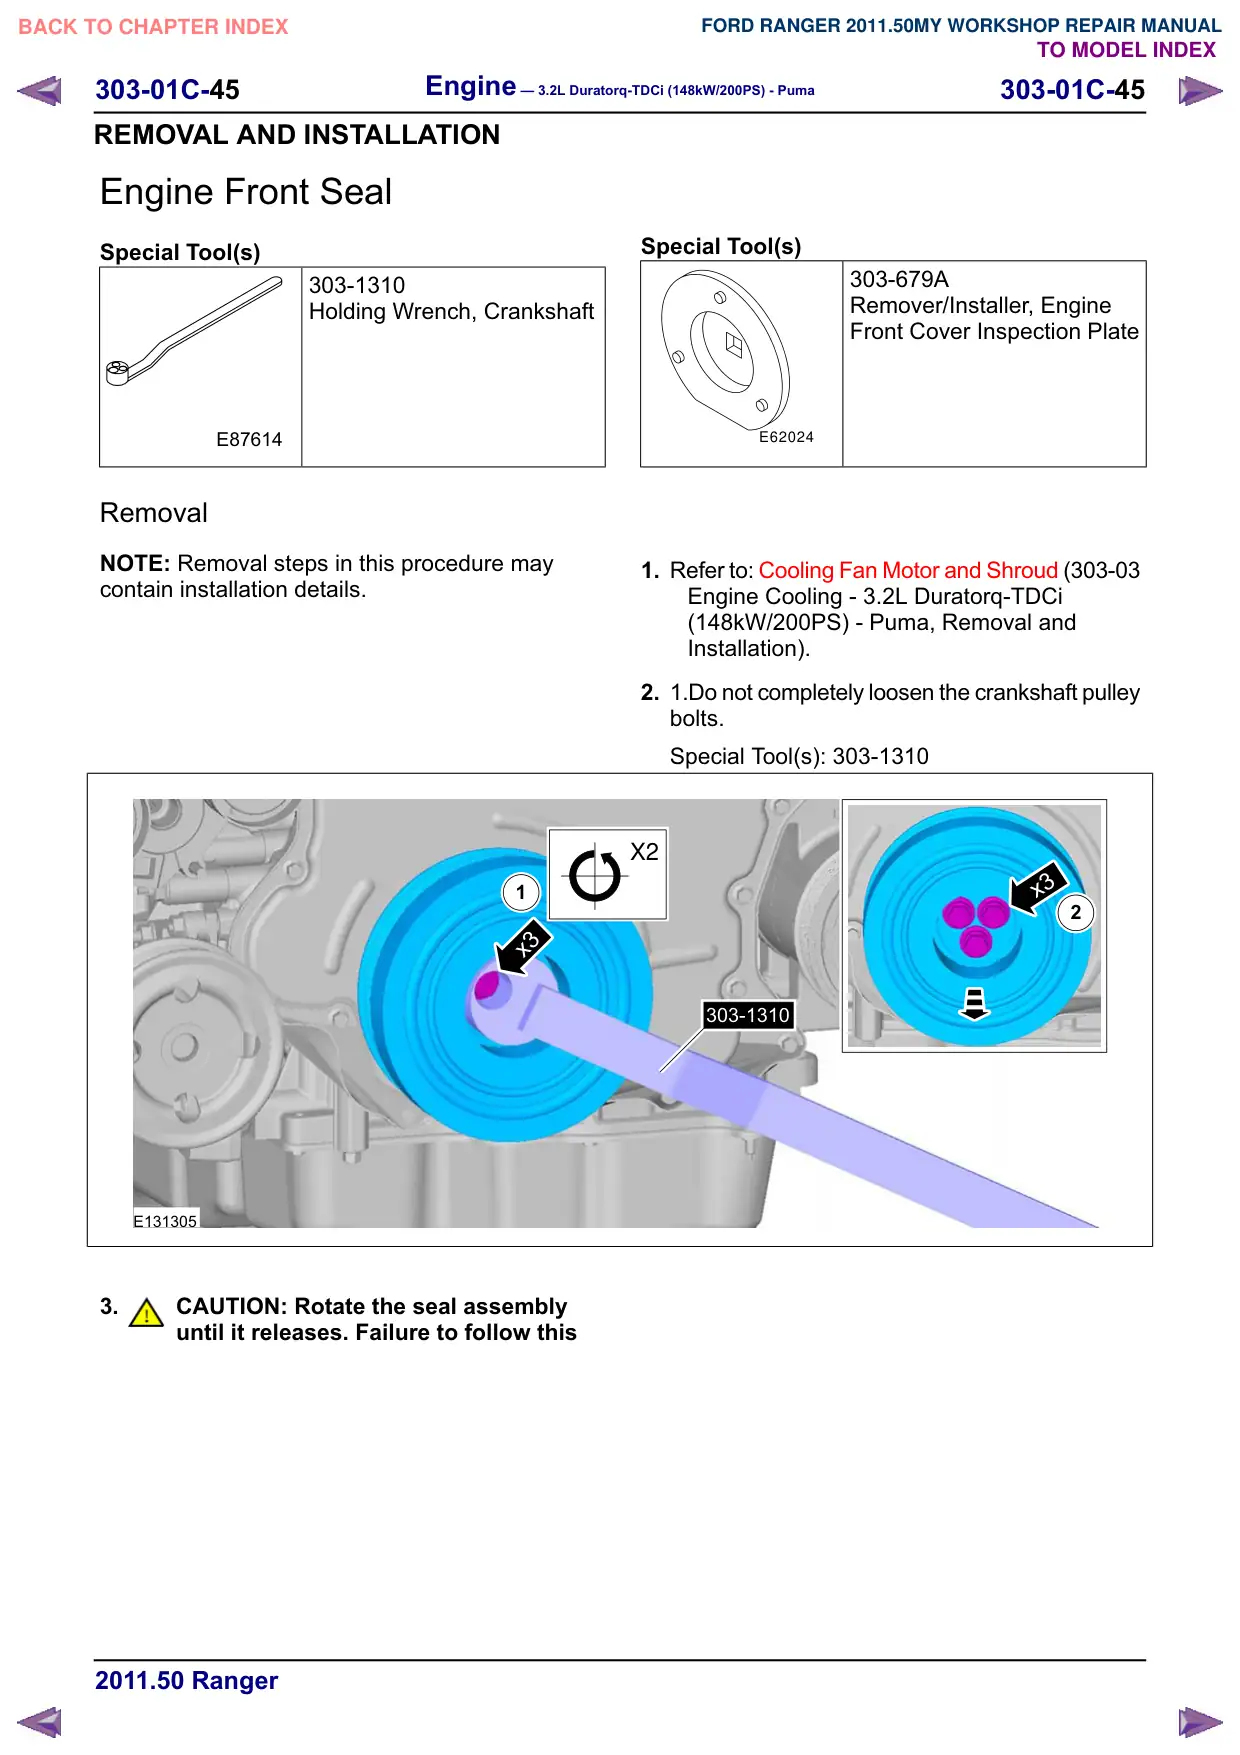
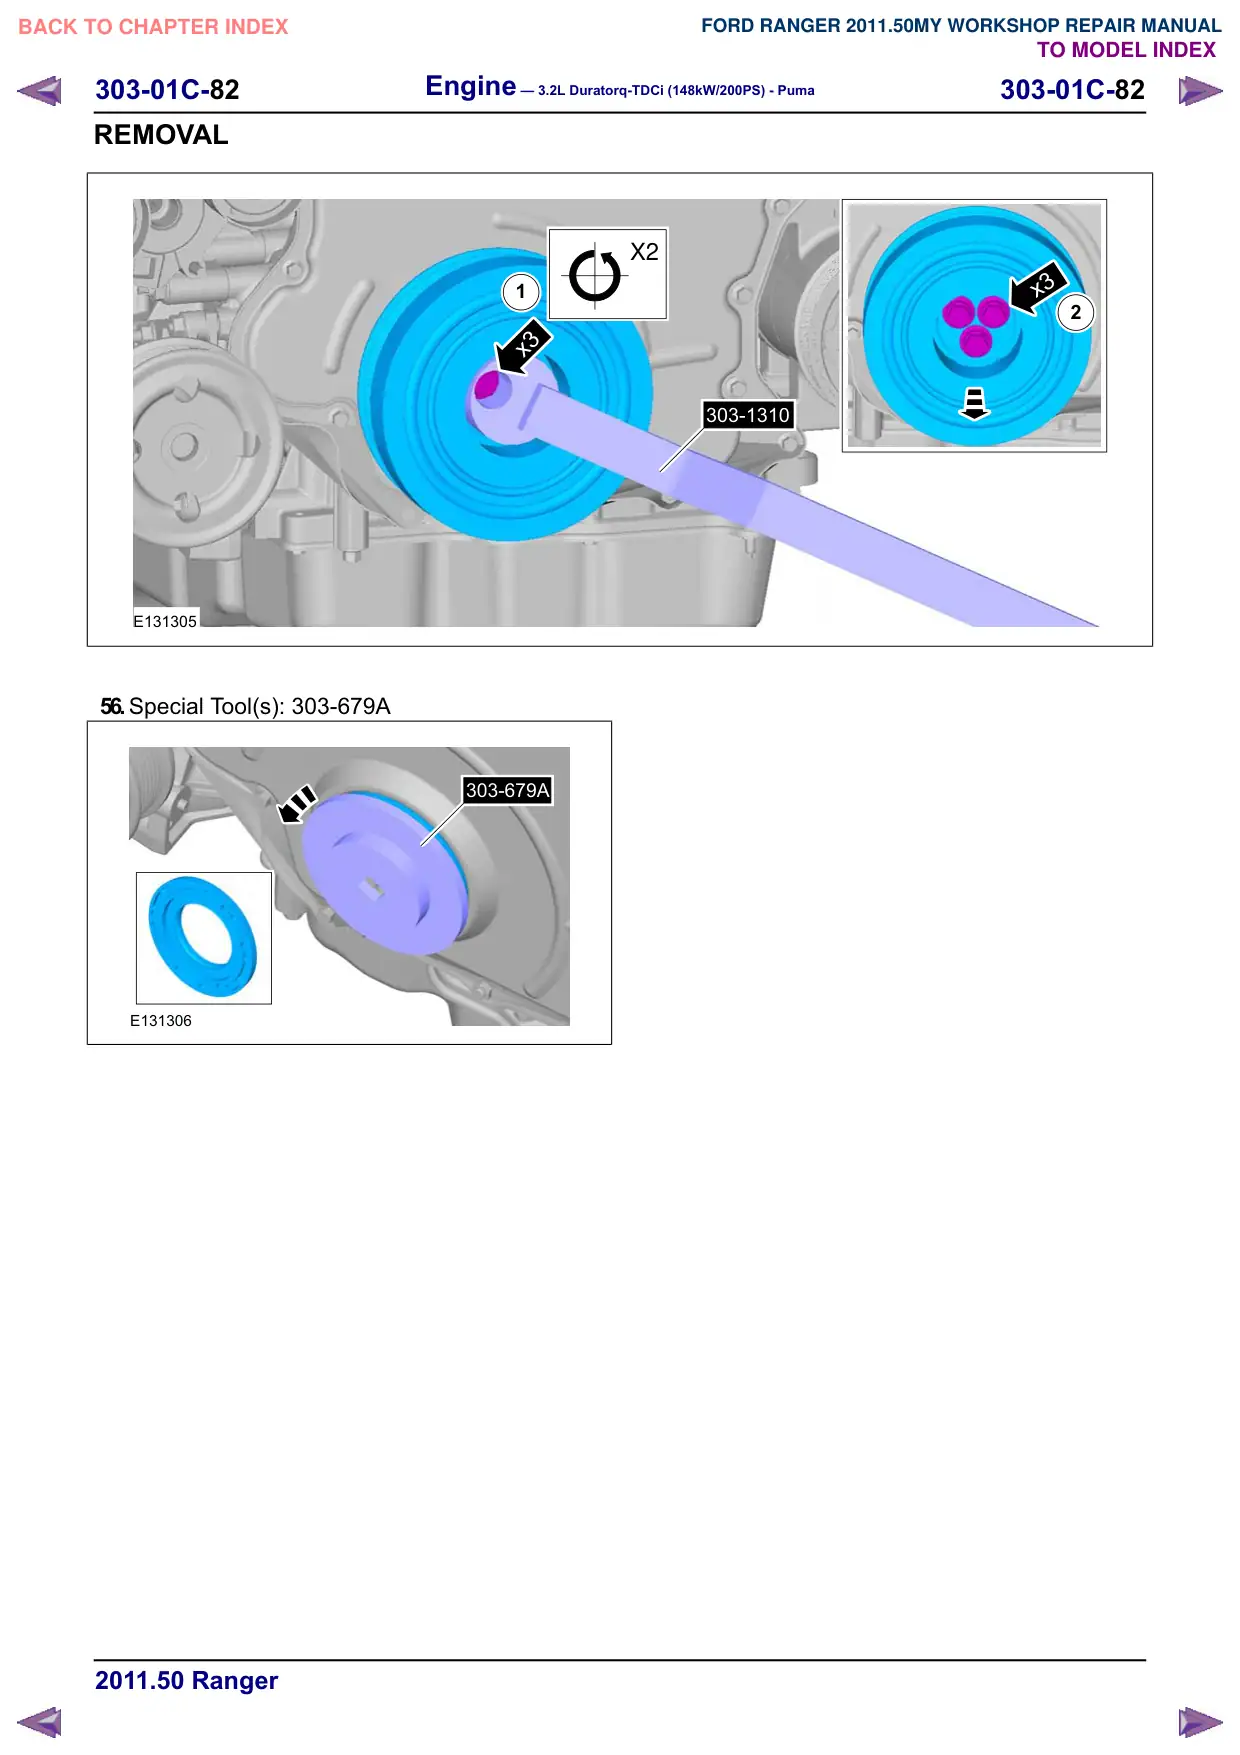
1
x3
E131305
3.
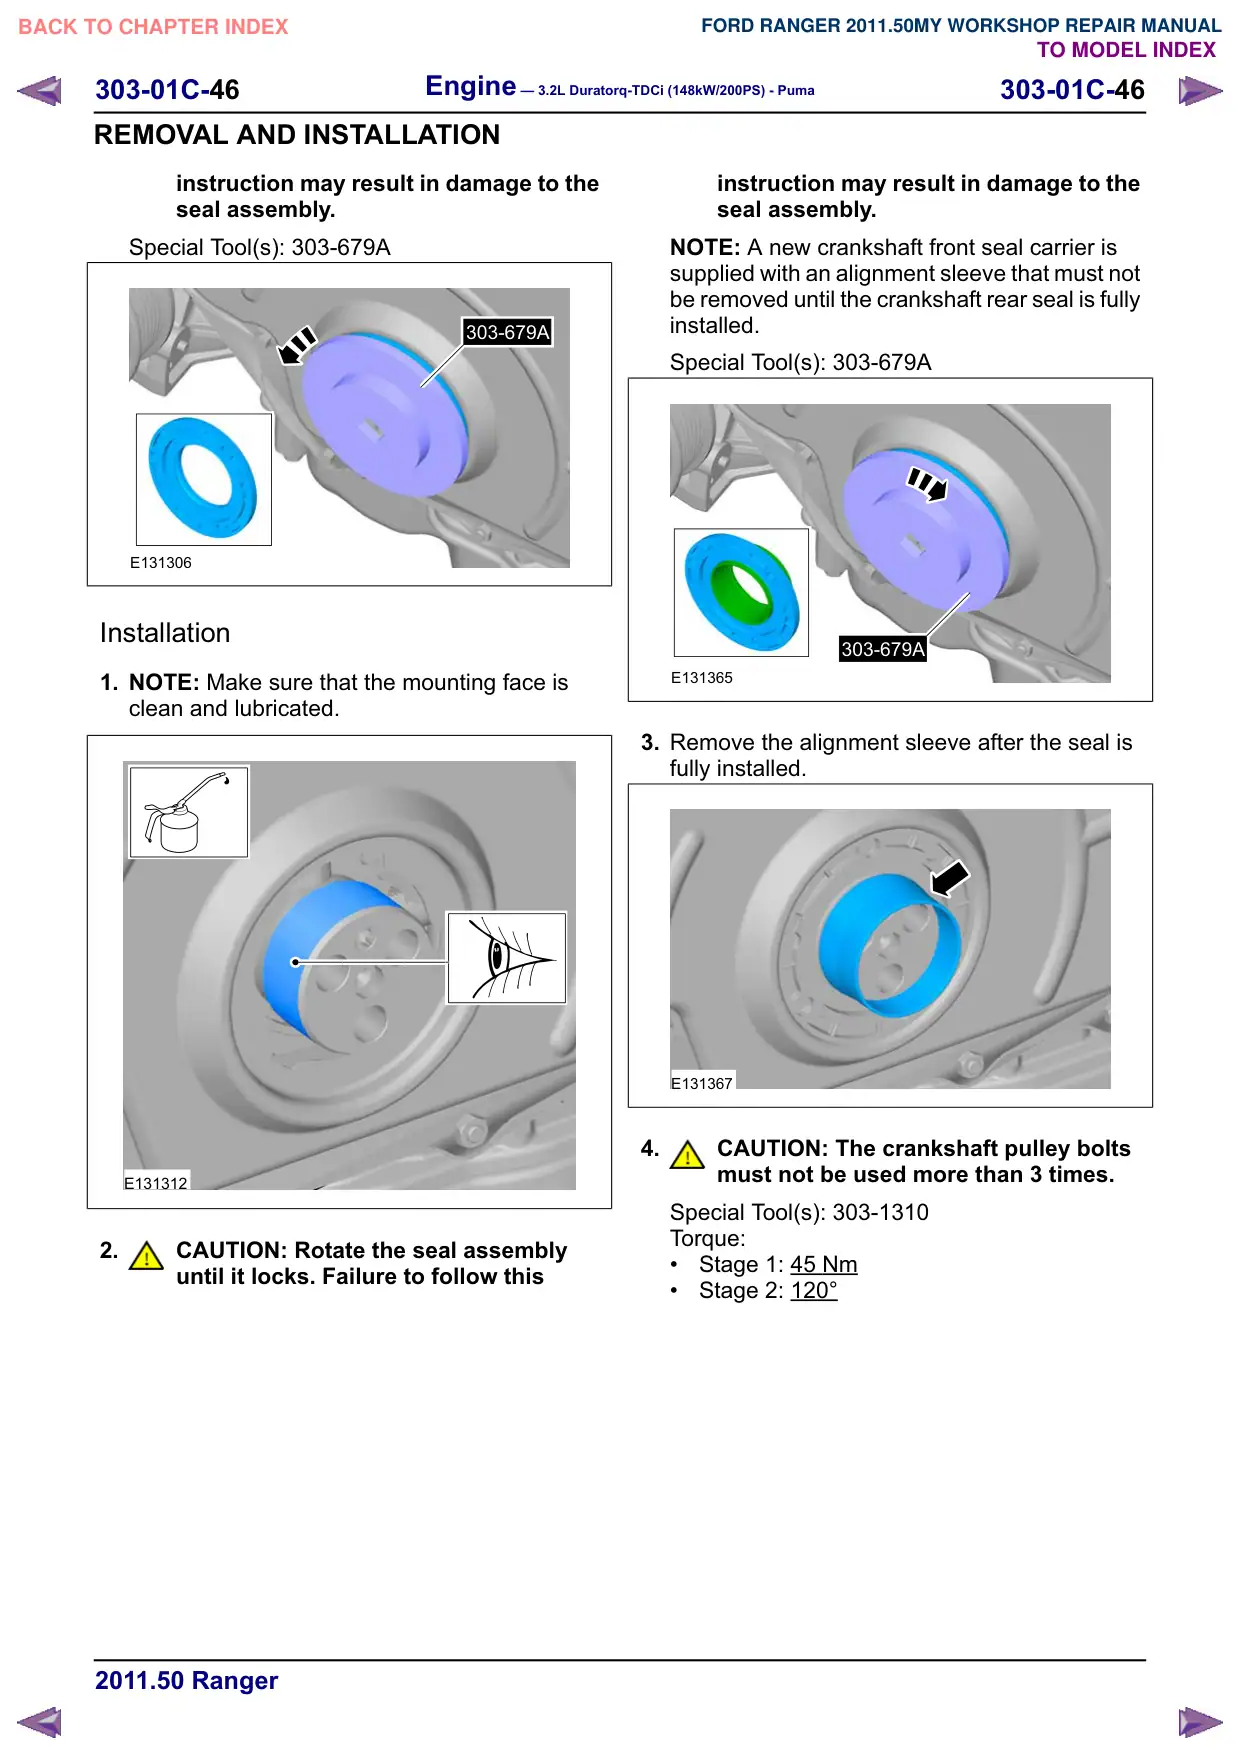
CAUTION: Rotate the seal assembly
until it releases. Failure to follow this
Special Tool(s)
303-679A
Remover/Installer, Engine
Front Cover Inspection Plate
E62024
1. Refer to: Cooling Fan Motor and Shroud (303-03
Engine Cooling - 3.2L Duratorq-TDCi
(148kW/200PS) - Puma, Removal and
Installation).
2. 1.Do not completely loosen the crankshaft pulley
bolts.
Special Tool(s): 303-1310
X2
x3
2
303-1310
Engine – 3.2L Duratorq-TDCi (148kW/200PS) - Puma
303-01C-46
303-01C-46
REMOVAL AND INSTALLATION
instruction may result in damage to the
seal assembly.
Special Tool(s): 303-679A
303-679A
E131306
Installation
1. NOTE: Make sure that the mounting face is
clean and lubricated.
E131312
2.
CAUTION: Rotate the seal assembly
until it locks. Failure to follow this
instruction may result in damage to the
seal assembly.
NOTE: A new crankshaft front seal carrier is
supplied with an alignment sleeve that must not
be removed until the crankshaft rear seal is fully
installed.
Special Tool(s): 303-679A
303-679A
E131365
3. Remove the alignment sleeve after the seal is
fully installed.
E131367
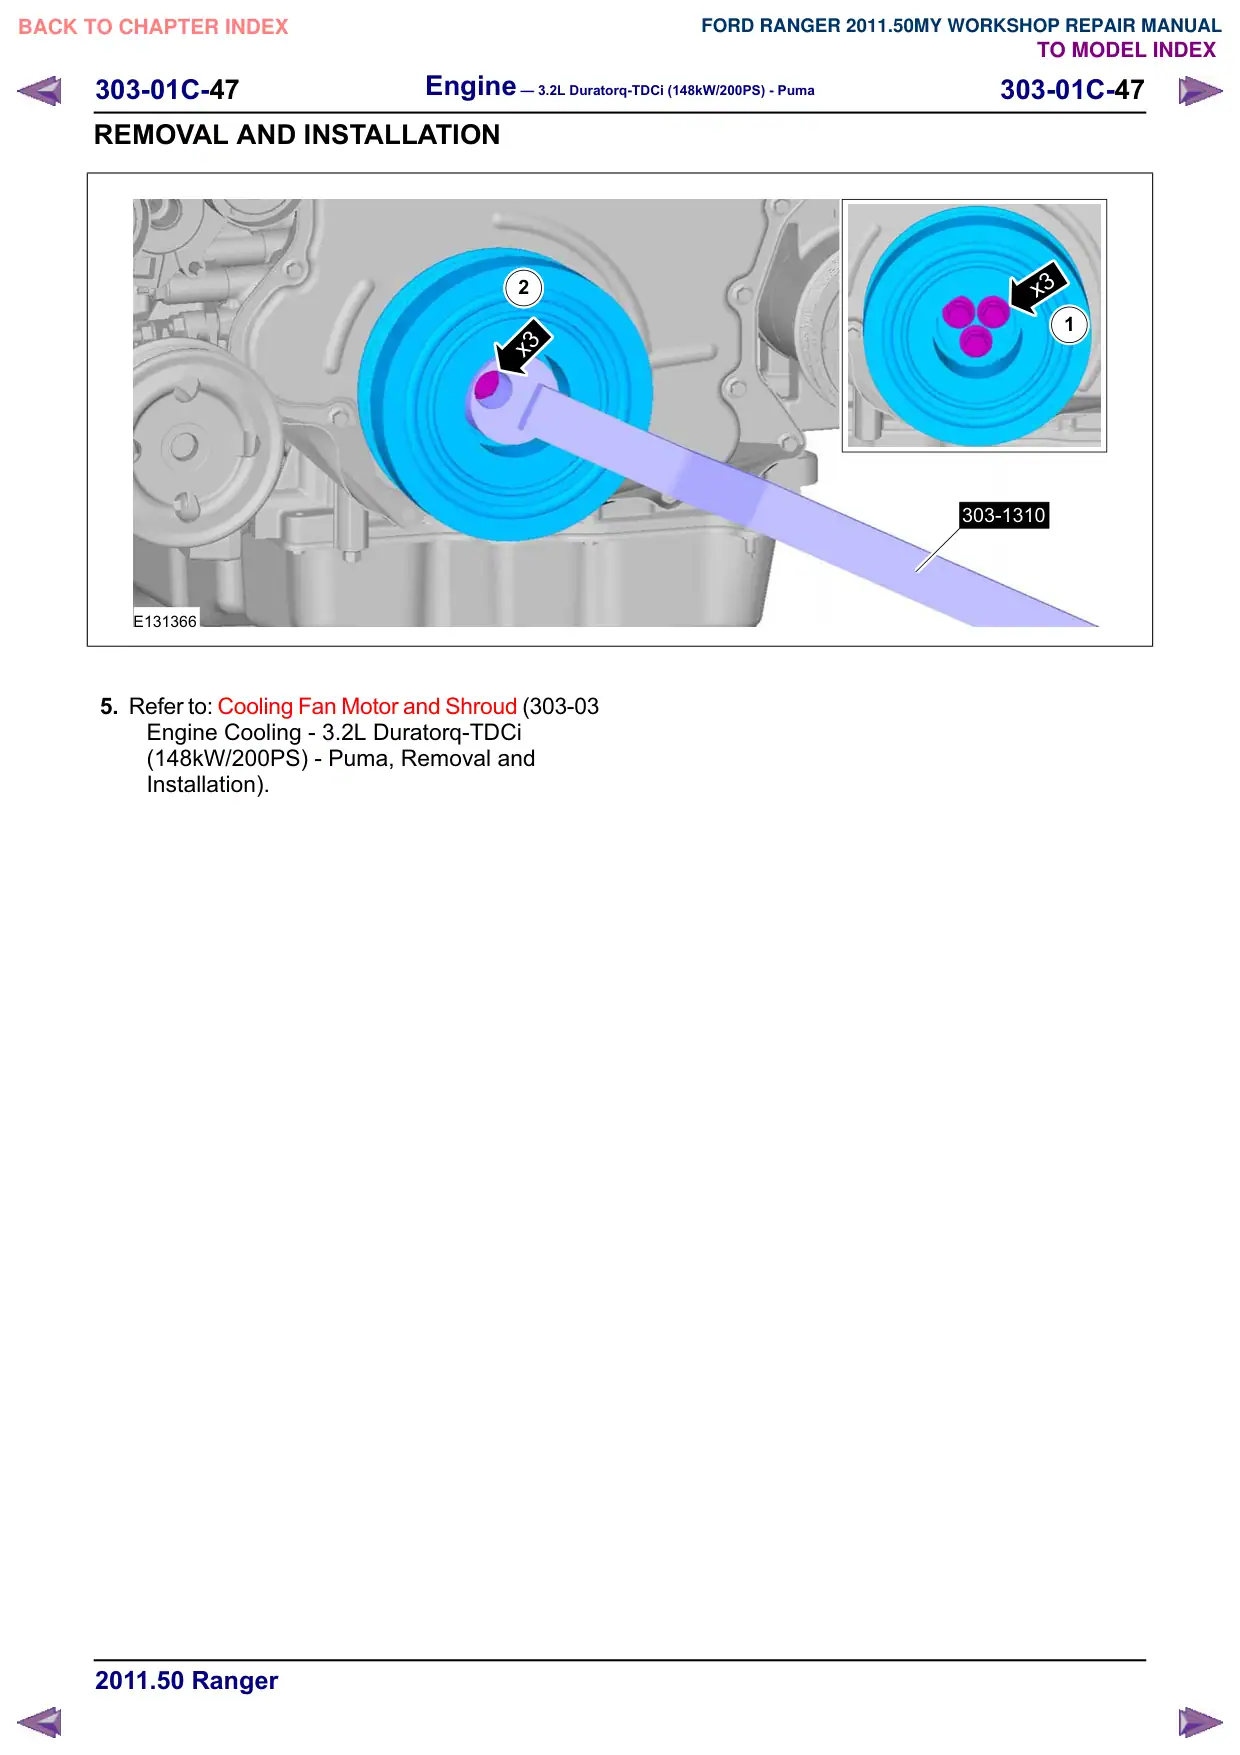
4.
CAUTION: The crankshaft pulley bolts
must not be used more than 3 times.
Special Tool(s): 303-1310
Torque:
Stage 1: 45 Nm
Stage 2: 120°
Engine – 3.2L Duratorq-TDCi (148kW/200PS) - Puma
303-01C-49
303-01C-49
REMOVAL AND INSTALLATION
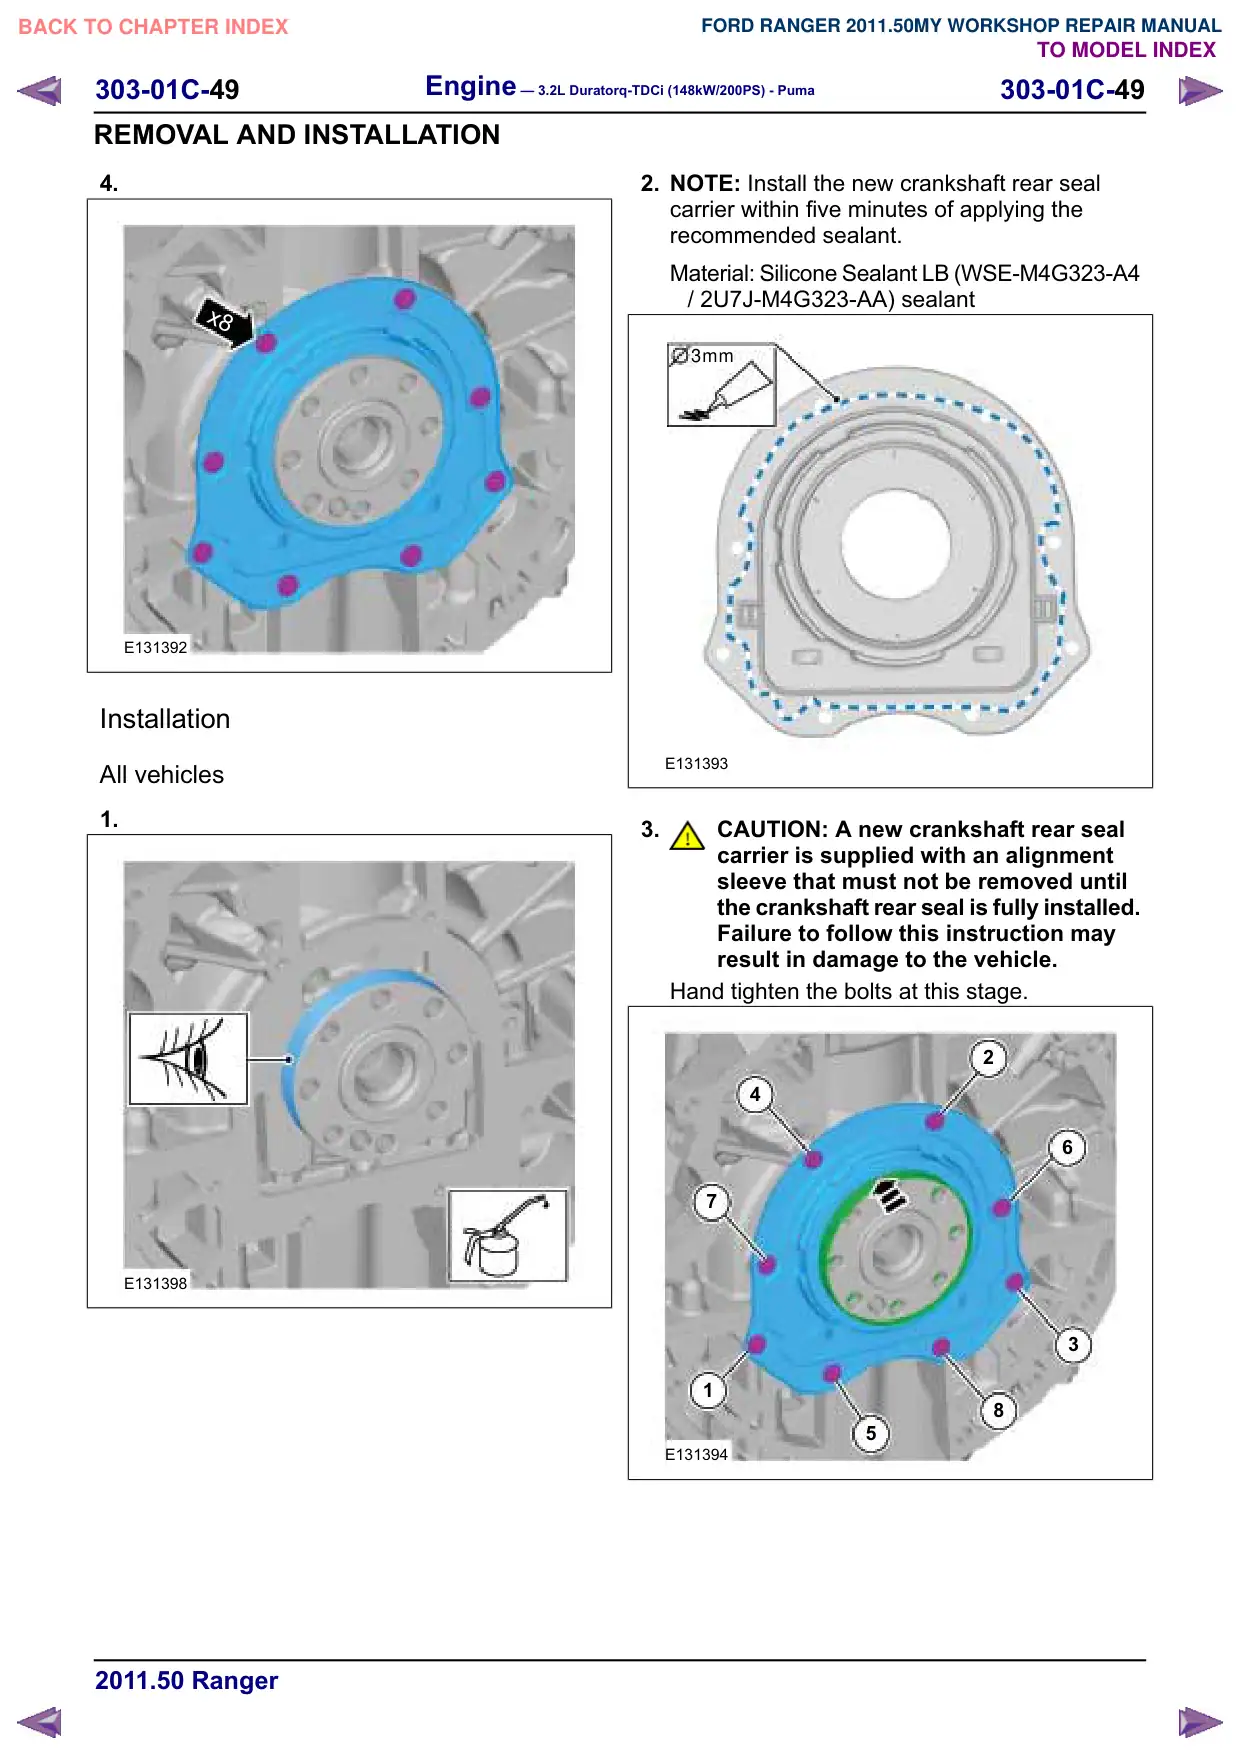
4.
x8
E131392
Installation
All vehicles
1.
E131398
2. NOTE: Install the new crankshaft rear seal
carrier within five minutes of applying the
recommended sealant.
Material: Silicone Sealant LB (WSE-M4G323-A4
/ 2U7J-M4G323-AA) sealant
3mm
E131393
3.
CAUTION: A new crankshaft rear seal
carrier is supplied with an alignment
sleeve that must not be removed until
the crankshaft rear seal is fully installed.
Failure to follow this instruction may
result in damage to the vehicle.
Hand tighten the bolts at this stage.
2
4
6
7
3
1
8
5
E131394
Engine – 3.2L Duratorq-TDCi (148kW/200PS) - Puma
303-01C-56
303-01C-56
REMOVAL
33.Refer to: Air Cleaner - 3.2L Duratorq-TDCi
(148kW/200PS) - Puma (303-12 Intake Air
Distribution and Filtering - 2.2L Duratorq-TDCi
(88kW/120PS) - Puma/2.2L Duratorq-TDCi
(96kW/130PS) - Puma/2.2L Duratorq-TDCi
(110kW/150PS) - Puma/3.2L Duratorq-TDCi
(148kW/200PS) - Puma, Removal and
Installation).
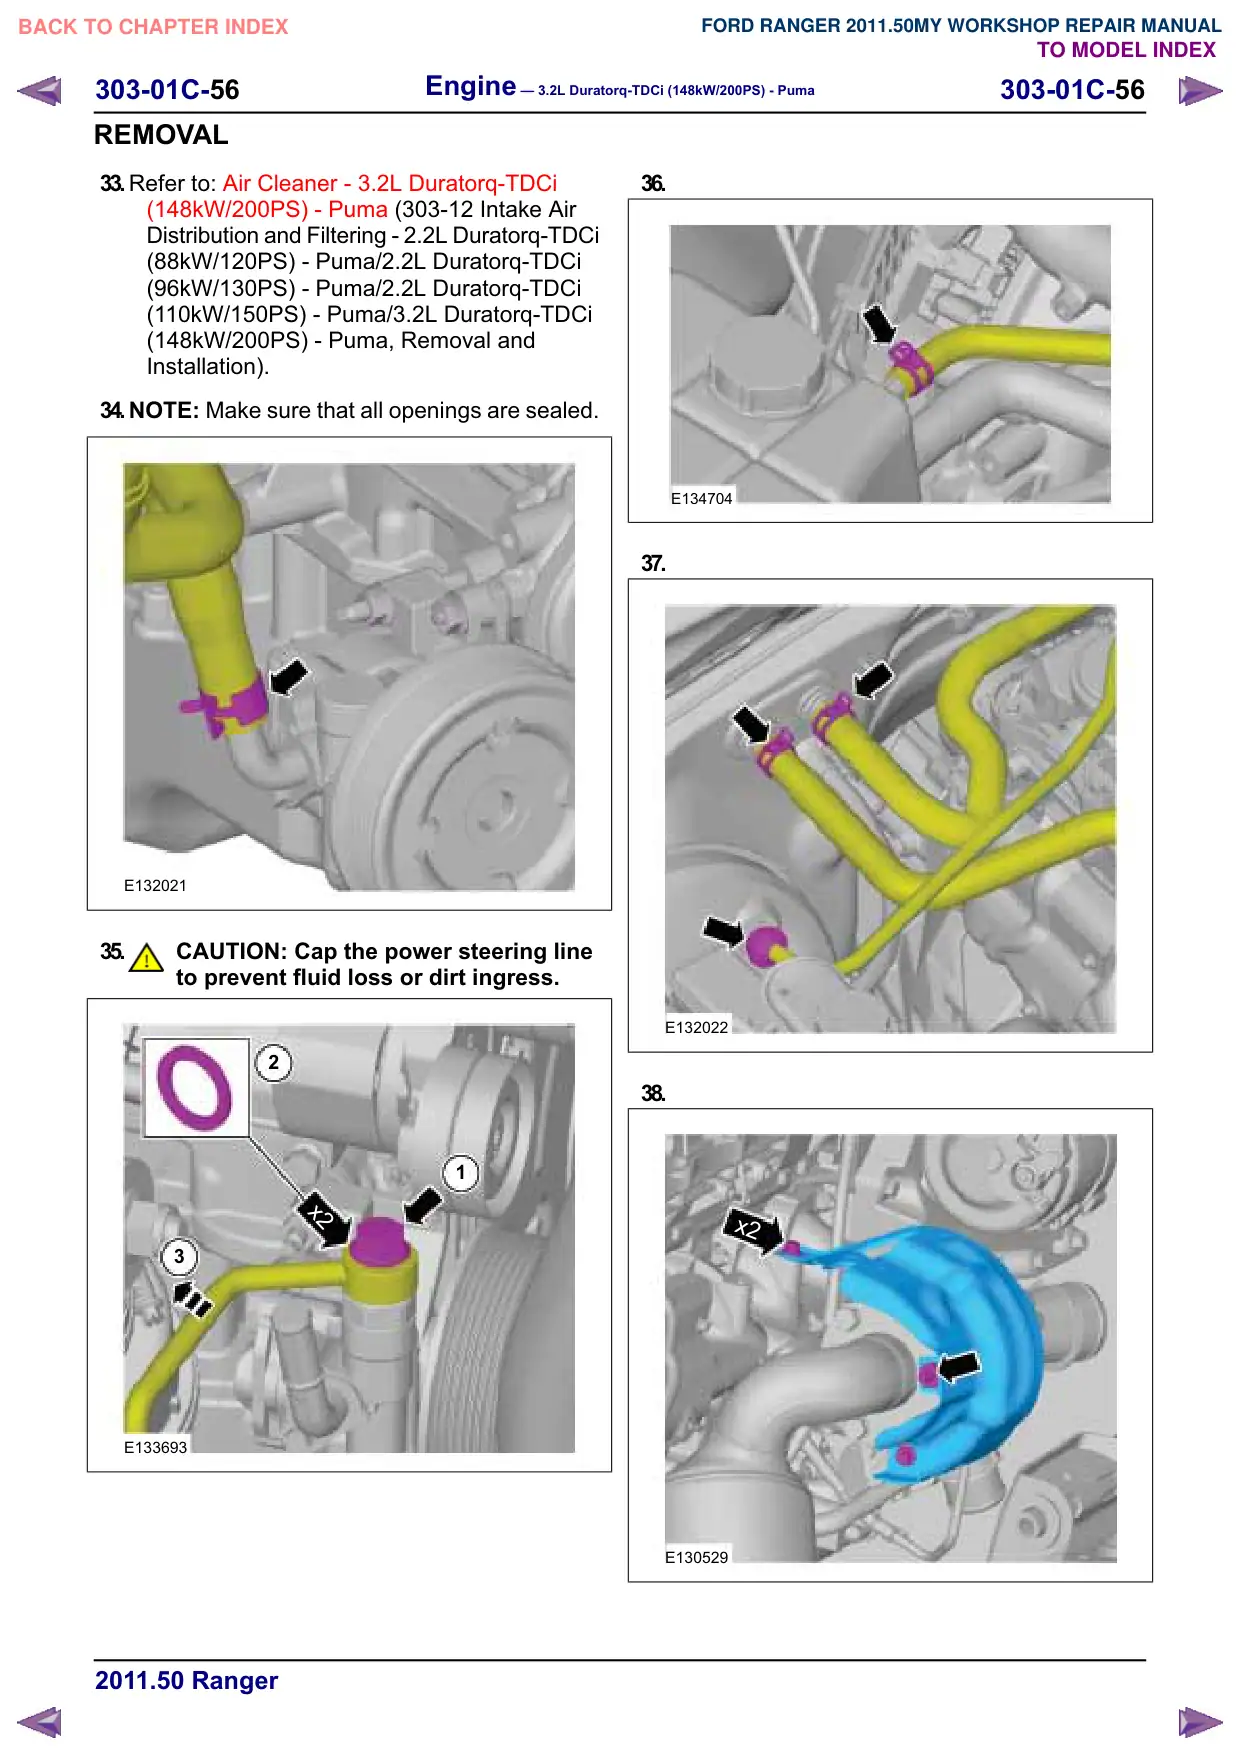
34.NOTE: Make sure that all openings are sealed.
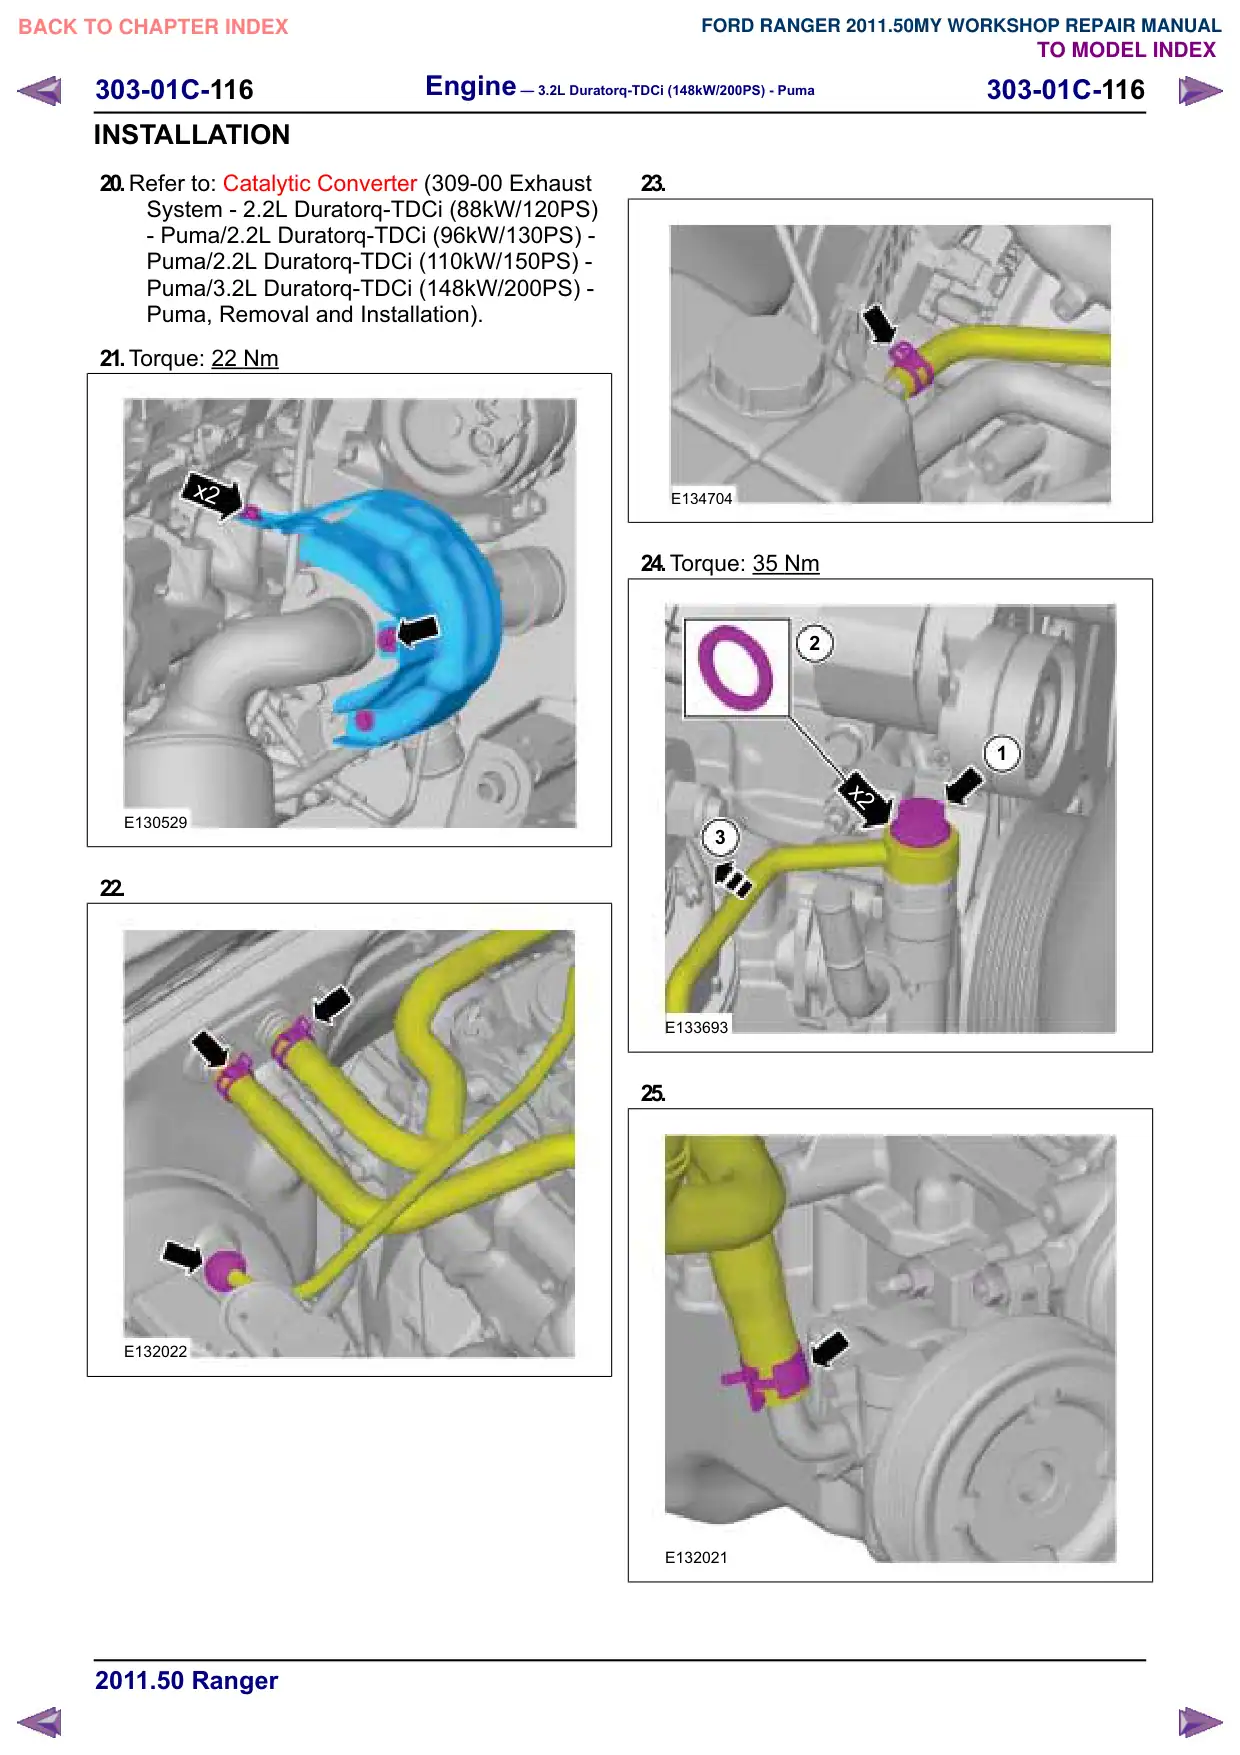
E132021
35.
CAUTION: Cap the power steering line
to prevent fluid loss or dirt ingress.
2
1
x2
3
E133693
36.
E134704
37.
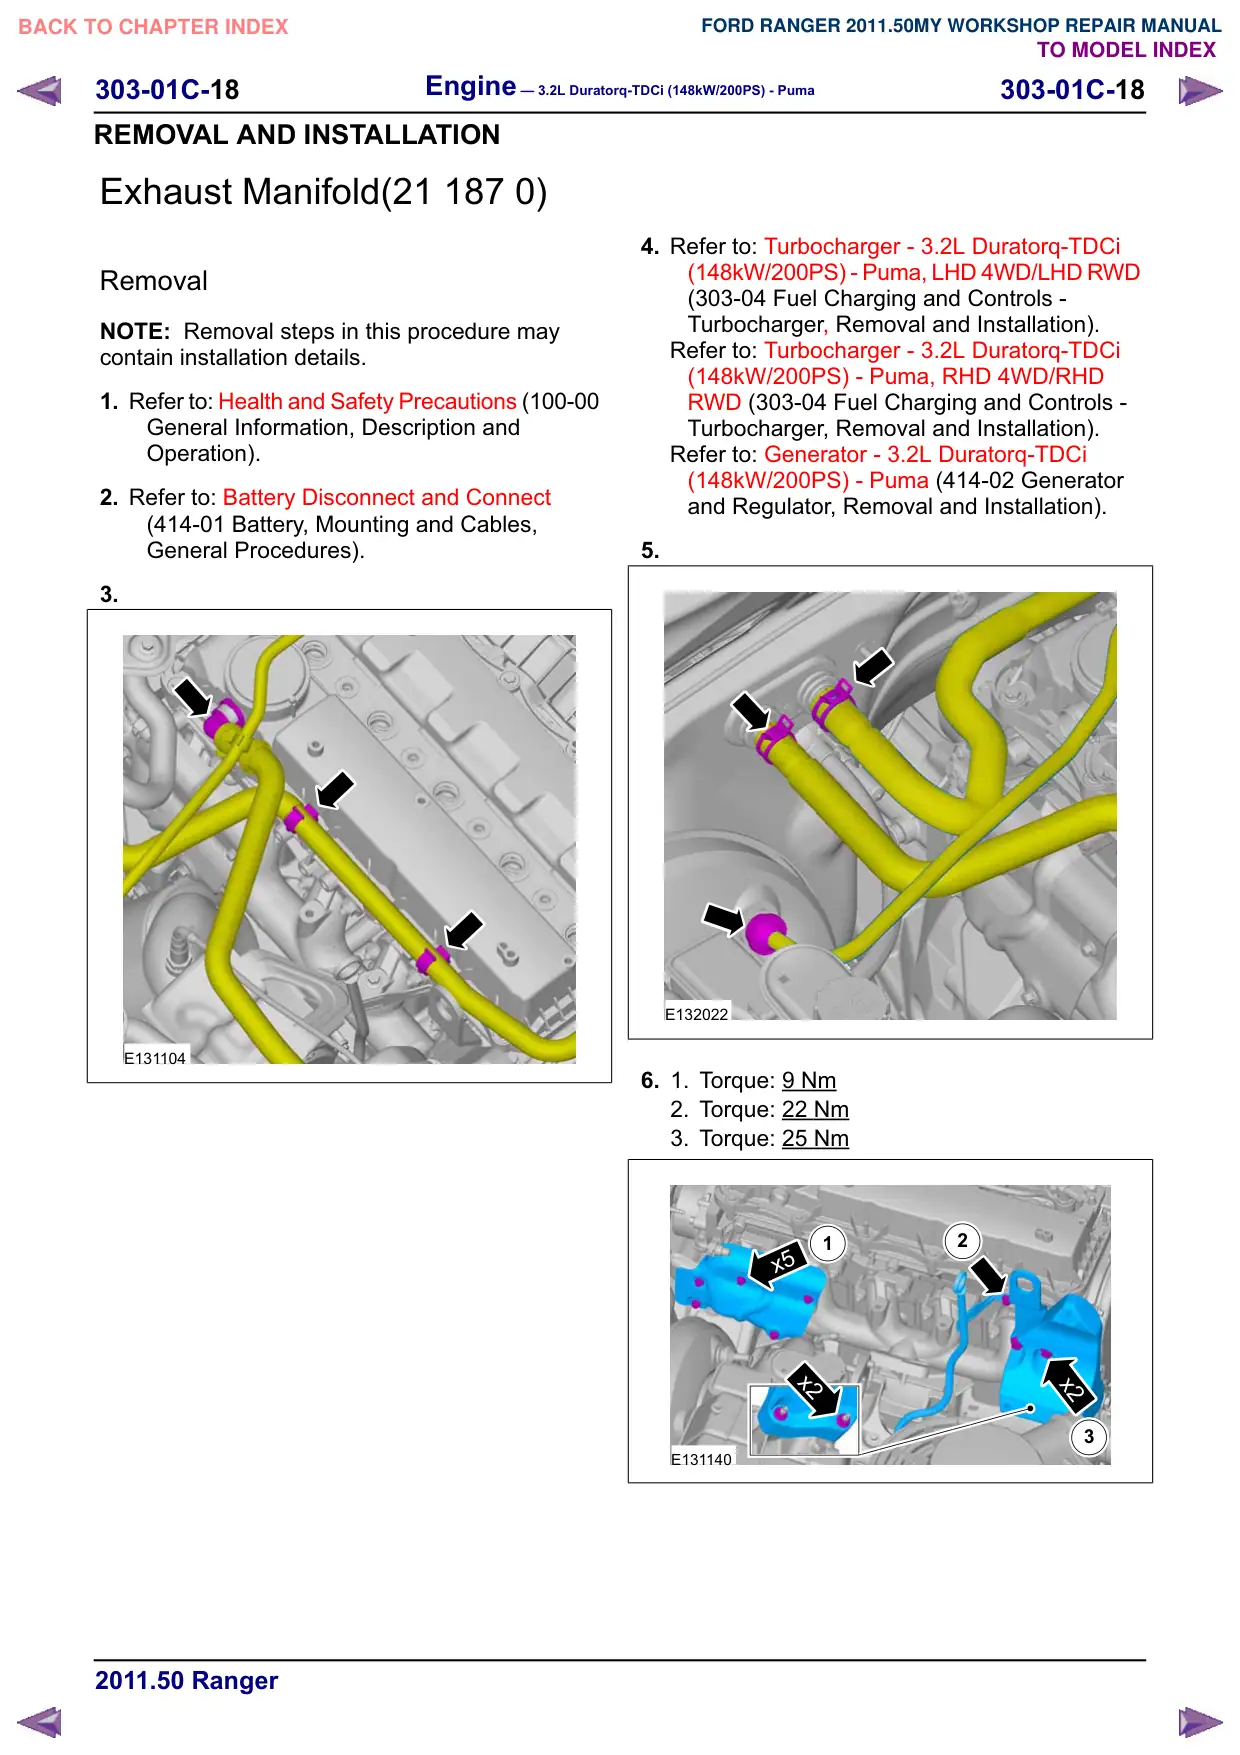
E132022
38.
x2
E130529
303-01C-57
Engine – 3.2L Duratorq-TDCi (148kW/200PS) - Puma
303-01C-57
REMOVAL
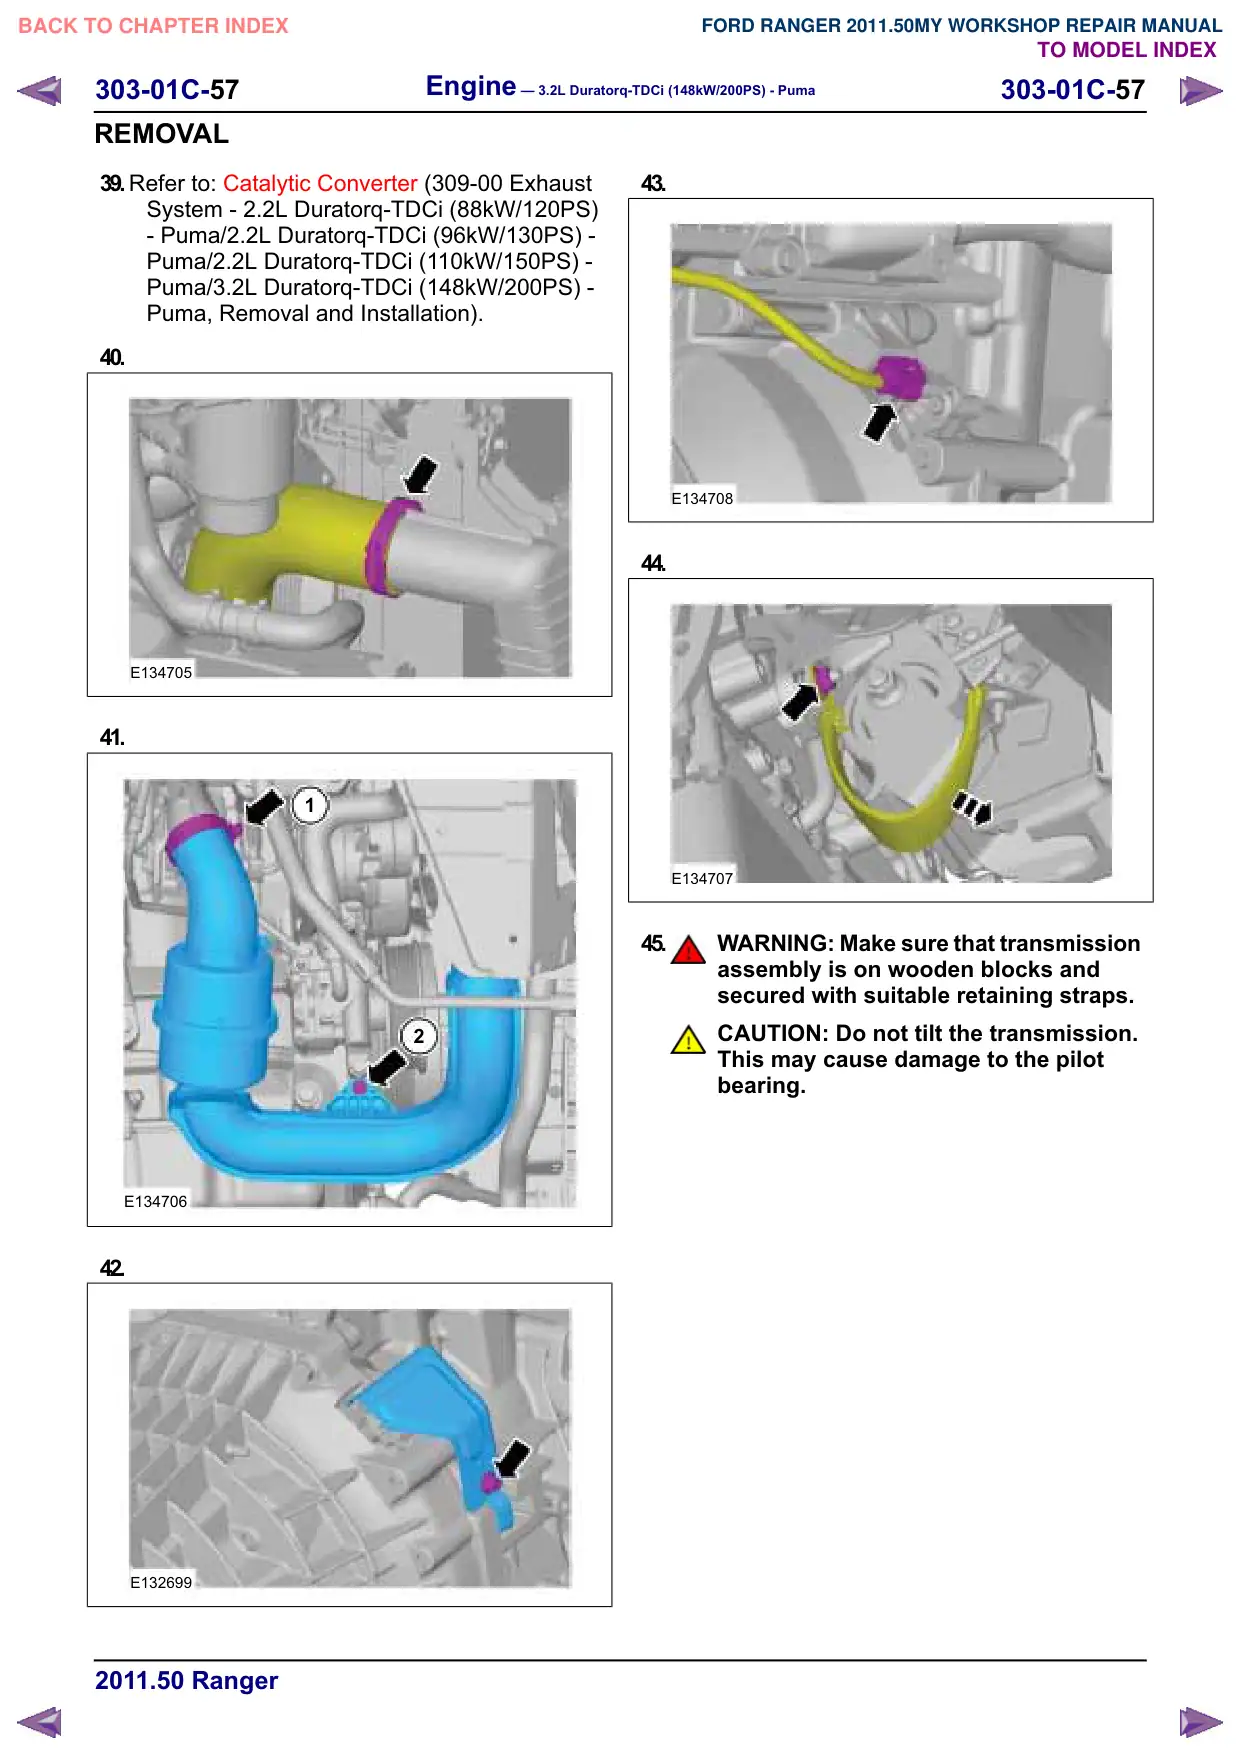
39.Refer to: Catalytic Converter (309-00 Exhaust
System - 2.2L Duratorq-TDCi (88kW/120PS)
- Puma/2.2L Duratorq-TDCi (96kW/130PS) -
Puma/2.2L Duratorq-TDCi (110kW/150PS) -
Puma/3.2L Duratorq-TDCi (148kW/200PS) -
Puma, Removal and Installation).
40.
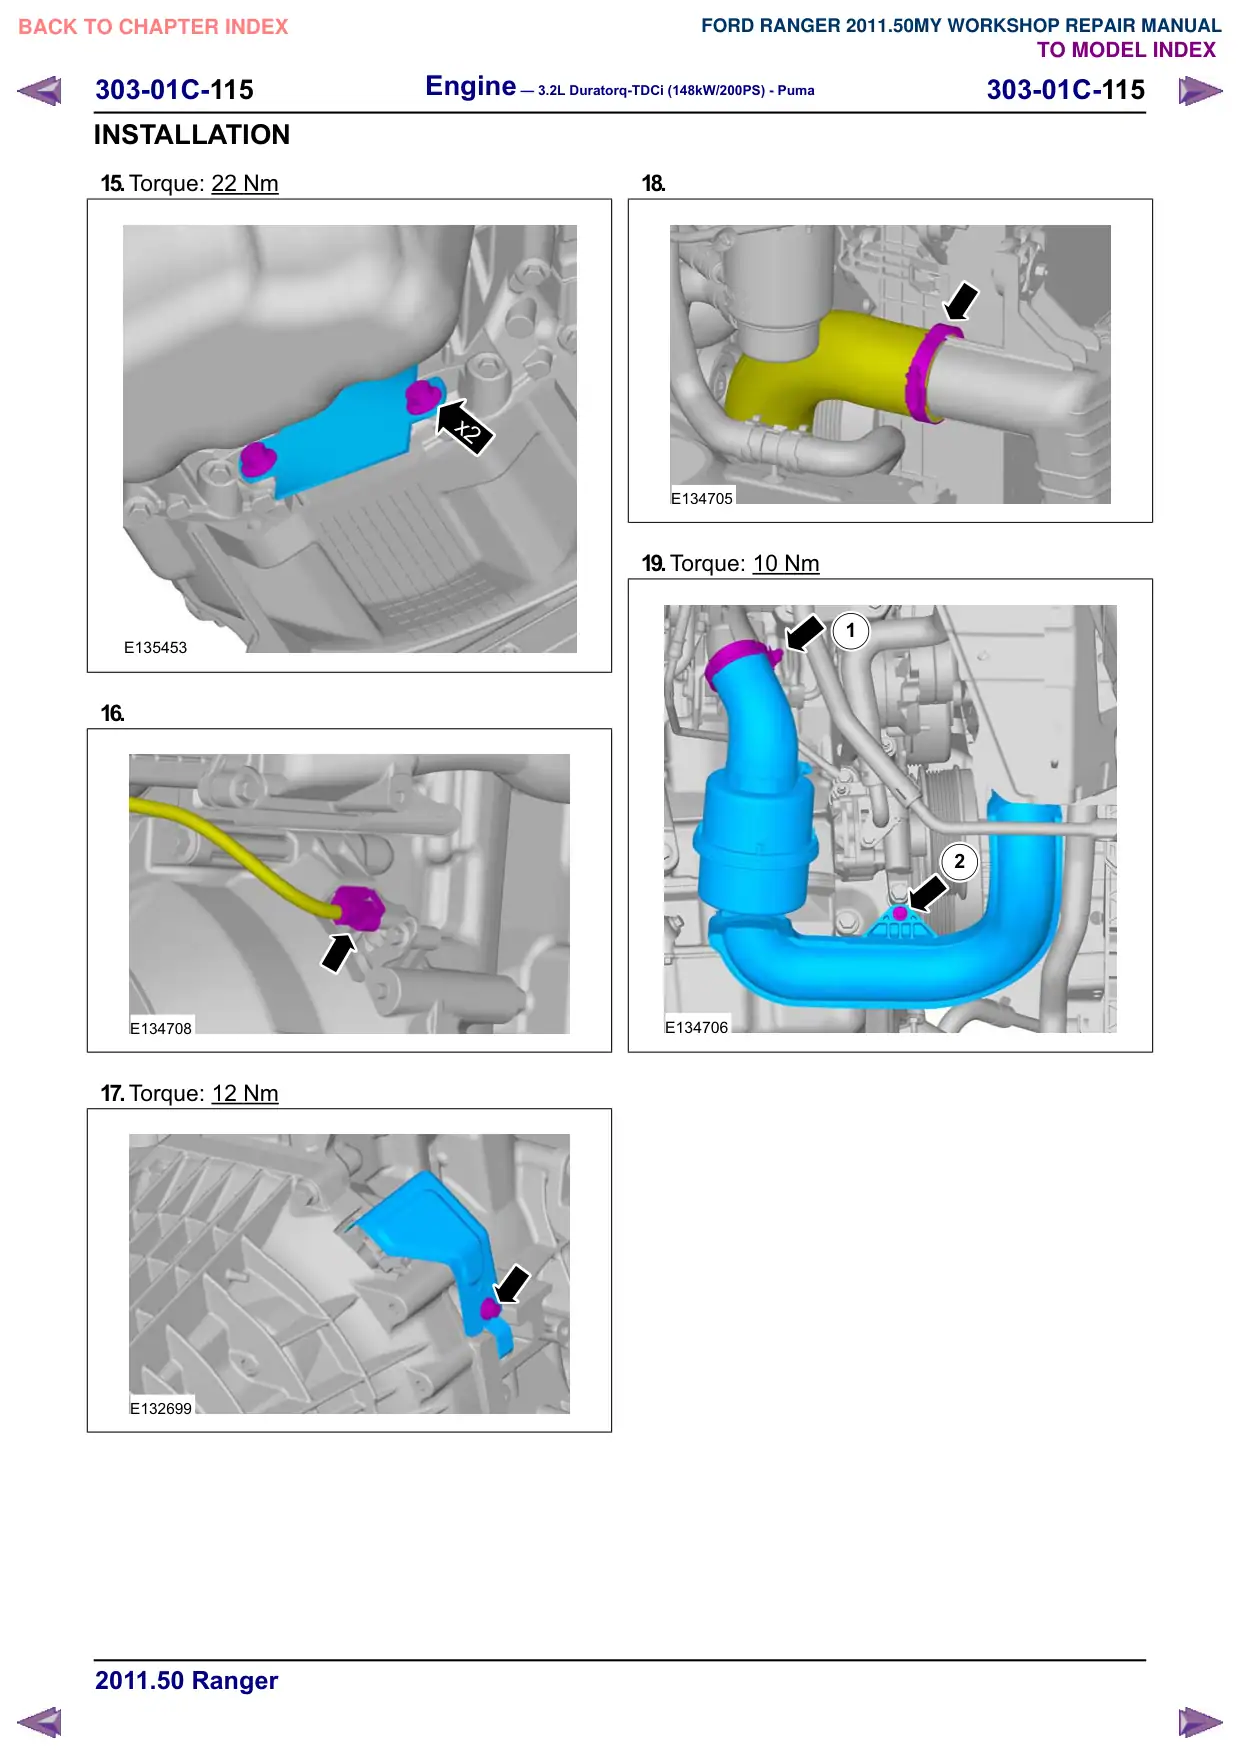
E134705
41.
1
2
E134706
42.
E132699
43.
E134708
44.
E134707
45.
WARNING: Make sure that transmission
assembly is on wooden blocks and
secured with suitable retaining straps.
CAUTION: Do not tilt the transmission.
This may cause damage to the pilot
bearing.
303-01C-58
Engine – 3.2L Duratorq-TDCi (148kW/200PS) - Puma
303-01C-58
REMOVAL
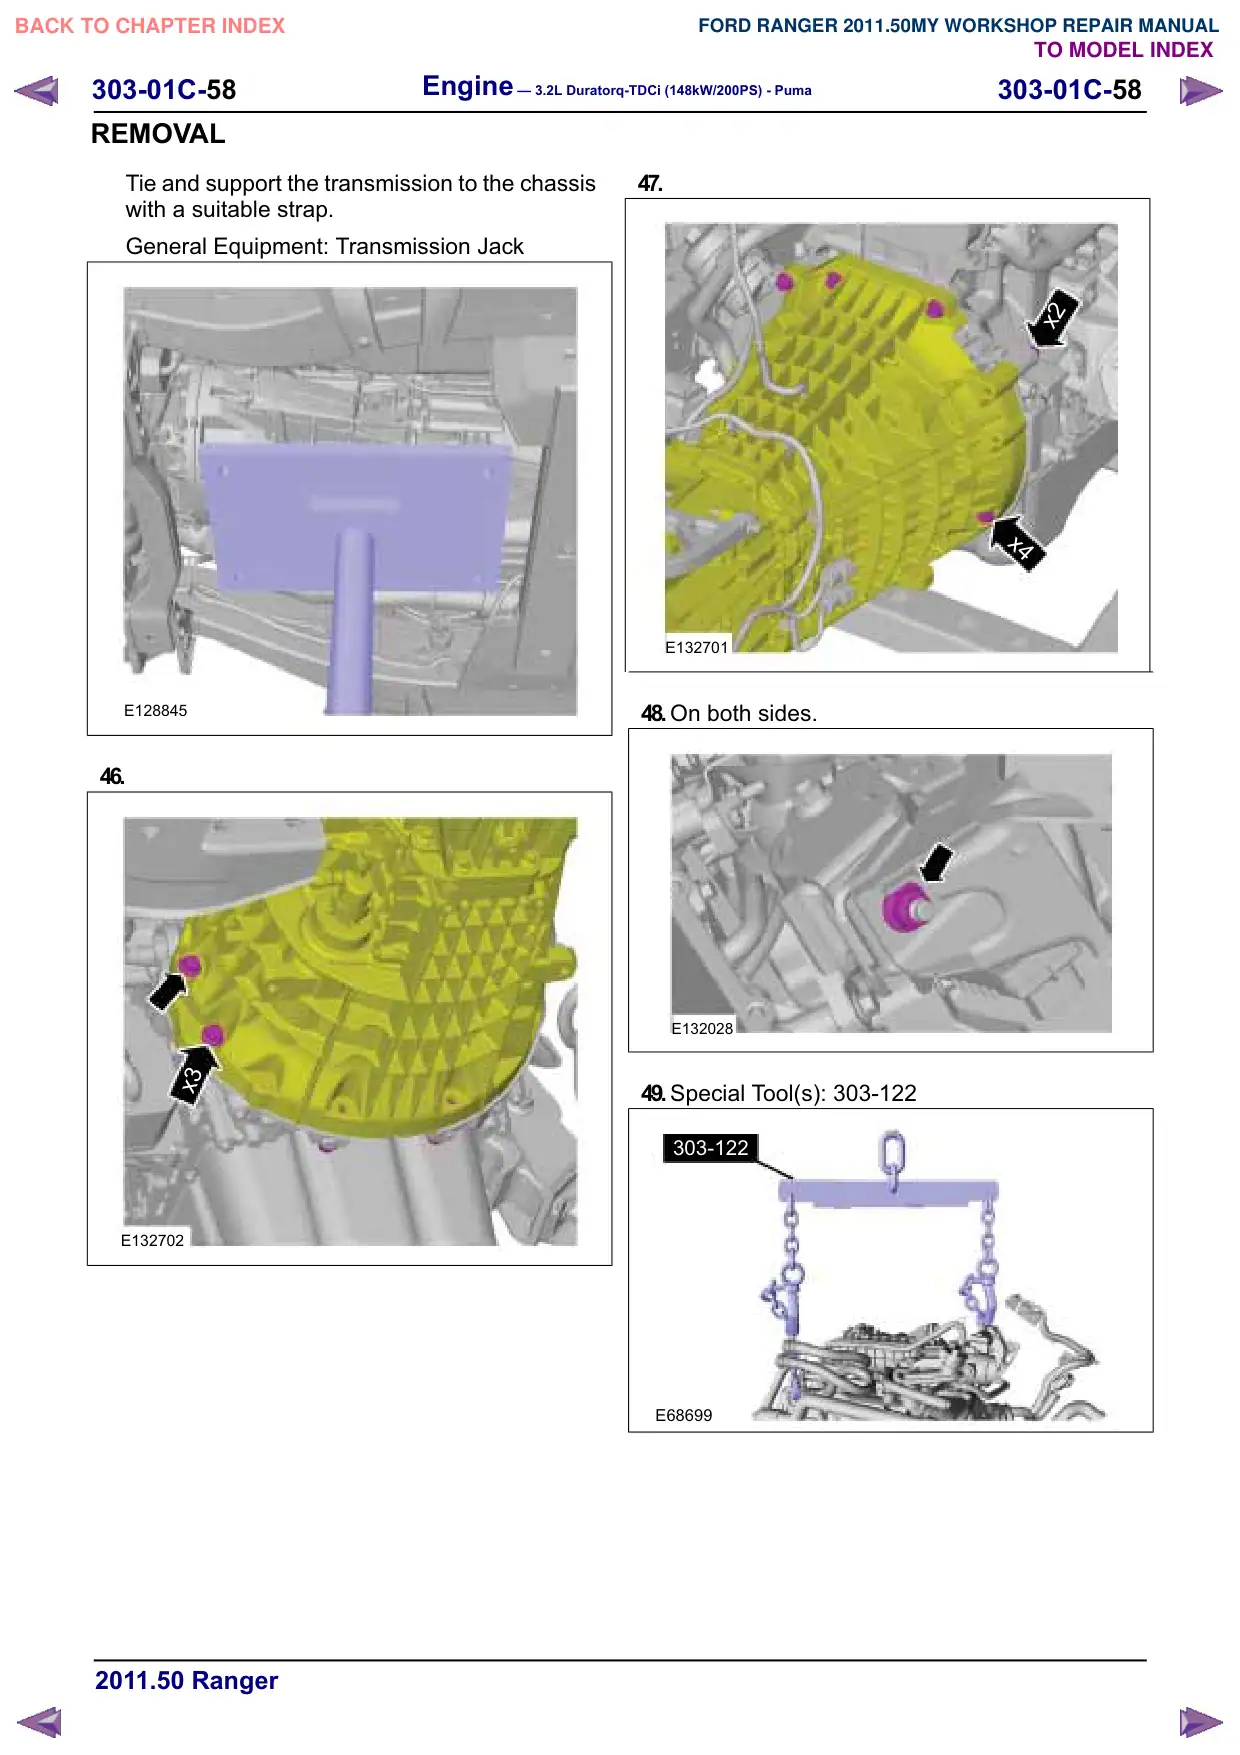
Tie and support the transmission to the chassis
with a suitable strap.
General Equipment: Transmission Jack
E128845
46.
x3
E132702
47.
x2
x4
E132701
48.On both sides.
E132028
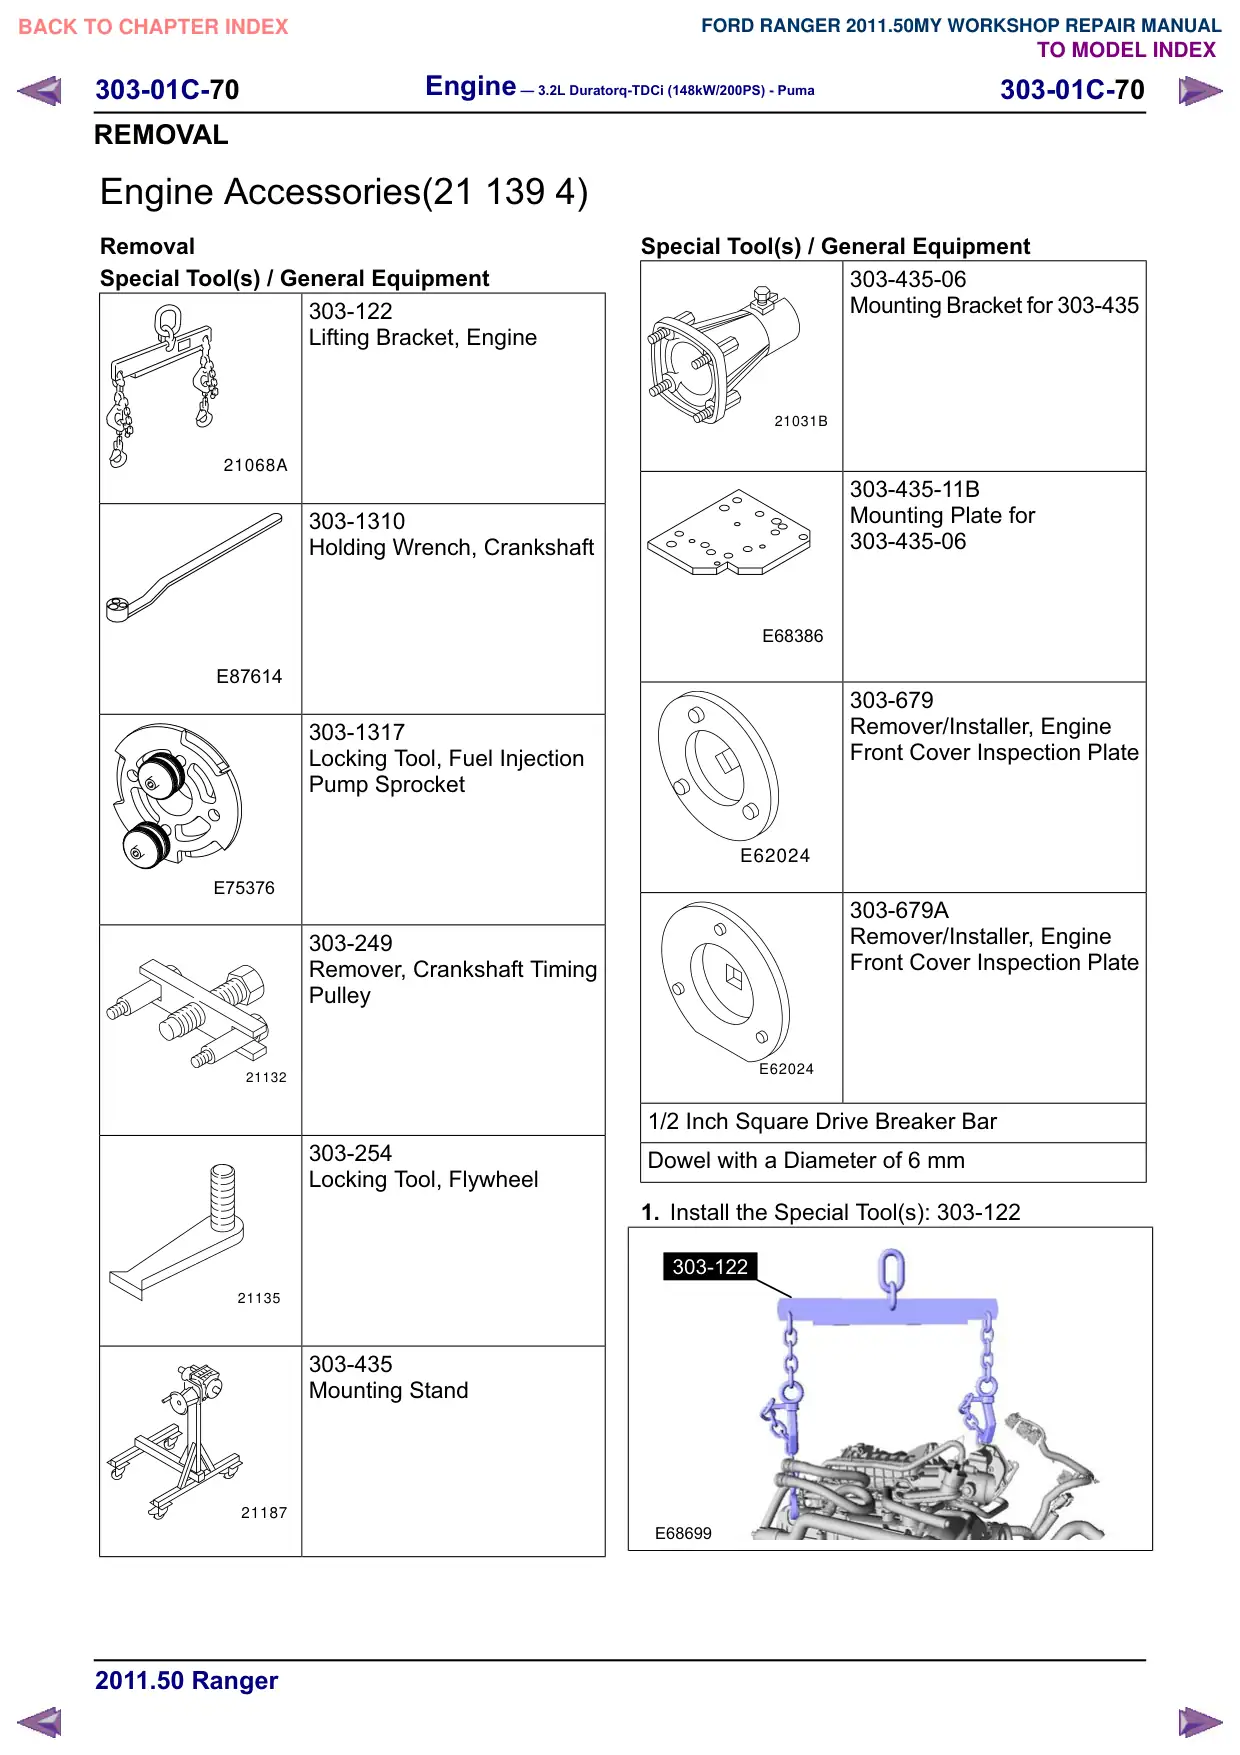
49.Special Tool(s): 303-122
303-122
E68699
Engine – 3.2L Duratorq-TDCi (148kW/200PS) - Puma
303-01C-65
303-01C-65
REMOVAL
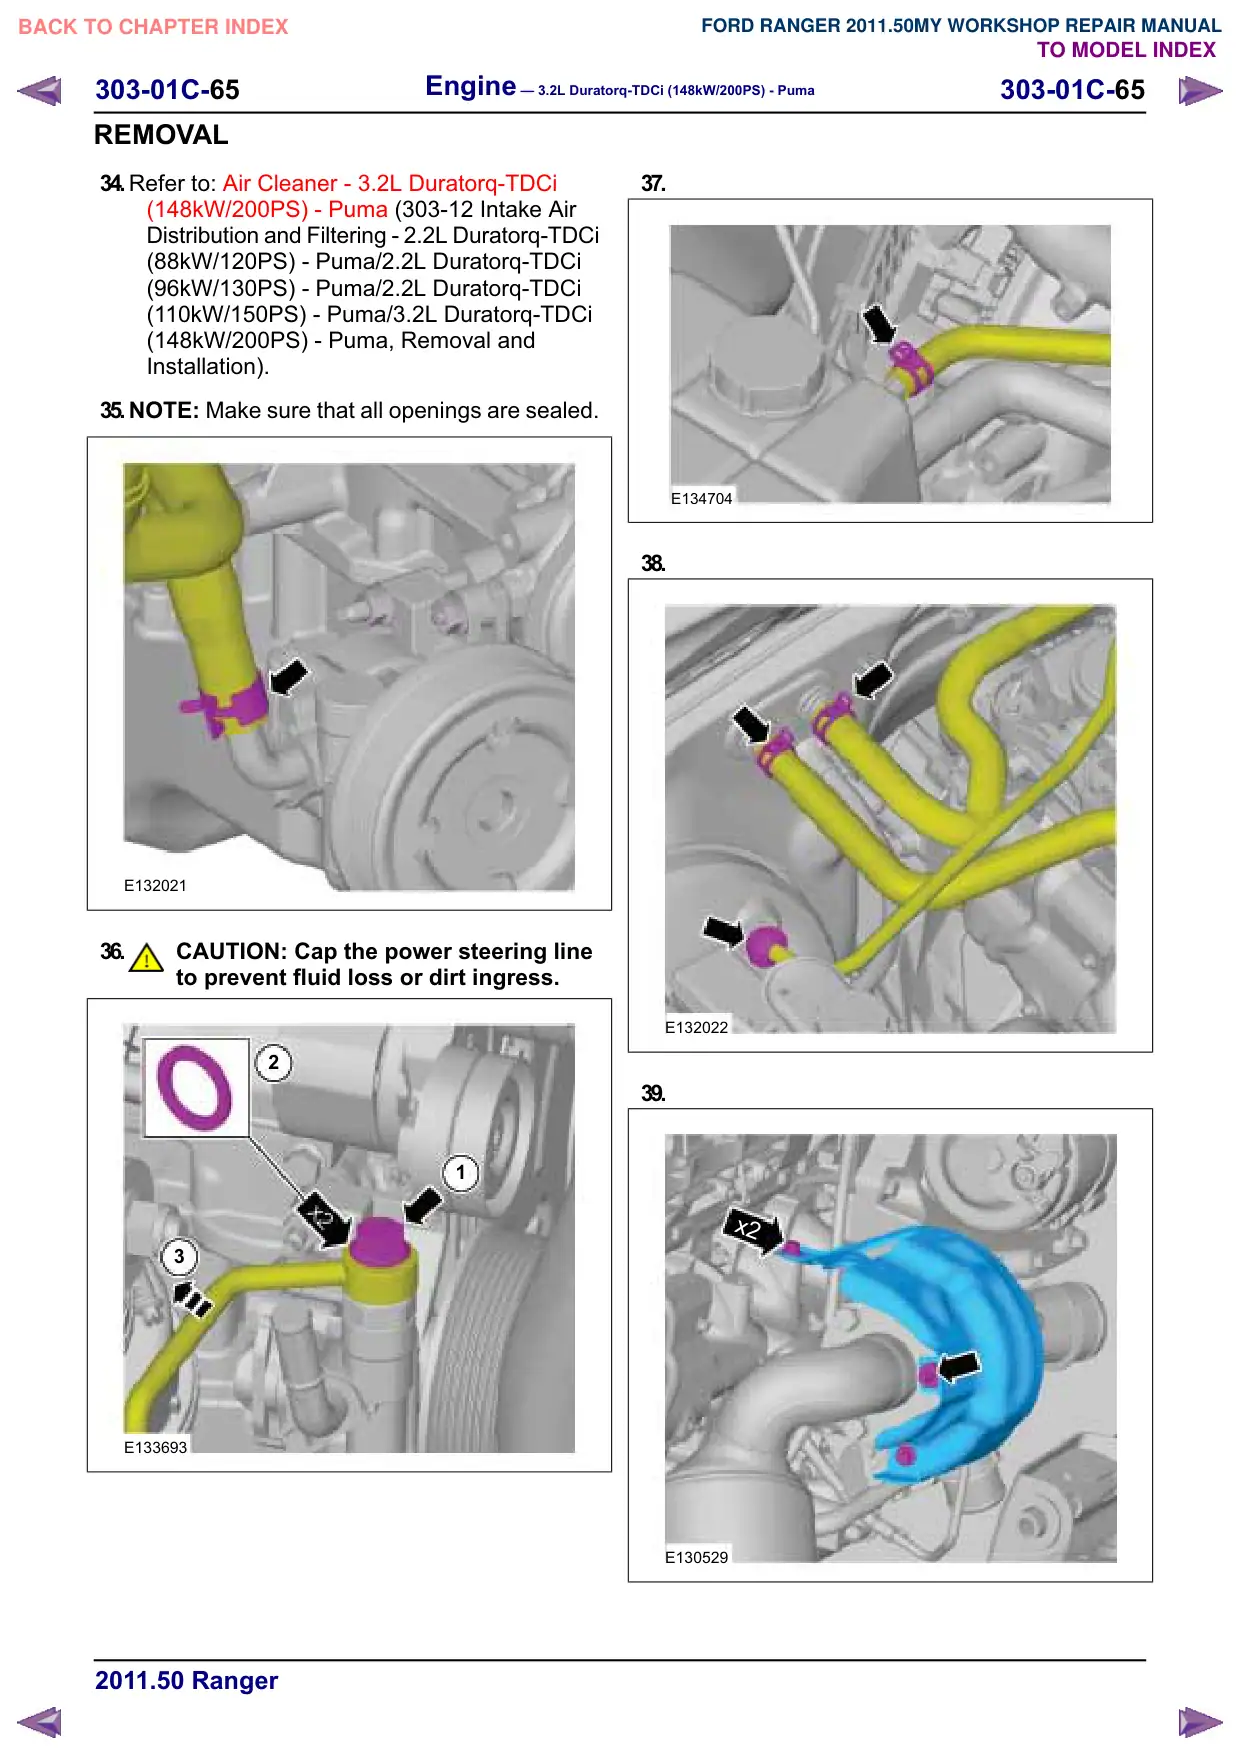
34.Refer to: Air Cleaner - 3.2L Duratorq-TDCi
(148kW/200PS) - Puma (303-12 Intake Air
Distribution and Filtering - 2.2L Duratorq-TDCi
(88kW/120PS) - Puma/2.2L Duratorq-TDCi
(96kW/130PS) - Puma/2.2L Duratorq-TDCi
(110kW/150PS) - Puma/3.2L Duratorq-TDCi
(148kW/200PS) - Puma, Removal and
Installation).
35.NOTE: Make sure that all openings are sealed.
E132021
36.
CAUTION: Cap the power steering line
to prevent fluid loss or dirt ingress.
2
1
3
E133693
37.
E134704
38.
E132022
39.
x2
E130529
303-01C-66
Engine – 3.2L Duratorq-TDCi (148kW/200PS) - Puma
303-01C-66
REMOVAL
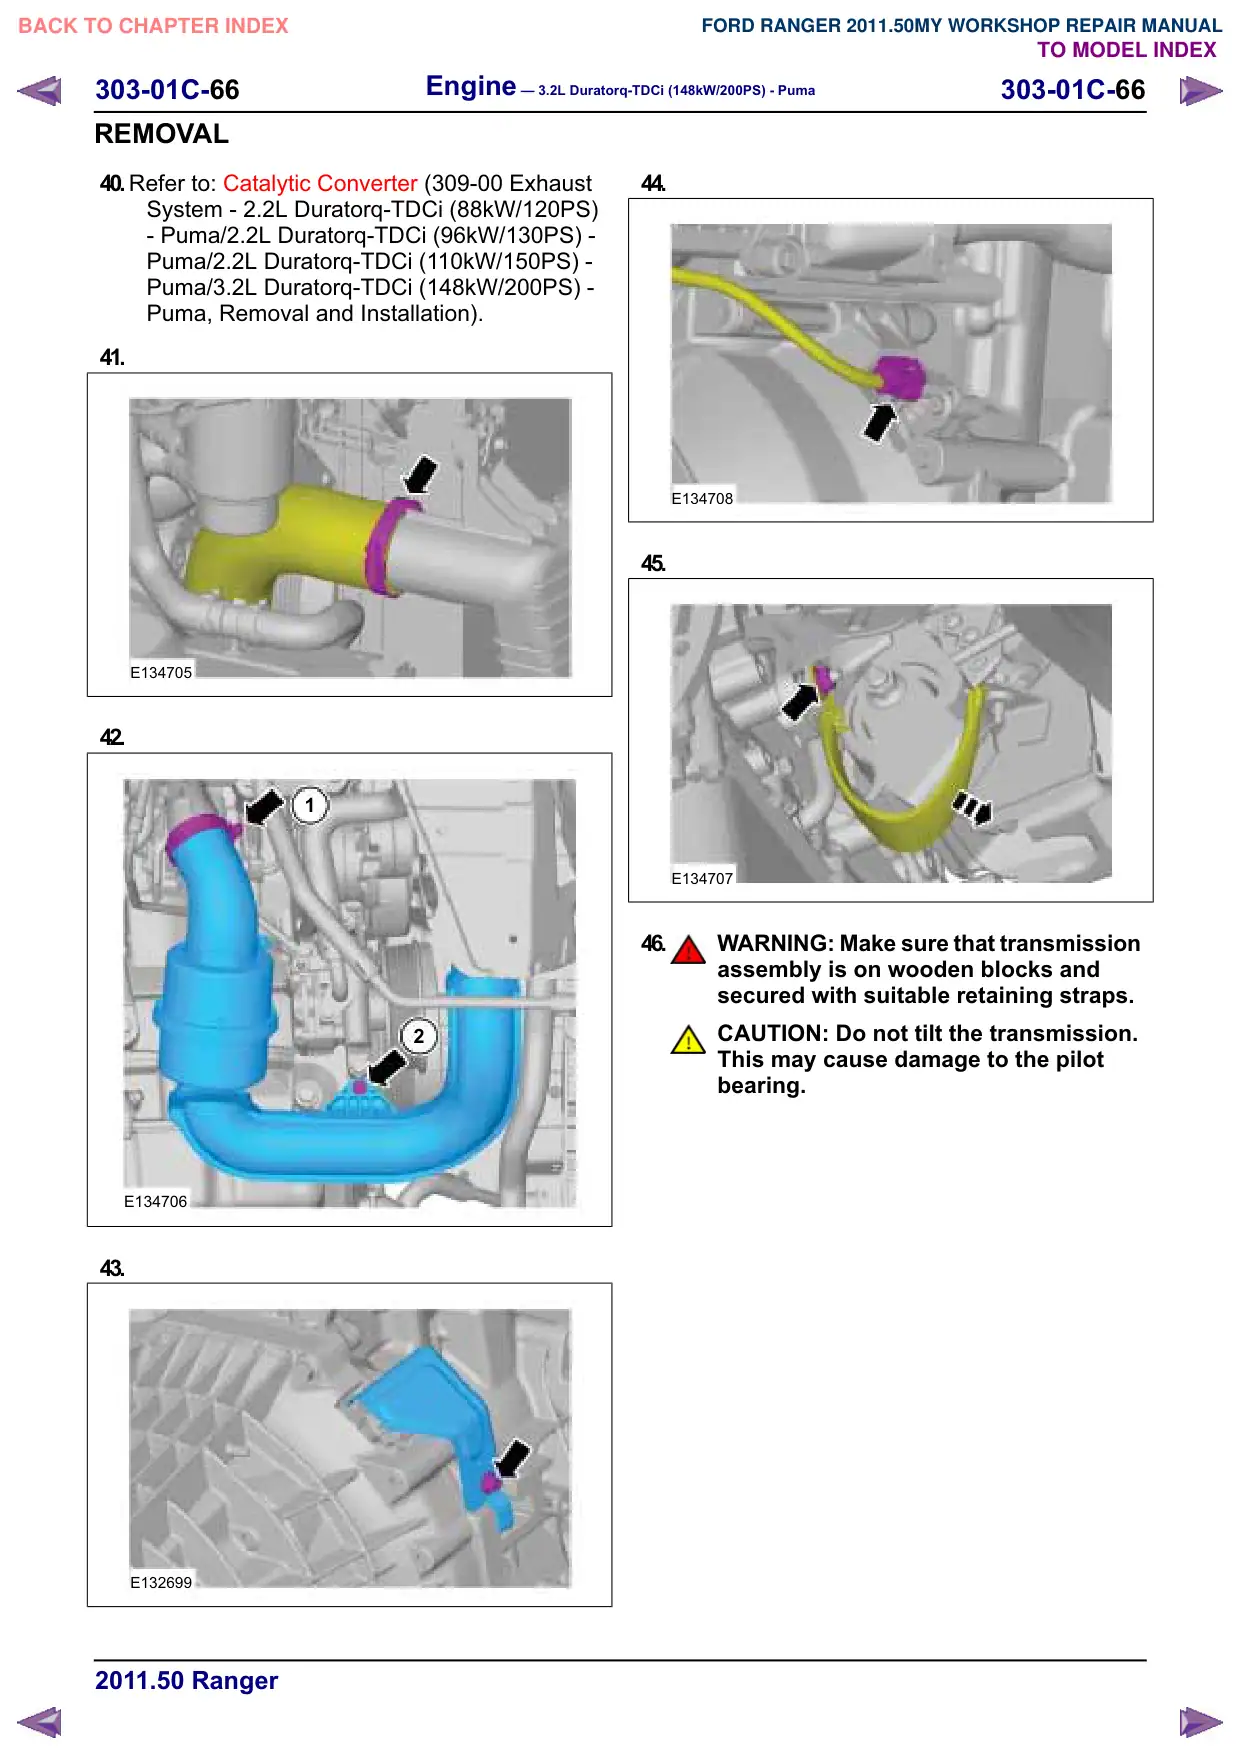
40.Refer to: Catalytic Converter (309-00 Exhaust
System - 2.2L Duratorq-TDCi (88kW/120PS)
- Puma/2.2L Duratorq-TDCi (96kW/130PS) -
Puma/2.2L Duratorq-TDCi (110kW/150PS) -
Puma/3.2L Duratorq-TDCi (148kW/200PS) -
Puma, Removal and Installation).
41.
E134705
42.
1
2
E134706
43.
E132699
44.
E134708
45.
E134707
46.
WARNING: Make sure that transmission
assembly is on wooden blocks and
secured with suitable retaining straps.
CAUTION: Do not tilt the transmission.
This may cause damage to the pilot
bearing.
Engine – 3.2L Duratorq-TDCi (148kW/200PS) - Puma
303-01C-67
303-01C-67
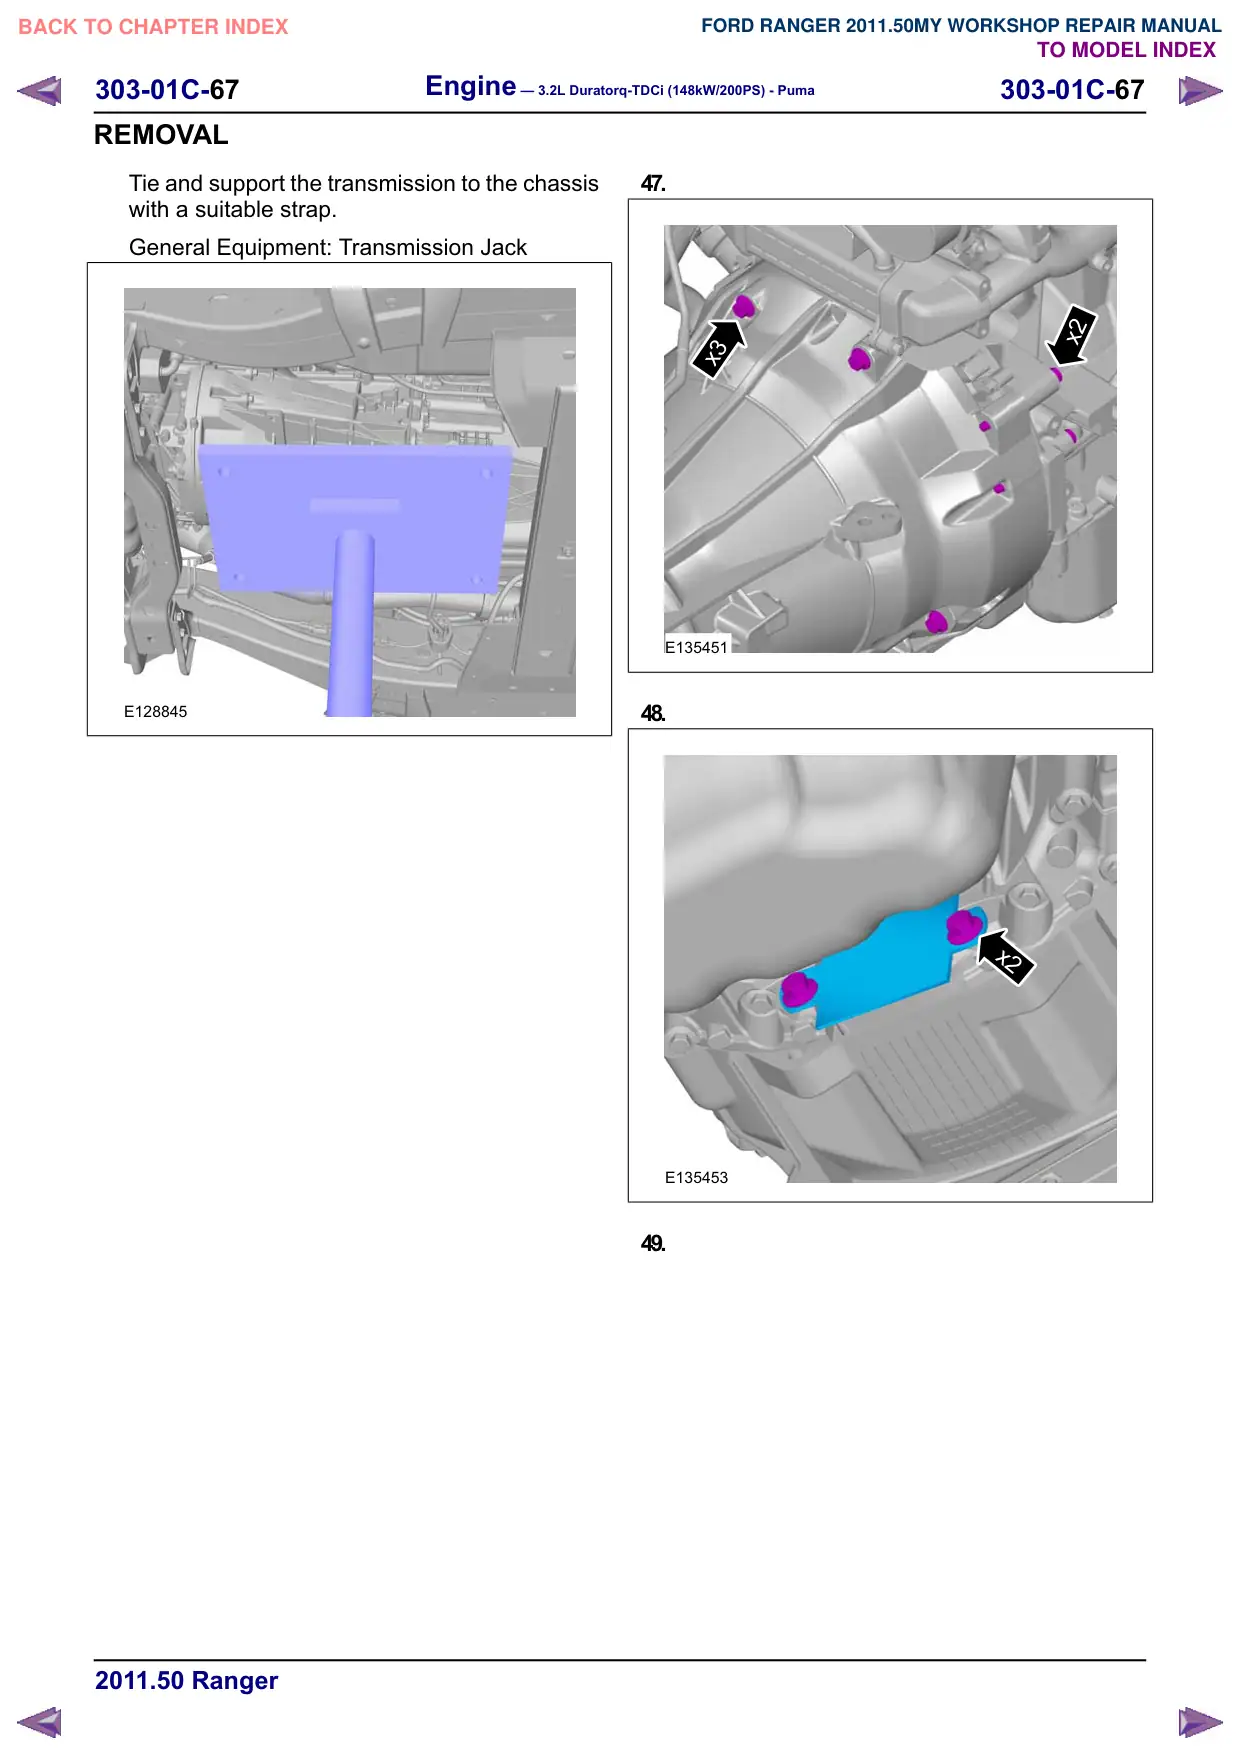
REMOVAL
Tie and support the transmission to the chassis
with a suitable strap.
General Equipment: Transmission Jack
E128845
47.
x2
x3
E135451
48.
x2
E135453
49.
303-01C-72
Engine – 3.2L Duratorq-TDCi (148kW/200PS) - Puma
303-01C-72
REMOVAL
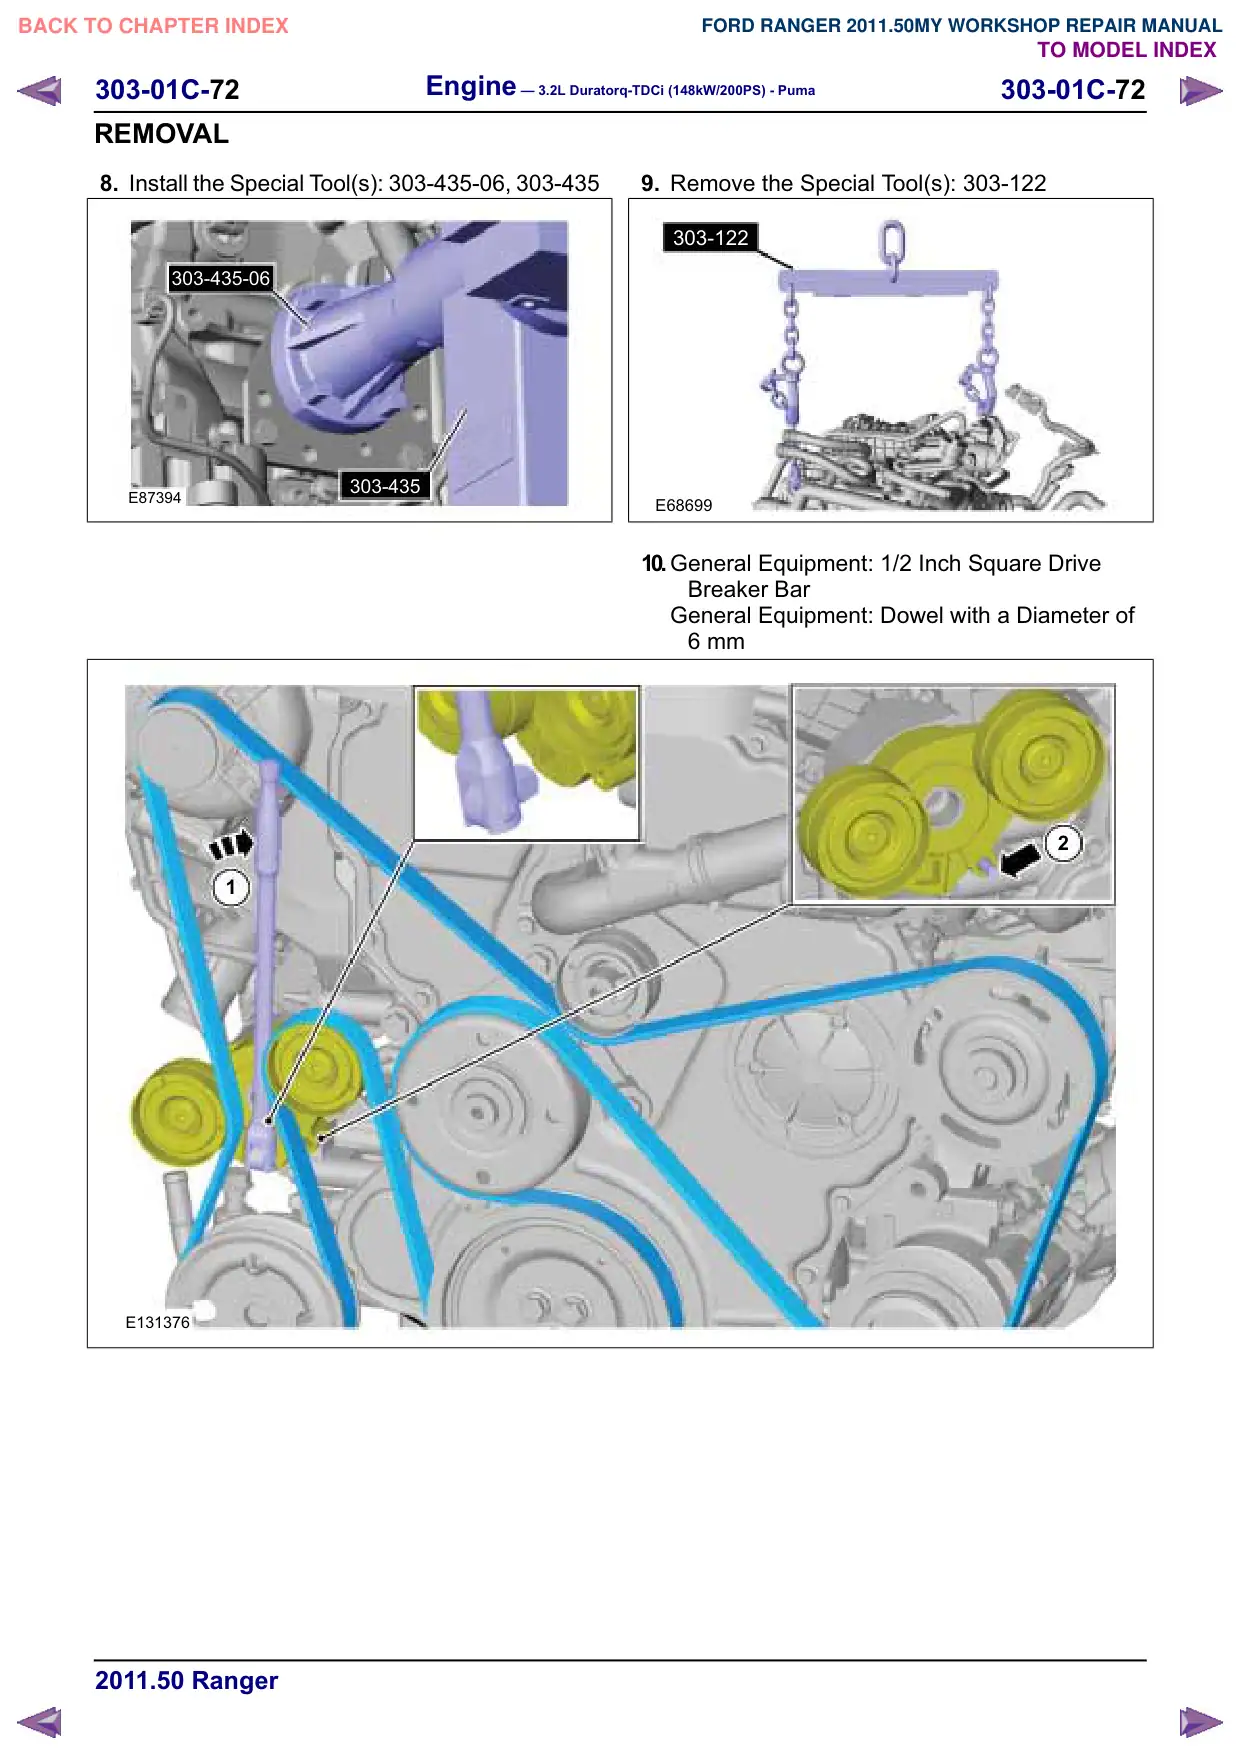
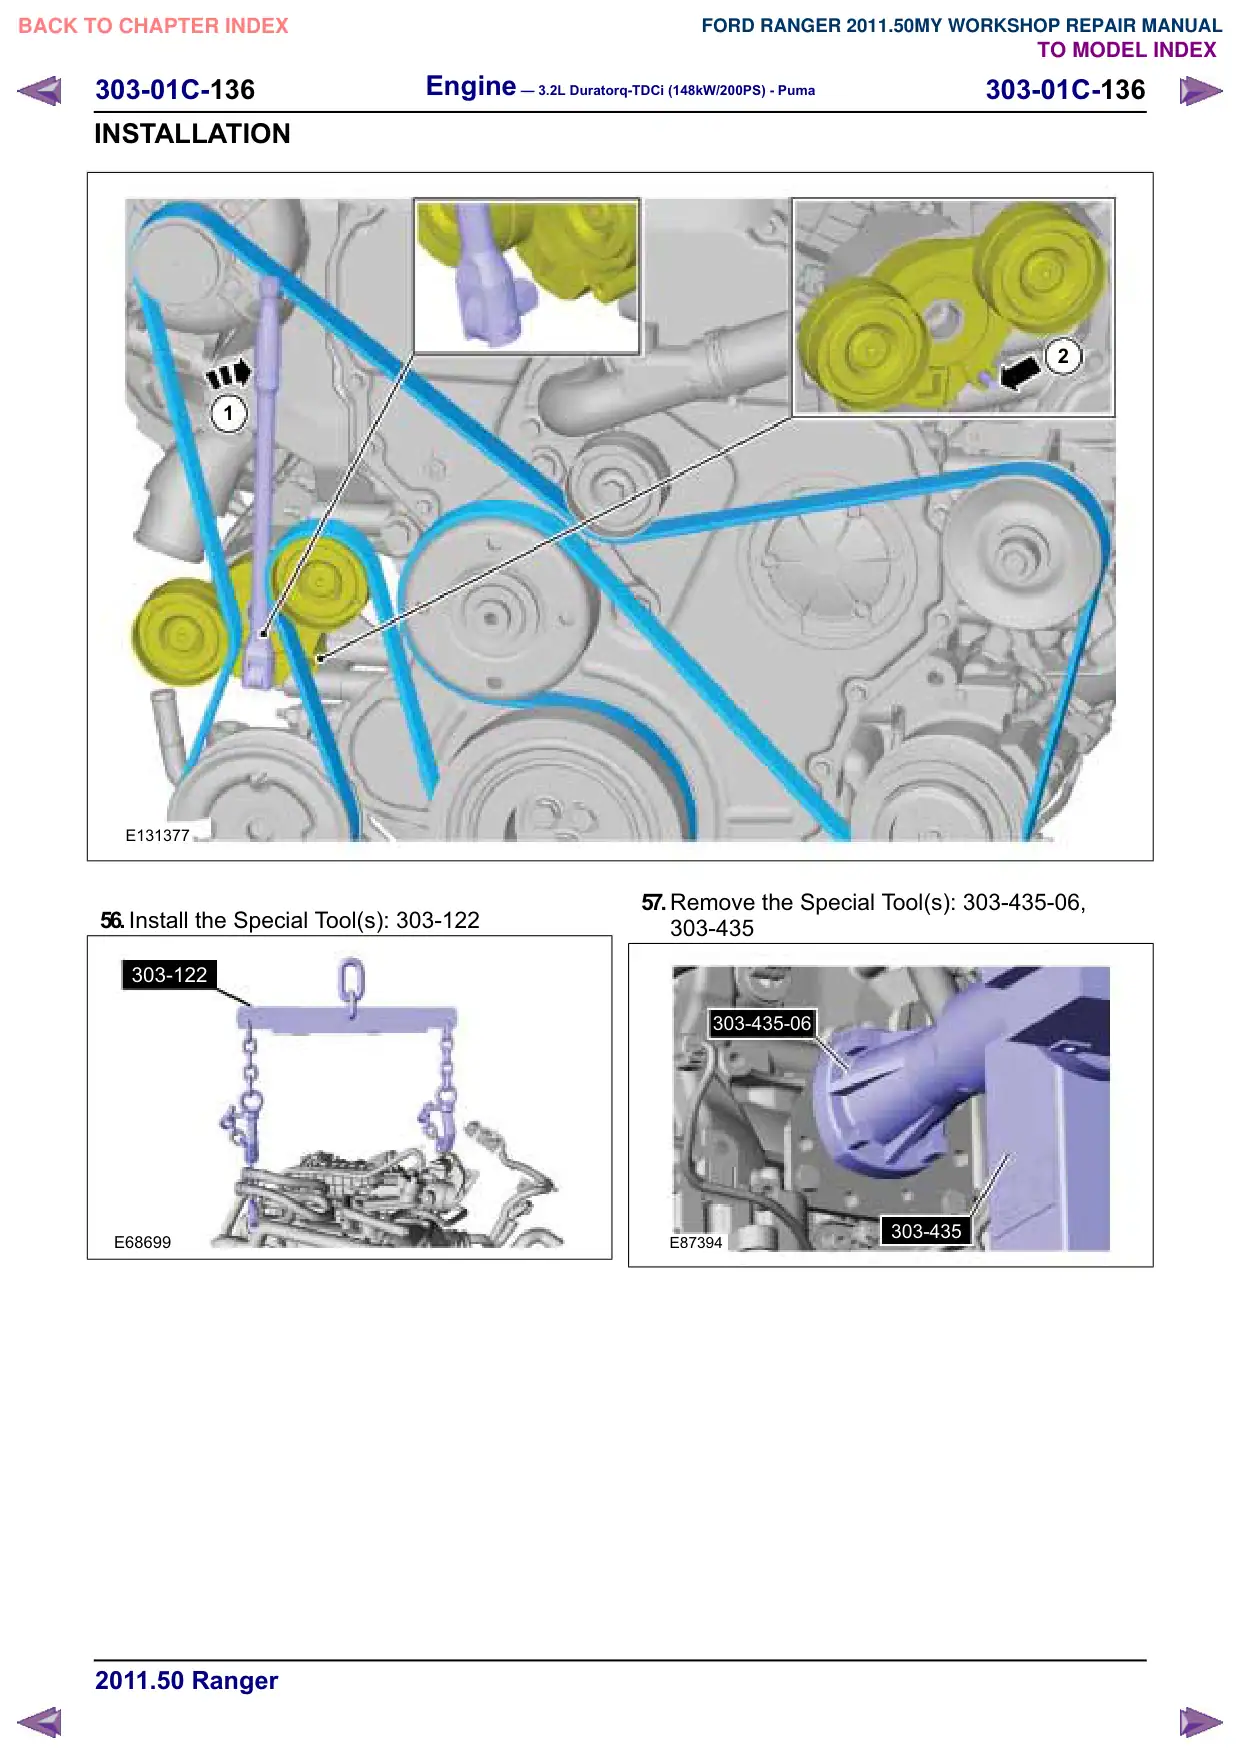
8. Install the Special Tool(s): 303-435-06, 303-435
303-435-06
303-435
E87394
1
E131376
9. Remove the Special Tool(s): 303-122
303-122
E68699
10.General Equipment: 1/2 Inch Square Drive
Breaker Bar
General Equipment: Dowel with a Diameter of
6 mm
2
Engine – 3.2L Duratorq-TDCi (148kW/200PS) - Puma
303-01C-78
303-01C-78
REMOVAL
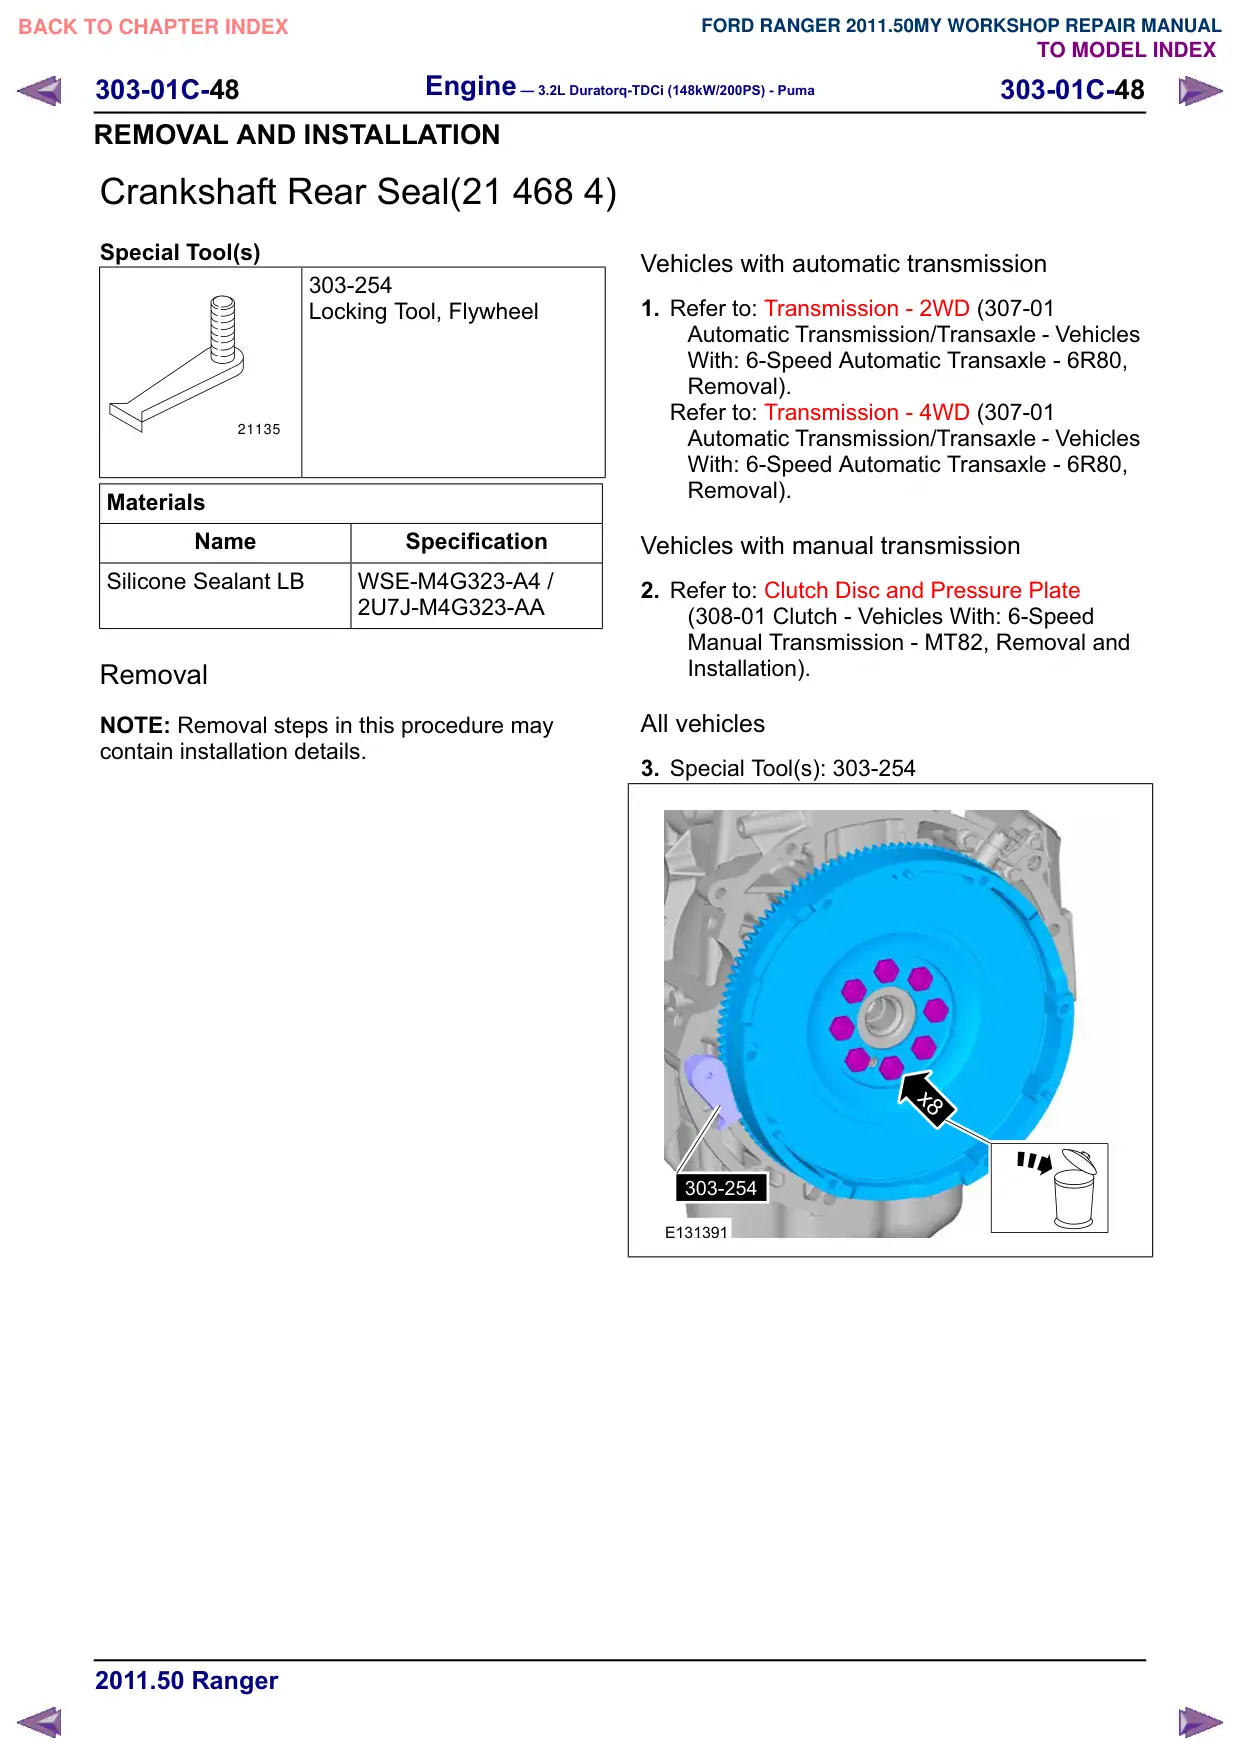
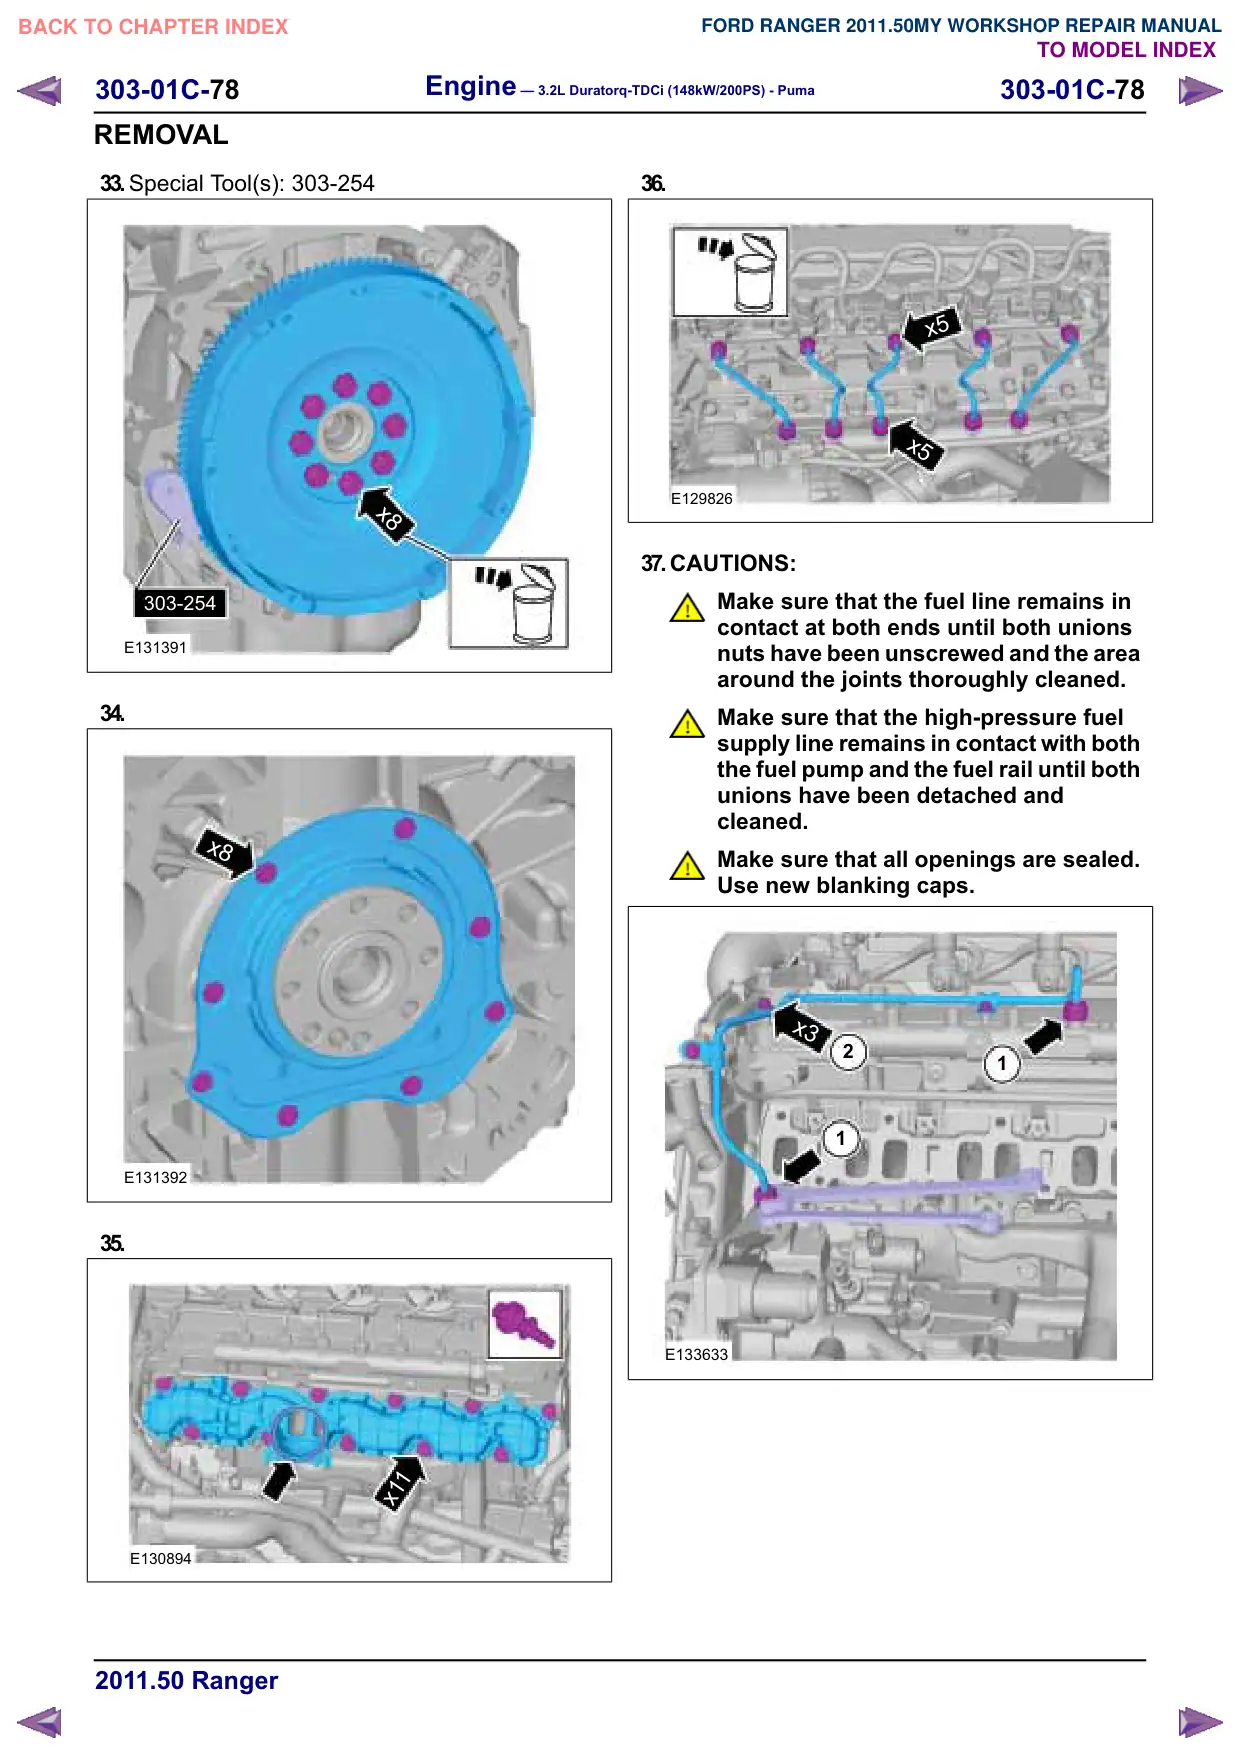
33.Special Tool(s): 303-254
x8
303-254
E131391
34.
x8
E131392
35.
x11
E130894
36.
x5
x5
E129826
37.CAUTIONS:
Make sure that the fuel line remains in
contact at both ends until both unions
nuts have been unscrewed and the area
around the joints thoroughly cleaned.
Make sure that the high-pressure fuel
supply line remains in contact with both
the fuel pump and the fuel rail until both
unions have been detached and
cleaned.
Make sure that all openings are sealed.
Use new blanking caps.
x3
2
1
1
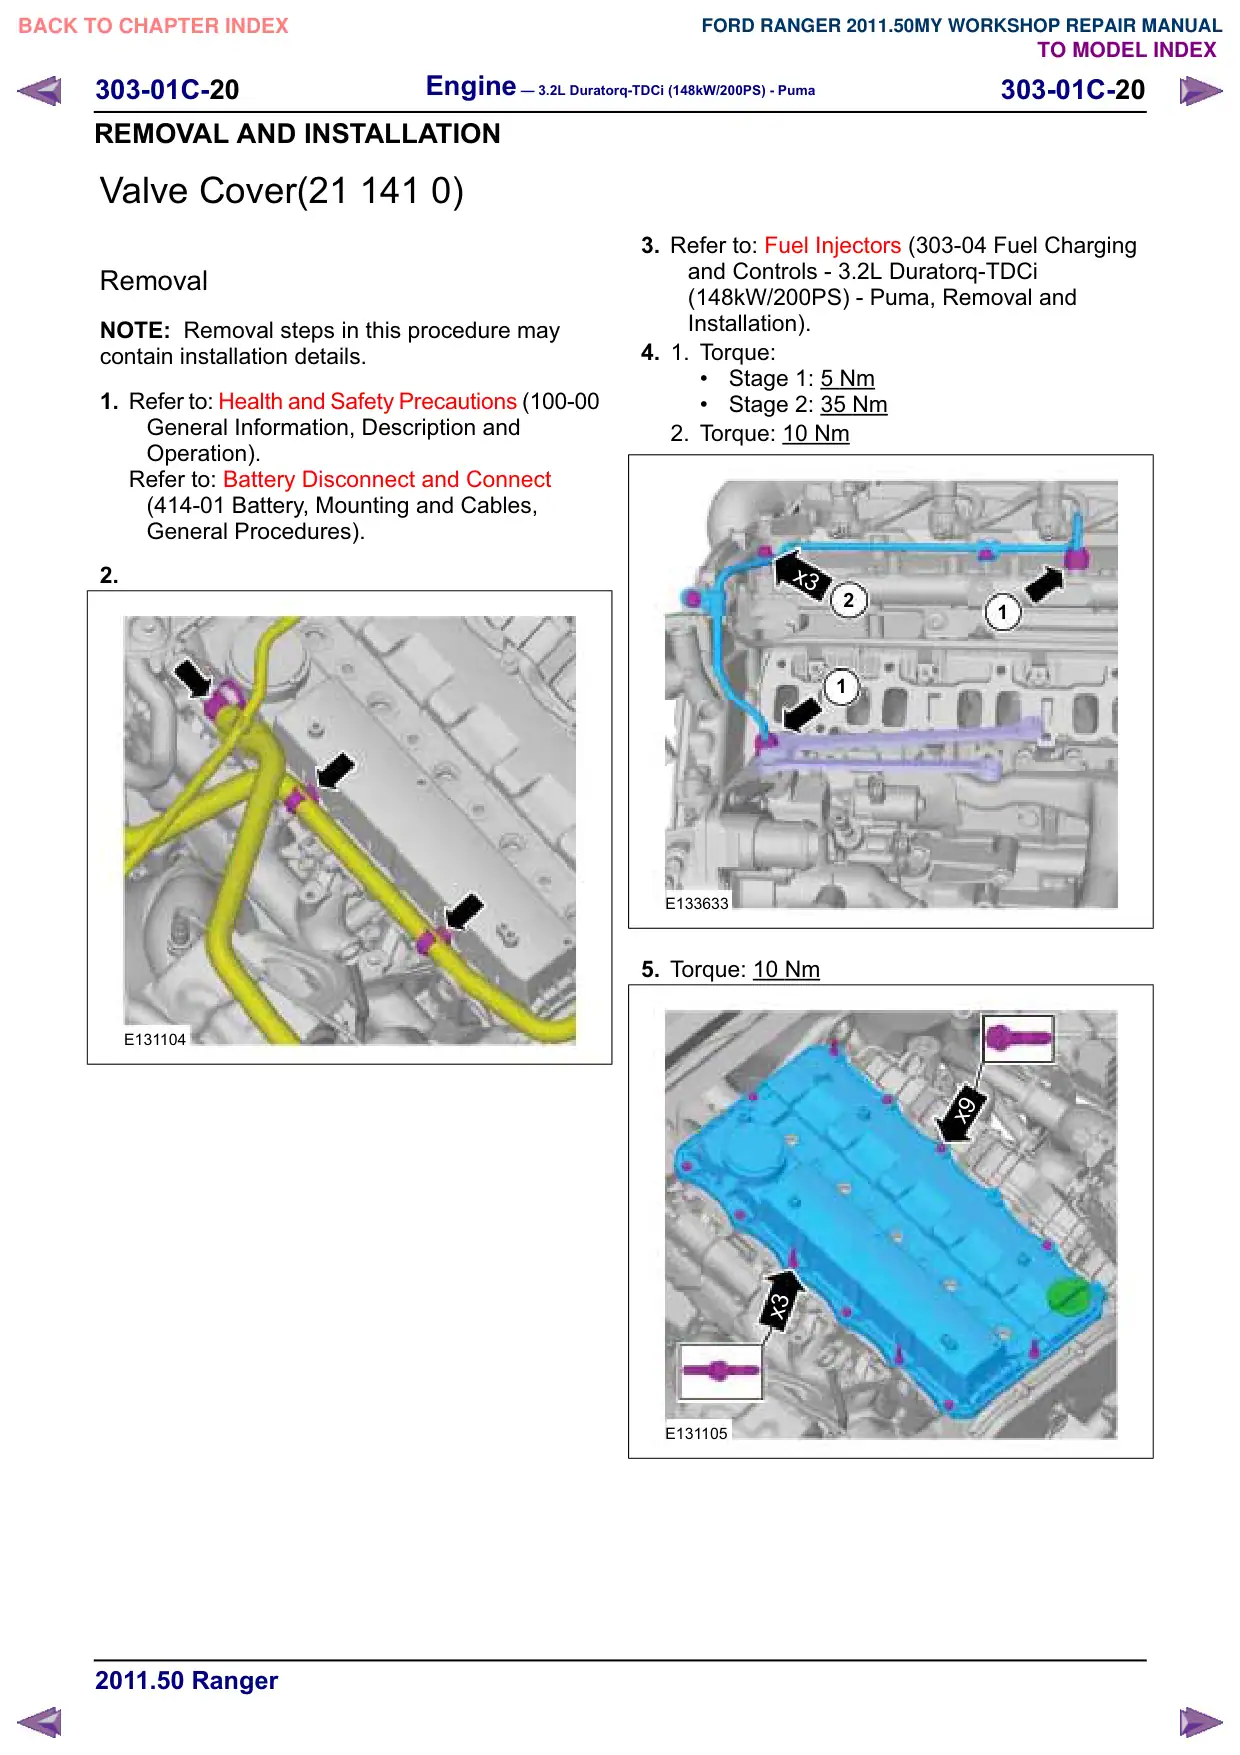
E133633
Engine – 3.2L Duratorq-TDCi (148kW/200PS) - Puma
303-01C-87
303-01C-87
DISASSEMBLY
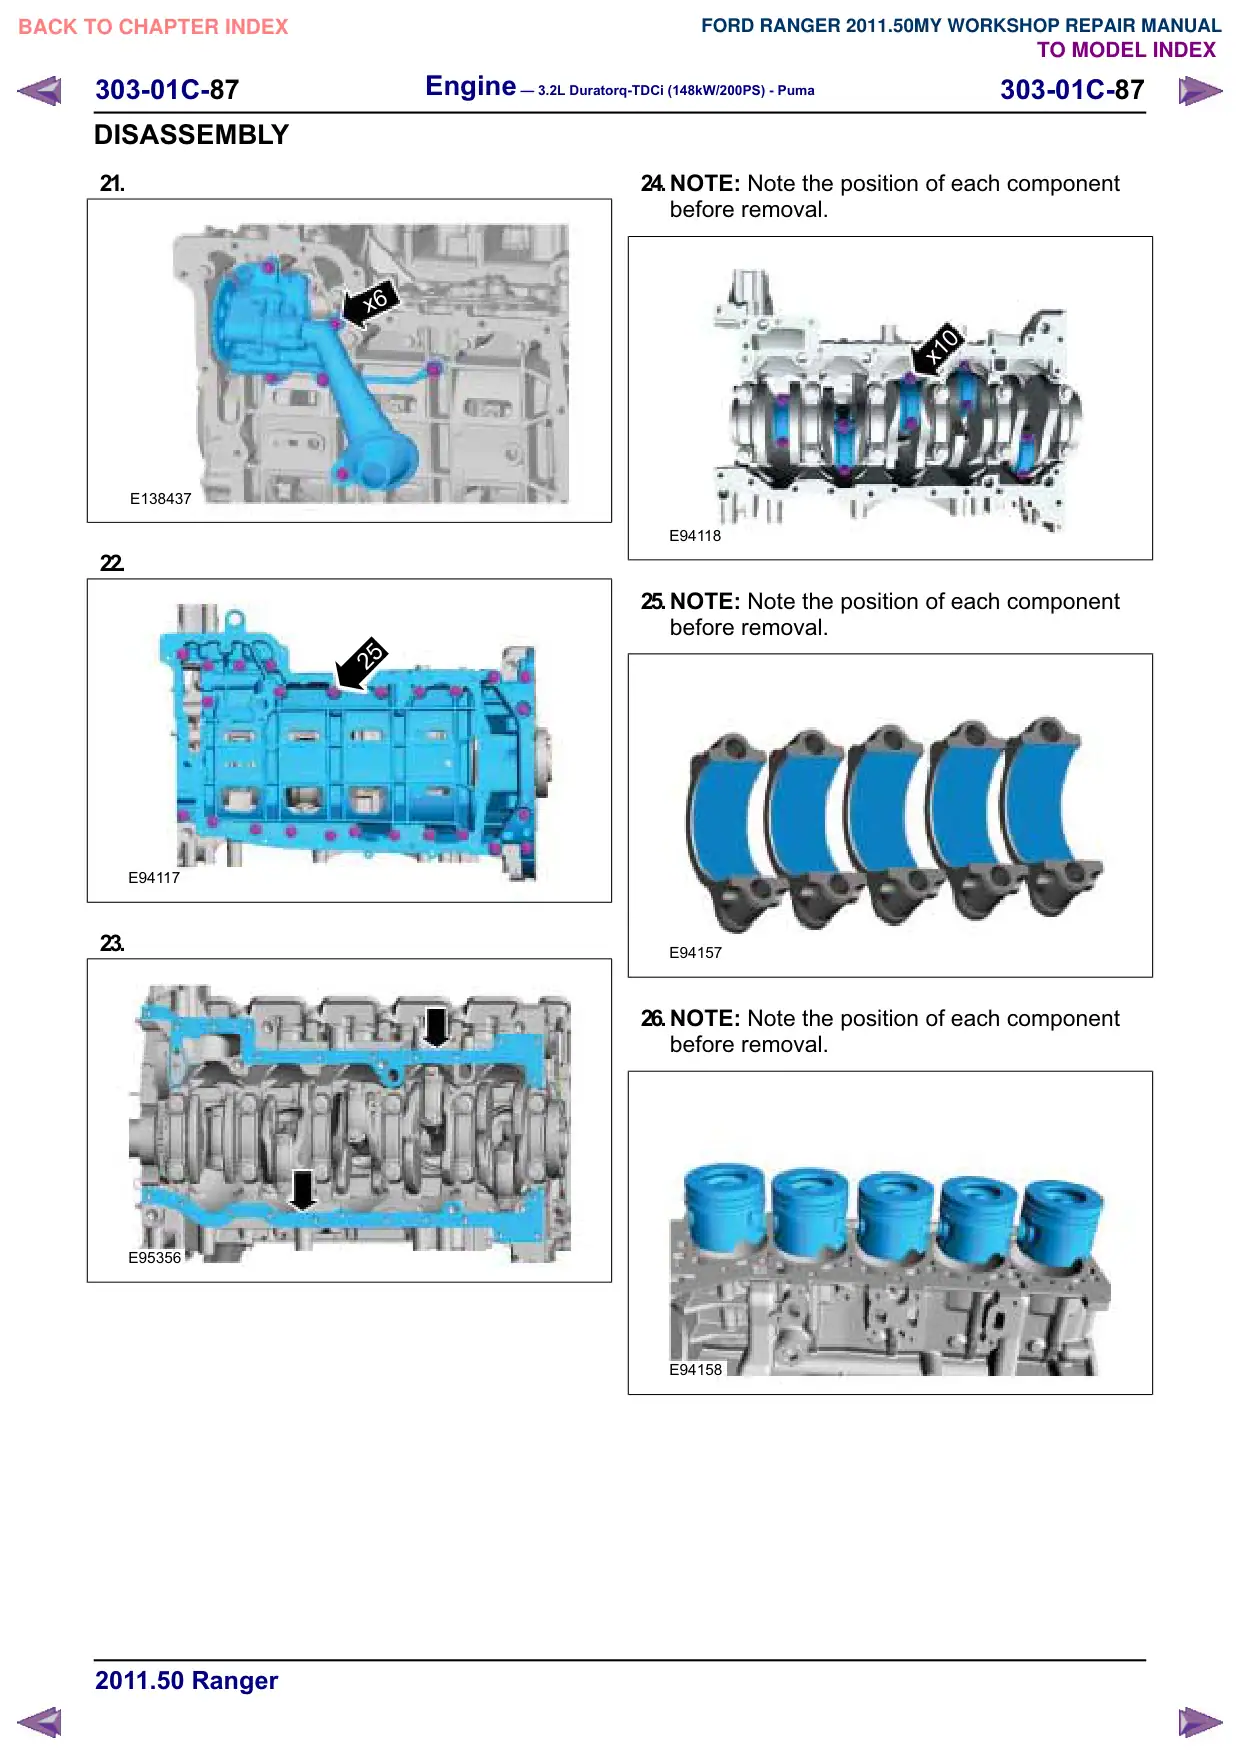
21.
x6
E138437
22.
E94117
23.
E95356
24.NOTE: Note the position of each component
before removal.
x10
E94118
25.NOTE: Note the position of each component
before removal.
E94157
26.NOTE: Note the position of each component
before removal.
E94158
Engine – 3.2L Duratorq-TDCi (148kW/200PS) - Puma
303-01C-88
303-01C-88
DISASSEMBLY
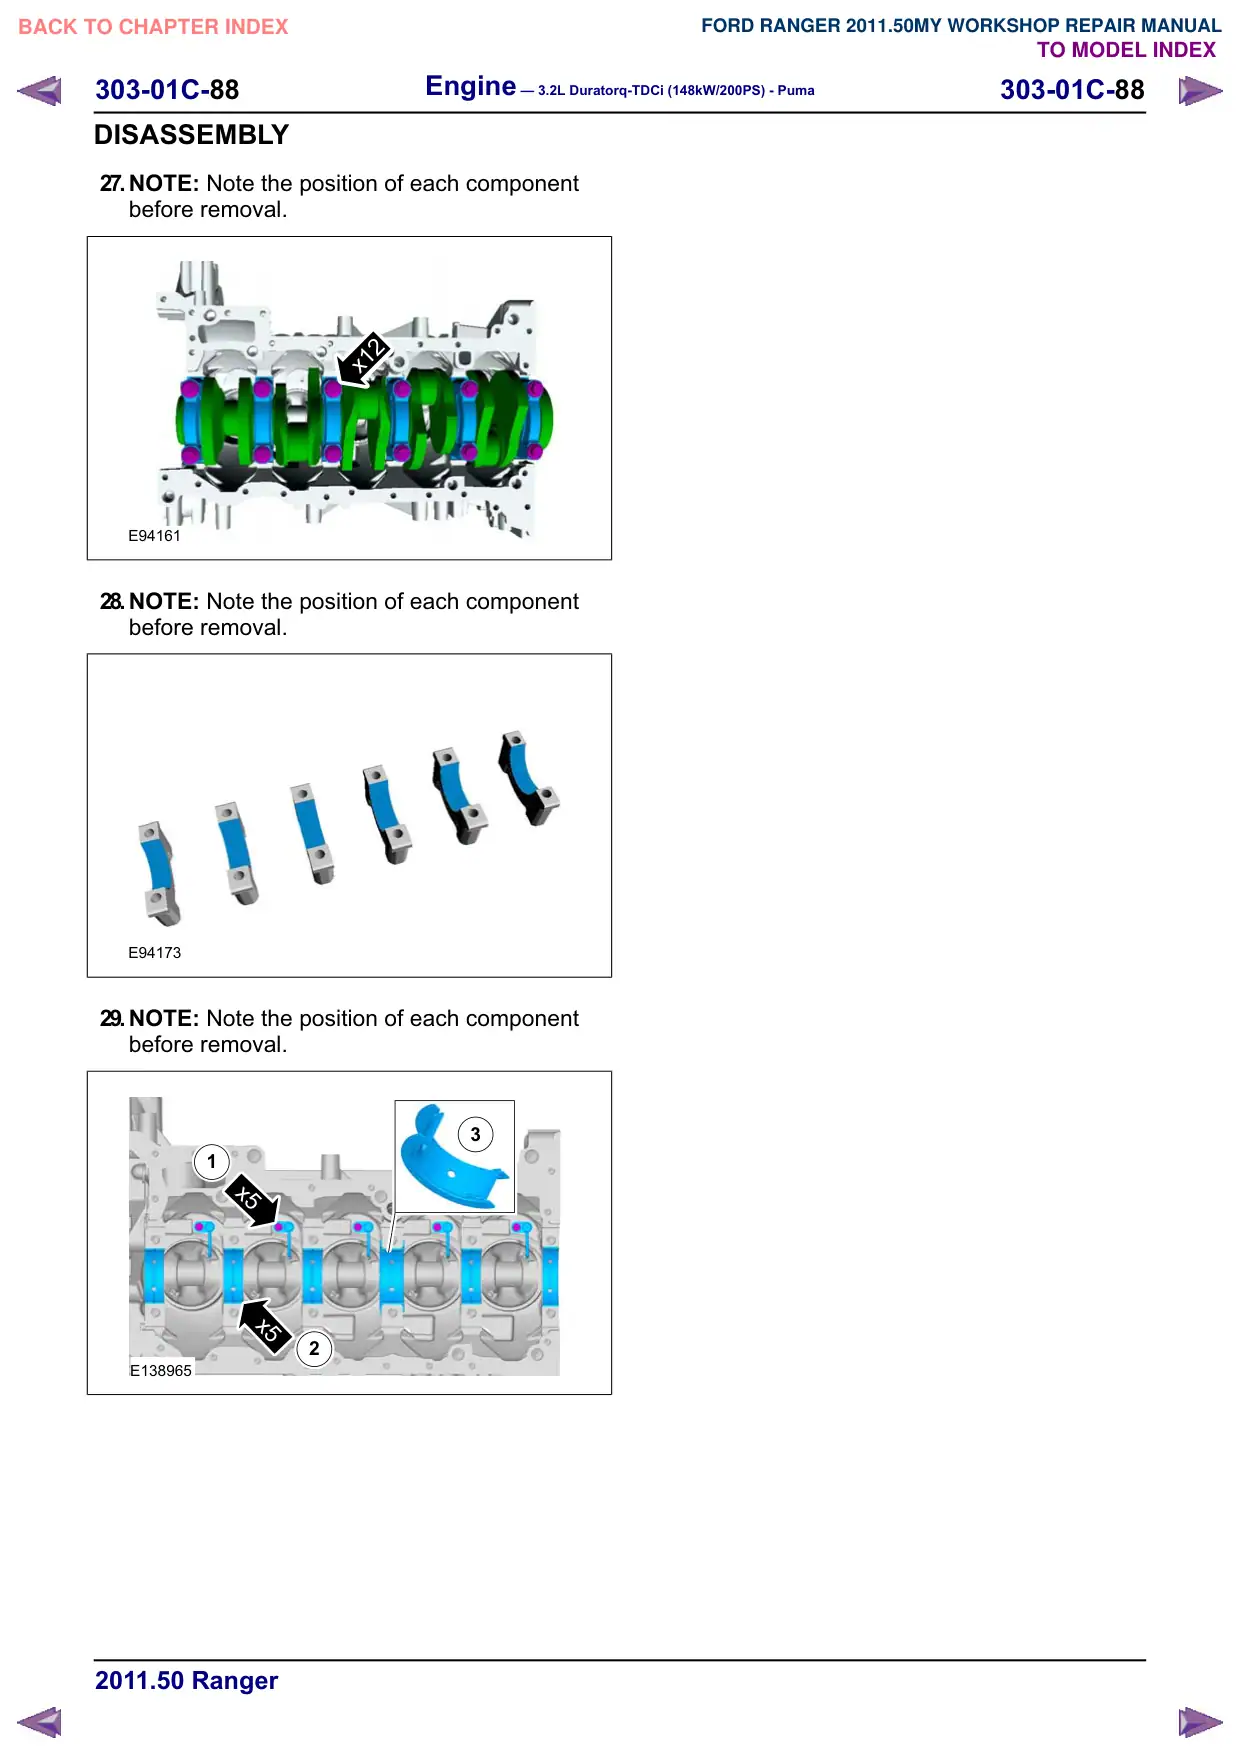
27.NOTE: Note the position of each component
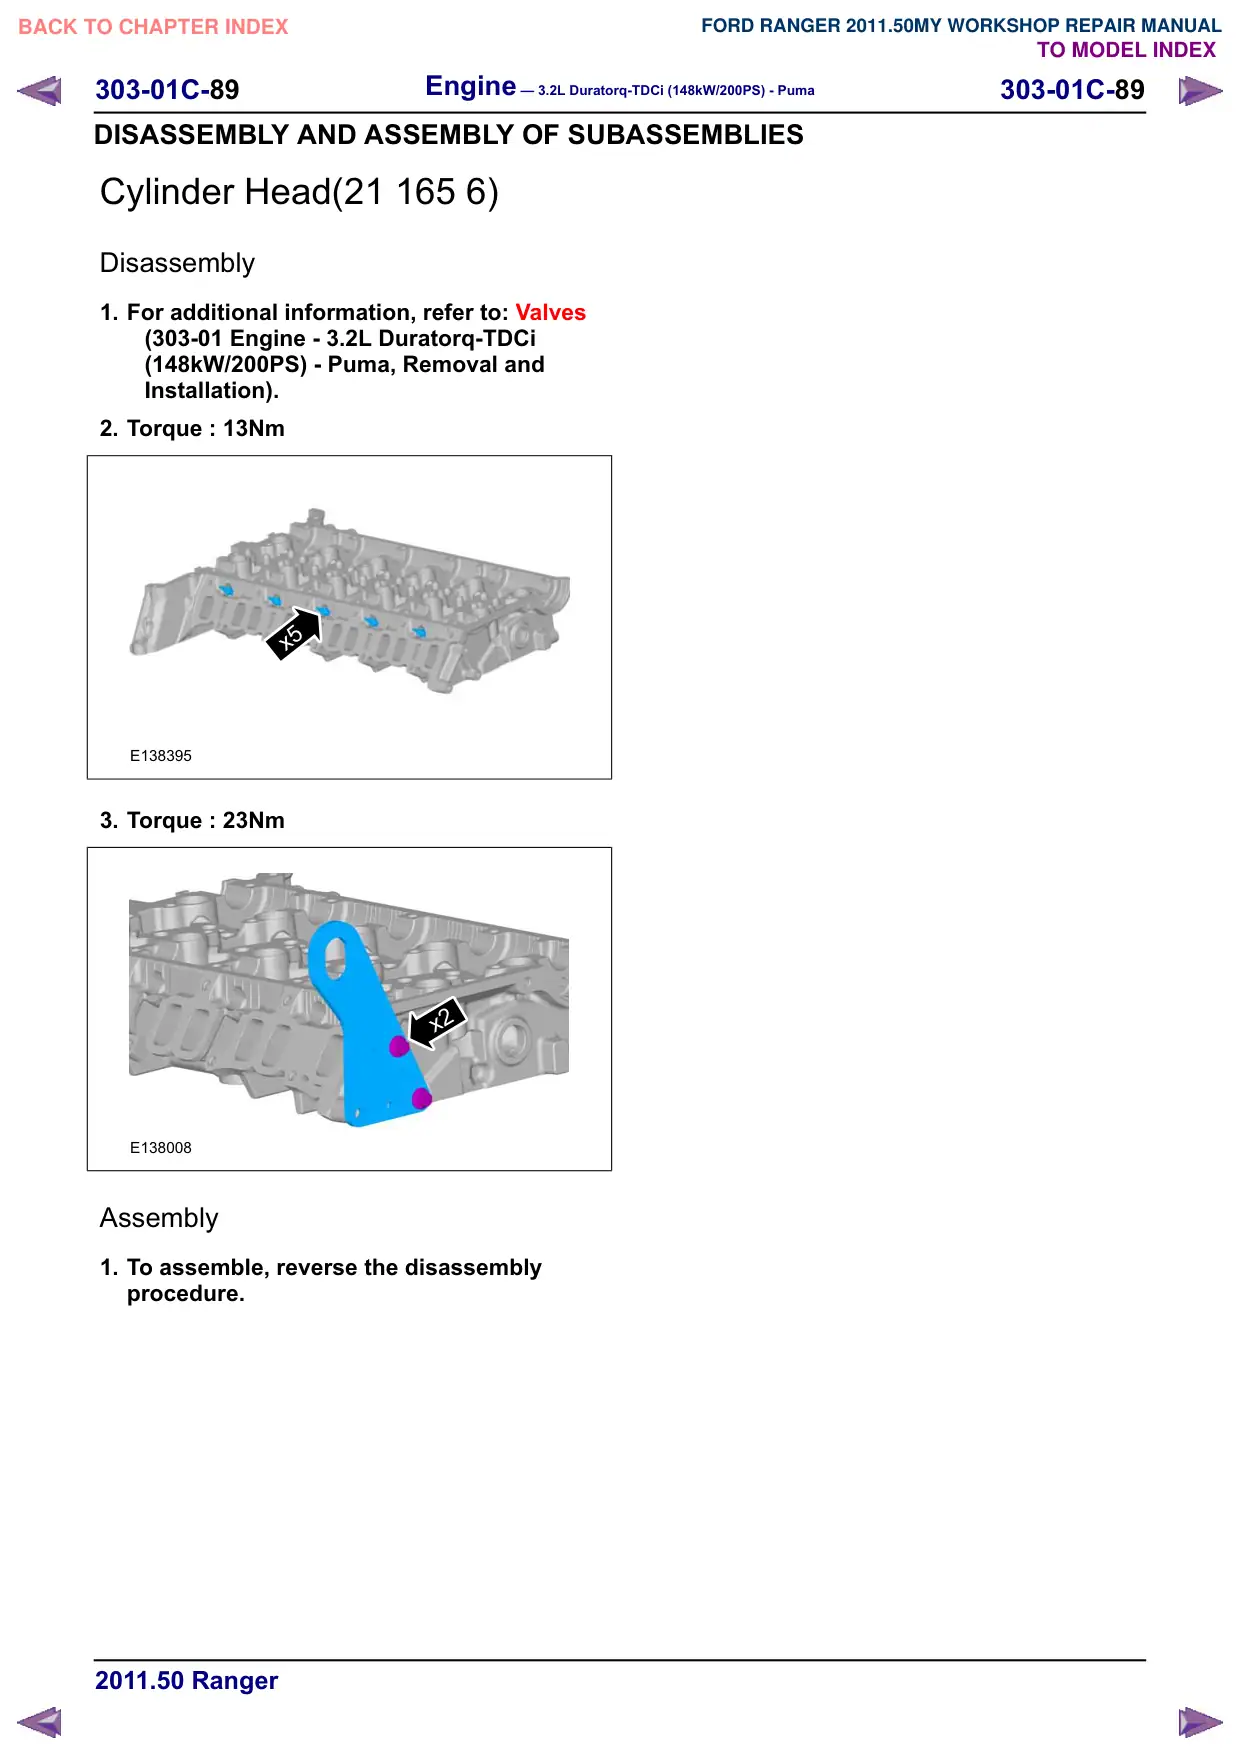
before removal.
x12
E94161
28.NOTE: Note the position of each component
before removal.
E94173
29.NOTE: Note the position of each component
before removal.
3
1
x5
x5
2
E138965
303-01C-91
Engine – 3.2L Duratorq-TDCi (148kW/200PS) - Puma
303-01C-91
ASSEMBLY
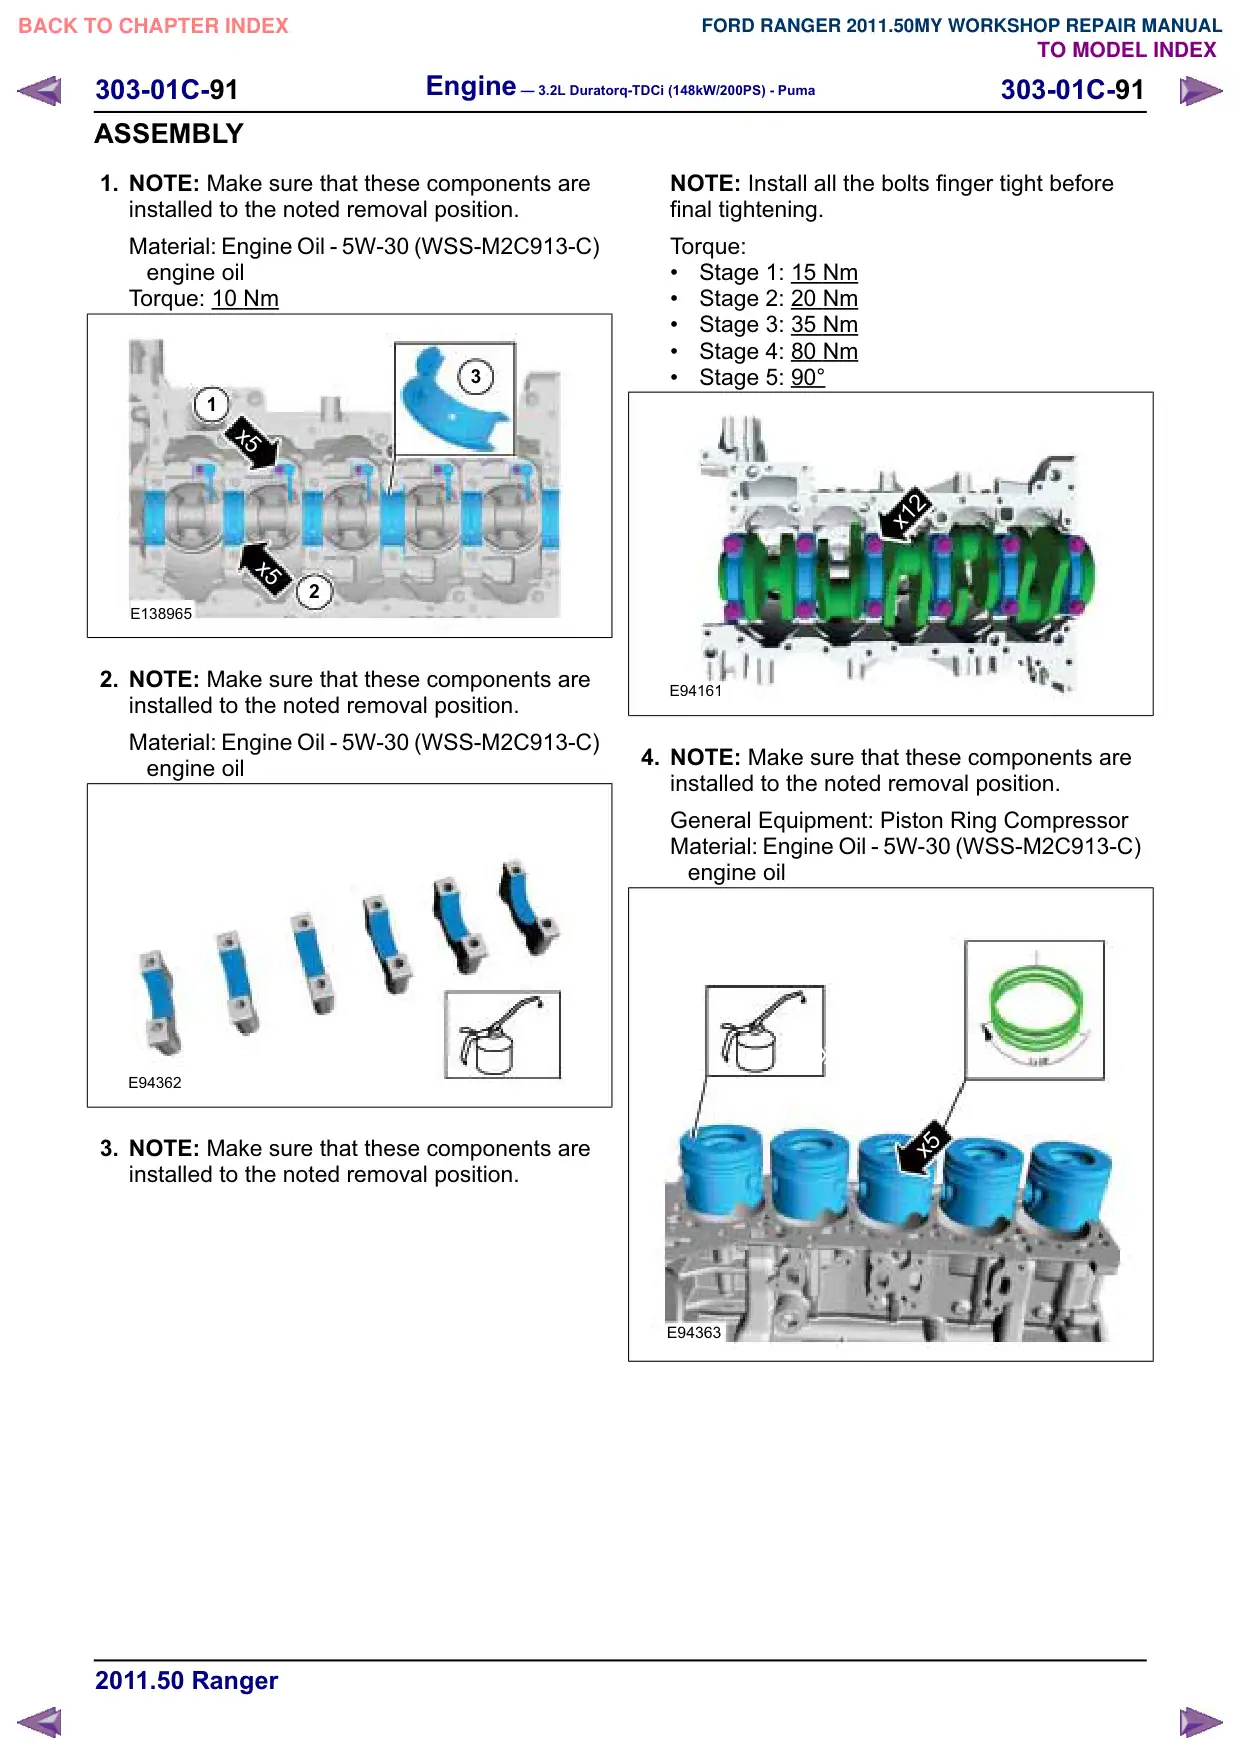
1. NOTE: Make sure that these components are
installed to the noted removal position.
Material: Engine Oil - 5W-30 (WSS-M2C913-C)
engine oil
Torque: 10
Nm
3
1
x5
x5
2
E138965
2. NOTE: Make sure that these components are
installed to the noted removal position.
Material: Engine Oil - 5W-30 (WSS-M2C913-C)
engine oil
E94362
3. NOTE: Make sure that these components are
installed to the noted removal position.
NOTE: Install all the bolts finger tight before
final tightening.
Torque:
Stage 1: 15
Nm
Stage 2: 20 Nm
Stage 3: 35
Nm
Stage 4: 80 Nm
Stage 5: 90°
x12
E94161
4. NOTE: Make sure that these components are
installed to the noted removal position.
General Equipment: Piston Ring Compressor
Material: Engine Oil - 5W-30 (WSS-M2C913-C)
engine oil
XXXX
X5X5XXX
x5
E94363
Engine – 3.2L Duratorq-TDCi (148kW/200PS) - Puma
303-01C-92
303-01C-92
ASSEMBLY
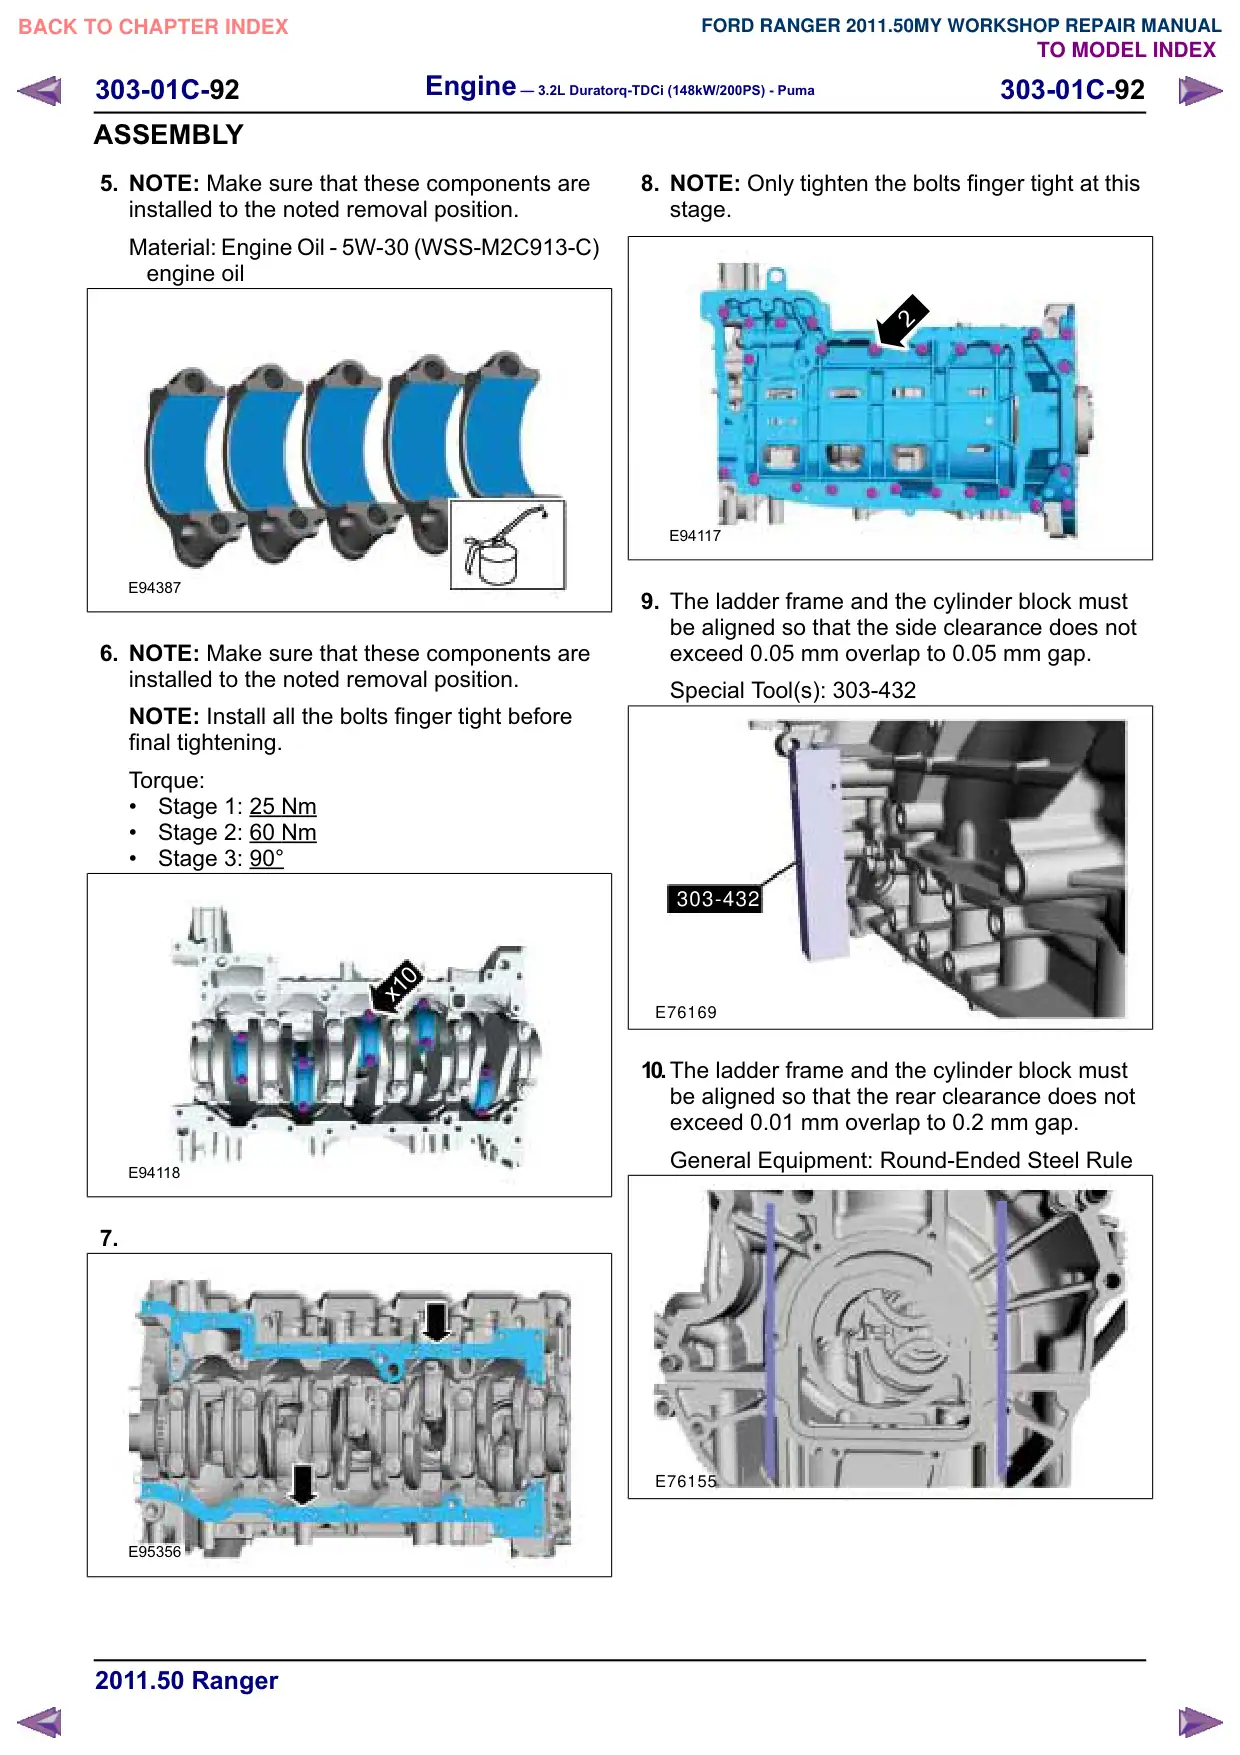
5. NOTE: Make sure that these components are
installed to the noted removal position.
Material: Engine Oil - 5W-30 (WSS-M2C913-C)
engine oil
E94387
6. NOTE: Make sure that these components are
installed to the noted removal position.
NOTE: Install all the bolts finger tight before
final tightening.
Torque:
Stage 1: 25
Nm
Stage 2: 60 Nm
Stage 3: 90°
x10
E94118
7.
E95356
8. NOTE: Only tighten the bolts finger tight at this
stage.
E94117
9. The ladder frame and the cylinder block must
be aligned so that the side clearance does not
exceed 0.05 mm overlap to 0.05 mm gap.
Special Tool(s): 303-432
303-432
E76169
10.The ladder frame and the cylinder block must
be aligned so that the rear clearance does not
exceed 0.01 mm overlap to 0.2 mm gap.
General Equipment: Round-Ended Steel Rule
E76155
303-01C-93
Engine – 3.2L Duratorq-TDCi (148kW/200PS) - Puma
303-01C-93
ASSEMBLY
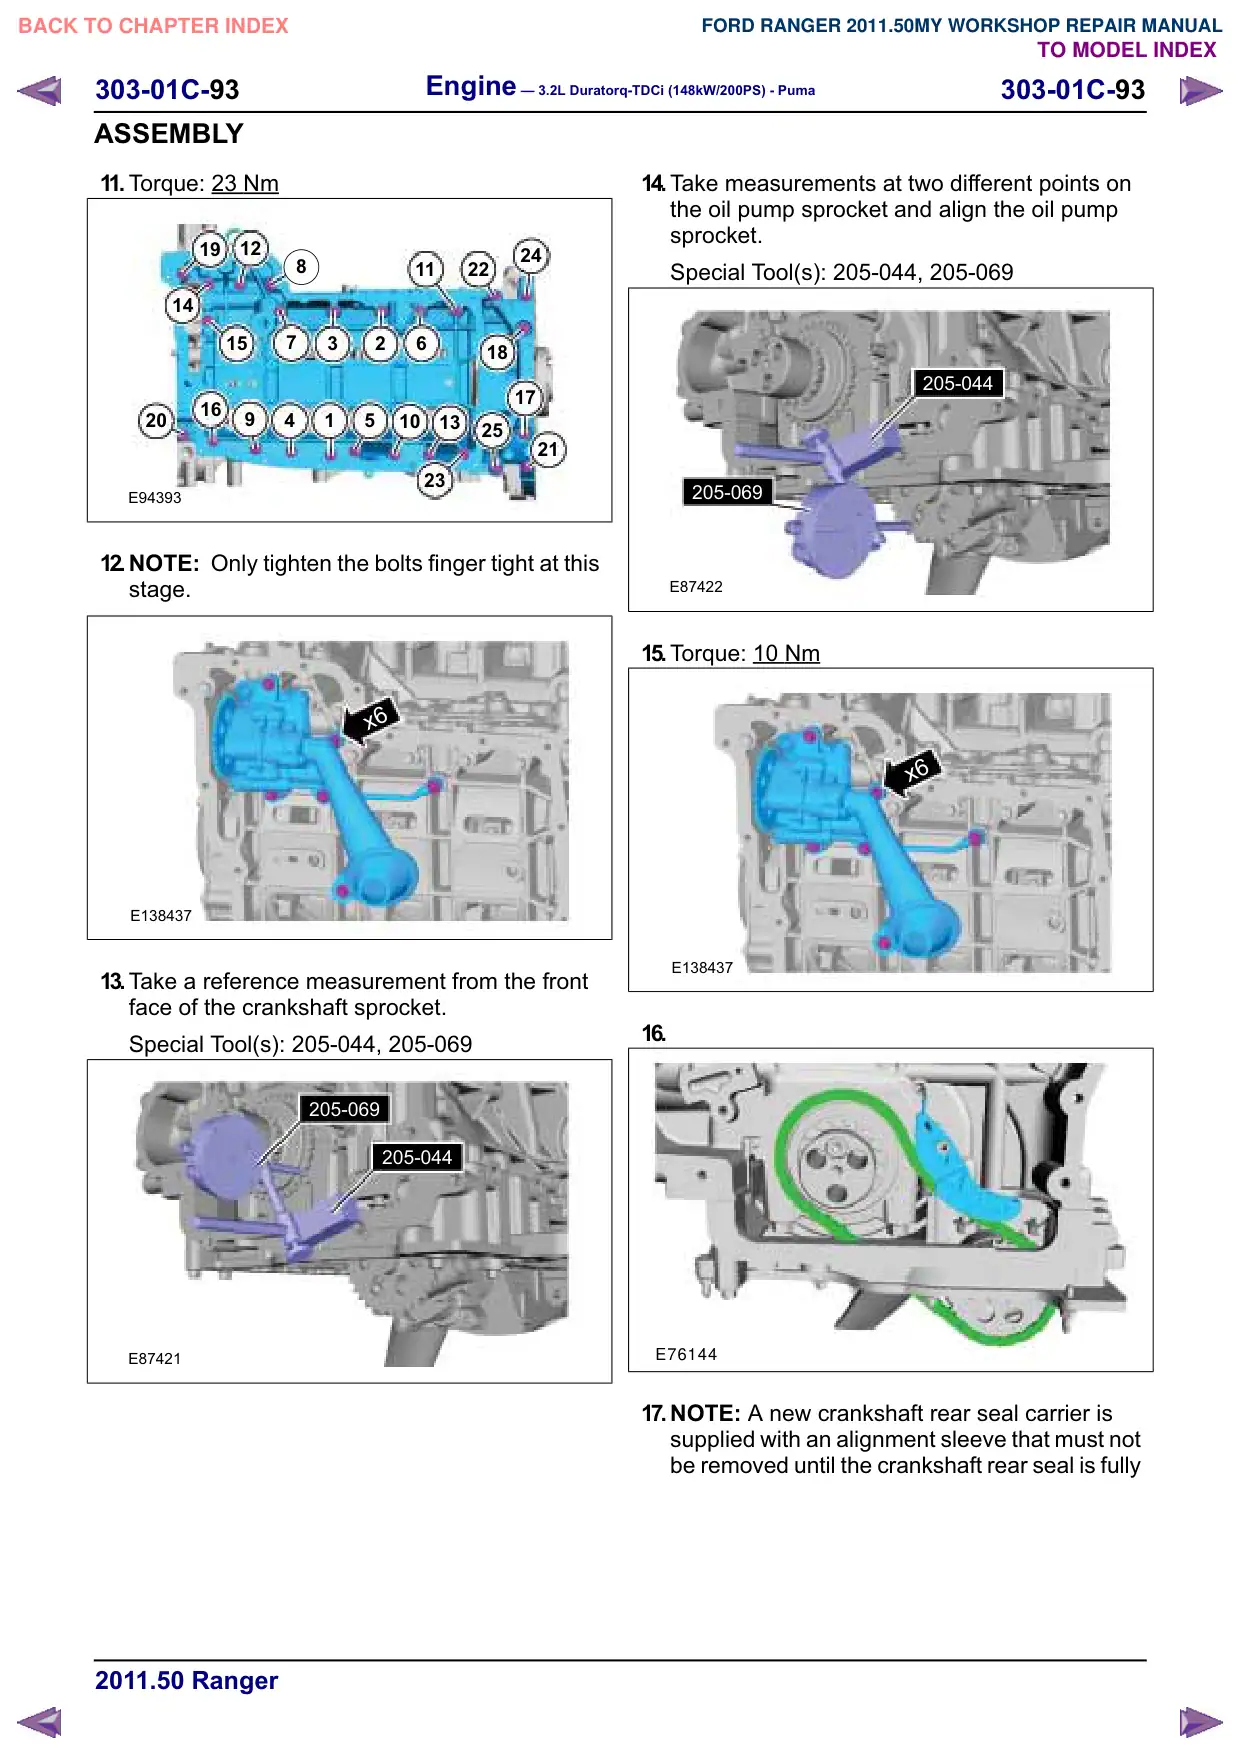
11. Torque: 23 Nm
12
19
24
8
11
22
14
15
7
3
2
6
18
17
16
20
4
1
5
10
13
25
21
23
E94393
12.NOTE: Only tighten the bolts finger tight at this
stage.
x6
E138437
13.Take a reference measurement from the front
face of the crankshaft sprocket.
Special Tool(s): 205-044, 205-069
205-069
205-044
E87421
14.Take measurements at two different points on
the oil pump sprocket and align the oil pump
sprocket.
Special Tool(s): 205-044, 205-069
205-044
205-069
E87422
15.Torque: 10
Nm
x6
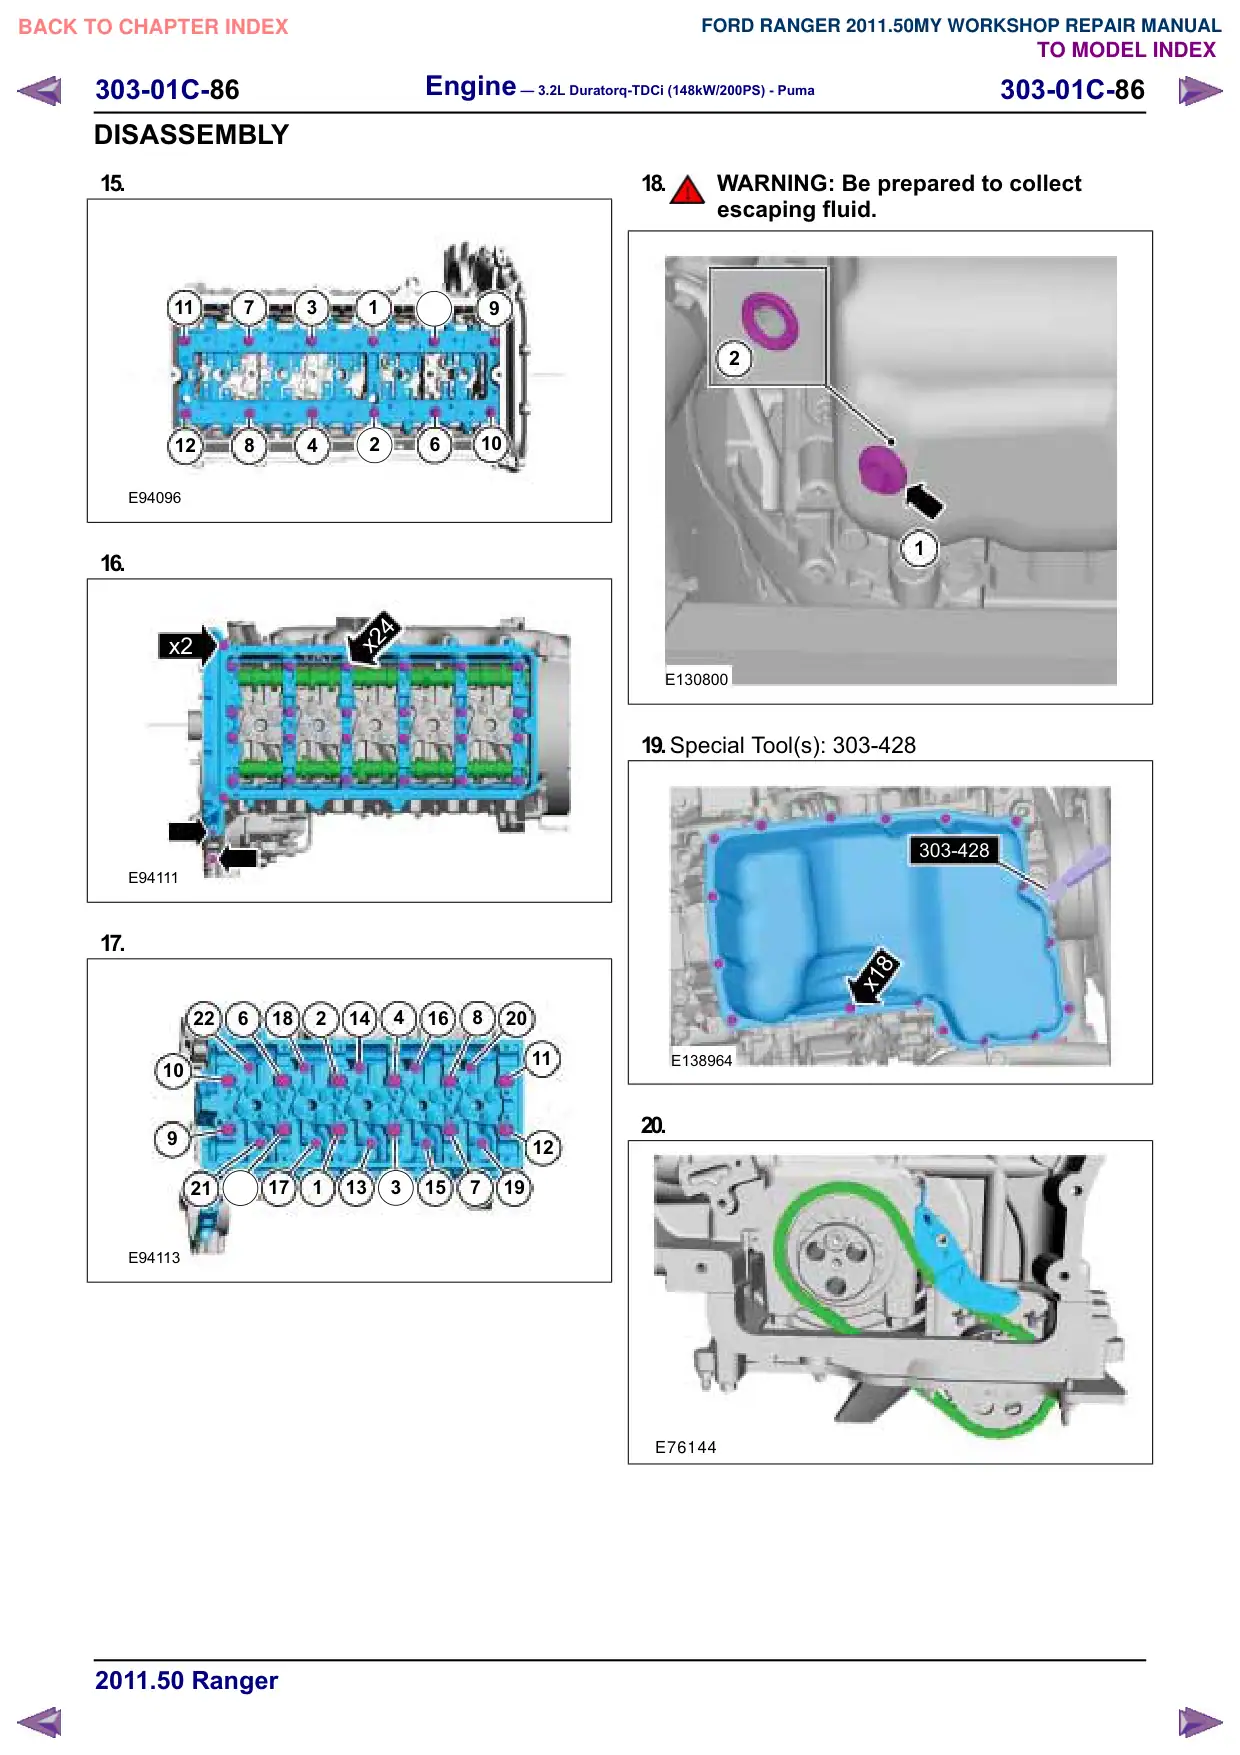
E138437
16.
E76144
17.NOTE: A new crankshaft rear seal carrier is
supplied with an alignment sleeve that must not
be removed until the crankshaft rear seal is fully
Engine – 3.2L Duratorq-TDCi (148kW/200PS) - Puma
303-01C-94
303-01C-94
ASSEMBLY
installed. Failure to follow this instruction may
result in damage to the vehicle.
Clean the area on the engine before installing
a new crankshaft rear seal carrier.
Check the two foam pads are located as
shown on the ladder frame gasket.
E58864
18.Material: Engine Oil - 5W-30 (WSS-M2C913-C)
engine oil
E131398
19.NOTE: Install the new crankshaft rear seal
carrier within five minutes of applying the
recommended sealant.
Material: Silicone Sealant LB (WSE-M4G323-A4
/ 2U7J-M4G323-AA) sealant
3mm
E131393
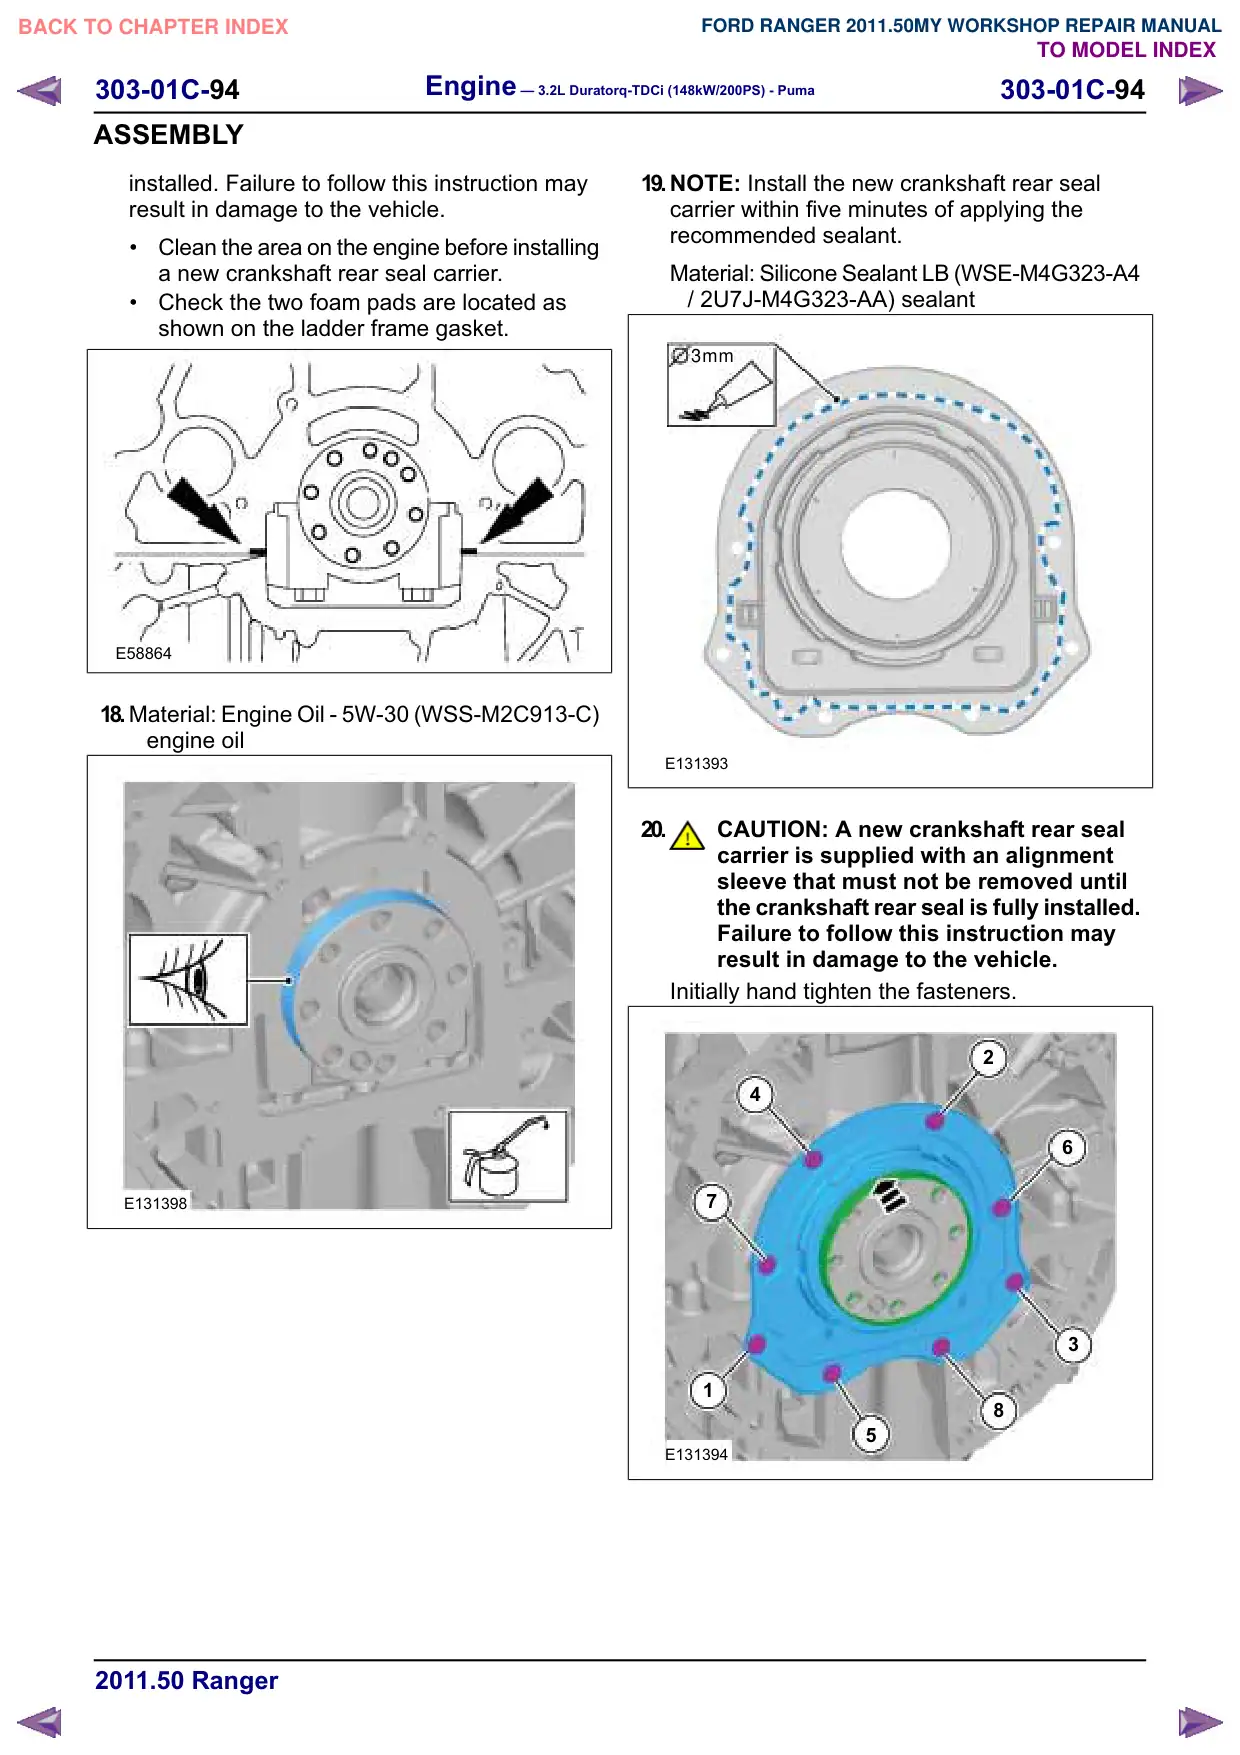
20.
CAUTION: A new crankshaft rear seal
carrier is supplied with an alignment
sleeve that must not be removed until
the crankshaft rear seal is fully installed.
Failure to follow this instruction may
result in damage to the vehicle.
Initially hand tighten the fasteners.
2
4
6
7
3
1
8
5
E131394
303-01C-95
Engine – 3.2L Duratorq-TDCi (148kW/200PS) - Puma
303-01C-95
ASSEMBLY
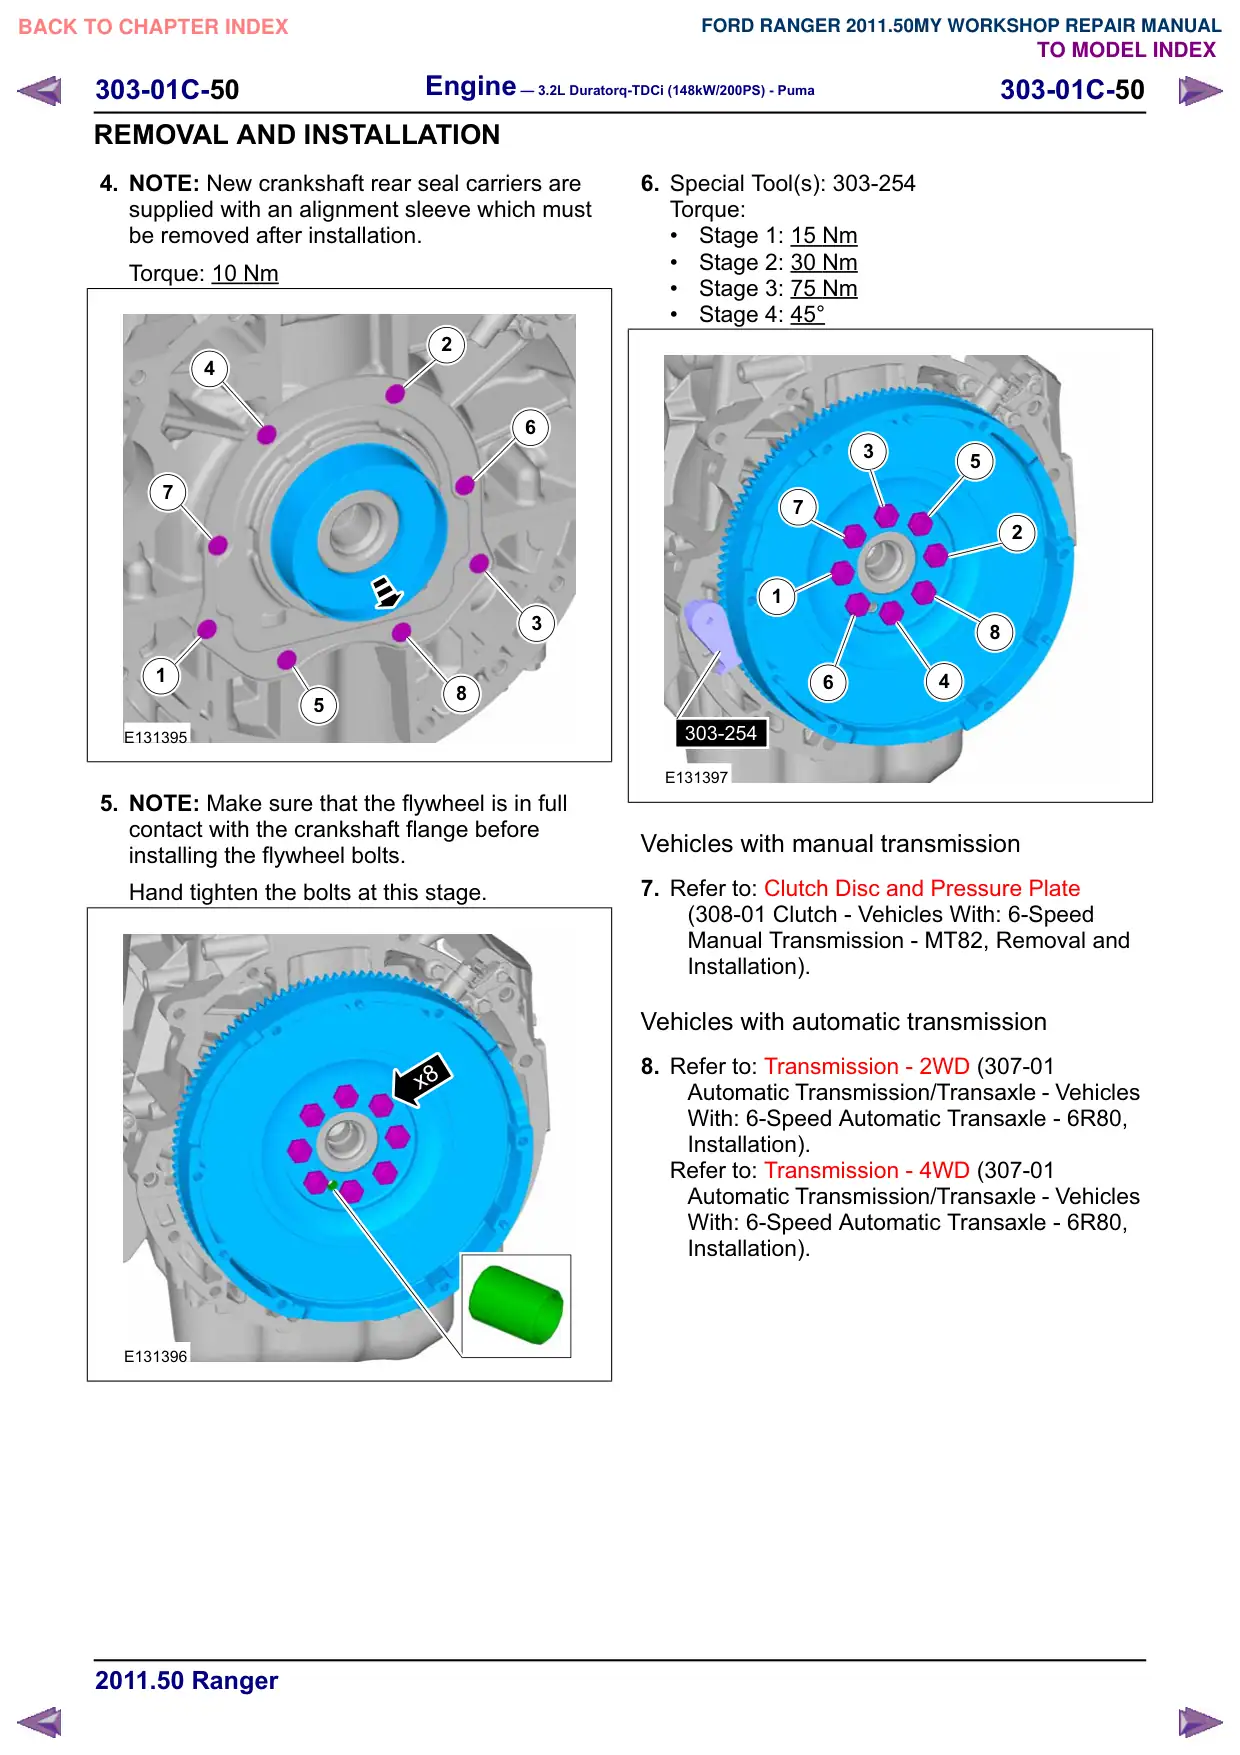
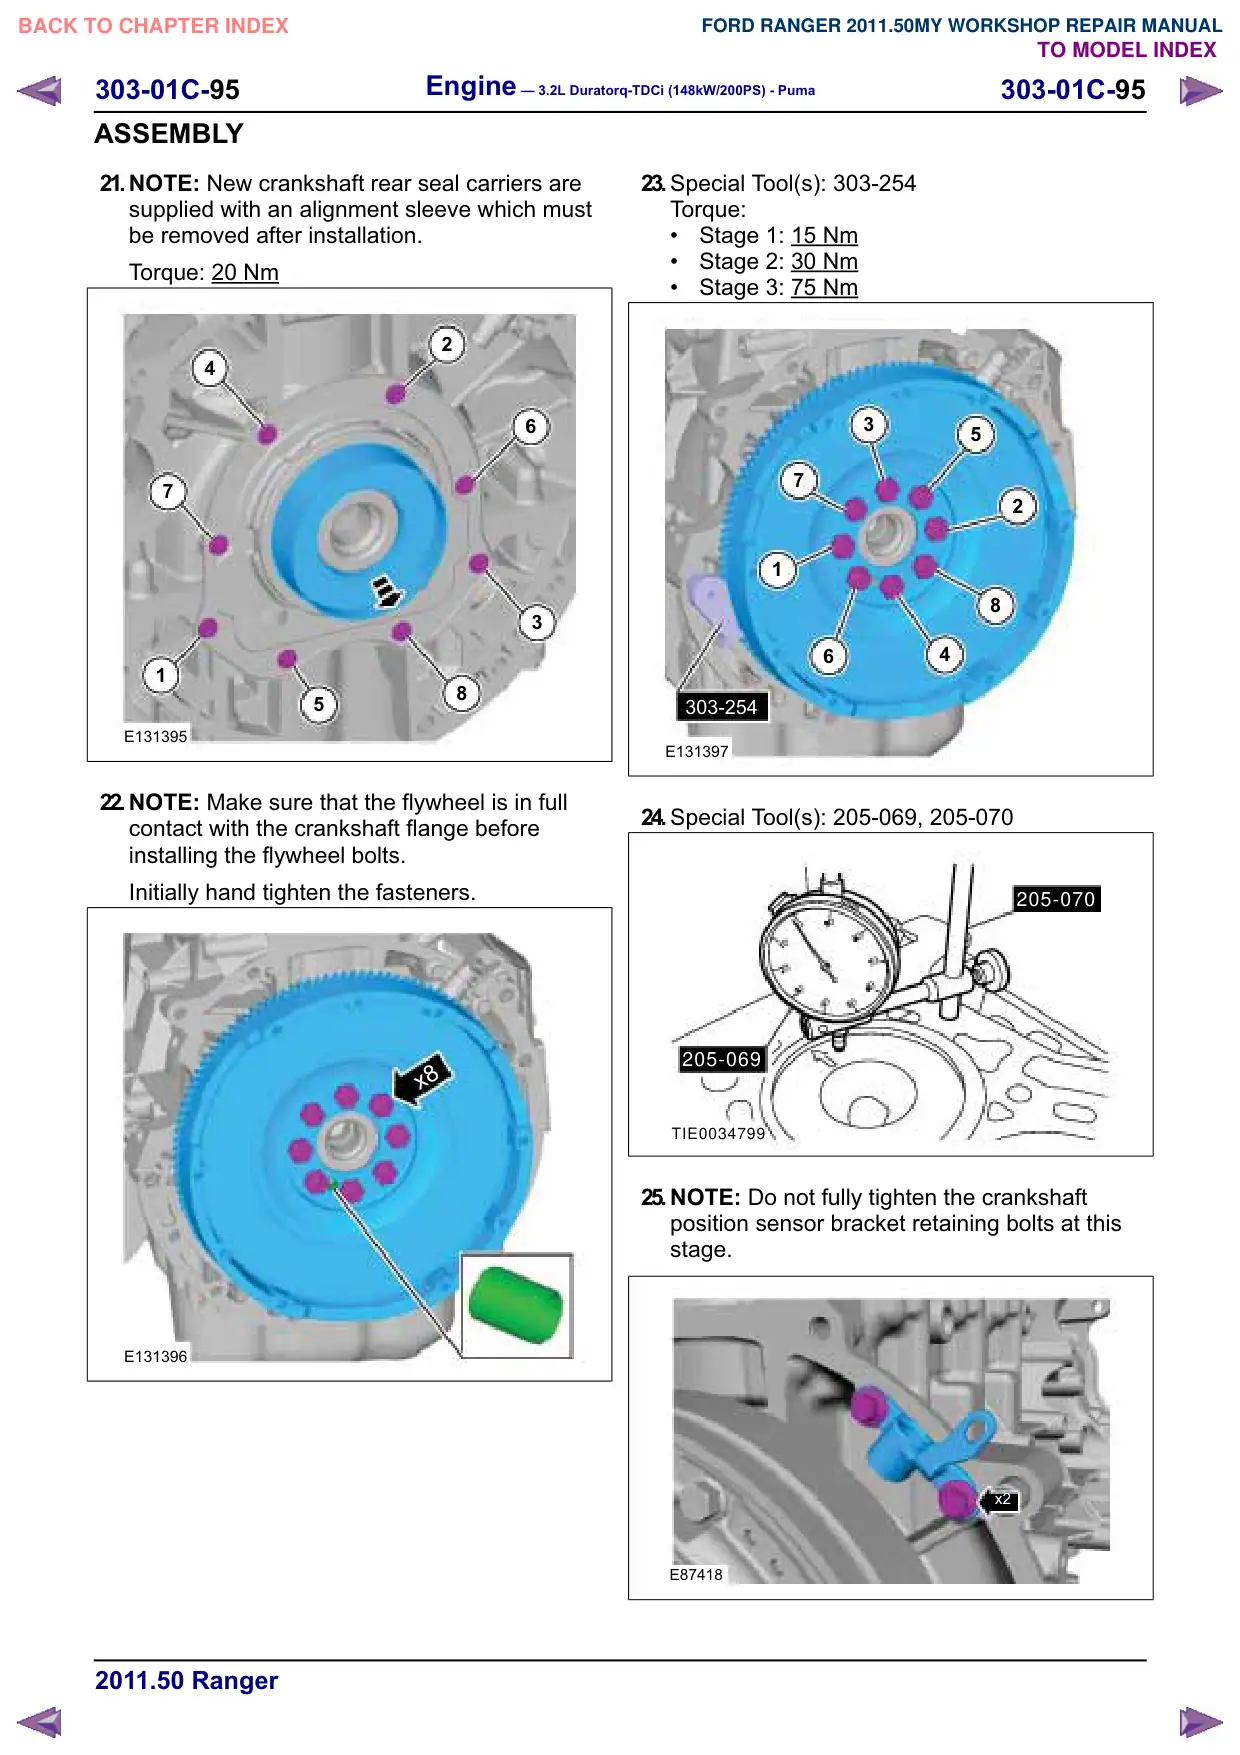
21.NOTE: New crankshaft rear seal carriers are
supplied with an alignment sleeve which must
be removed after installation.
Torque: 20
Nm
2
4
6
7
3
1
8
5
E131395
22.NOTE: Make sure that the flywheel is in full
contact with the crankshaft flange before
installing the flywheel bolts.
Initially hand tighten the fasteners.
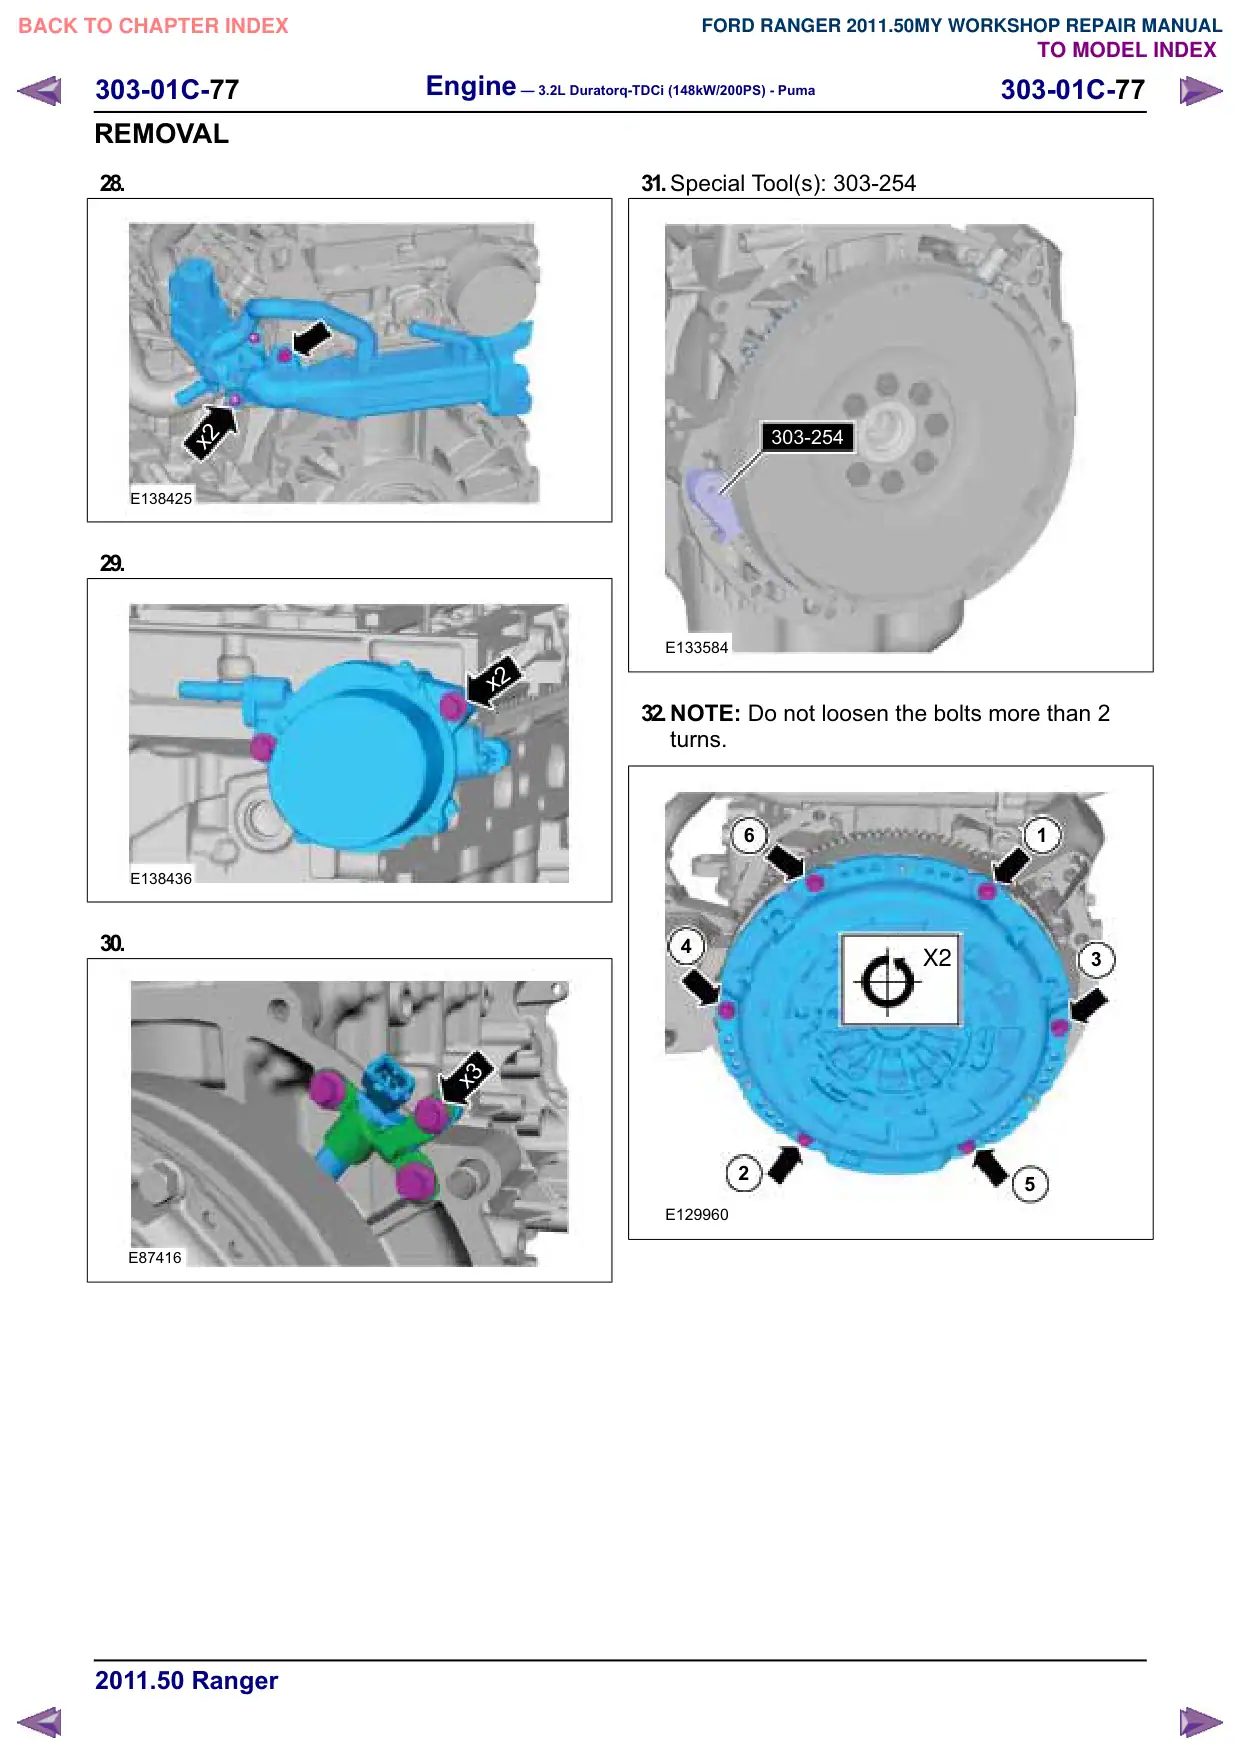
x8
E131396
23.Special Tool(s): 303-254
Torque:
Stage 1: 15
Nm
Stage 2: 30 Nm
Stage 3: 75 Nm
3
5
7
2
1
8
4
6
303-254
E131397
24.Special Tool(s): 205-069, 205-070
205-070
205-069
TIE0034799
25.NOTE: Do not fully tighten the crankshaft
position sensor bracket retaining bolts at this
stage.
x2
E87418
Engine – 3.2L Duratorq-TDCi (148kW/200PS) - Puma
303-01C-96
303-01C-96
ASSEMBLY
26.NOTE: After installation do not move the special
tool.
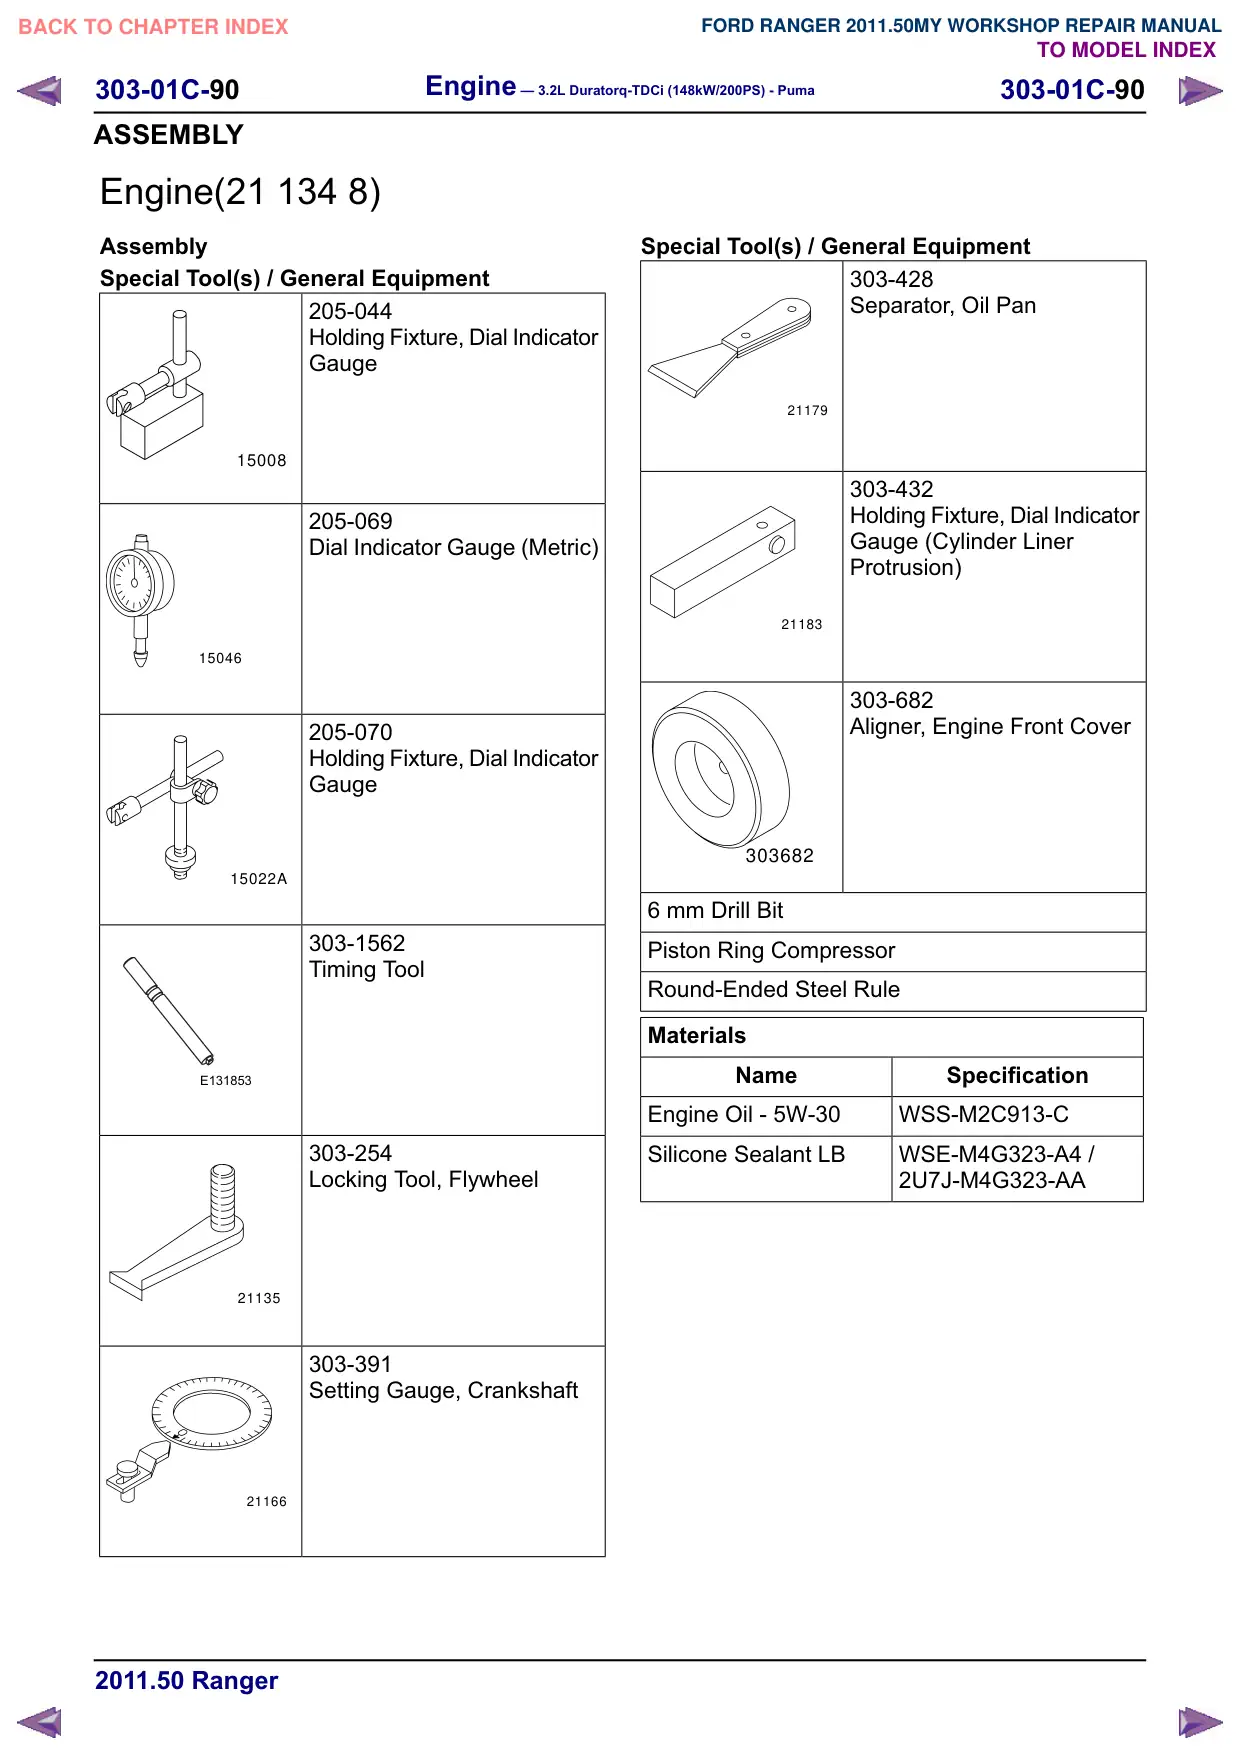
Special Tool(s): 303-391
303-391
TIE0034801
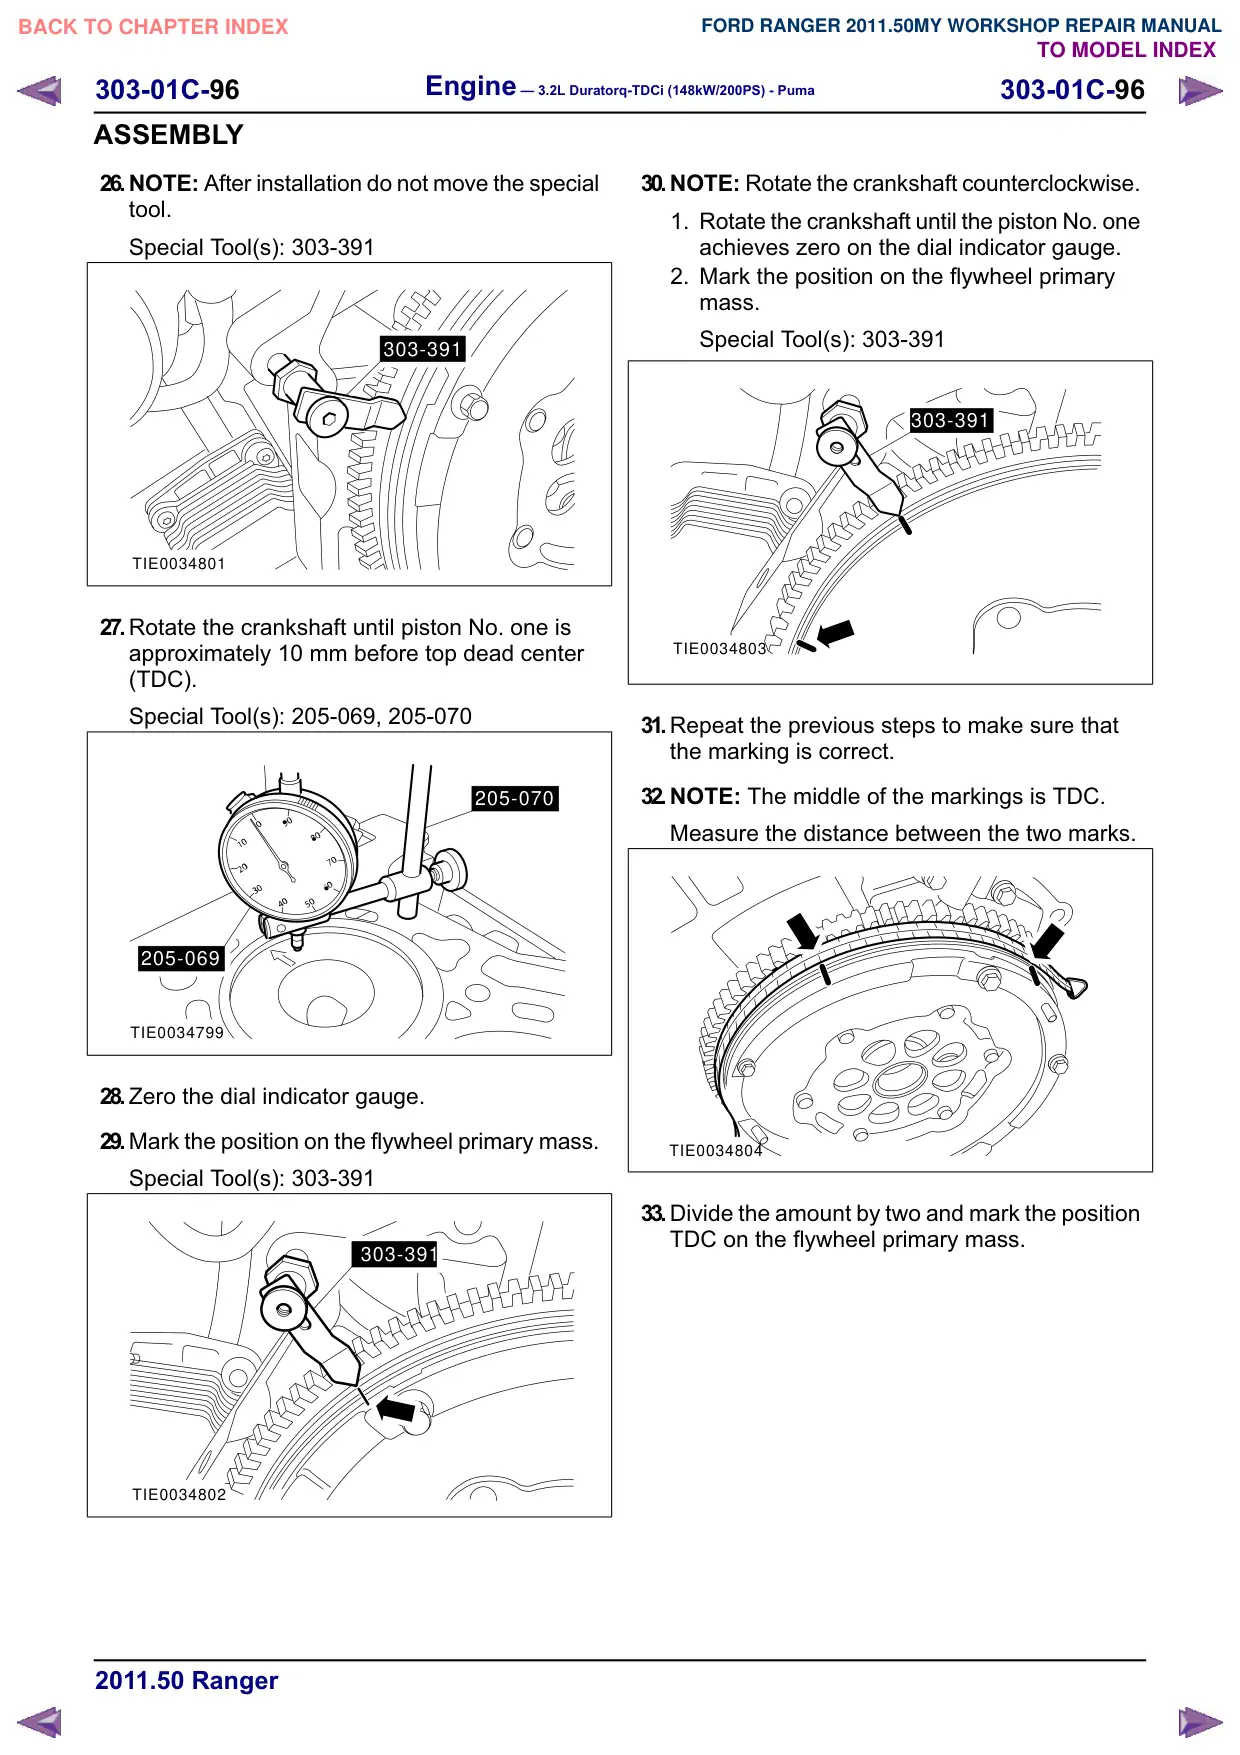
27.Rotate the crankshaft until piston No. one is
approximately 10 mm before top dead center
(TDC).
Special Tool(s): 205-069, 205-070
205-070
205-069
TIE0034799
28.Zero the dial indicator gauge.
29.Mark the position on the flywheel primary mass.
Special Tool(s): 303-391
303-391
TIE0034802
30.NOTE: Rotate the crankshaft counterclockwise.
1. Rotate the crankshaft until the piston No. one
achieves zero on the dial indicator gauge.
2. Mark the position on the flywheel primary
mass.
Special Tool(s): 303-391
303-391
TIE0034803
31.Repeat the previous steps to make sure that
the marking is correct.
32.NOTE: The middle of the markings is TDC.
Measure the distance between the two marks.
TIE0034804
33.Divide the amount by two and mark the position
TDC on the flywheel primary mass.
Engine – 3.2L Duratorq-TDCi (148kW/200PS) - Puma
303-01C-97
303-01C-97
ASSEMBLY
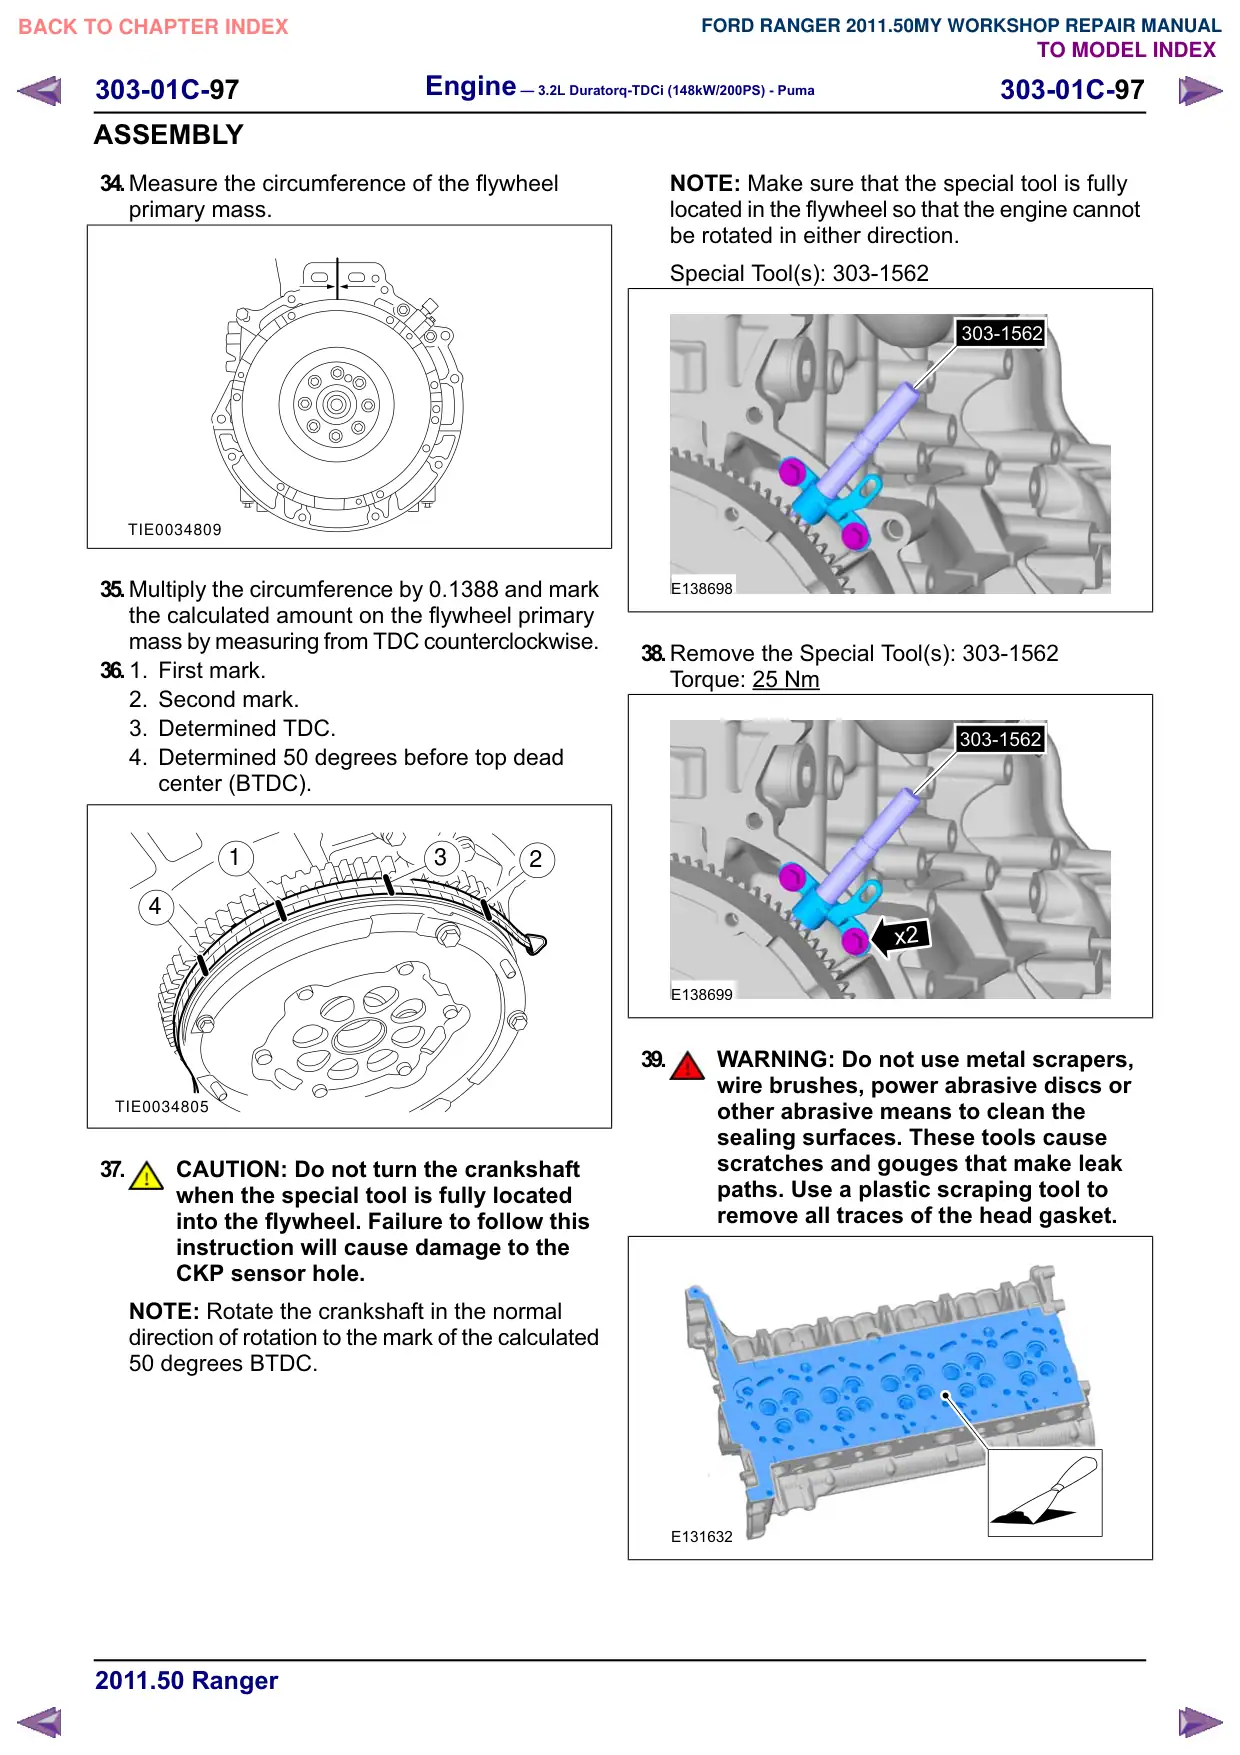
34.Measure the circumference of the flywheel
primary mass.
TIE0034809
35.Multiply the circumference by 0.1388 and mark
the calculated amount on the flywheel primary
mass by measuring from TDC counterclockwise.
36.
1.
First mark.
2. Second mark.
3. Determined TDC.
4. Determined 50 degrees before top dead
center (BTDC).
1
3
2
4
TIE0034805
37.
CAUTION: Do not turn the crankshaft
when the special tool is fully located
into the flywheel. Failure to follow this
instruction will cause damage to the
CKP sensor hole.
NOTE: Rotate the crankshaft in the normal
direction of rotation to the mark of the calculated
50 degrees BTDC.
NOTE: Make sure that the special tool is fully
located in the flywheel so that the engine cannot
be rotated in either direction.
Special Tool(s): 303-1562
303-1562
E138698
38.Remove the Special Tool(s): 303-1562
Torque: 25 Nm
303-1562
x2
E138699
39.
WARNING: Do not use metal scrapers,
wire brushes, power abrasive discs or
other abrasive means to clean the
sealing surfaces. These tools cause
scratches and gouges that make leak
paths. Use a plastic scraping tool to
remove all traces of the head gasket.
E131632
303-01C-98
Engine – 3.2L Duratorq-TDCi (148kW/200PS) - Puma
303-01C-98
ASSEMBLY
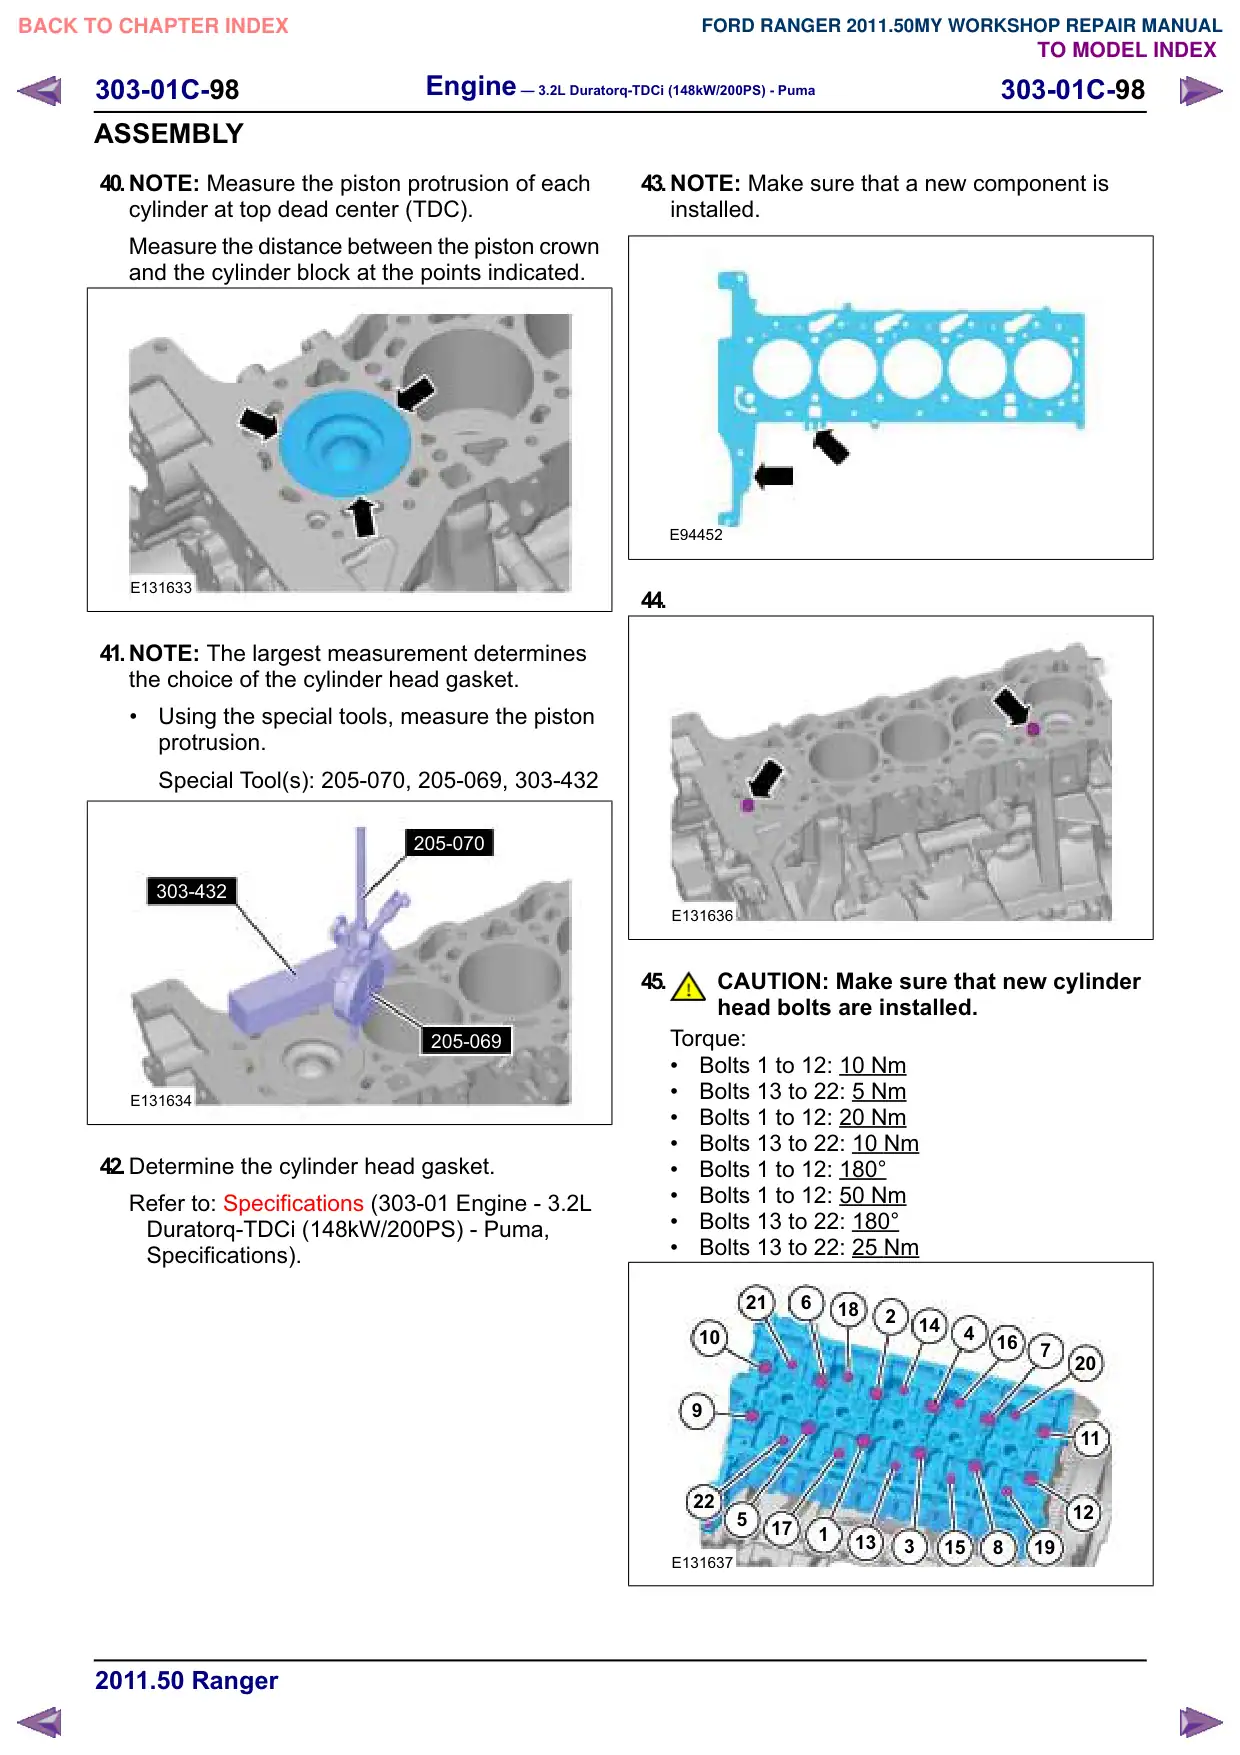
40.NOTE: Measure the piston protrusion of each
cylinder at top dead center (TDC).
Measure the distance between the piston crown
and the cylinder block at the points indicated.
E131633
41.NOTE: The largest measurement determines
the choice of the cylinder head gasket.
Using the special tools, measure the piston
protrusion.
Special Tool(s): 205-070, 205-069, 303-432
205-070
303-432
205-069
E131634
42.Determine the cylinder head gasket.
Refer to: Specifications (303-01 Engine - 3.2L
Duratorq-TDCi (148kW/200PS) - Puma,
Specifications).
43.NOTE: Make sure that a new component is
installed.
E94452
44.
E131636
45.
CAUTION: Make sure that new cylinder
head bolts are installed.
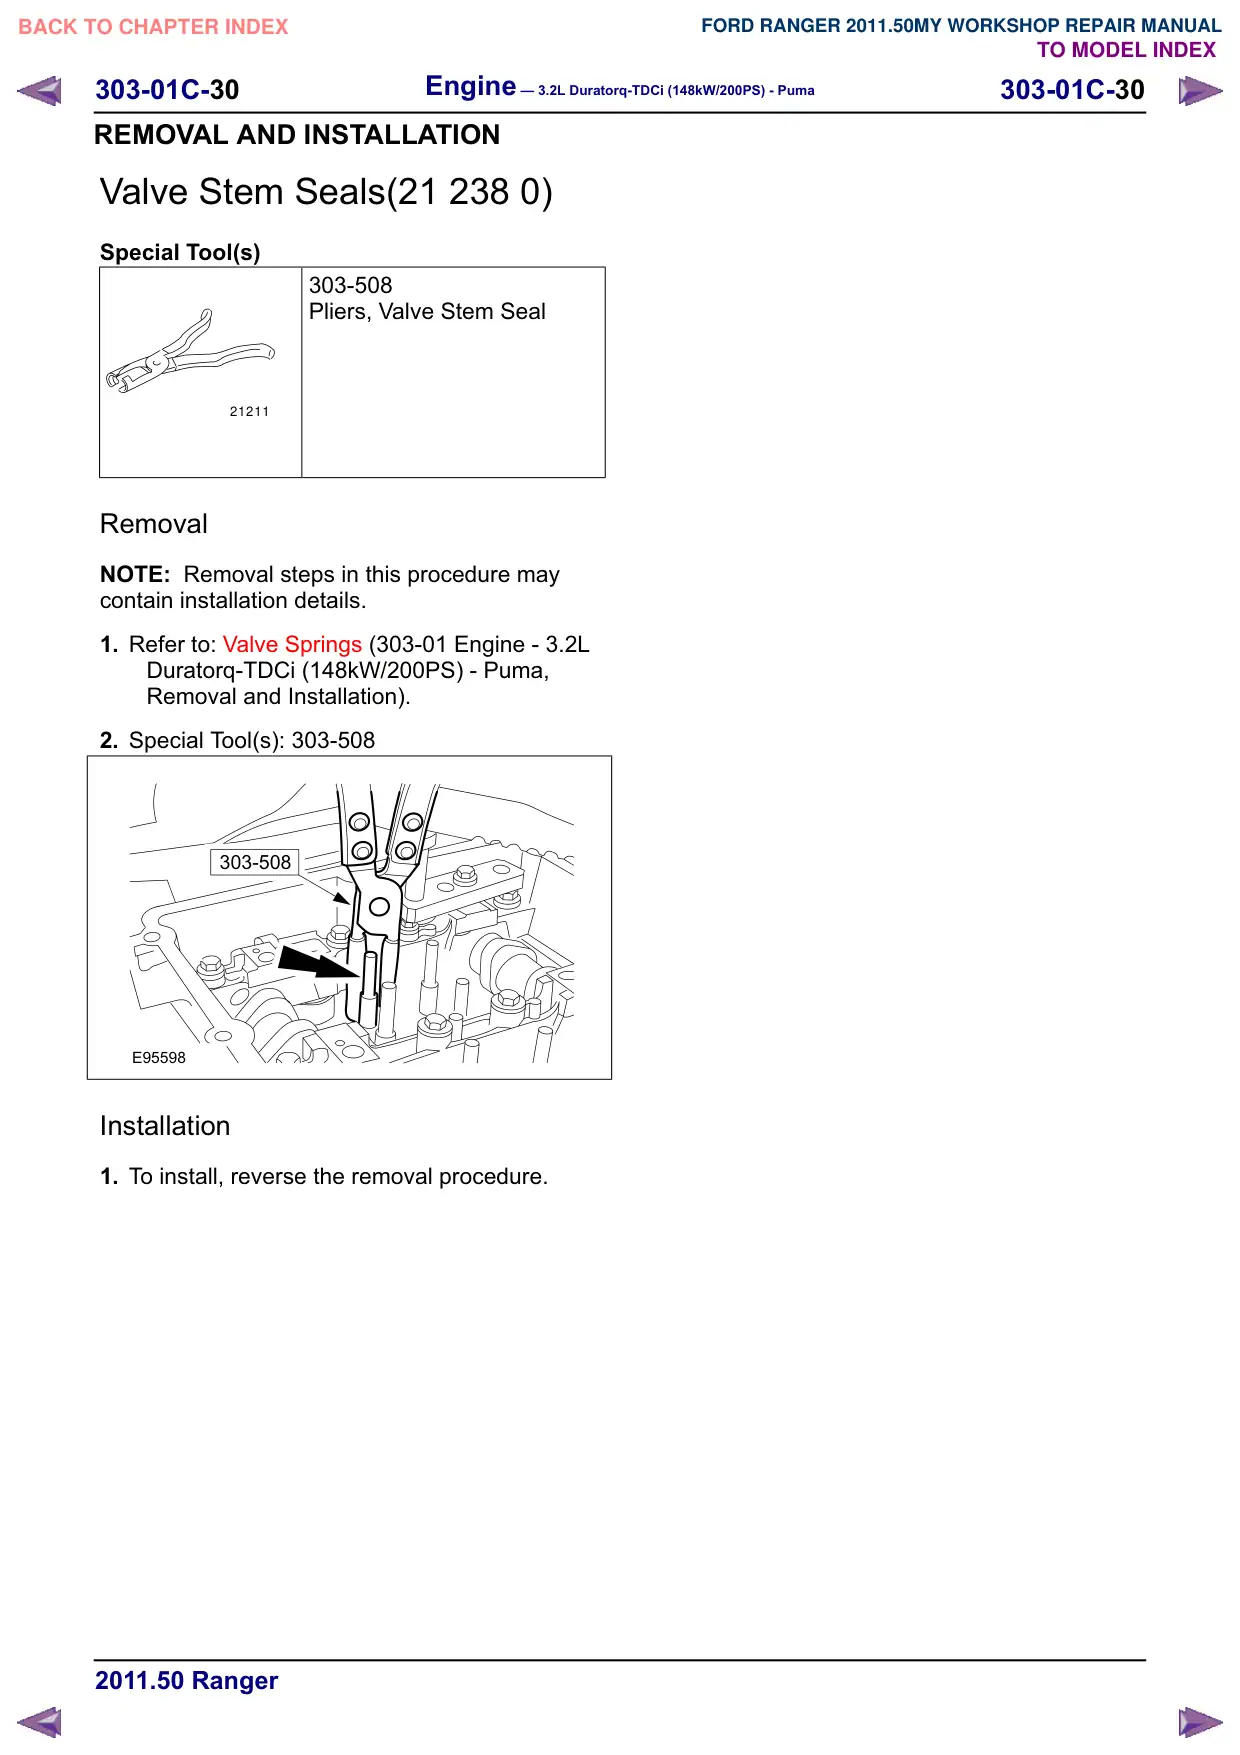
Torque:
Bolts 1 to 12: 10 Nm
Bolts 13 to 22: 5 Nm
Bolts 1 to 12: 20 Nm
Bolts 13 to 22: 10
Nm
Bolts 1 to 12: 180°
Bolts 1 to 12: 50 Nm
Bolts 13 to 22: 180°
Bolts 13 to 22: 25 Nm
21
6
18
2
14
4
10
16
7
20
11
22
12
5
17
1
13
3
15
8
19
E131637
303-01C-100
Engine – 3.2L Duratorq-TDCi (148kW/200PS) - Puma
303-01C-100
ASSEMBLY
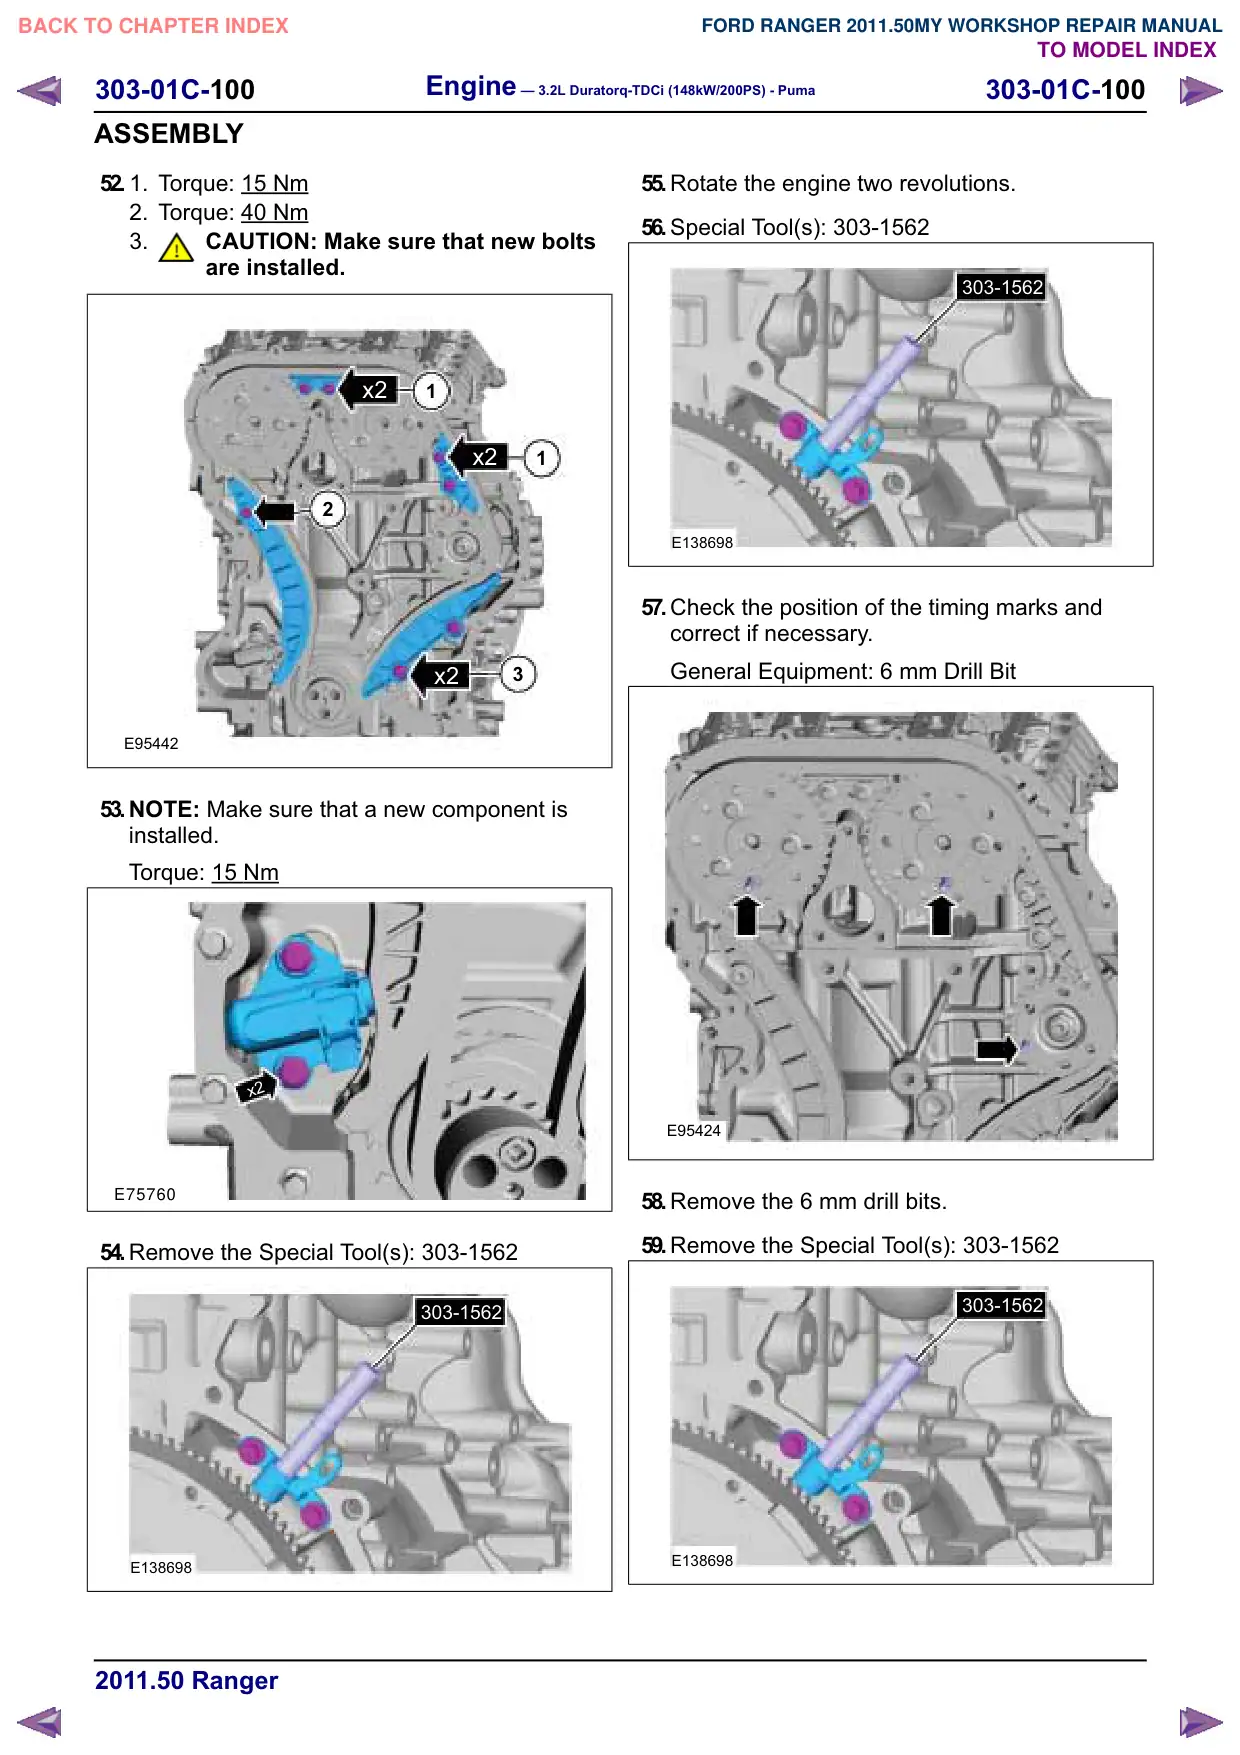
52.
1.
Torque: 15 Nm
2. Torque: 40
Nm
3.
CAUTION: Make sure that new bolts
are installed.
x2
1
x2
1
2
x2
3
E95442
53.NOTE: Make sure that a new component is
installed.
Torque: 15
Nm
x2
E75760
54.Remove the Special Tool(s): 303-1562
303-1562
E138698
55.Rotate the engine two revolutions.
56.Special Tool(s): 303-1562
303-1562
E138698
57.Check the position of the timing marks and
correct if necessary.
General Equipment: 6 mm Drill Bit
E95424
58.Remove the 6 mm drill bits.
59.Remove the Special Tool(s): 303-1562
303-1562
E138698
303-01C-101
Engine – 3.2L Duratorq-TDCi (148kW/200PS) - Puma
303-01C-101
ASSEMBLY
60.
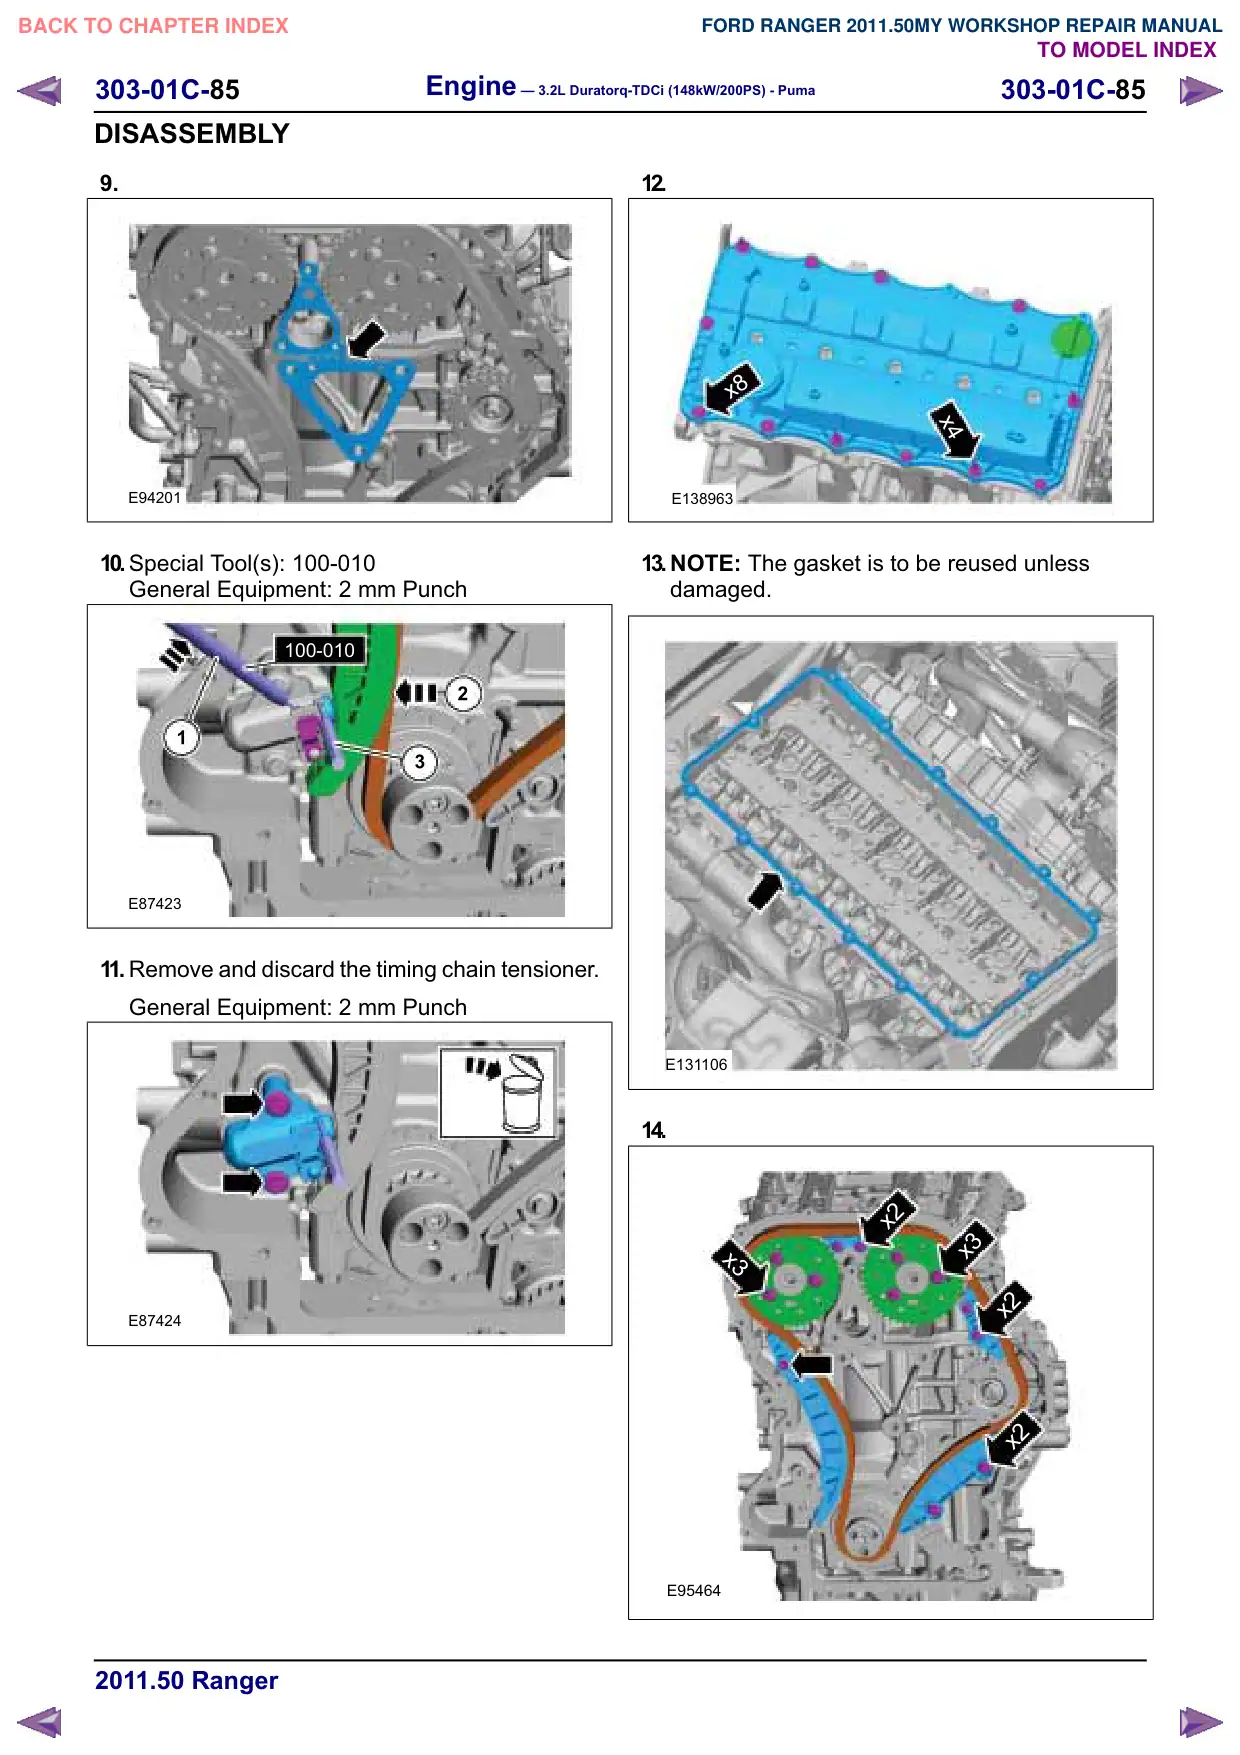
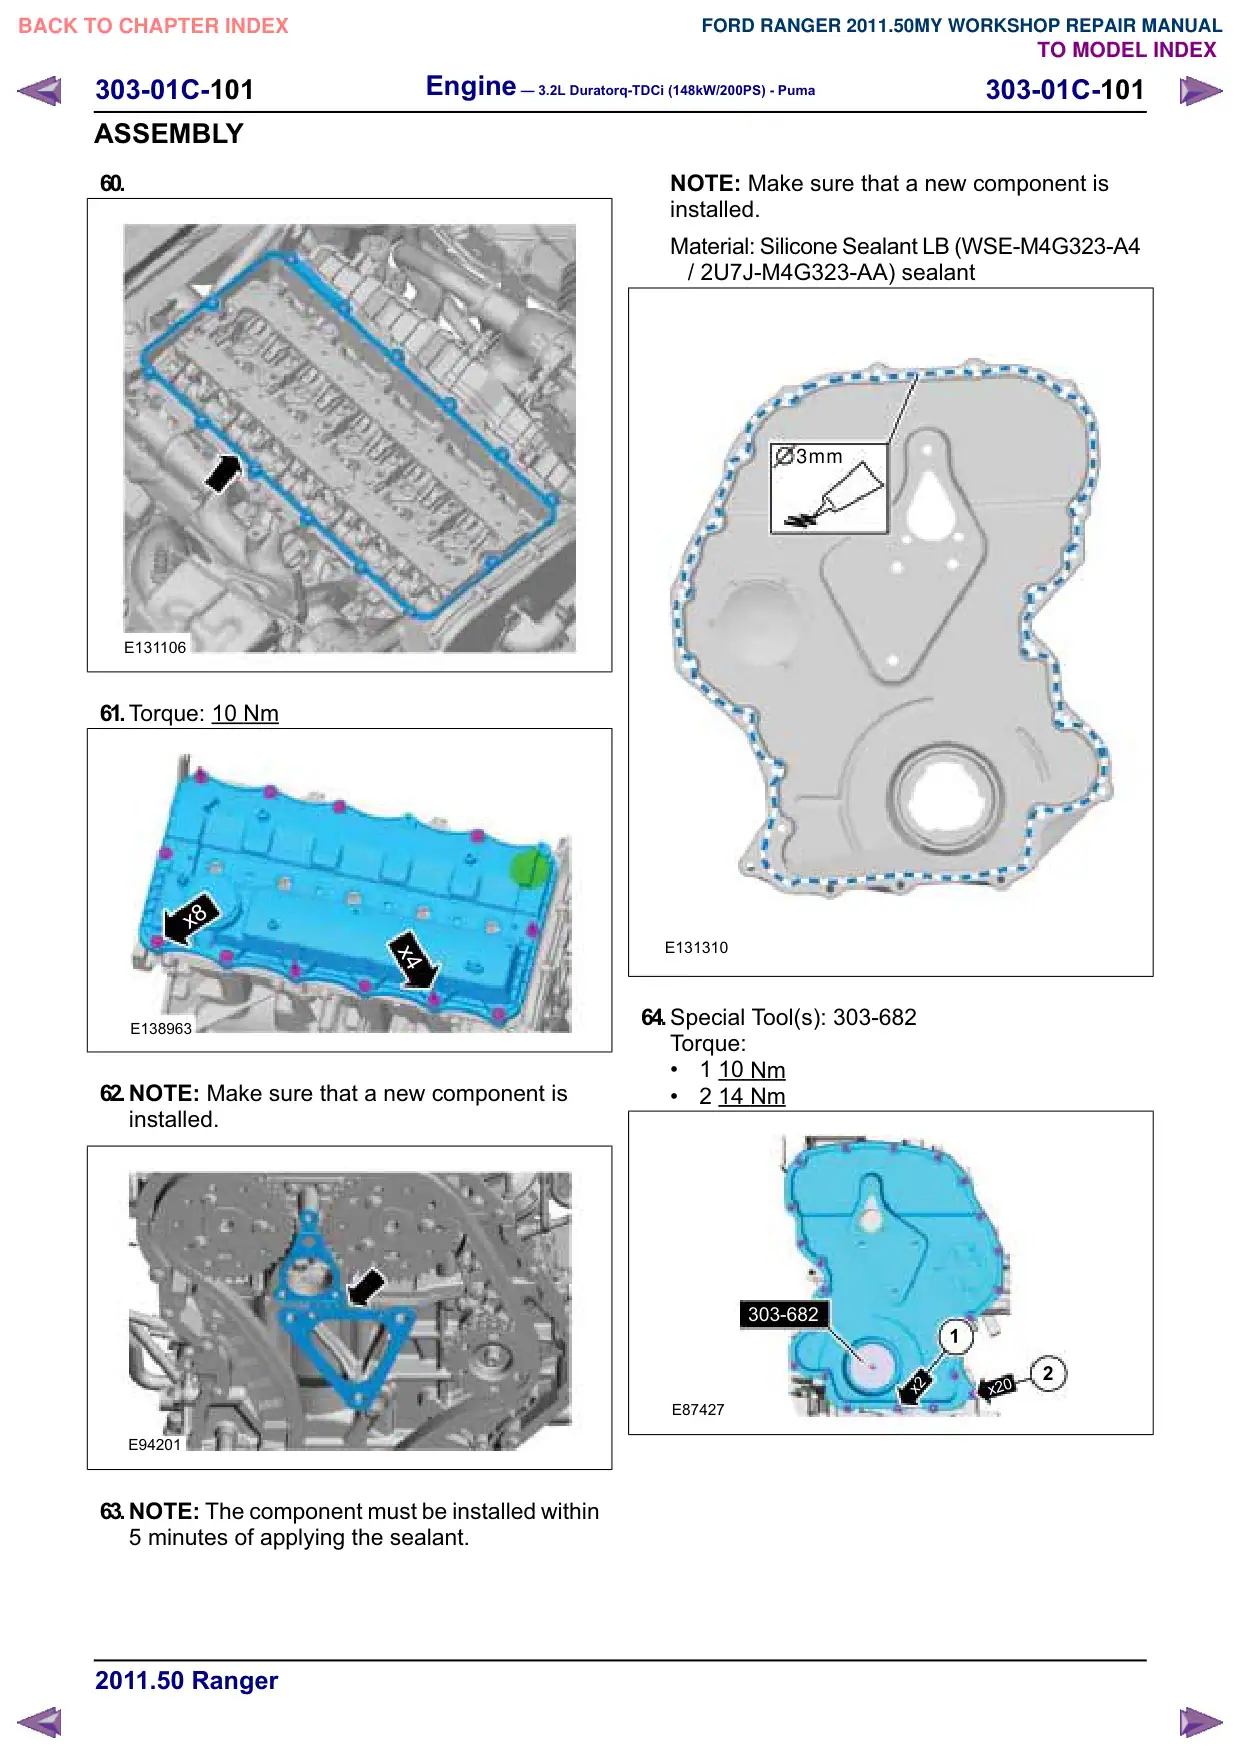
E131106
61.Torque: 10 Nm
x8
x4
E138963
62.NOTE: Make sure that a new component is
installed.
E94201
63.NOTE: The component must be installed within
5 minutes of applying the sealant.
NOTE: Make sure that a new component is
installed.
Material: Silicone Sealant LB (WSE-M4G323-A4
/ 2U7J-M4G323-AA) sealant
3mm
E131310
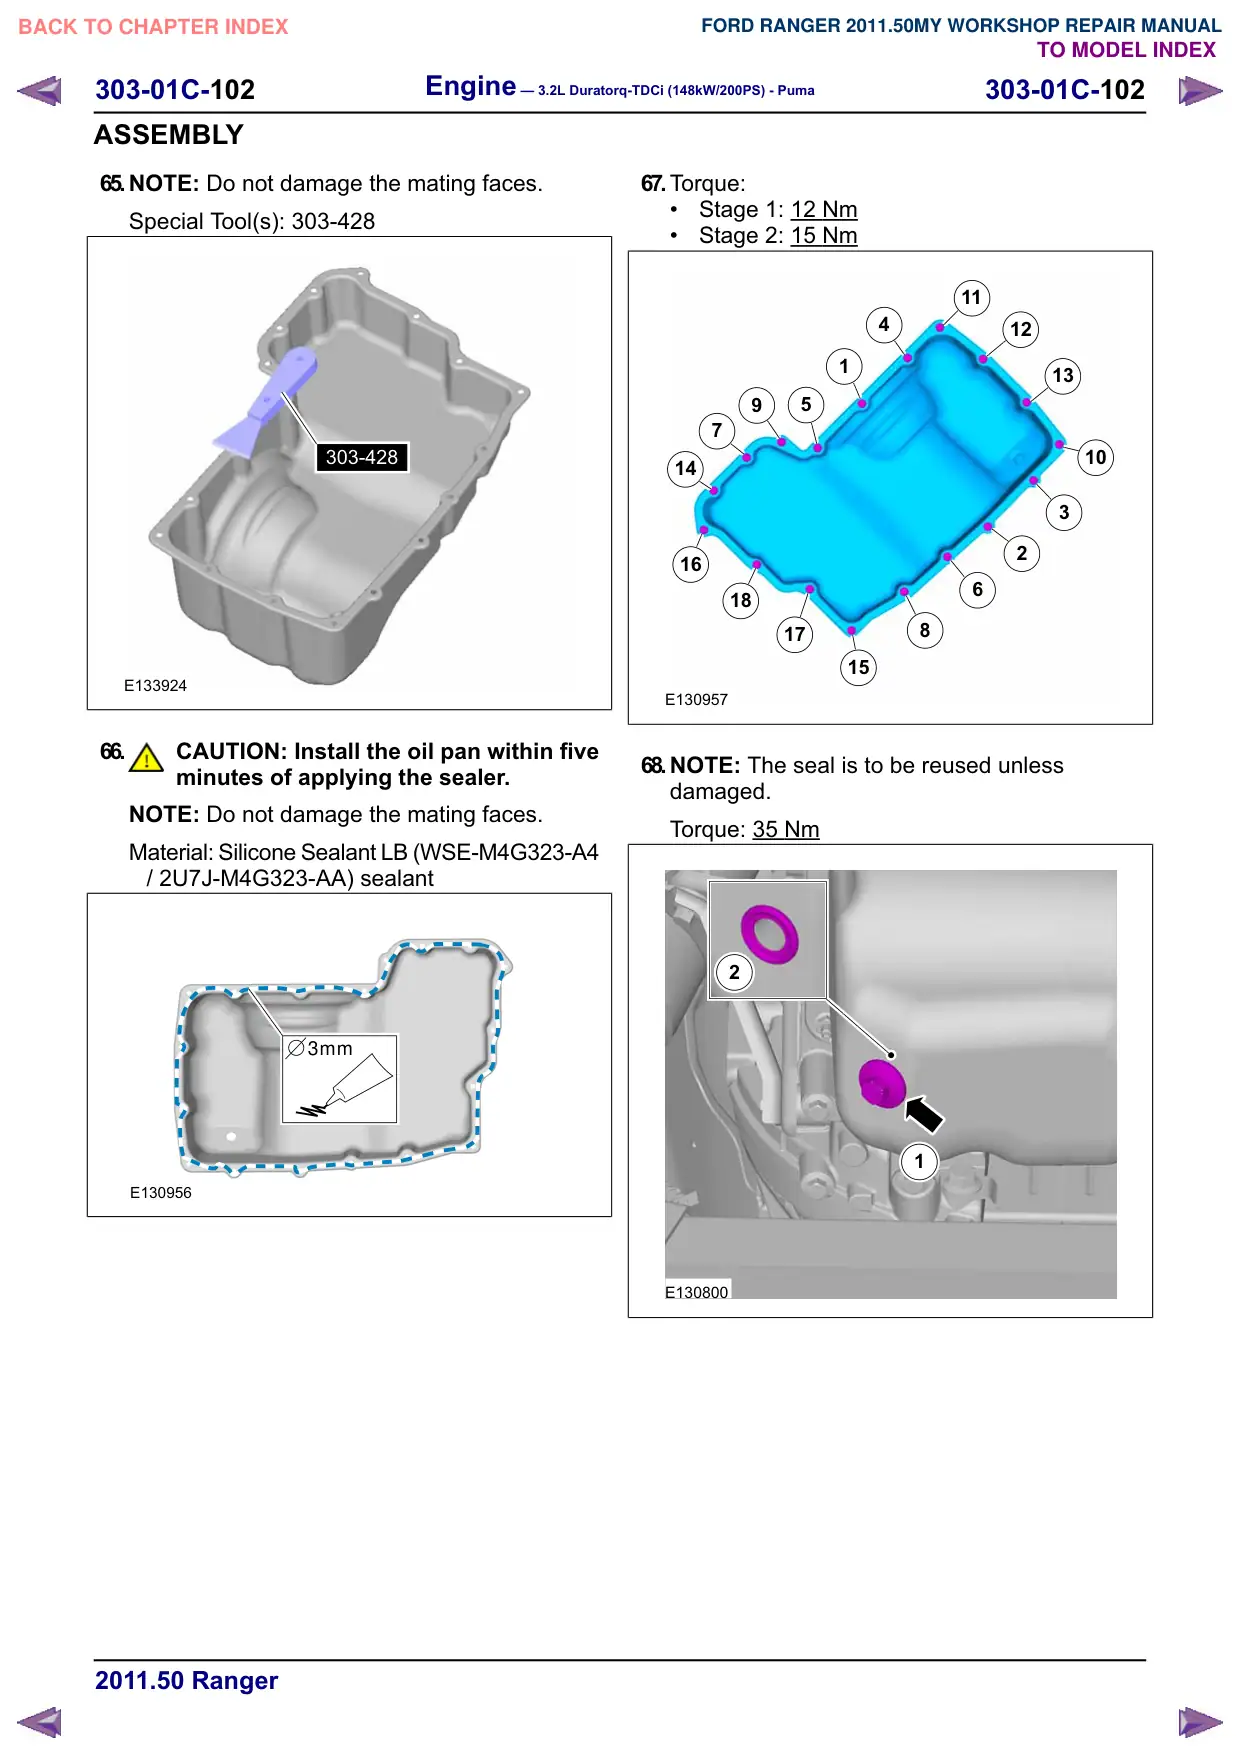
64.Special Tool(s): 303-682
Torque:
1 10 Nm
2 14 Nm
303-682
1
2
x2
x20
E87427
303-01C-103
Engine – 3.2L Duratorq-TDCi (148kW/200PS) - Puma
303-01C-103
INSTALLATION
Engine – Vehicles With: 6-Speed Manual Transmission -
MT82(21 132 0; 21 132 6; 21 132 7)
Installation
Special Tool(s)
303-122
Lifting Bracket, Engine
21068A
1. Refer to: Health and Safety Precautions (100-00
General Information, Description and
Operation).
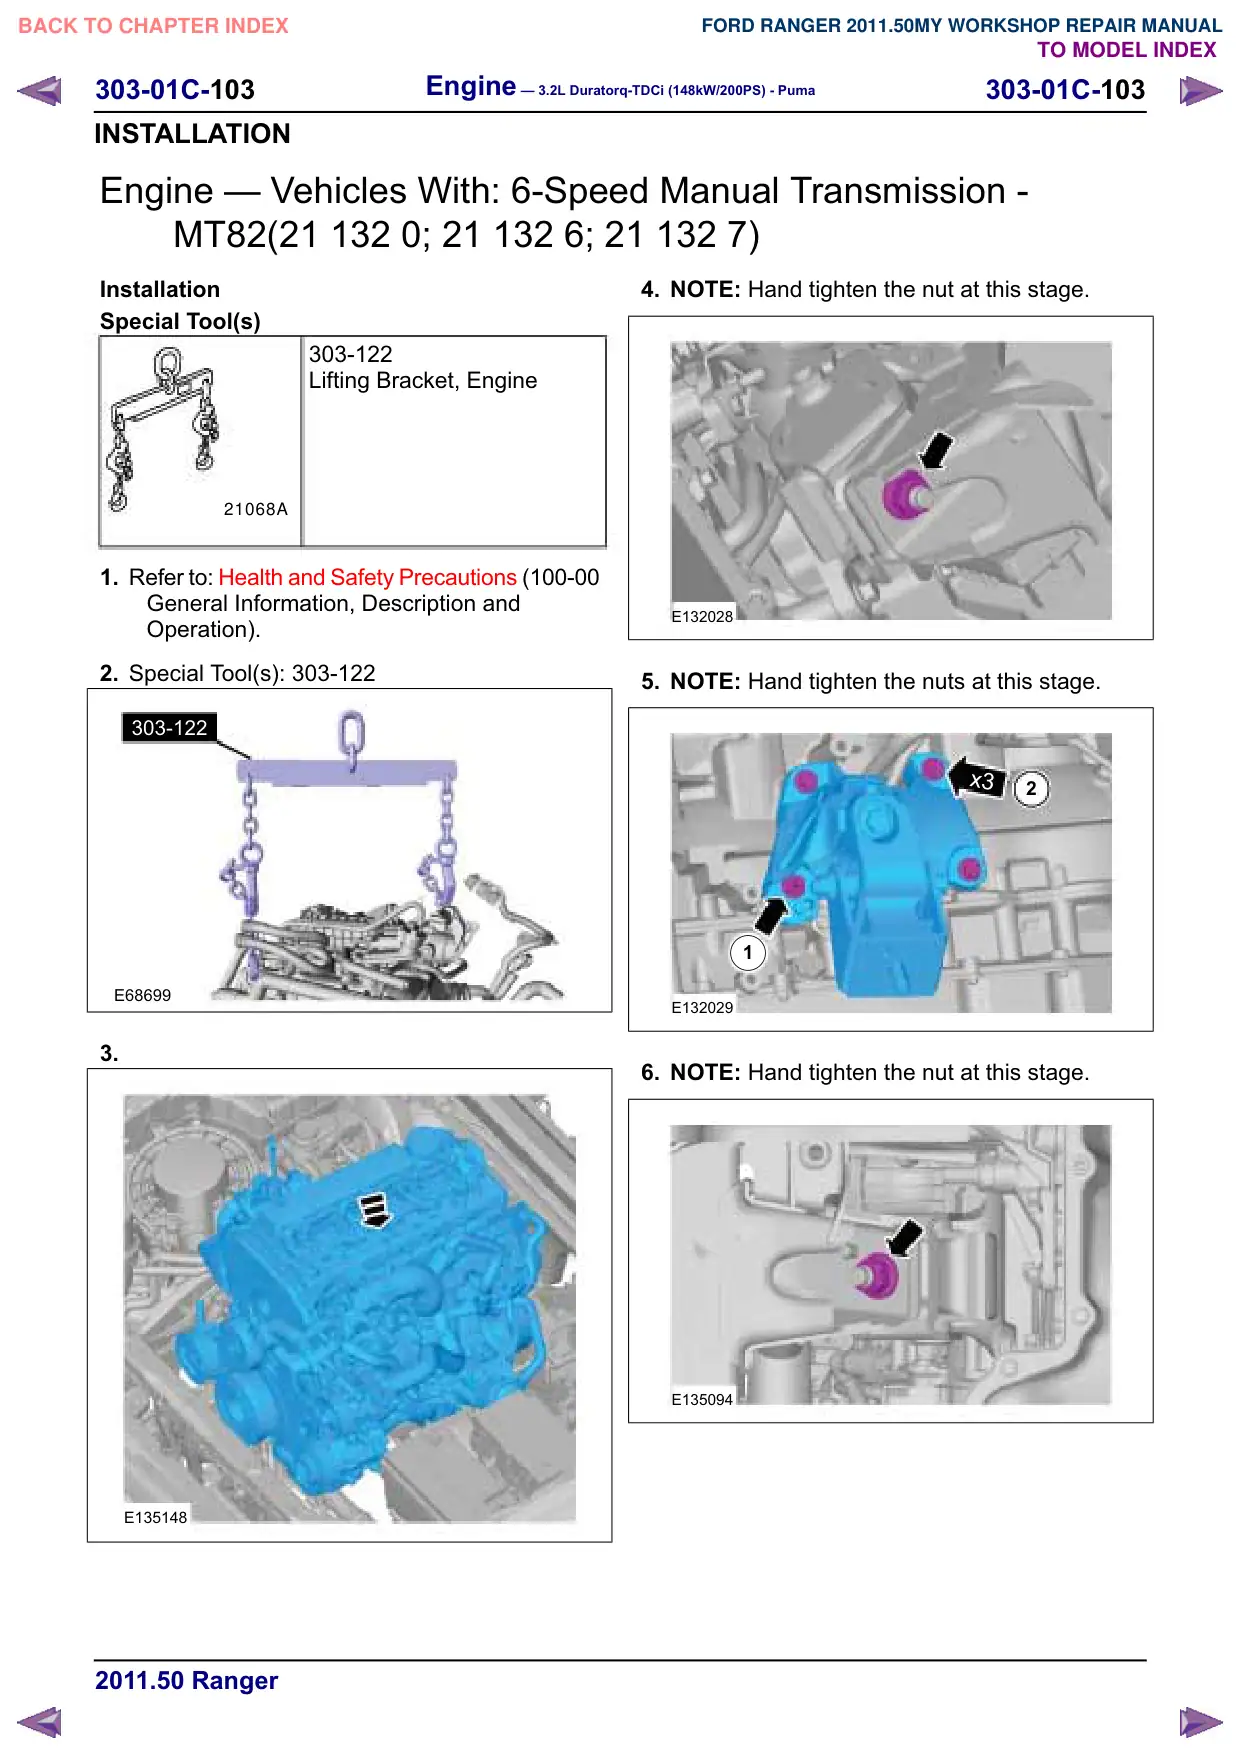
2. Special Tool(s): 303-122
303-122
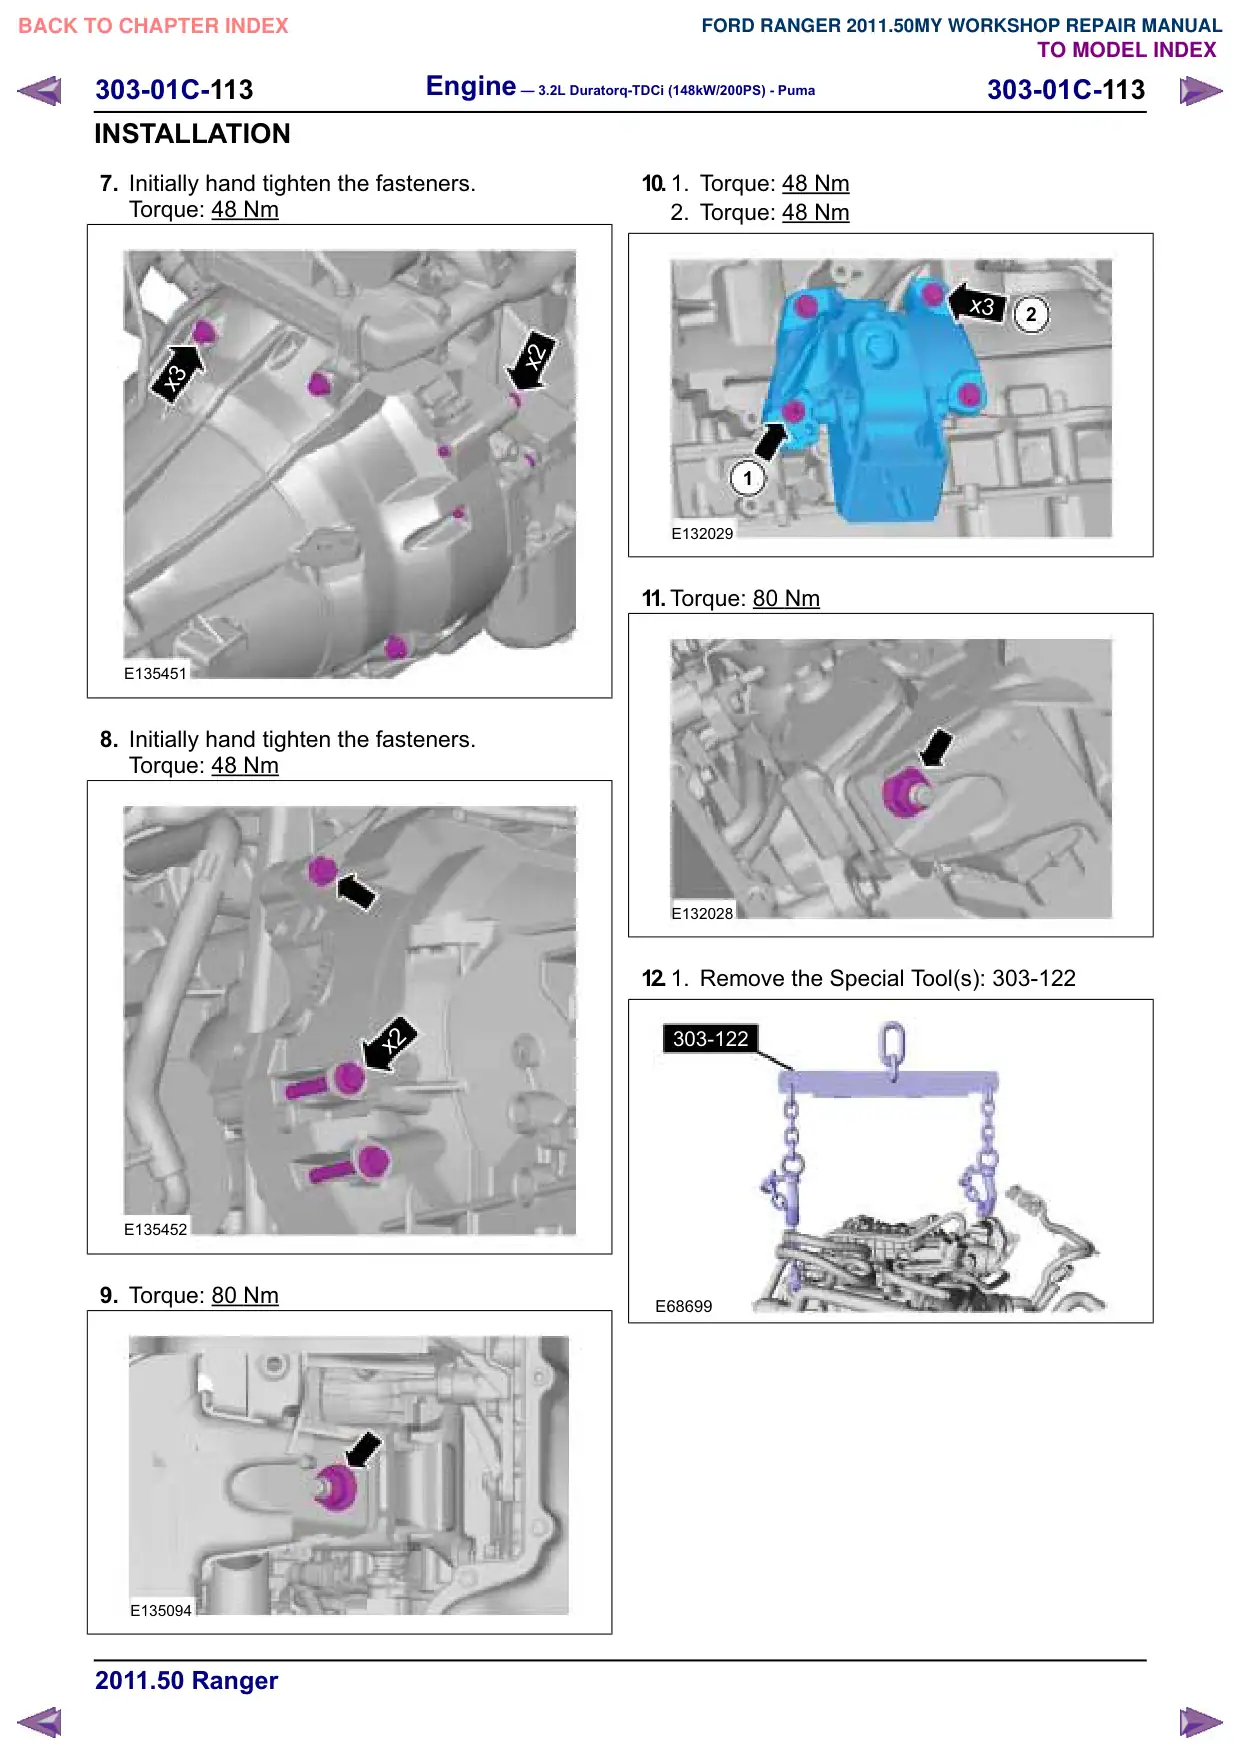
E68699
3.
E135148
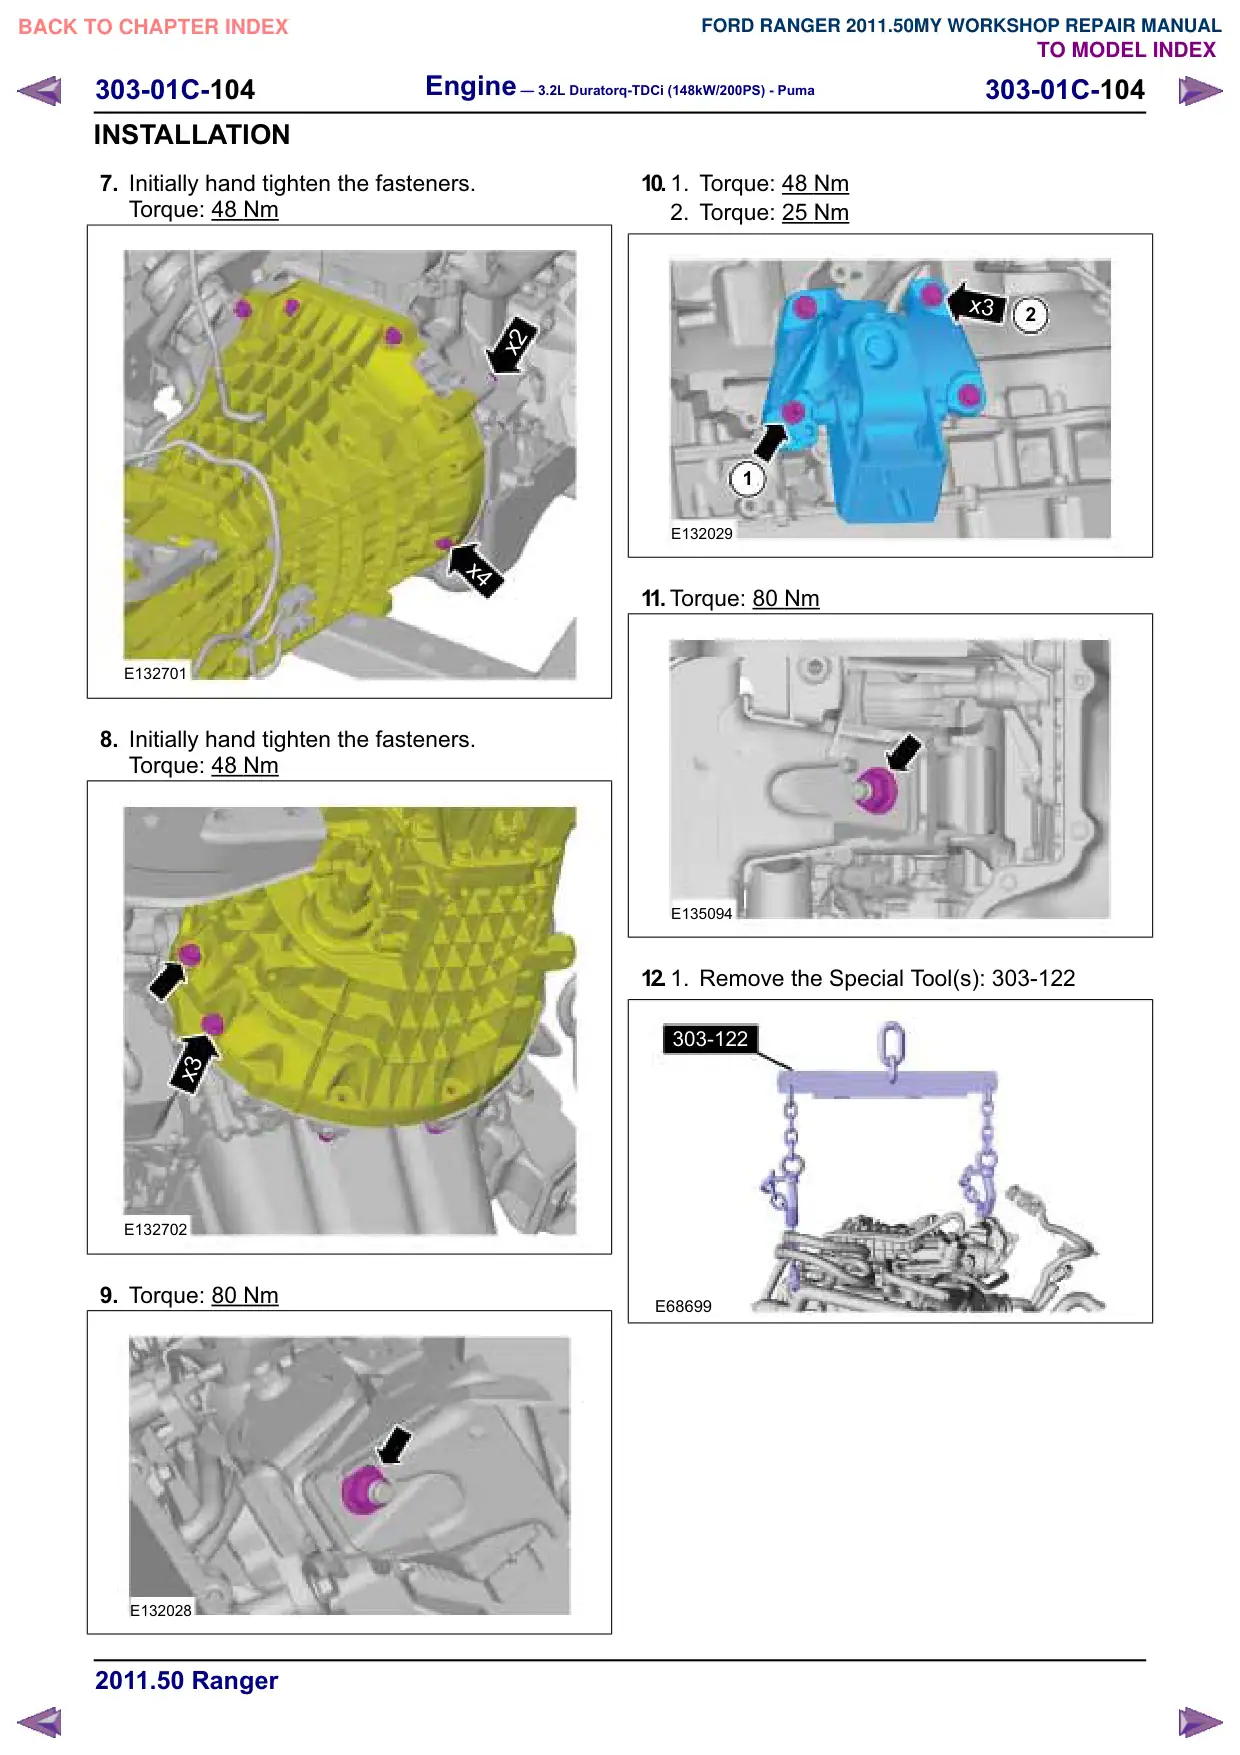
4. NOTE: Hand tighten the nut at this stage.
E132028
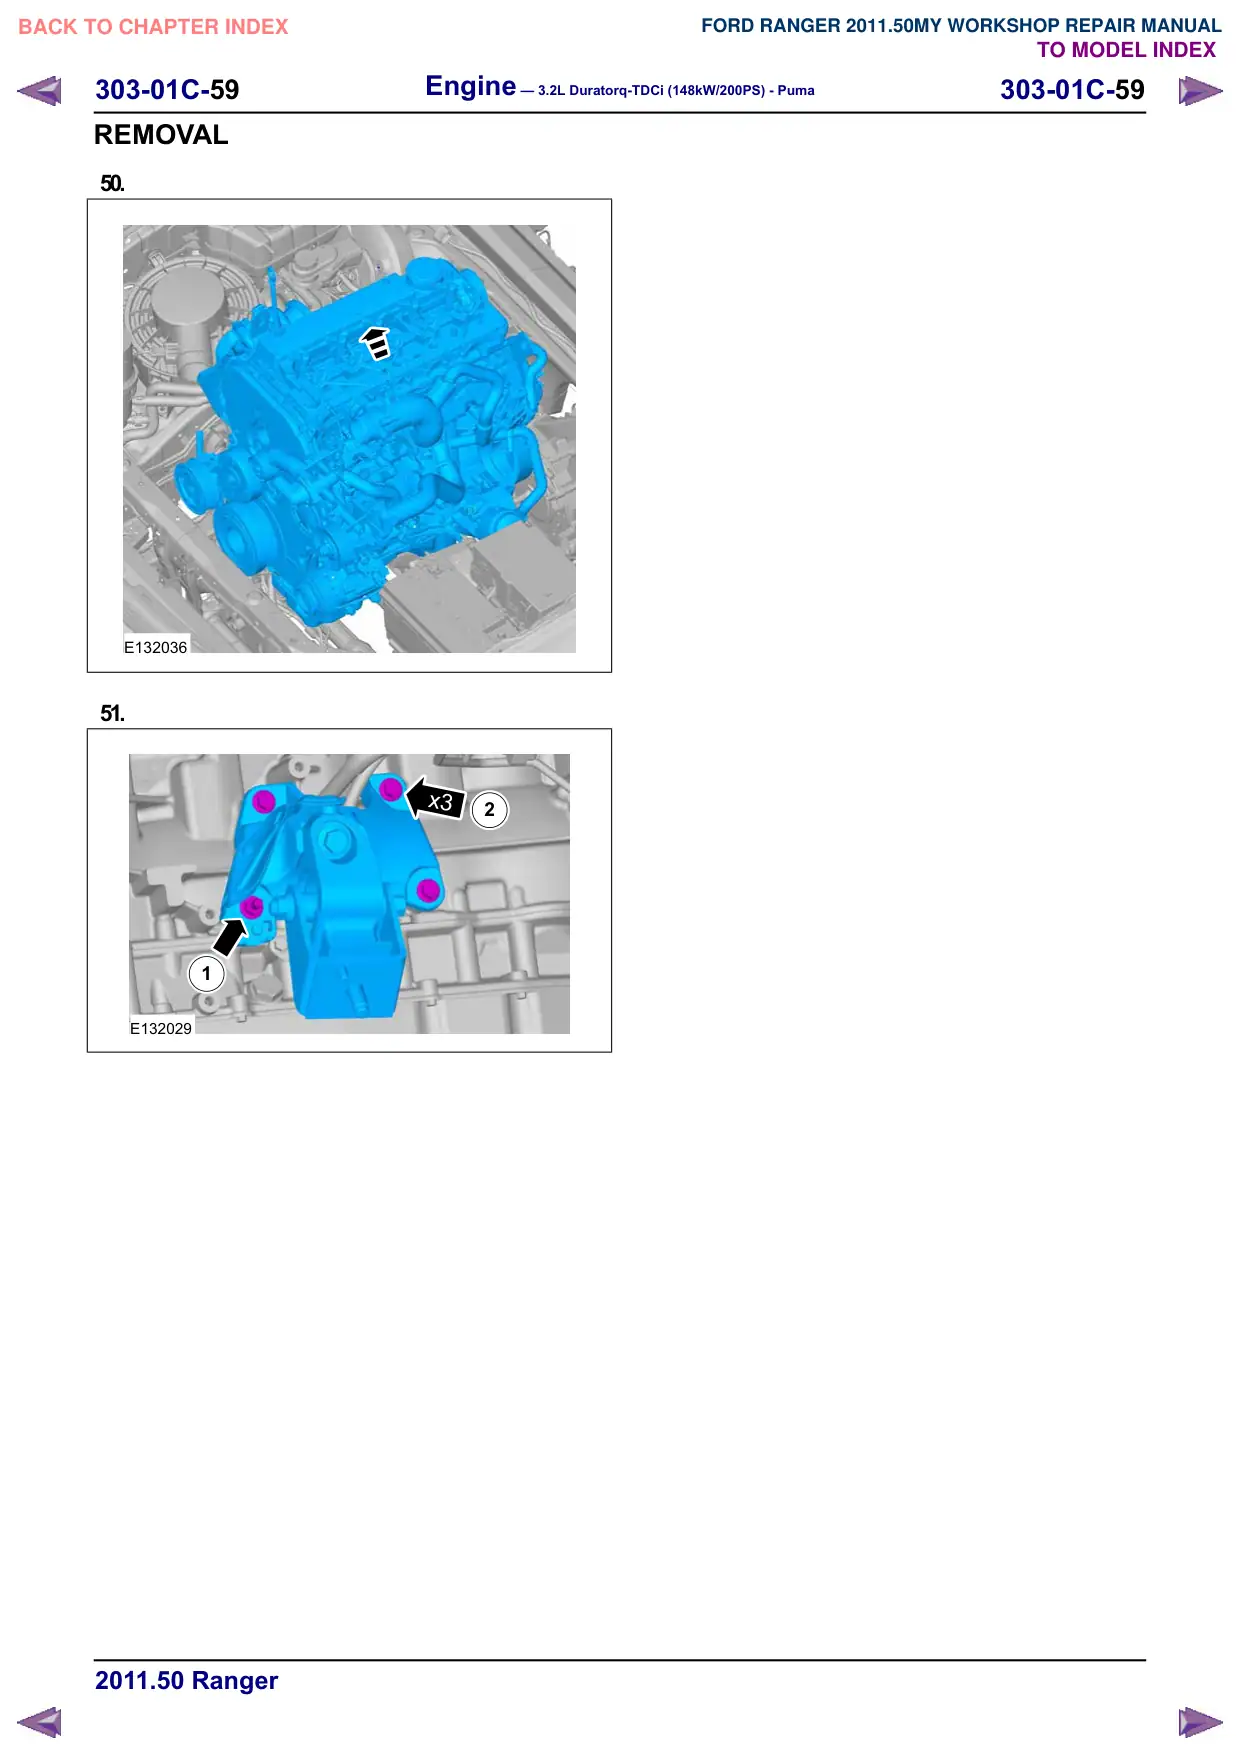
5. NOTE: Hand tighten the nuts at this stage.
x3
2
1
E132029
6. NOTE: Hand tighten the nut at this stage.
E135094
Engine – 3.2L Duratorq-TDCi (148kW/200PS) - Puma
303-01C-111
303-01C-111
INSTALLATION
50.Refer to: Air Conditioning (A/C) System
Recovery, Evacuation and Charging (412-00
Climate Control System - General Information,
General Procedures).
51.Refer to: Cooling System Draining, Filling and
Bleeding - 2.2L Duratorq-TDCi (88kW/120PS)
- Puma/2.2L Duratorq-TDCi (96kW/130PS) -
Puma/2.2L Duratorq-TDCi (110kW/150PS) -
Puma/3.2L Duratorq-TDCi (148kW/200PS) -
Puma (303-03 Engine Cooling - 3.2L
Duratorq-TDCi (148kW/200PS) - Puma,
General Procedures).
52.Refer to: Battery Disconnect and Connect
(414-01 Battery, Mounting and Cables,
General Procedures).
303-01C-112
Engine – 3.2L Duratorq-TDCi (148kW/200PS) - Puma
303-01C-112
INSTALLATION
Engine – Vehicles With: 6-Speed Automatic Transaxle -
6R80(21 132 0; 21 132 6; 21 132 7)
Installation
Special Tool(s)
303-122
Lifting Bracket, Engine
21068A
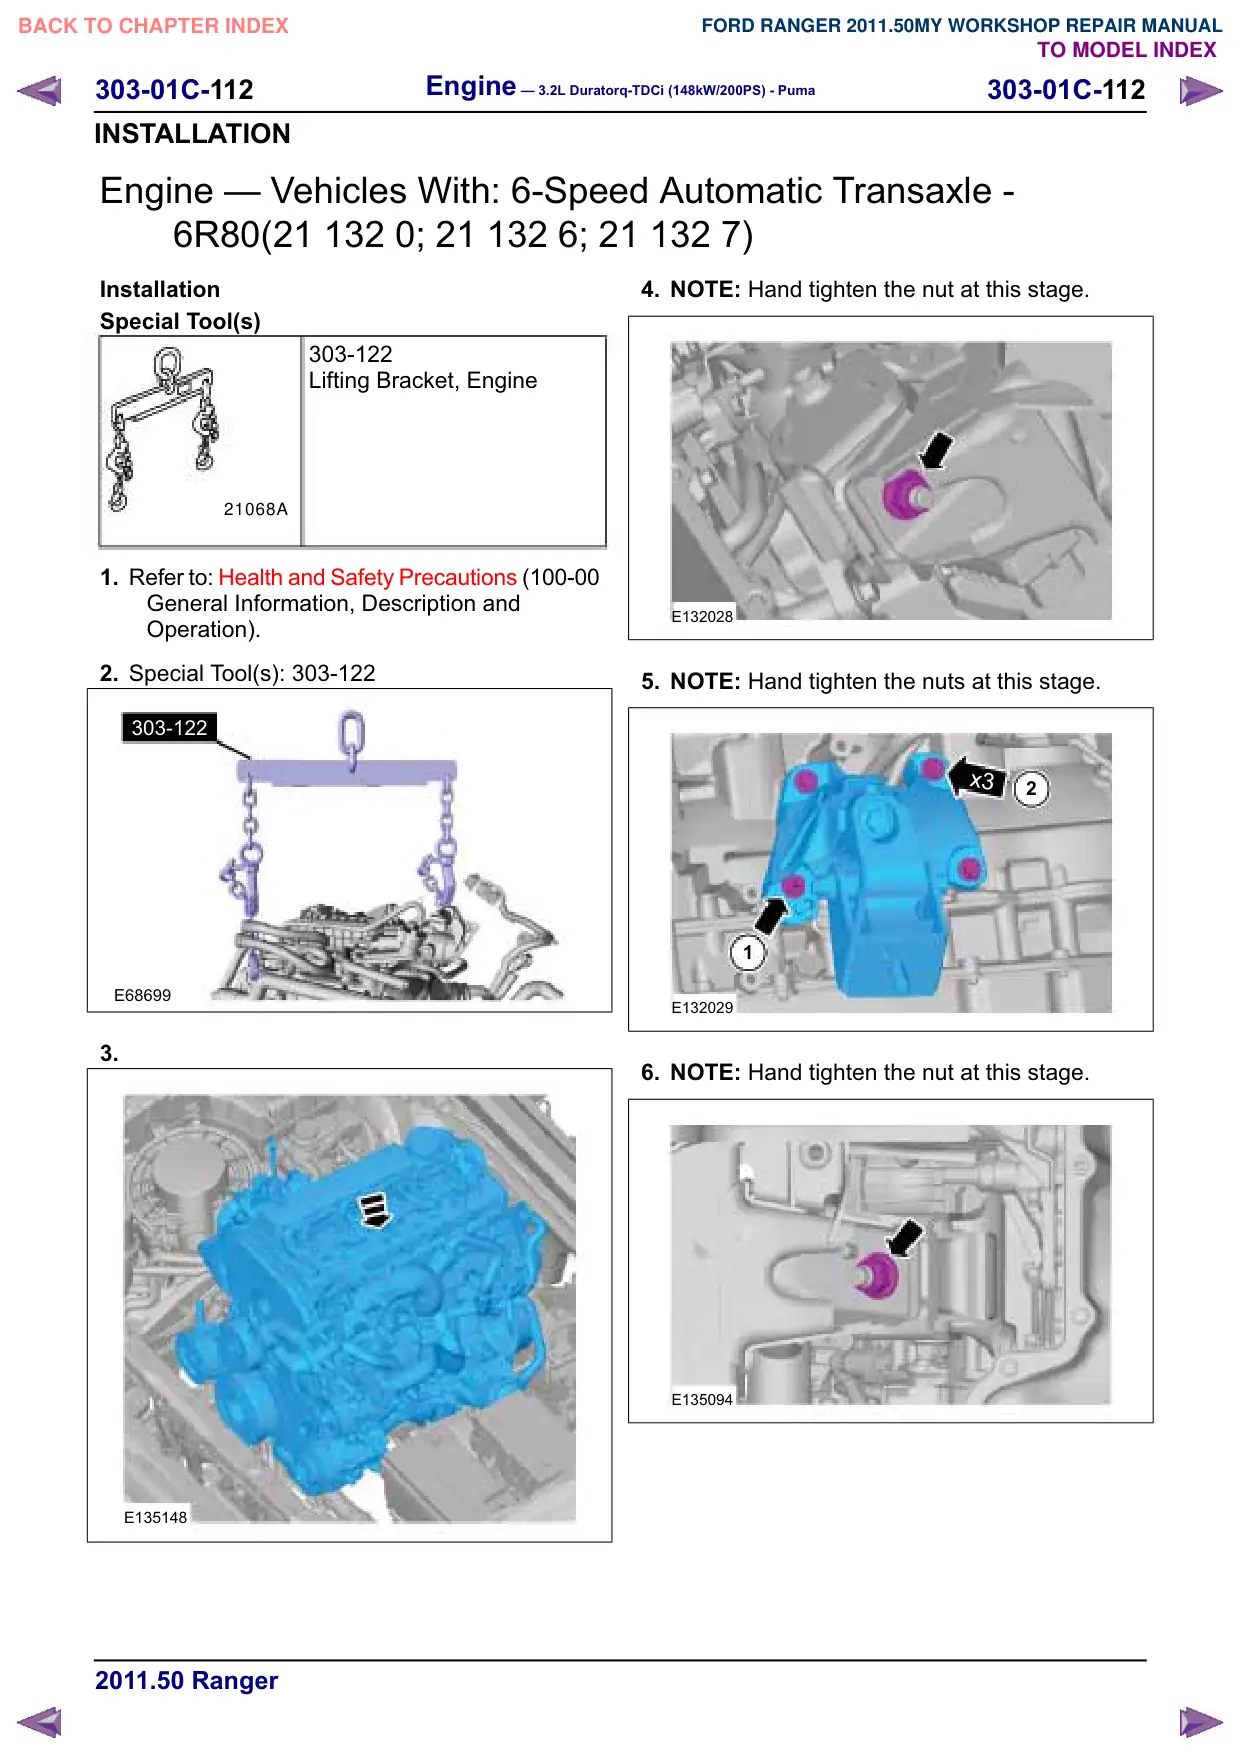
1. Refer to: Health and Safety Precautions (100-00
General Information, Description and
Operation).
2. Special Tool(s): 303-122
303-122
E68699
3.
E135148
4. NOTE: Hand tighten the nut at this stage.
E132028
5. NOTE: Hand tighten the nuts at this stage.
x3
2
1
E132029
6. NOTE: Hand tighten the nut at this stage.
E135094
Engine – 3.2L Duratorq-TDCi (148kW/200PS) - Puma
303-01C-123
303-01C-123
INSTALLATION
1.
E131398
2. NOTE: Install the new crankshaft rear seal
carrier within five minutes of applying the
recommended sealant.
Material: Silicone Sealant LB (WSE-M4G323-A4
/ 2U7J-M4G323-AA) sealant
3mm
E131393
3.
CAUTION: A new crankshaft rear seal
carrier is supplied with an alignment
sleeve that must not be removed until
the crankshaft rear seal is fully installed.
Failure to follow this instruction may
result in damage to the vehicle.
Initially hand tighten the fasteners.
2
4
6
7
3
1
8
5
E131394
4. NOTE: New crankshaft rear seal carriers are
supplied with an alignment sleeve which must
be removed after installation.
Torque: 20 Nm
2
4
6
7
3
1
8
5
E131395
Engine – 3.2L Duratorq-TDCi (148kW/200PS) - Puma
303-01C-124
303-01C-124
INSTALLATION
5. Special Tool(s): 303-254
303-254
E133584
6. NOTE: Make sure that the flywheel is in full
contact with the crankshaft flange before
installing the flywheel bolts.
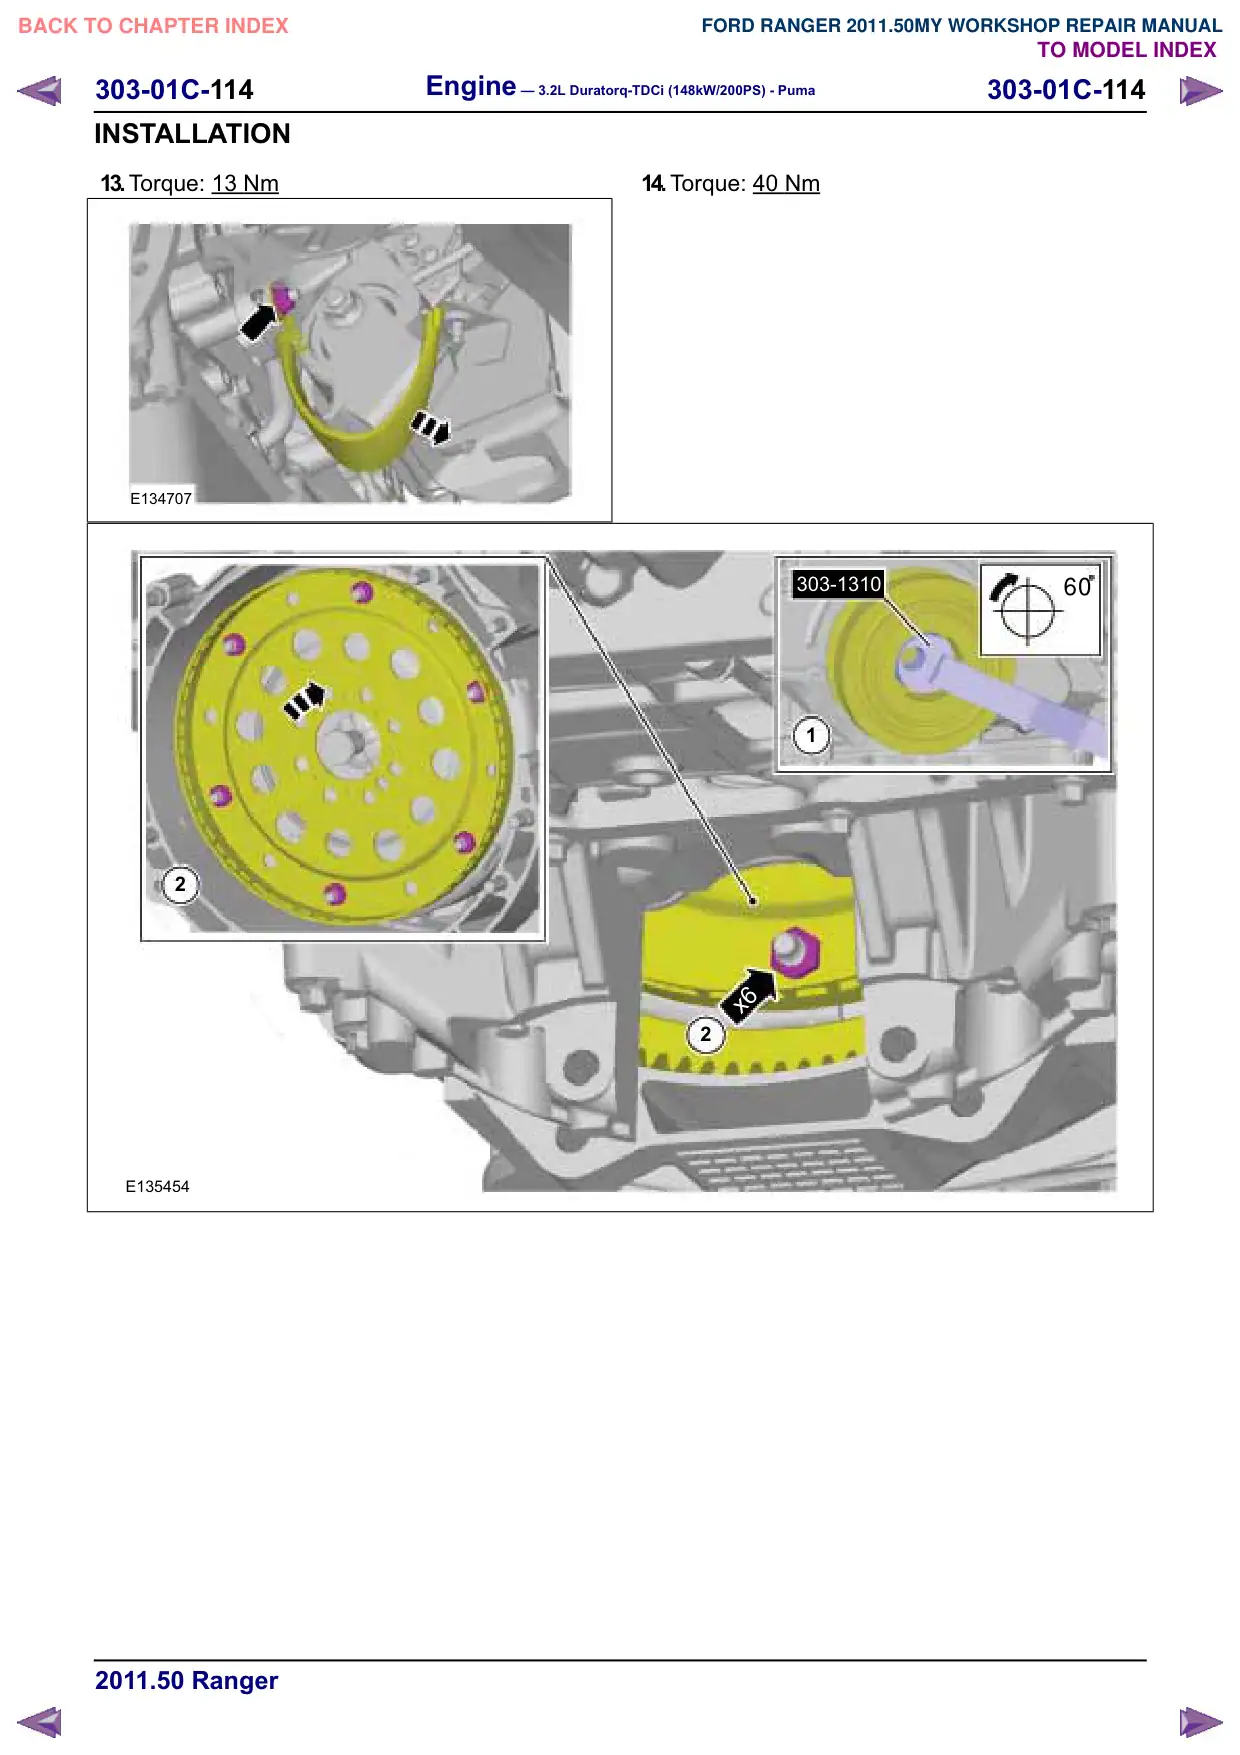
Initially hand tighten the fasteners.
x8
E131396
7. Special Tool(s): 303-254
Torque:
Stage 1: 15 Nm
Stage 2: 30 Nm
Stage 3: 75 Nm
3
5
7
2
1
8
4
6
303-254
E131397
8. NOTE: The cone on the special tool must only
be tightened finger tight to prevent damage to
the clutch disc.
Special Tool(s): 308-204
308-204
E129961
303-01C-125
Engine – 3.2L Duratorq-TDCi (148kW/200PS) - Puma
303-01C-125
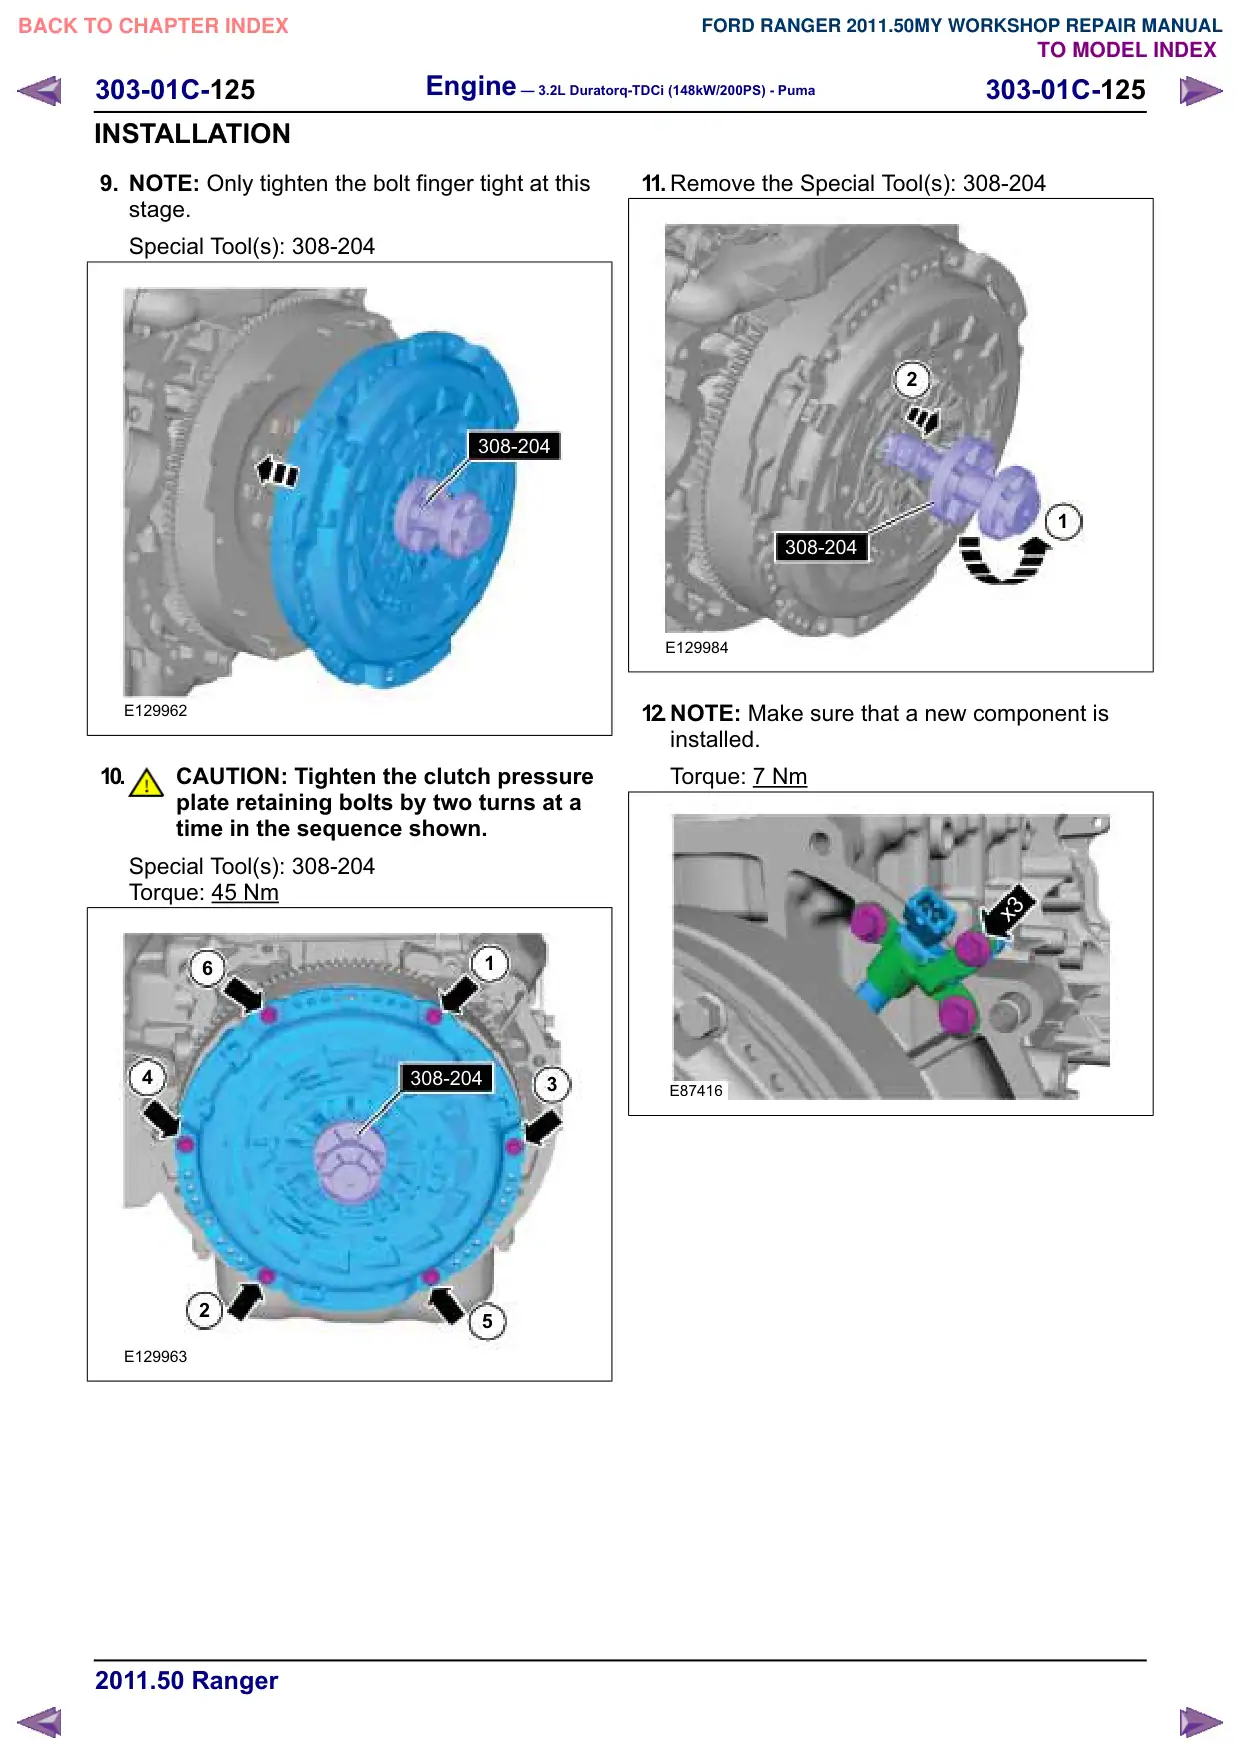
INSTALLATION
9. NOTE: Only tighten the bolt finger tight at this
stage.
Special Tool(s): 308-204
308-204
E129962
10.
CAUTION: Tighten the clutch pressure
plate retaining bolts by two turns at a
time in the sequence shown.
Special Tool(s): 308-204
Torque: 45
Nm
6
1
4
308-204
3
2
5
E129963
11. Remove the Special Tool(s): 308-204
2
1
308-204
E129984
12.NOTE: Make sure that a new component is
installed.
Torque: 7
Nm
x3
E87416
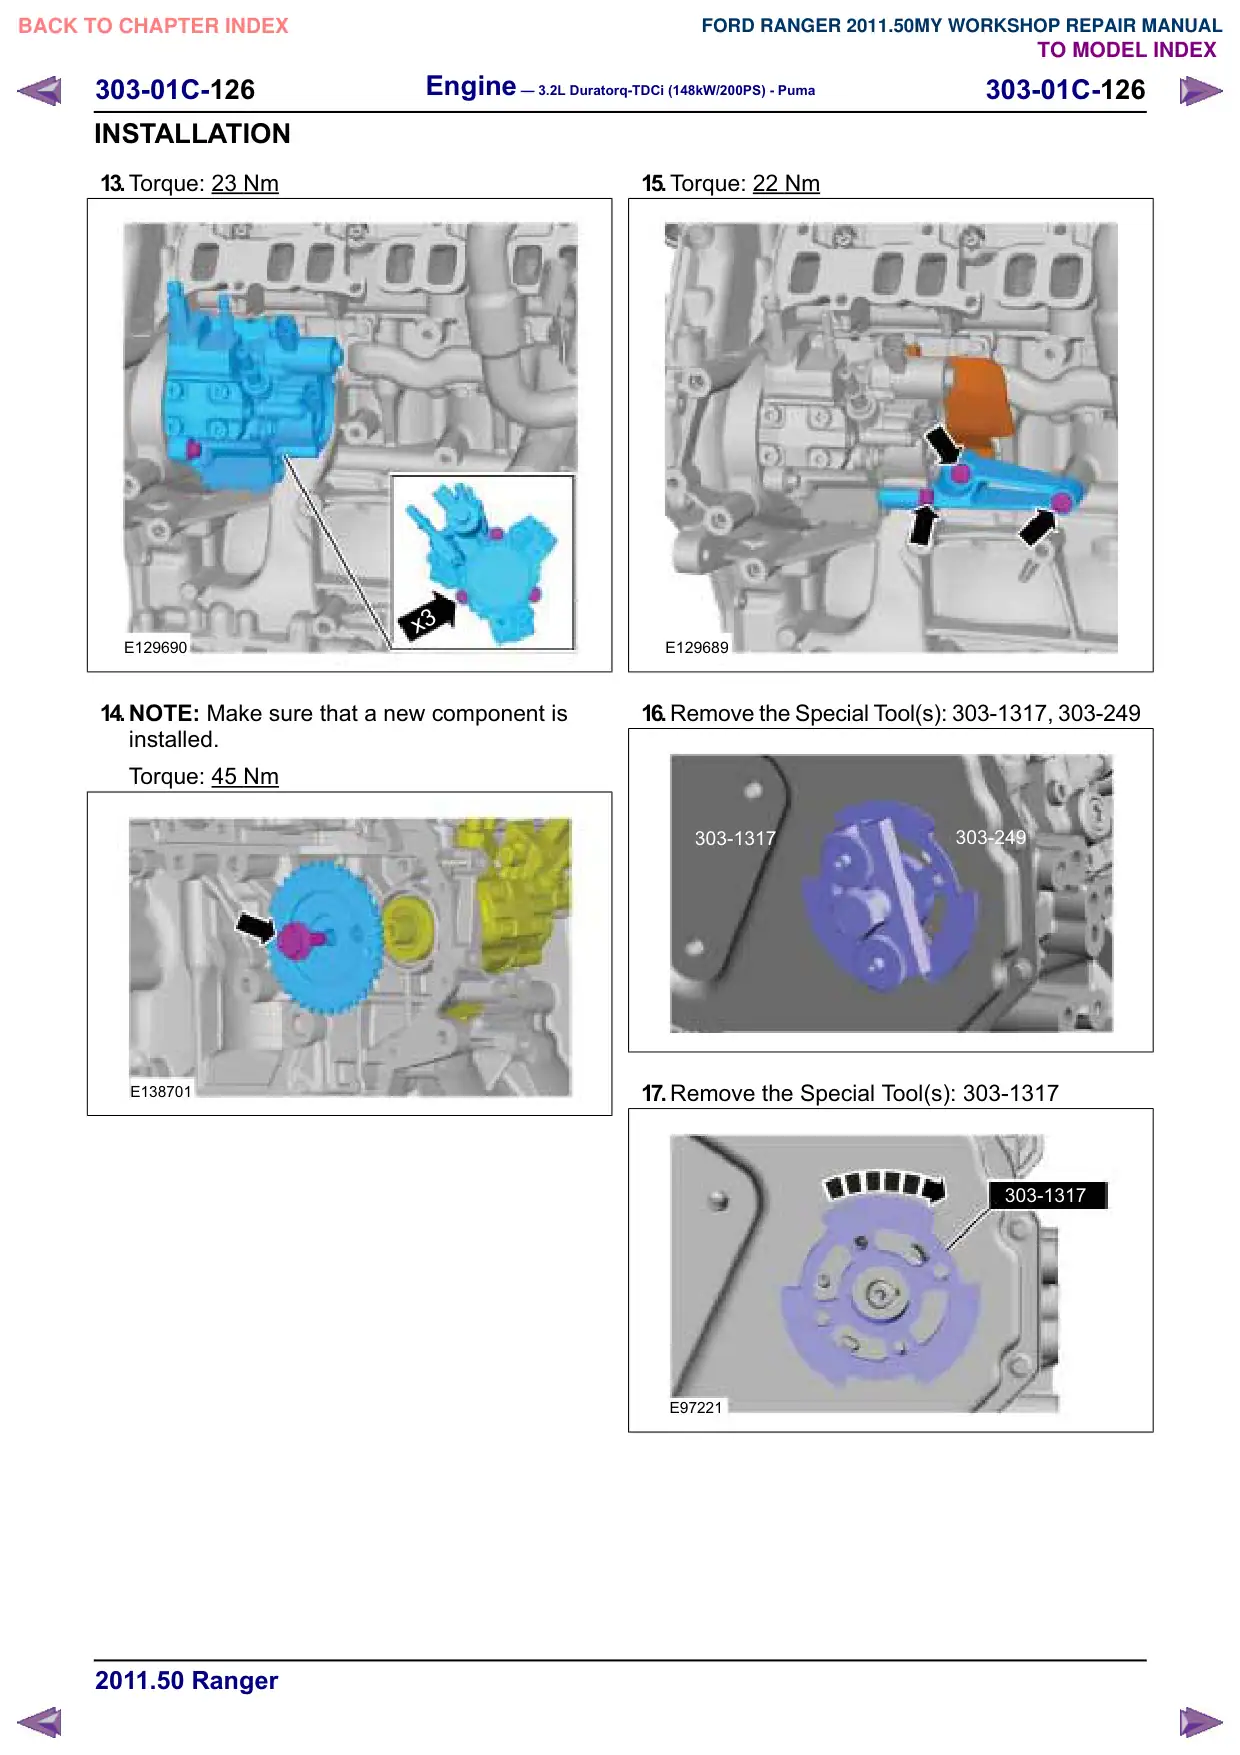
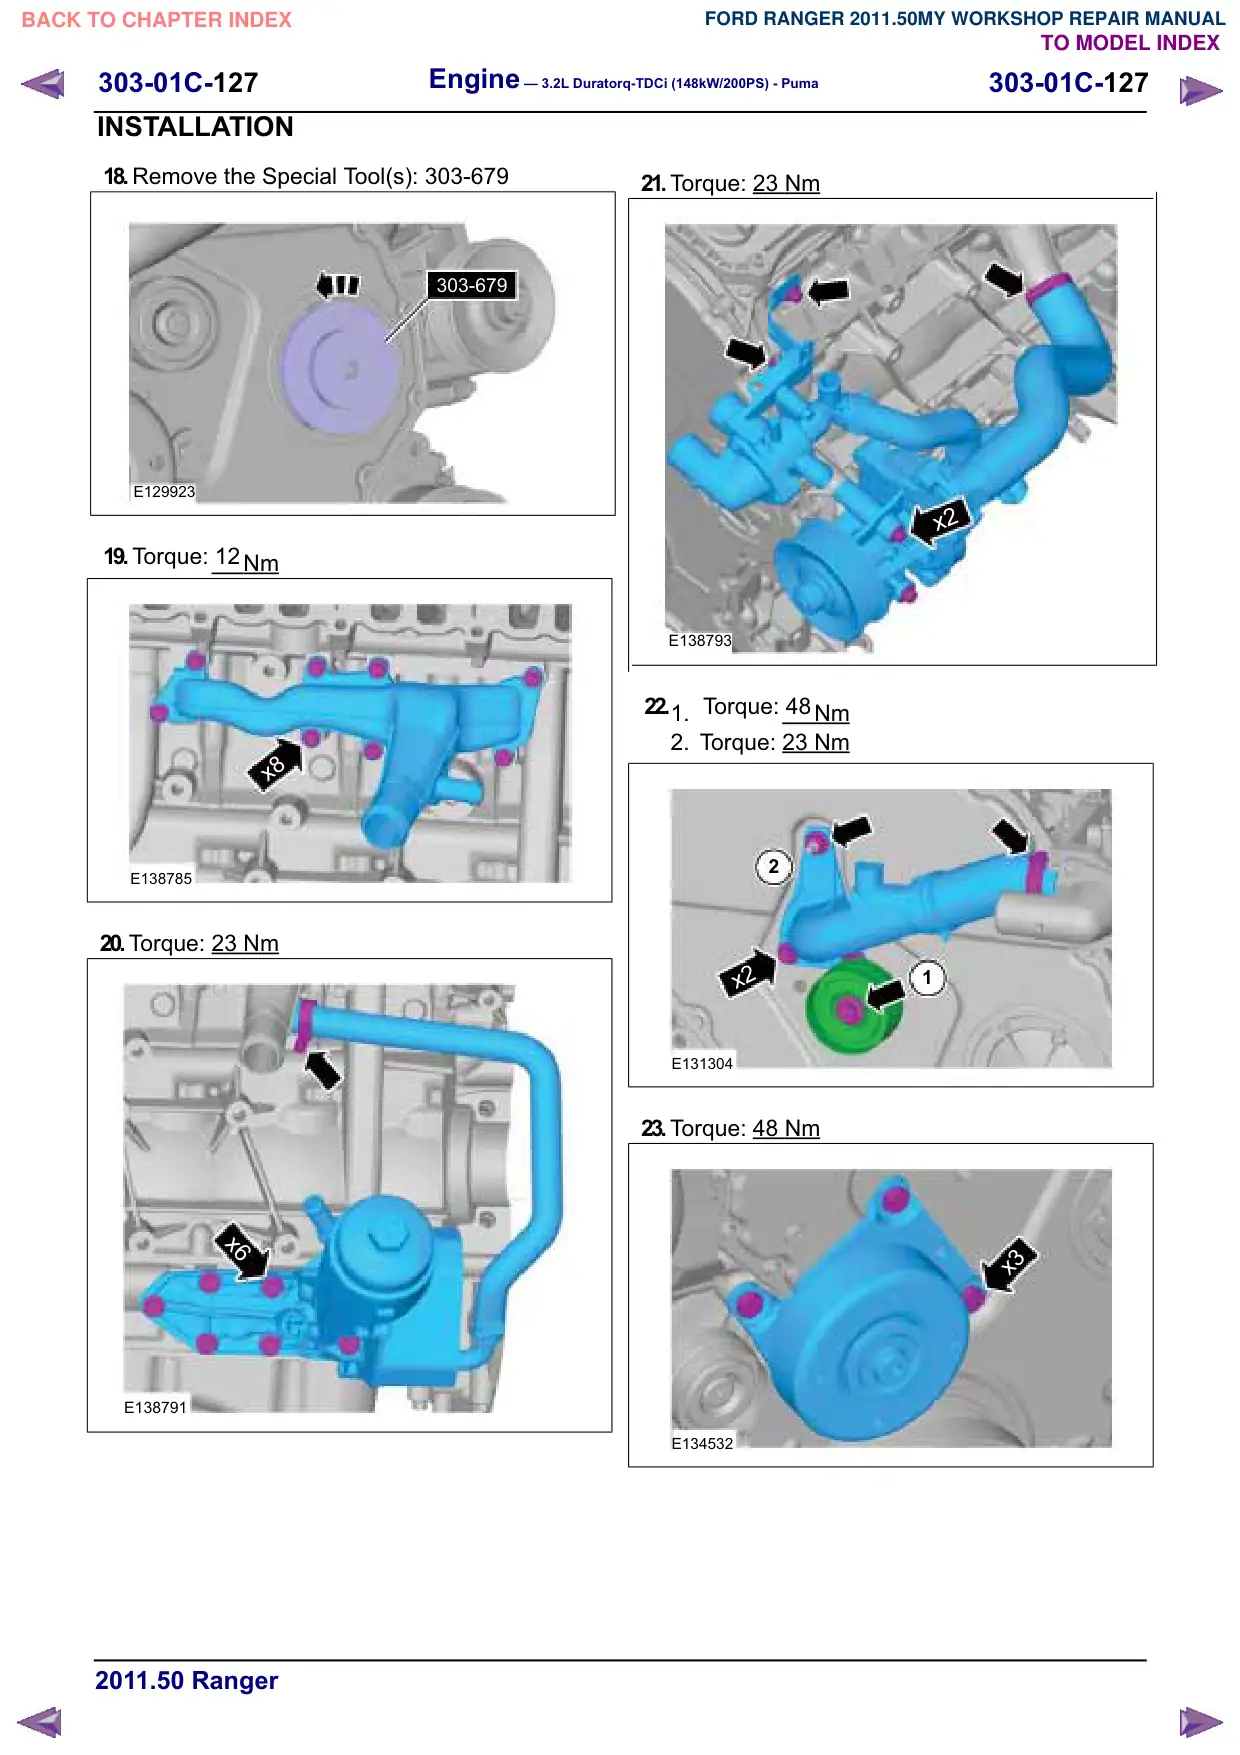
Engine – 3.2L Duratorq-TDCi (148kW/200PS) - Puma
303-01C-128
303-01C-128
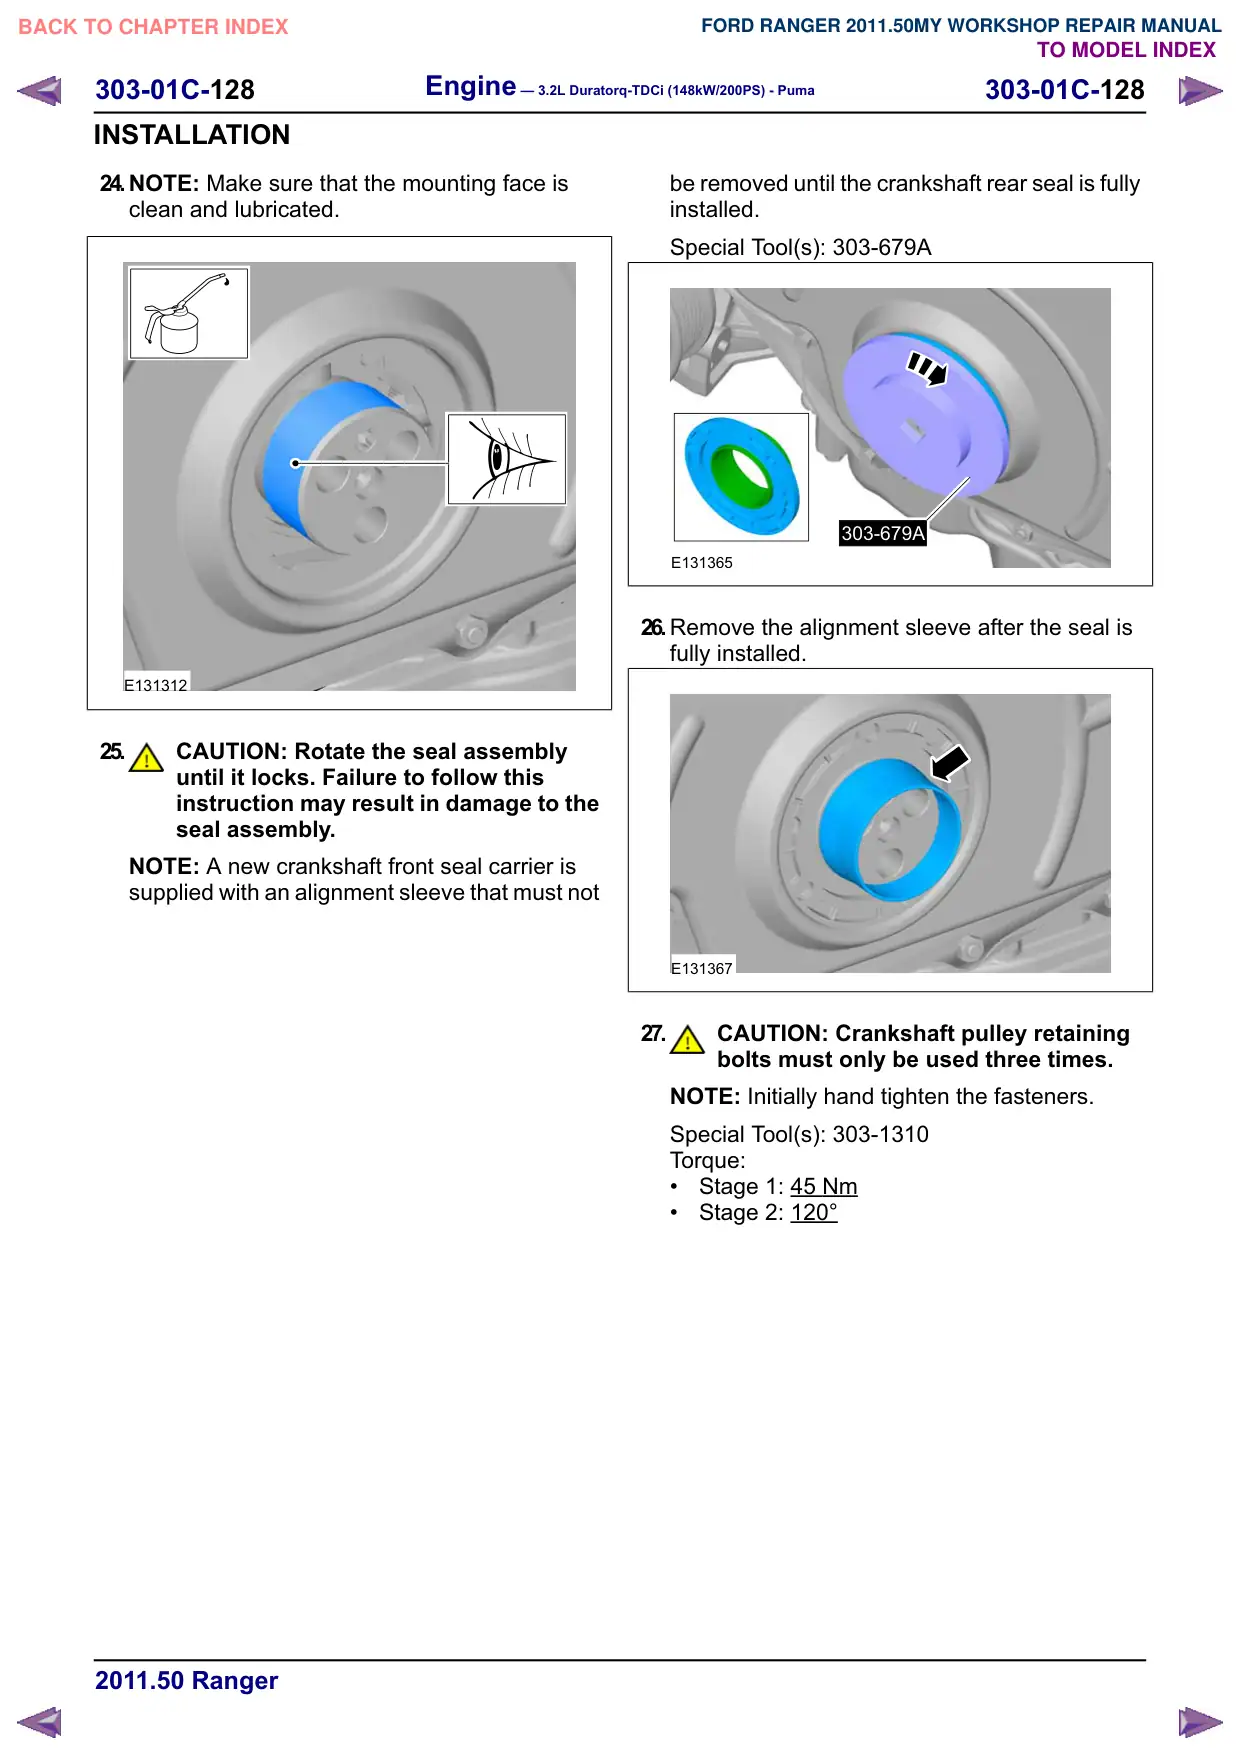
INSTALLATION
24.NOTE: Make sure that the mounting face is
clean and lubricated.
E131312
25.
CAUTION: Rotate the seal assembly
until it locks. Failure to follow this
instruction may result in damage to the
seal assembly.
NOTE: A new crankshaft front seal carrier is
supplied with an alignment sleeve that must not
be removed until the crankshaft rear seal is fully
installed.
Special Tool(s): 303-679A
303-679A
E131365
26.Remove the alignment sleeve after the seal is
fully installed.
E131367
27.
CAUTION: Crankshaft pulley retaining
bolts must only be used three times.
NOTE: Initially hand tighten the fasteners.
Special Tool(s): 303-1310
Torque:
Stage 1: 45 Nm
Stage 2: 120°
303-01C-130
Engine – 3.2L Duratorq-TDCi (148kW/200PS) - Puma
303-01C-130
INSTALLATION
injectors making sure that the copper seals are
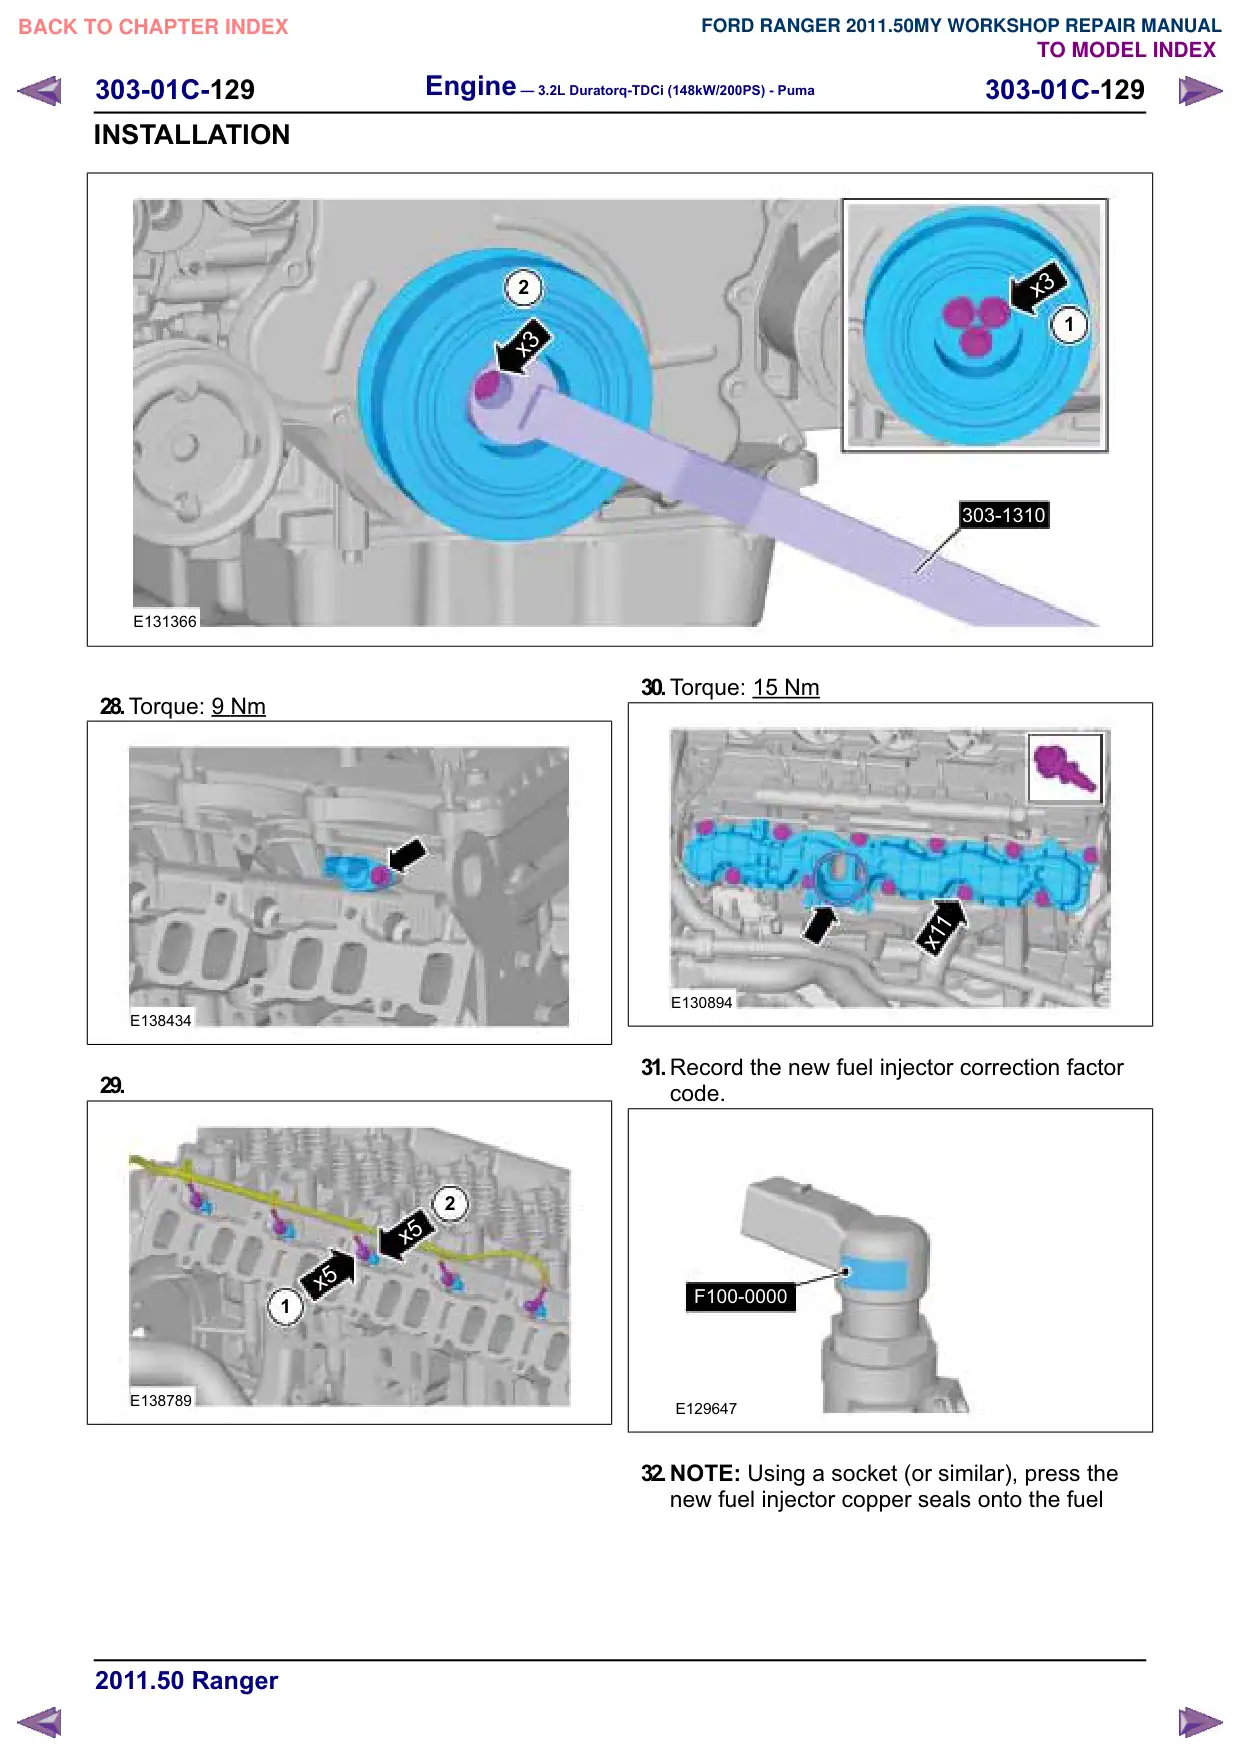
pushed fully home to prevent uneven clamping.
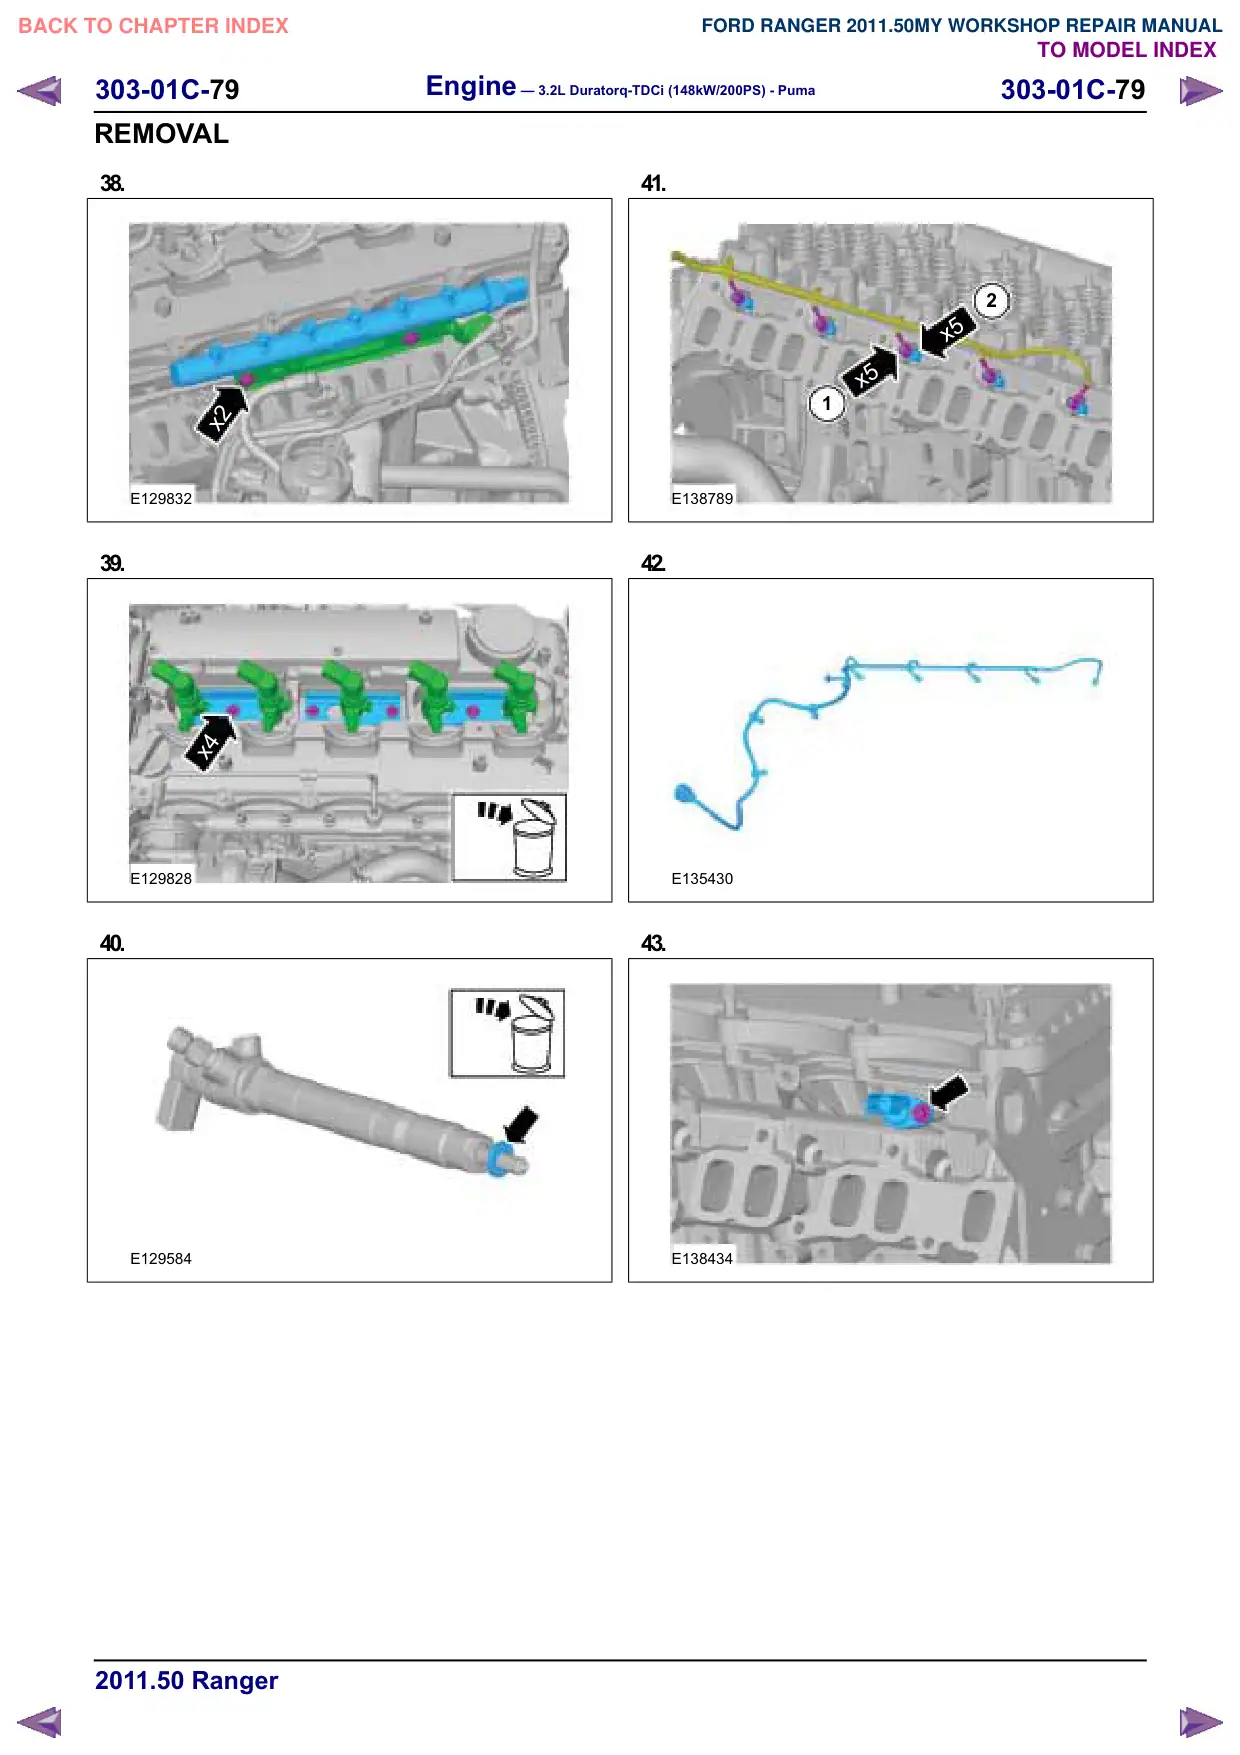
E129584
33.
CAUTION: Make sure that new bolts are
installed.
Torque:
Stage 1: 5 Nm
Stage 2: 180°
x4
E129828
34.Torque:
Stage 1: 7 Nm
Stage 2: 20 Nm
x2
E129832
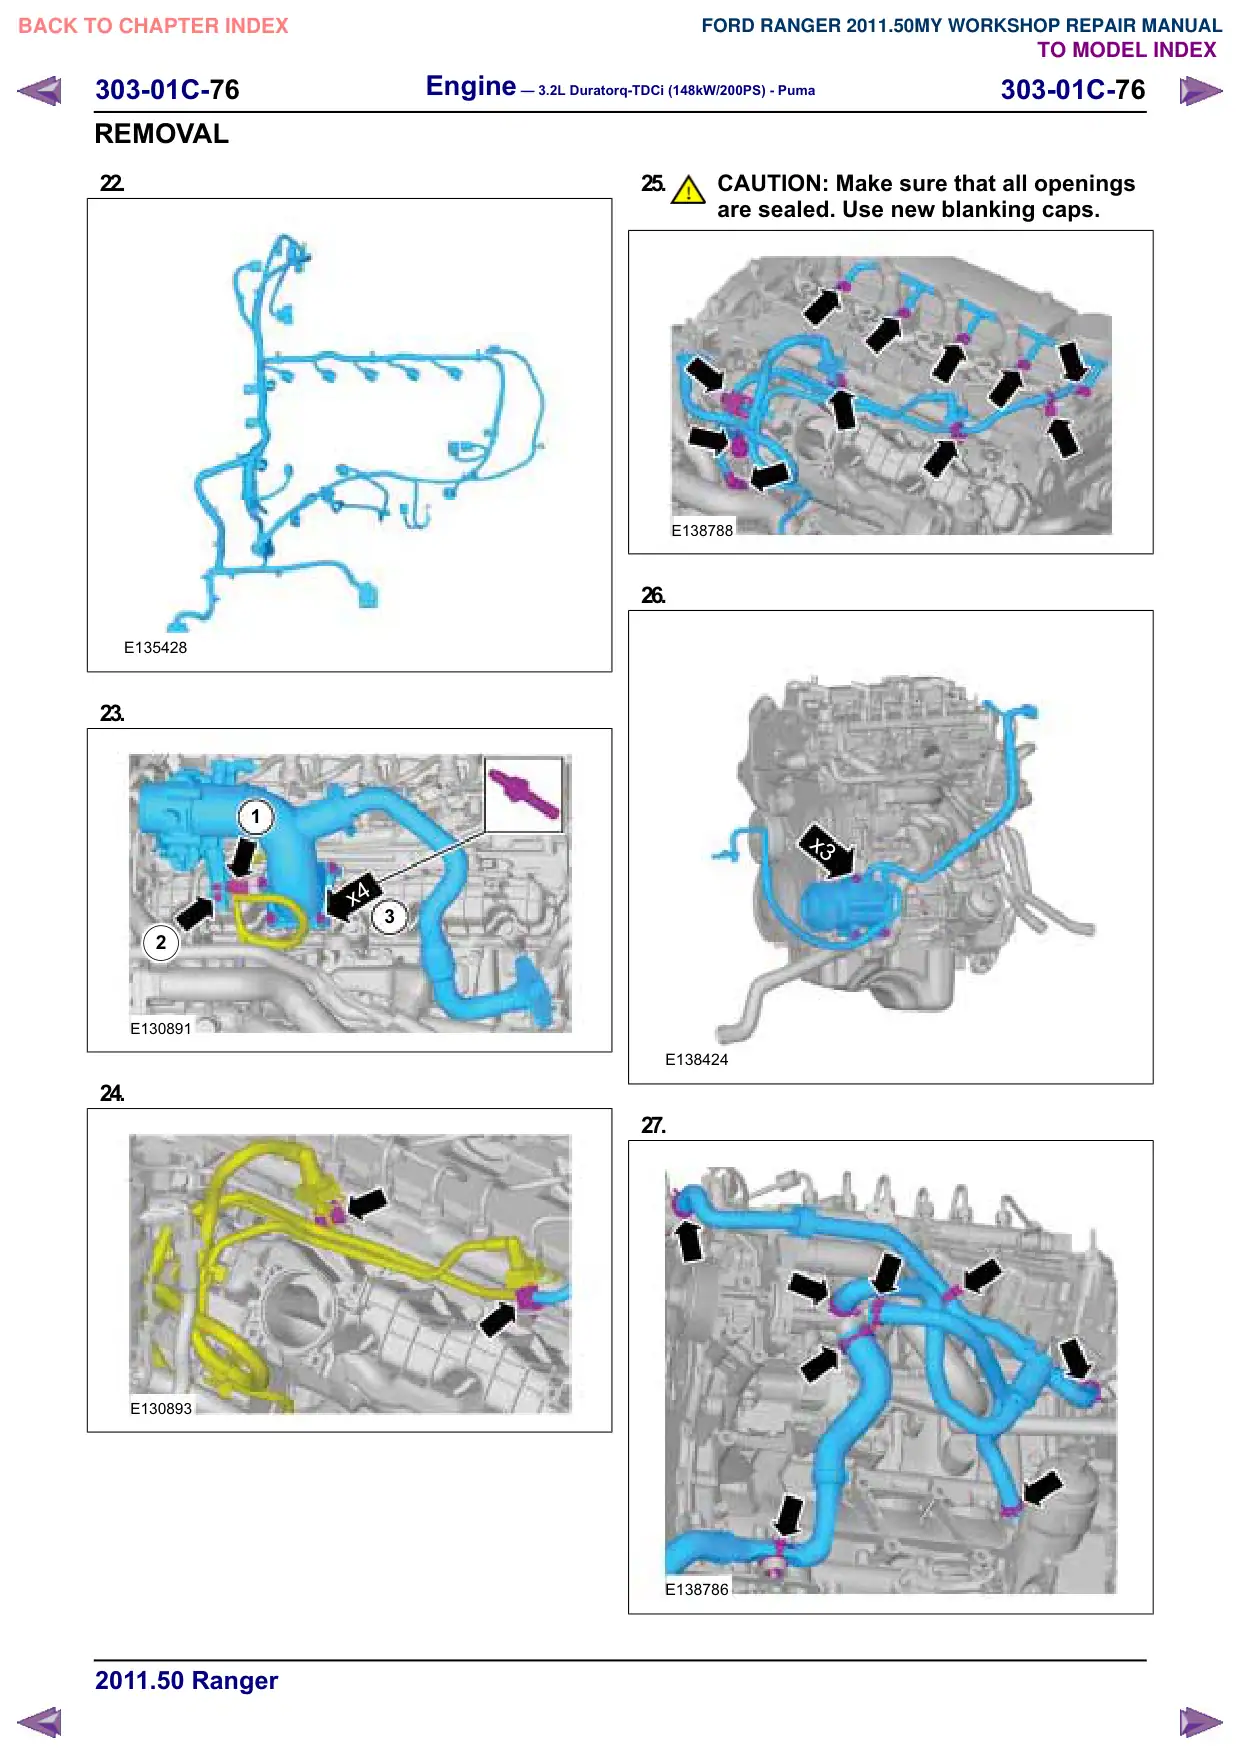
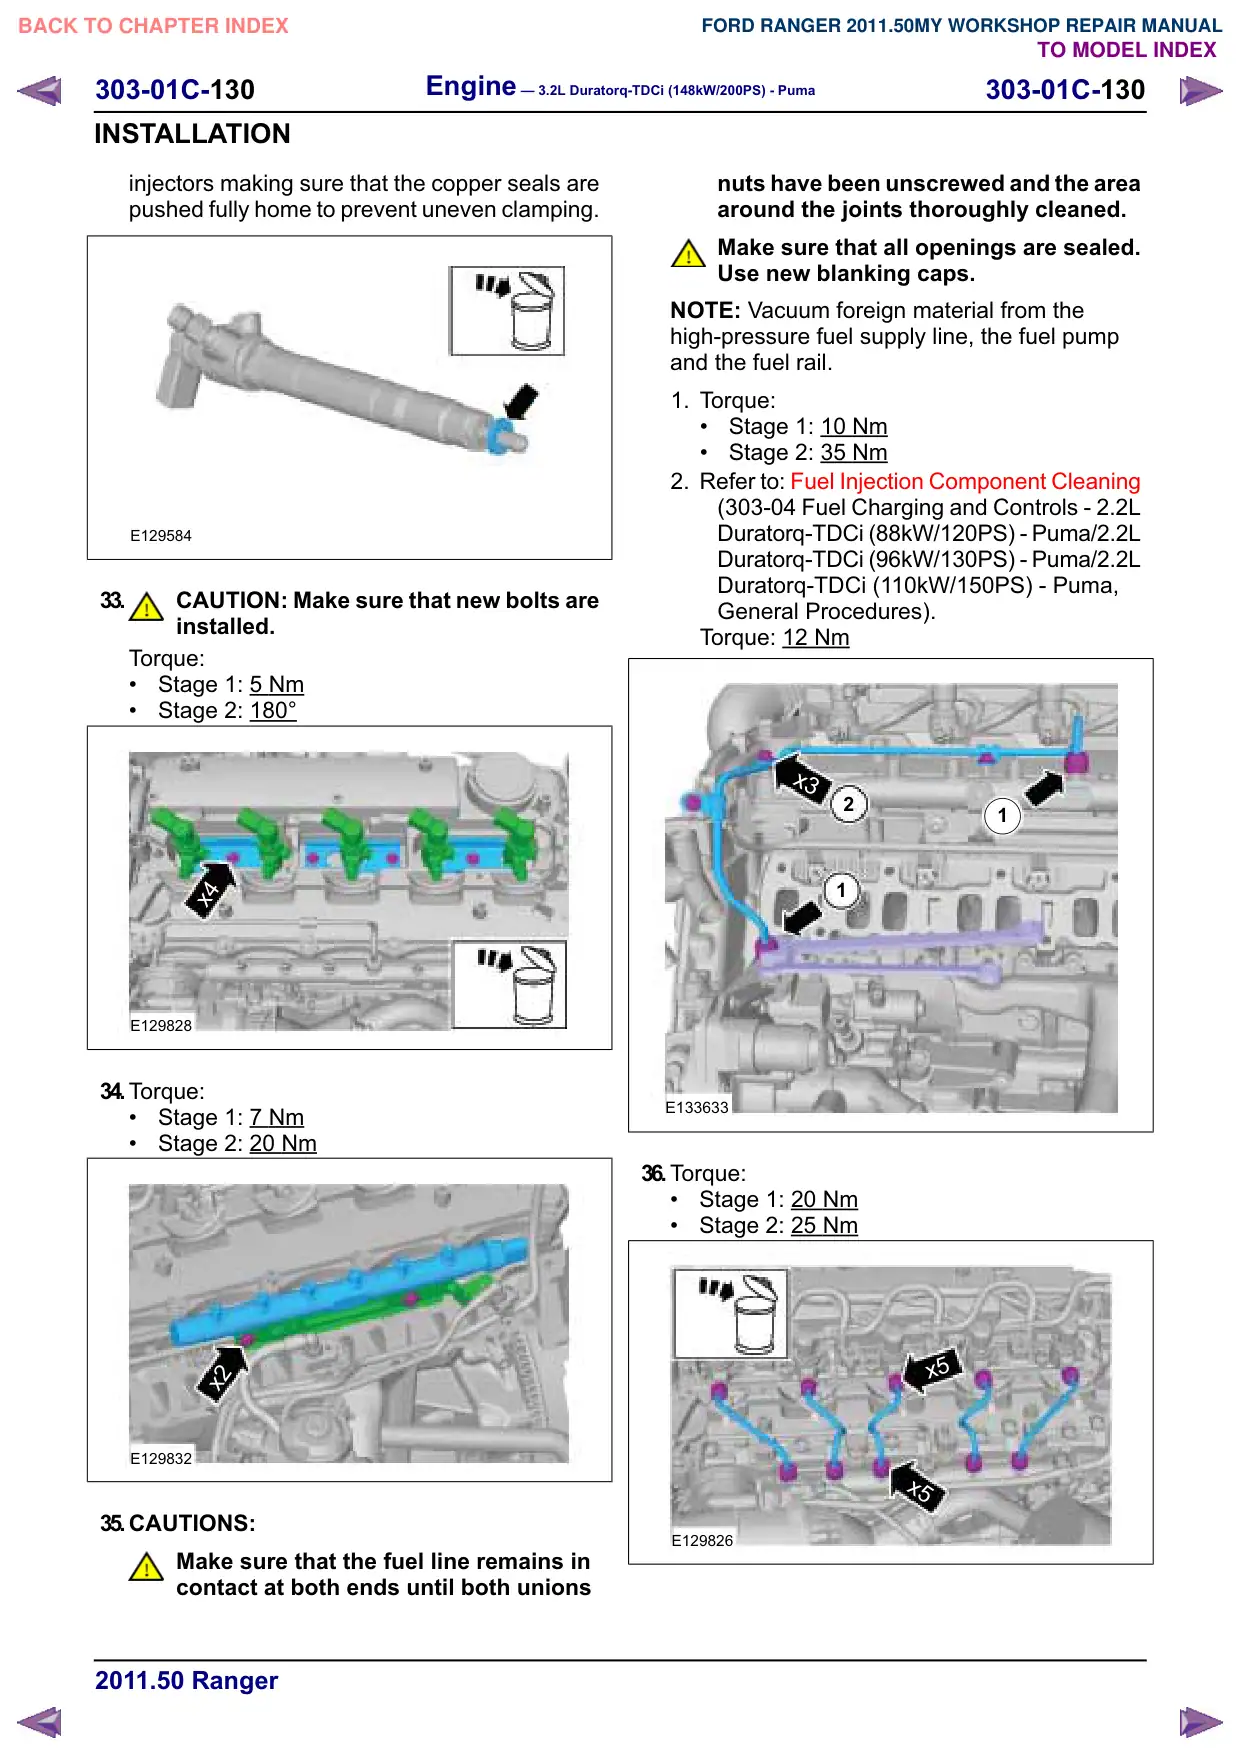
35.CAUTIONS:
Make sure that the fuel line remains in
contact at both ends until both unions
nuts have been unscrewed and the area
around the joints thoroughly cleaned.
Make sure that all openings are sealed.
Use new blanking caps.
NOTE: Vacuum foreign material from the
high-pressure fuel supply line, the fuel pump
and the fuel rail.
1. Torque:
Stage 1: 10
Nm
Stage 2: 35 Nm
2. Refer to: Fuel Injection Component Cleaning
(303-04 Fuel Charging and Controls - 2.2L
Duratorq-TDCi (88kW/120PS) - Puma/2.2L
Duratorq-TDCi (96kW/130PS) - Puma/2.2L
Duratorq-TDCi (110kW/150PS) - Puma,
General Procedures).
Torque: 12 Nm
x3
2
1
1
E133633
36.Torque:
Stage 1: 20 Nm
Stage 2: 25
Nm
x5
x5
E129826
Engine – 3.2L Duratorq-TDCi (148kW/200PS) - Puma
303-01C-135
303-01C-135
INSTALLATION
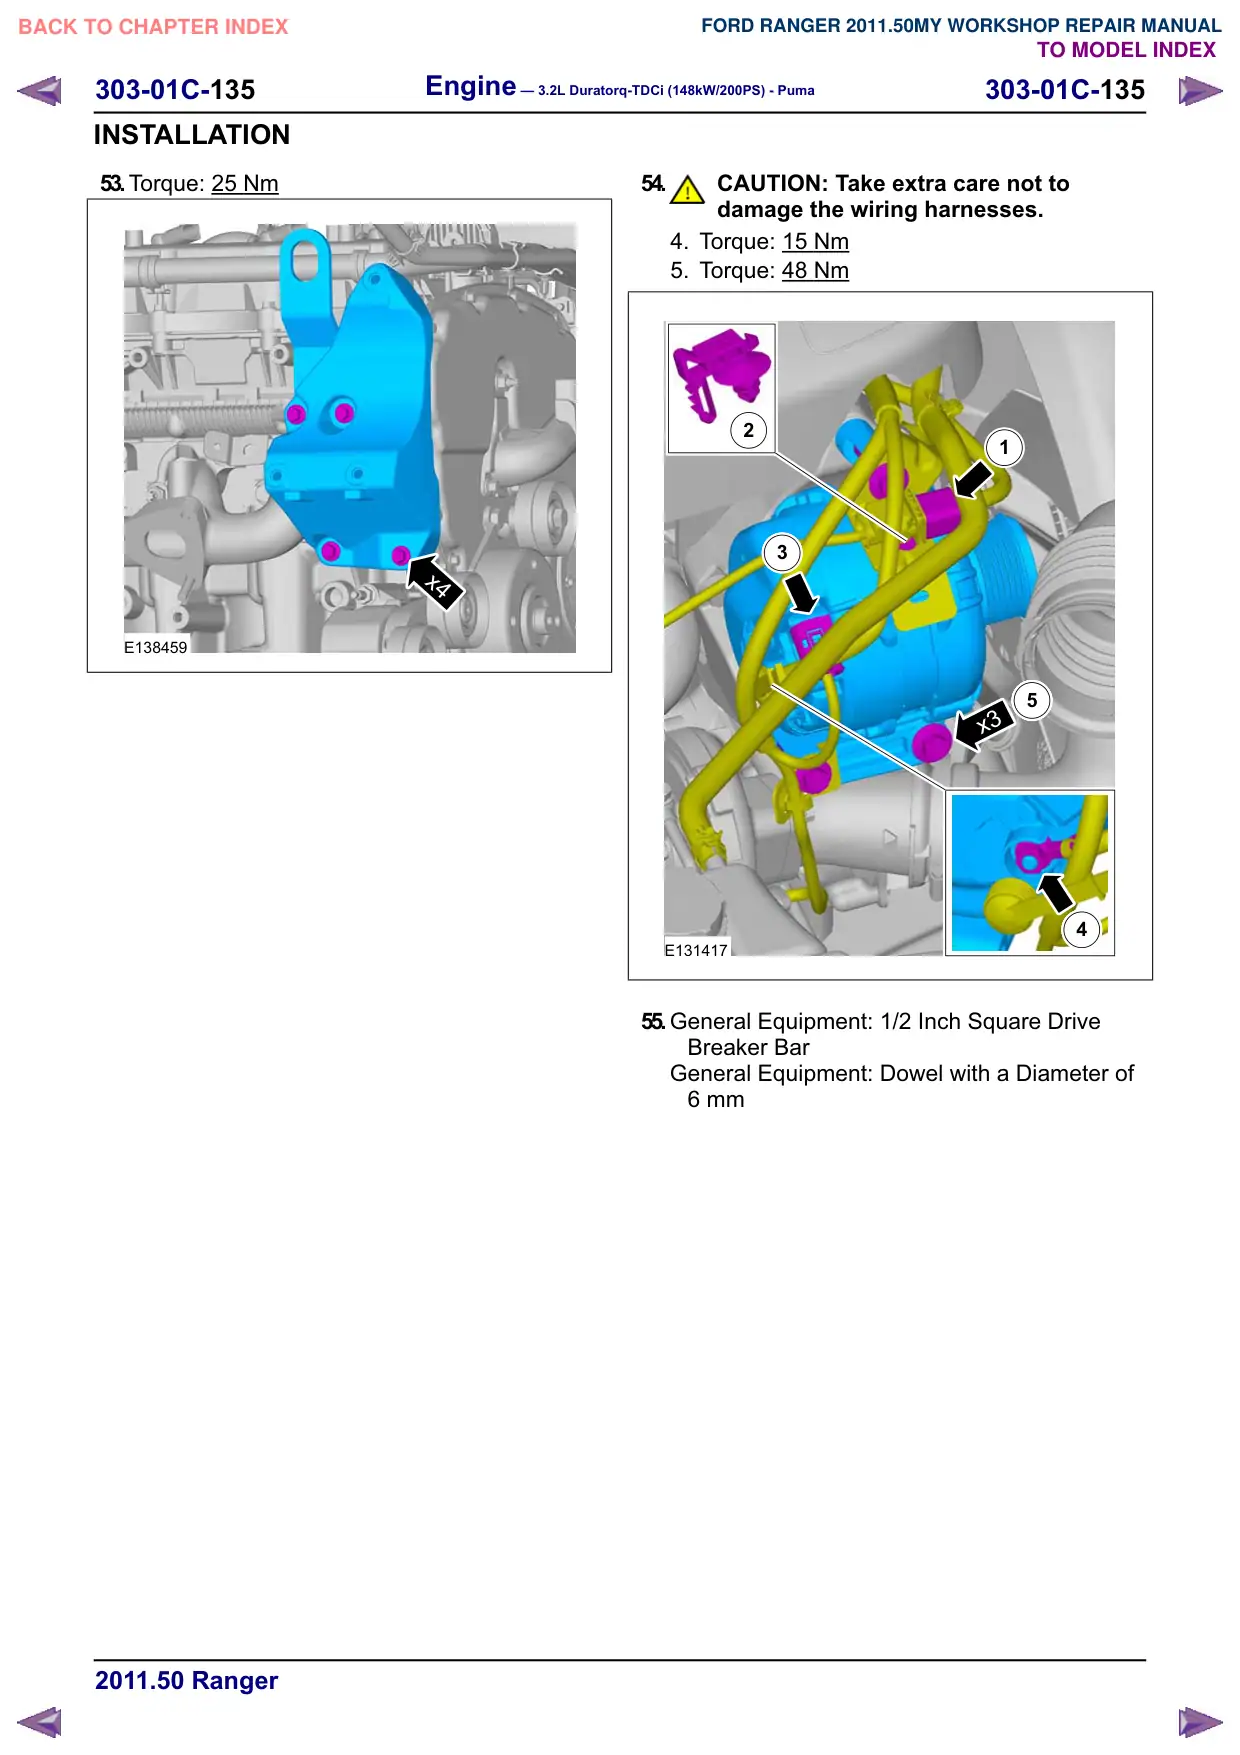
53.Torque: 25 Nm
x4
E138459
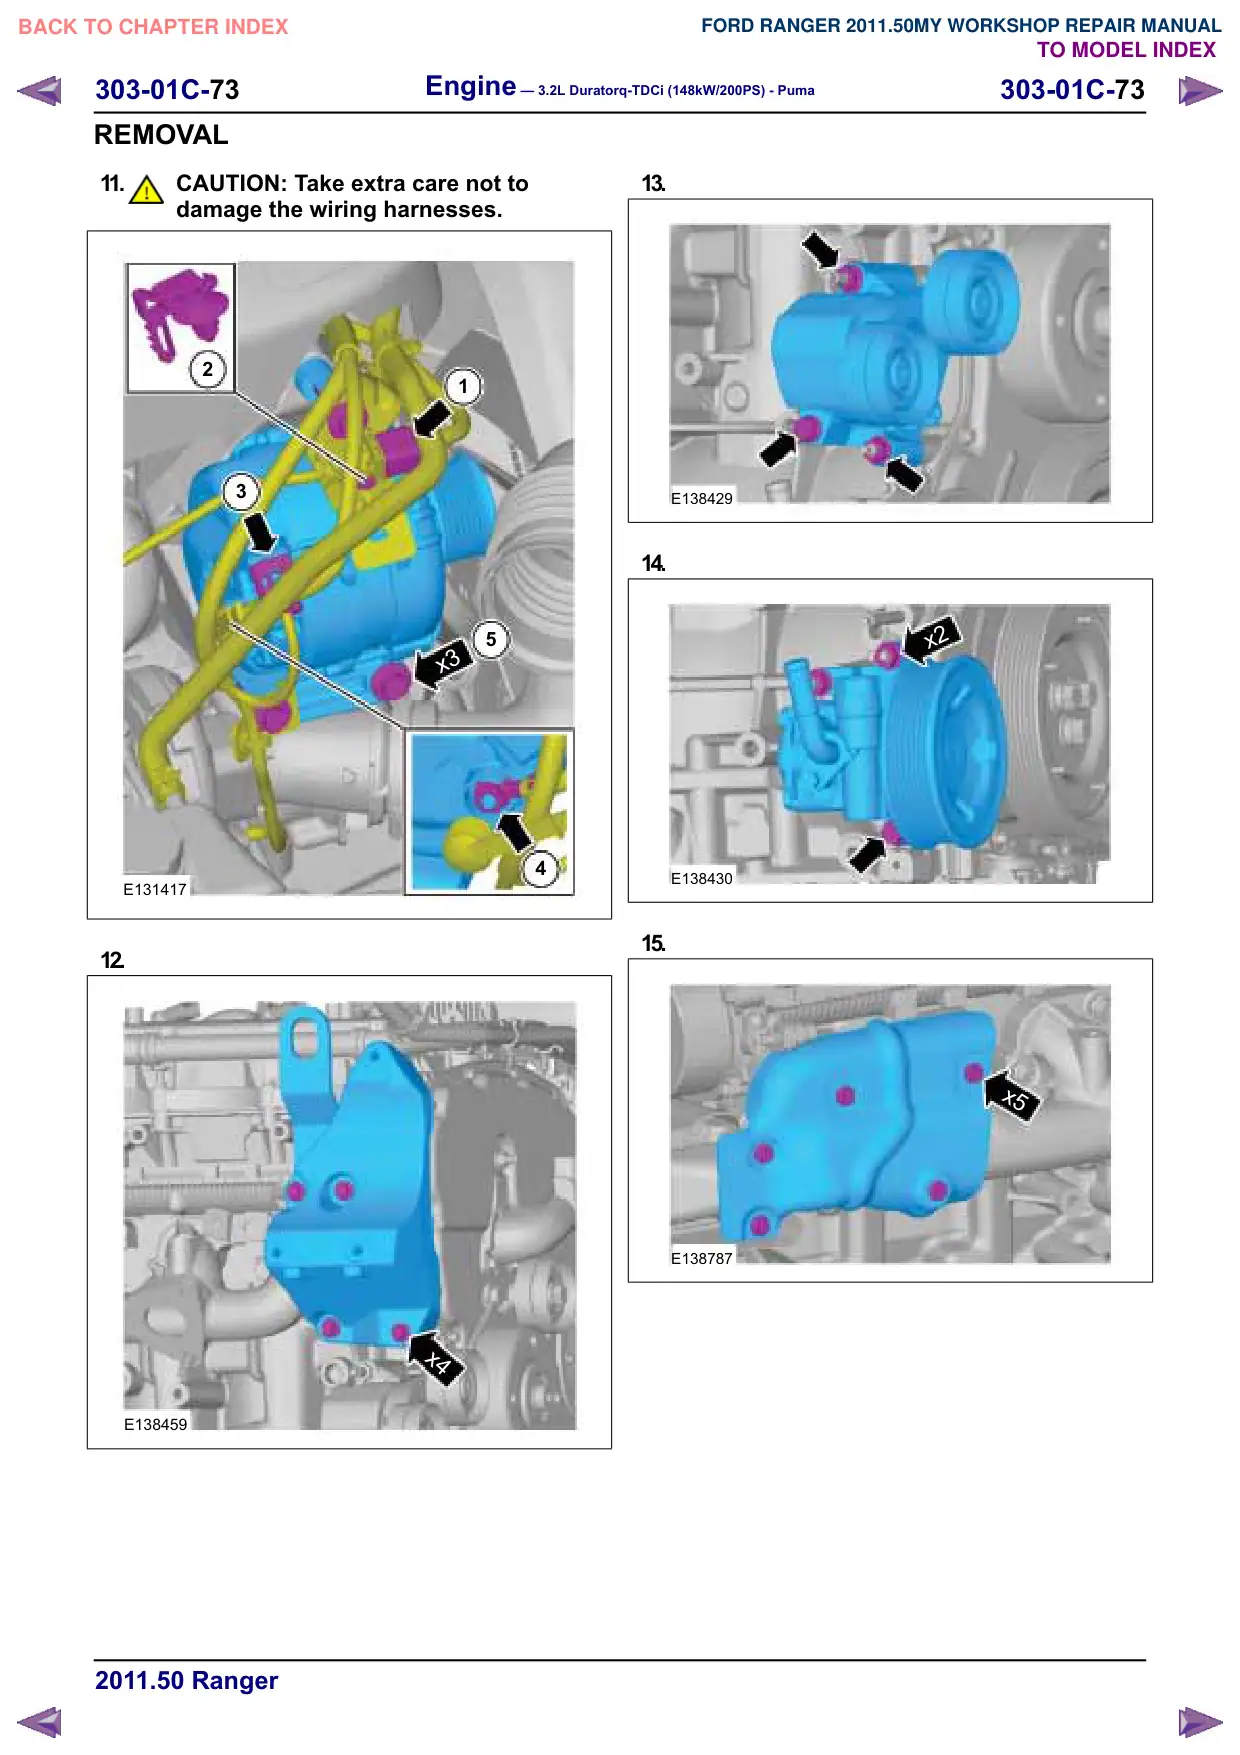
54.
CAUTION: Take extra care not to
damage the wiring harnesses.
4. Torque: 15 Nm
5. Torque: 48 Nm
2
1
3
5
x3
4
E131417
55.General Equipment: 1/2 Inch Square Drive
Breaker Bar
General Equipment: Dowel with a Diameter of
6 mm