417-01-2
Exterior Lighting
417-01-2
DESCRIPTION AND OPERATION
Exterior Lighting
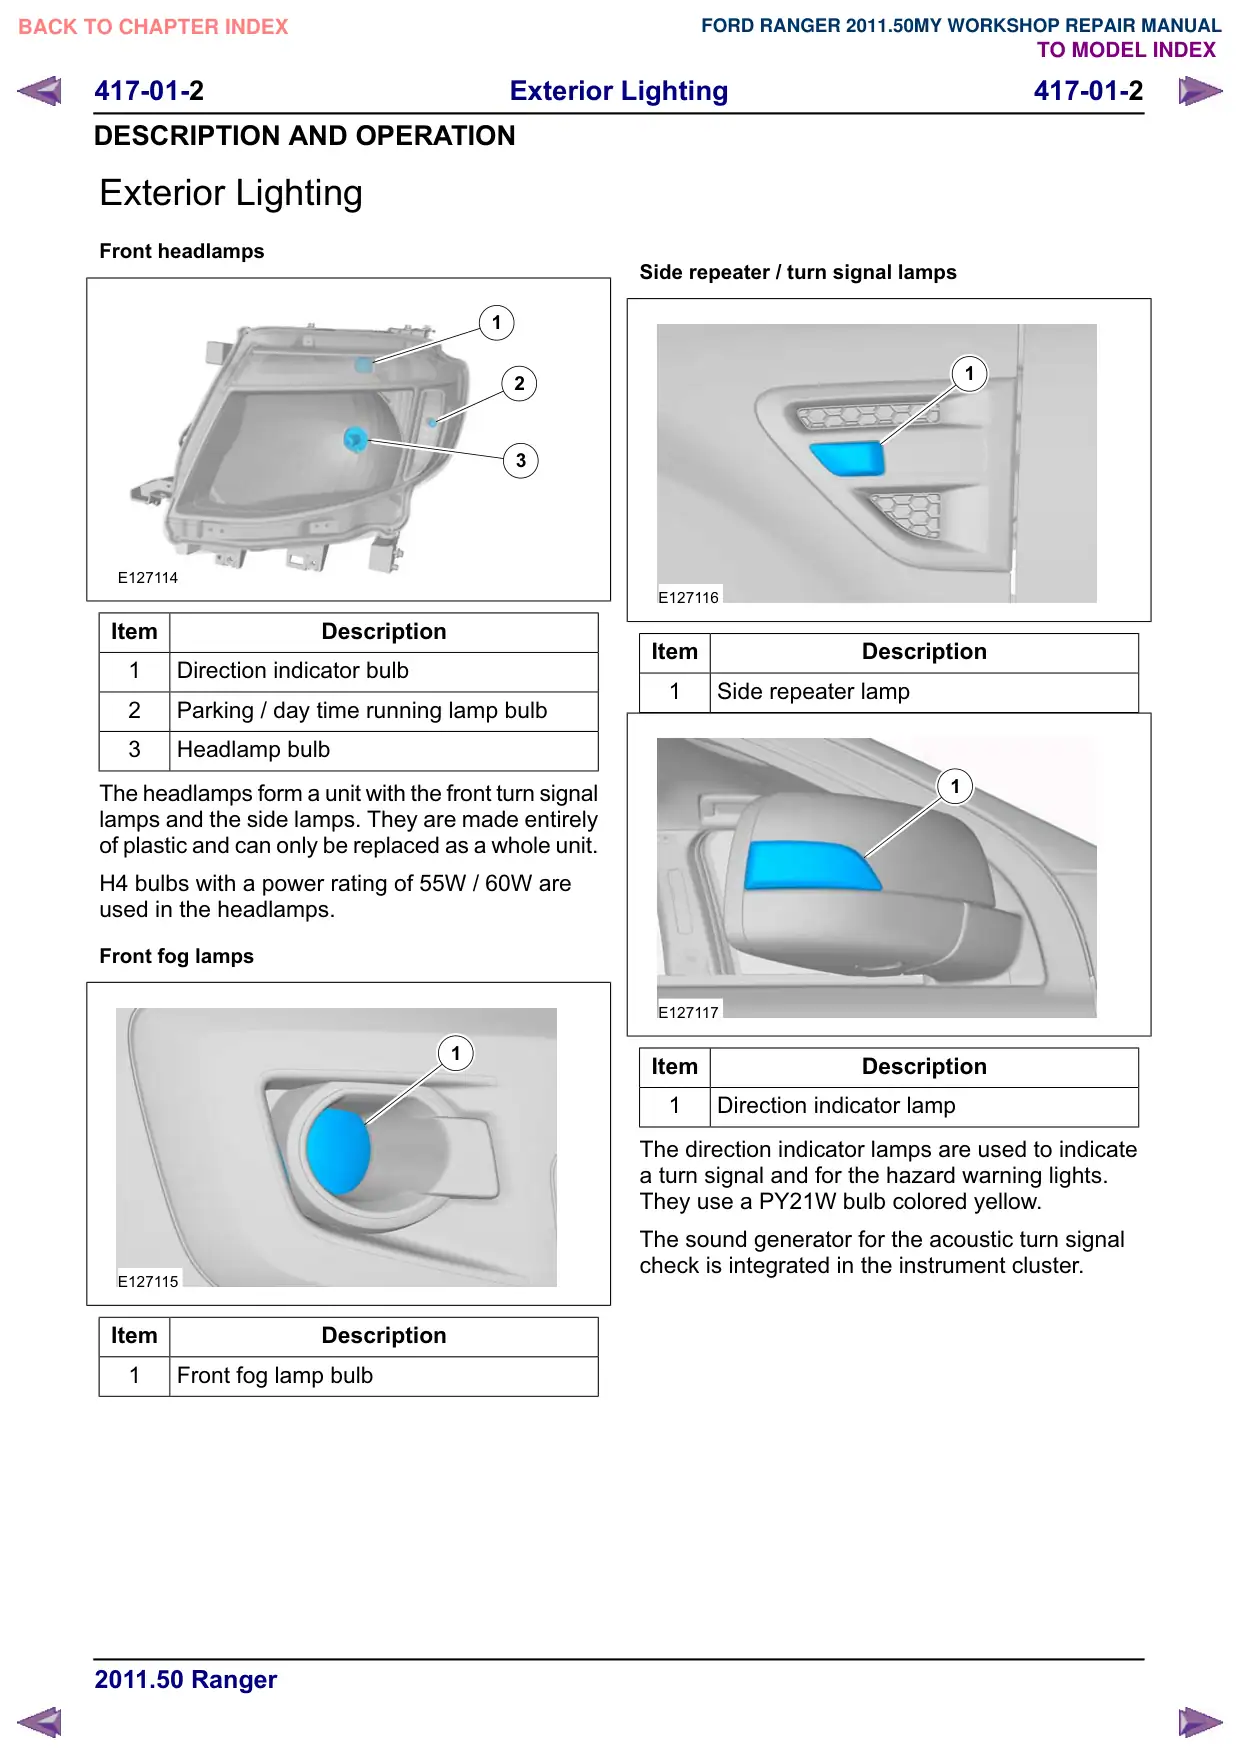
Front headlamps
1
2
3
E127114
Item
Description
1
Direction indicator bulb
2
Parking / day time running lamp bulb
3
Headlamp bulb
The headlamps form a unit with the front turn signal
lamps and the side lamps. They are made entirely
of plastic and can only be replaced as a whole unit.
H4 bulbs with a power rating of 55W / 60W are
used in the headlamps.
Front fog lamps
1
E127115
Item
Description
1
Front fog lamp bulb
Side repeater / turn signal lamps
1
E127116
Item
Description
1
Side repeater lamp
1
E127117
Item
Description
1
Direction indicator lamp
The direction indicator lamps are used to indicate
a turn signal and for the hazard warning lights.
They use a PY21W bulb colored yellow.
The sound generator for the acoustic turn signal
check is integrated in the instrument cluster.
417-01-3
Exterior Lighting
417-01-3
DESCRIPTION AND OPERATION
Puddle lamps
1
E127118
Item
Description
1
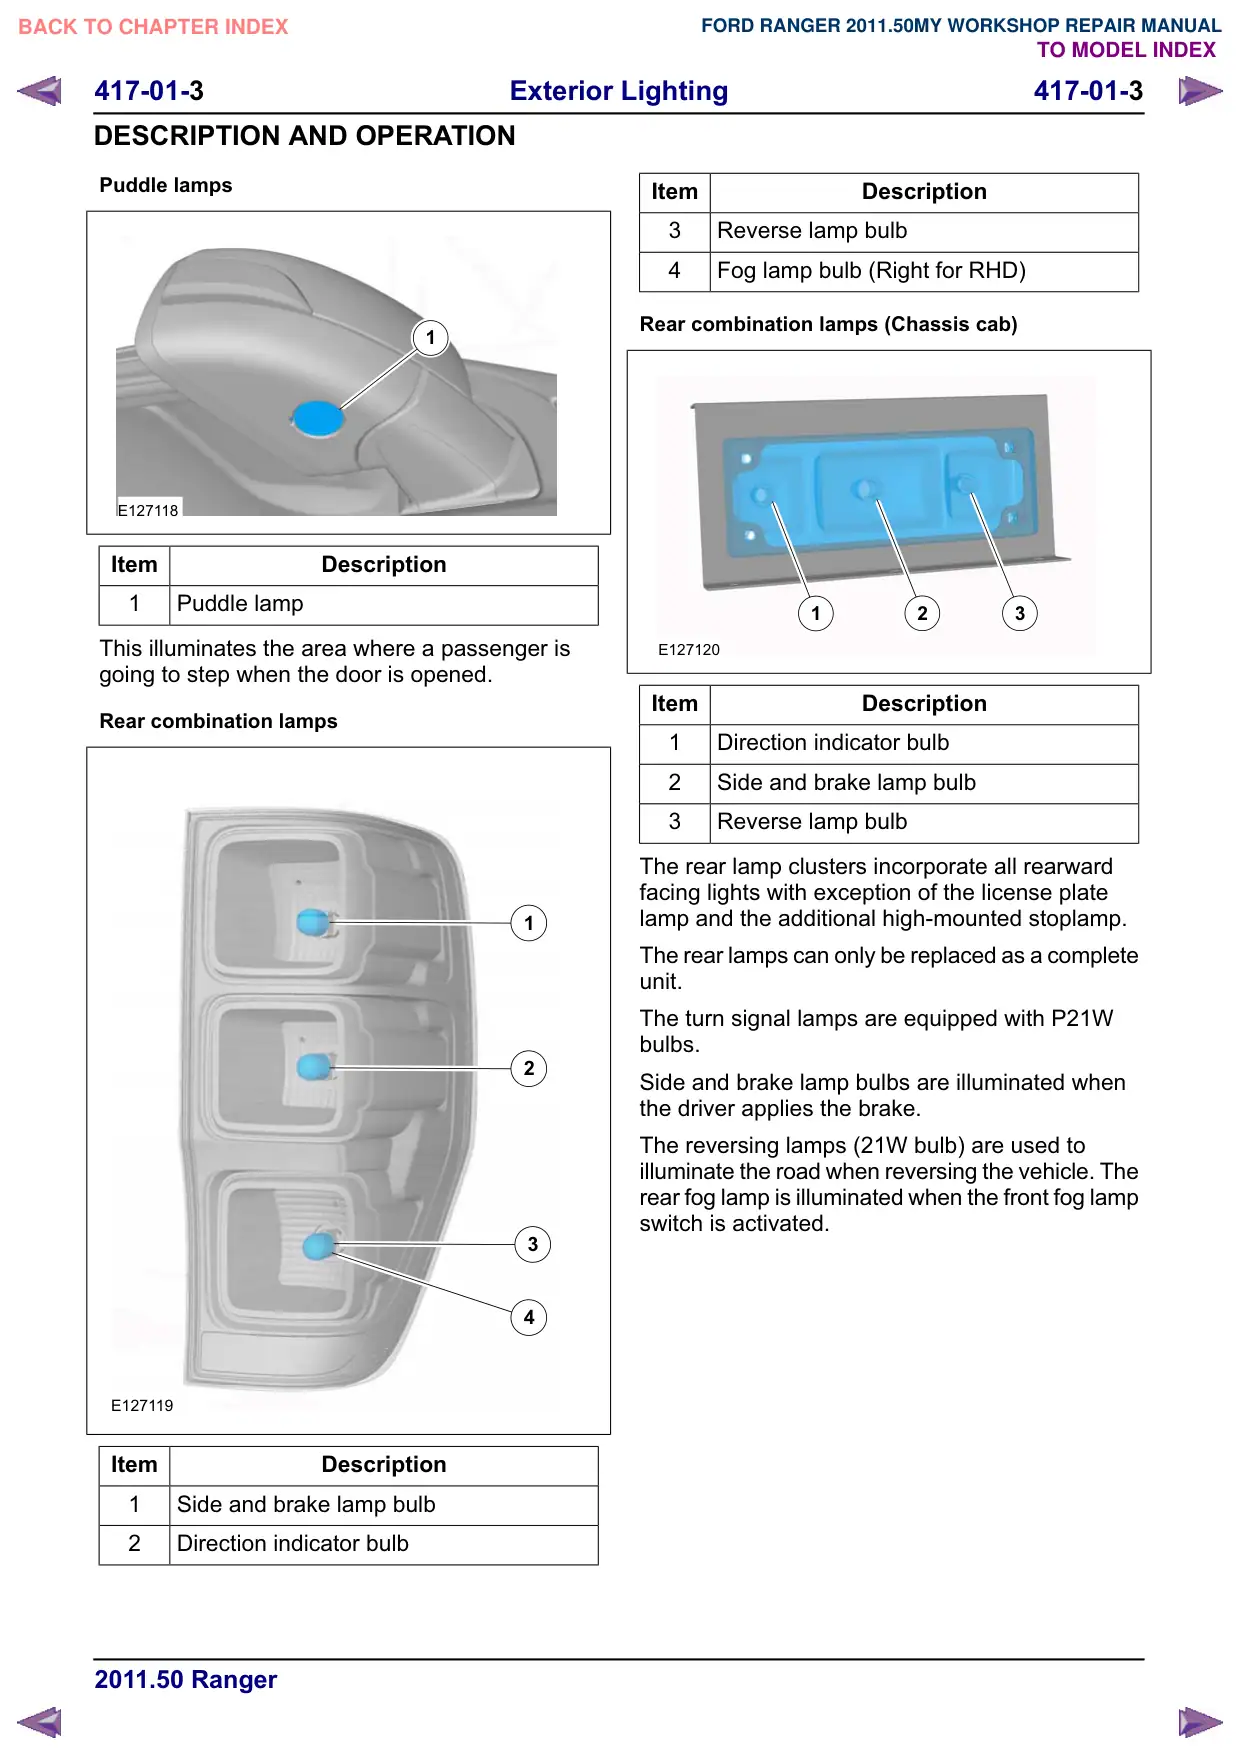
Puddle lamp
This illuminates the area where a passenger is
going to step when the door is opened.
Rear combination lamps
1
2
3
4
E127119
Item
Description
1
Side and brake lamp bulb
2
Direction indicator bulb
Item
Description
3
Reverse lamp bulb
4
Fog lamp bulb (Right for RHD)
Rear combination lamps (Chassis cab)
1
2
3
E127120
Item
Description
1
Direction indicator bulb
2
Side and brake lamp bulb
3
Reverse lamp bulb
The rear lamp clusters incorporate all rearward
facing lights with exception of the license plate
lamp and the additional high-mounted stoplamp.
The rear lamps can only be replaced as a complete
unit.
The turn signal lamps are equipped with P21W
bulbs.
Side and brake lamp bulbs are illuminated when
the driver applies the brake.
The reversing lamps (21W bulb) are used to
illuminate the road when reversing the vehicle. The
rear fog lamp is illuminated when the front fog lamp
switch is activated.
417-01-4
Exterior Lighting
417-01-4
DESCRIPTION AND OPERATION
License plate lamp
1
E127121
Item
Description
1
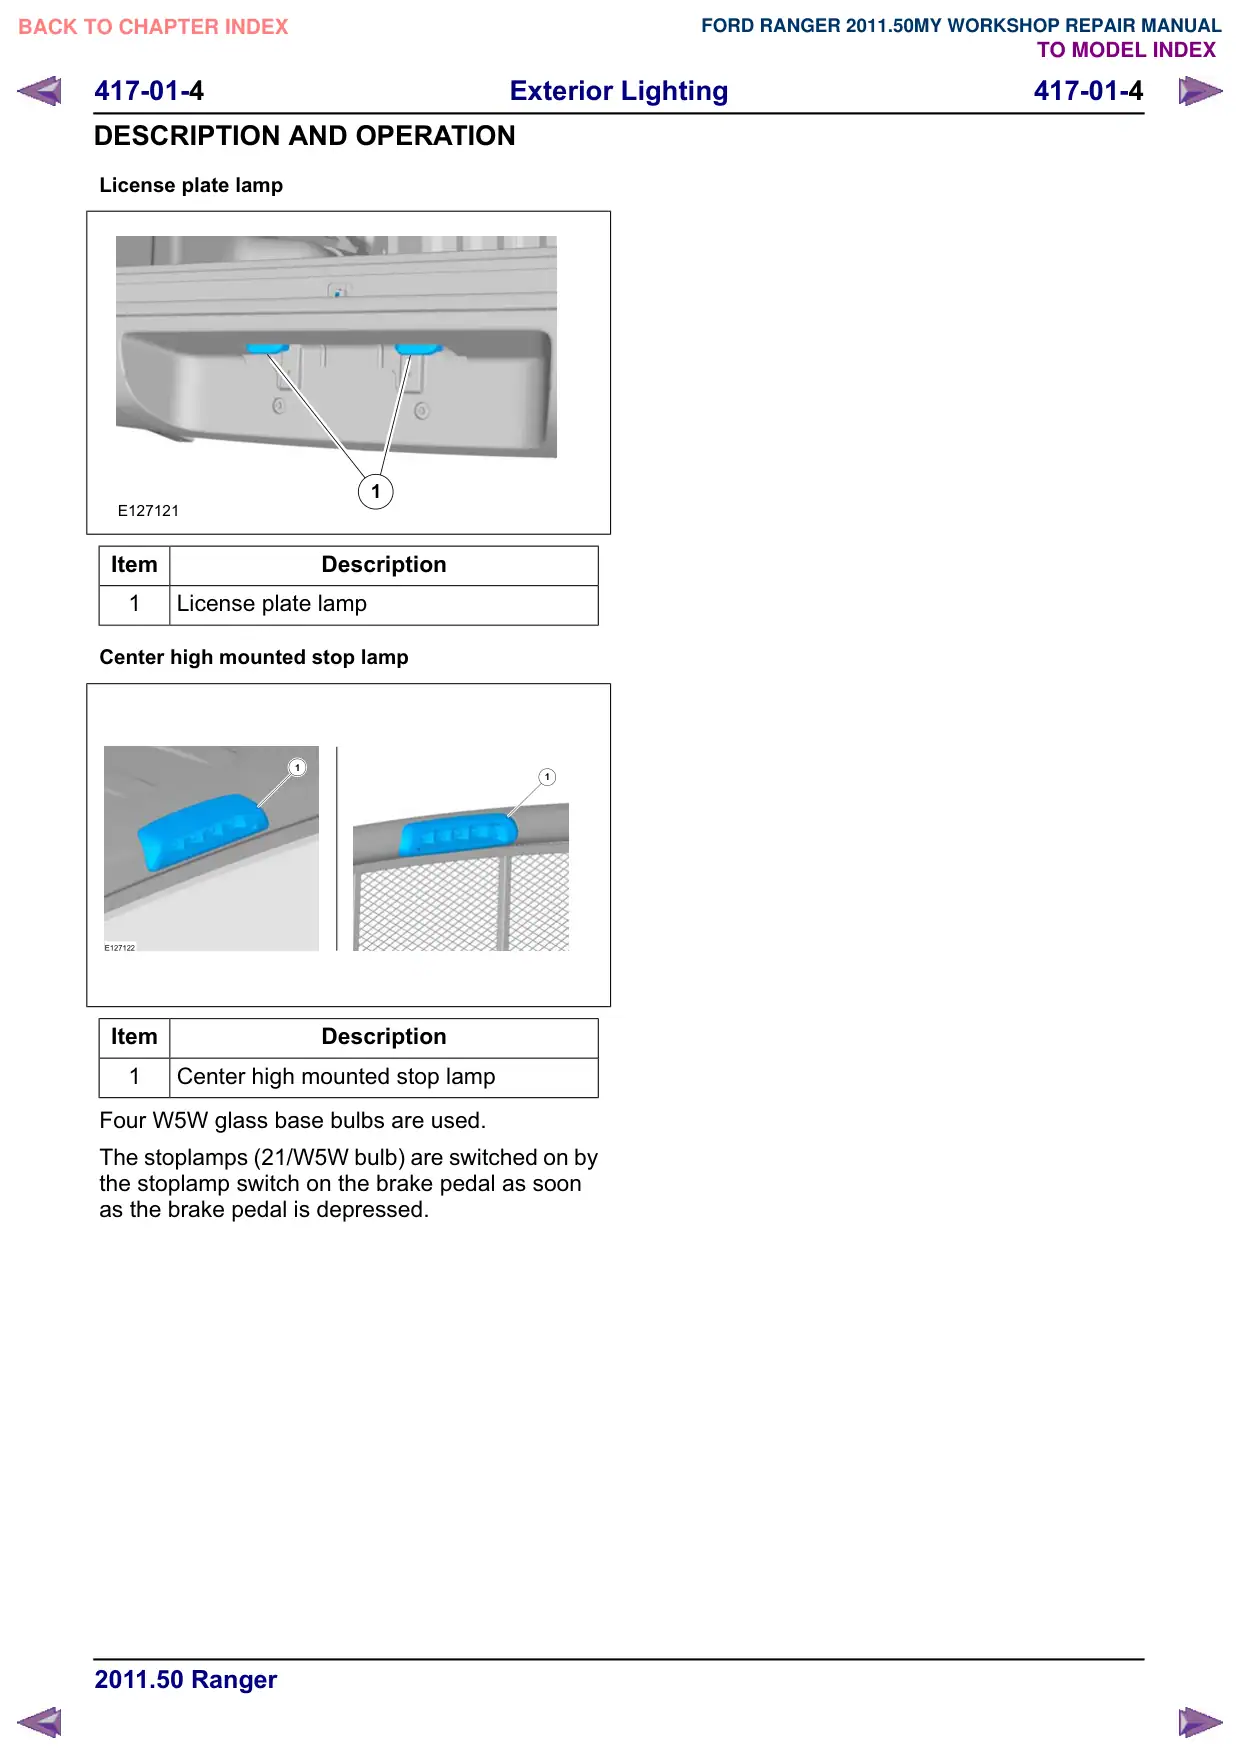
License plate lamp
Center high mounted stop lamp
1
1
E127122
Item
Description
1
Center high mounted stop lamp
Four W5W glass base bulbs are used.
The stoplamps (21/W5W bulb) are switched on by
the stoplamp switch on the brake pedal as soon
as the brake pedal is depressed.
417-01-5
Exterior Lighting
417-01-5
GENERAL PROCEDURES
Headlamp Adjustment
General Equipment
Headlamp Beam Setter
Activation
1. Adjust the tire pressure to the specification.
2. Position the unloaded vehicle on a flat, level
surface.
3. Seat one person in the driver‘s seat.
[
<
E136737
8. Place an object in front of the headlight not
being adjusted to block its light beam.
9. Start the engine so that the battery remains
charged.
10.Turn on the headlamp.
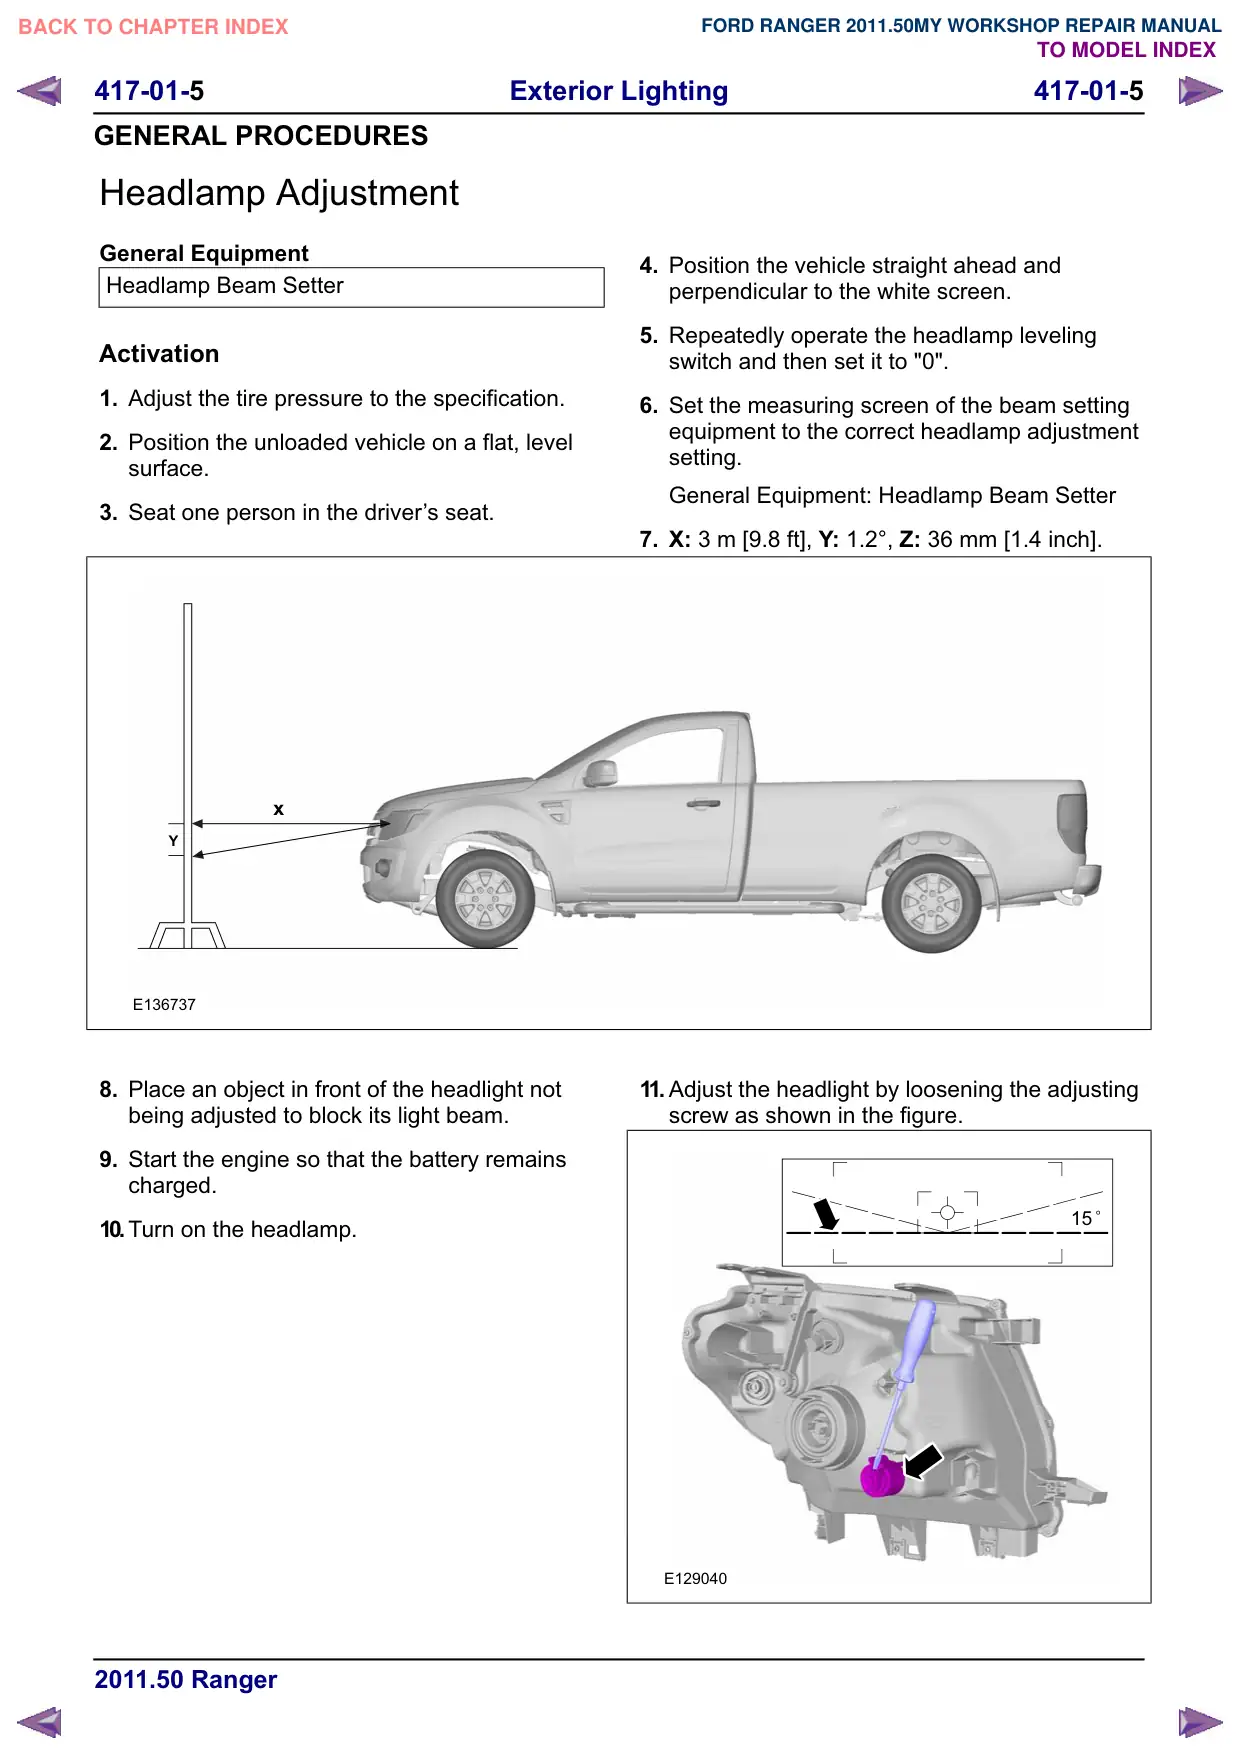
4. Position the vehicle straight ahead and
perpendicular to the white screen.
5. Repeatedly operate the headlamp leveling
switch and then set it to "0".
6. Set the measuring screen of the beam setting
equipment to the correct headlamp adjustment
setting.
General Equipment: Headlamp Beam Setter
7. X: 3 m [9.8 ft], Y: 1.2°, Z: 36 mm [1.4 inch].
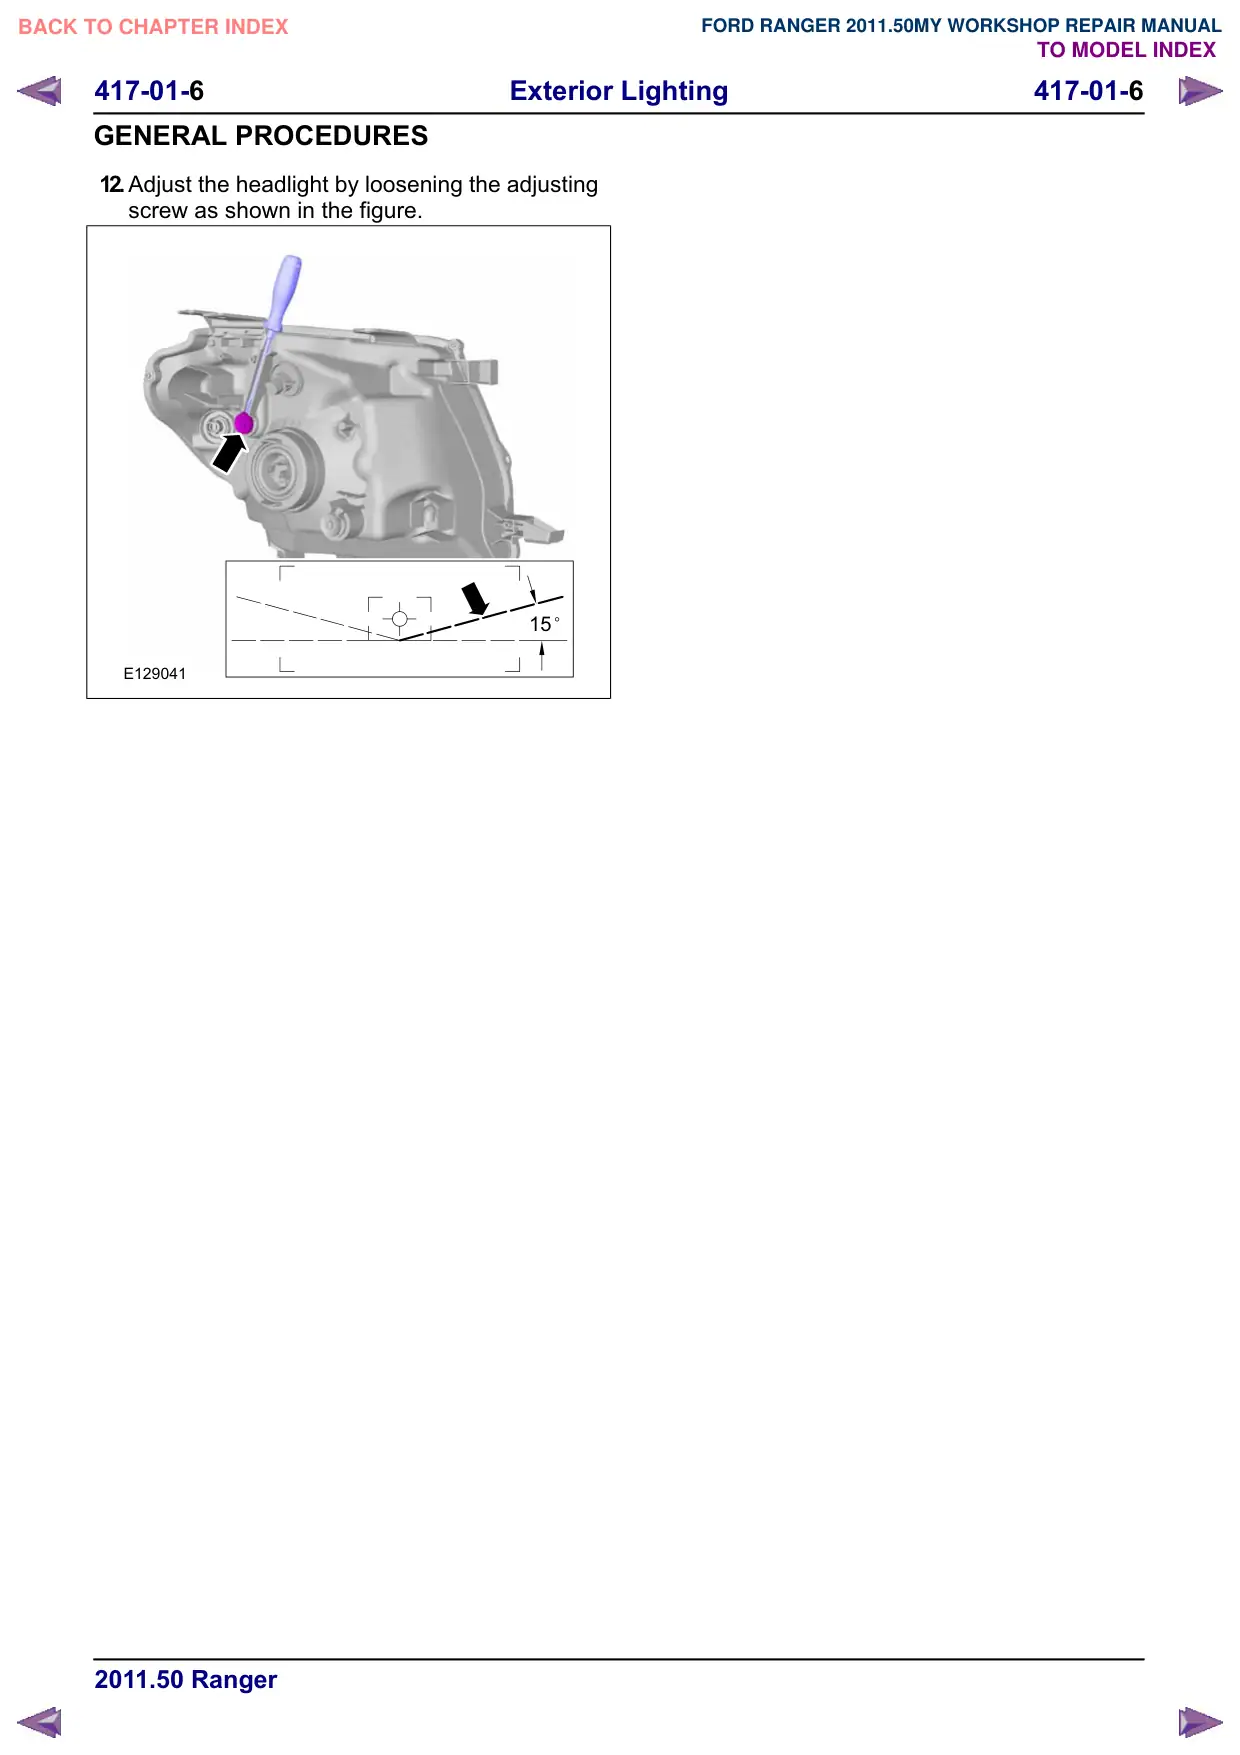
11. Adjust the headlight by loosening the adjusting
screw as shown in the figure.
15
E129040
417-01-7
Exterior Lighting
417-01-7
GENERAL PROCEDURES
Front Fog Lamp Adjustment
Activation
13.Make an adjustment screen using
double-weight, white paper.
14.Adjust the tire pressure to the specification.
[
<
E136738
18.Place an object in front of the fog light not being
adjusted to block its light beam.
19.Start the engine so that the battery remains
charged.
20.Turn the front fog lights on.
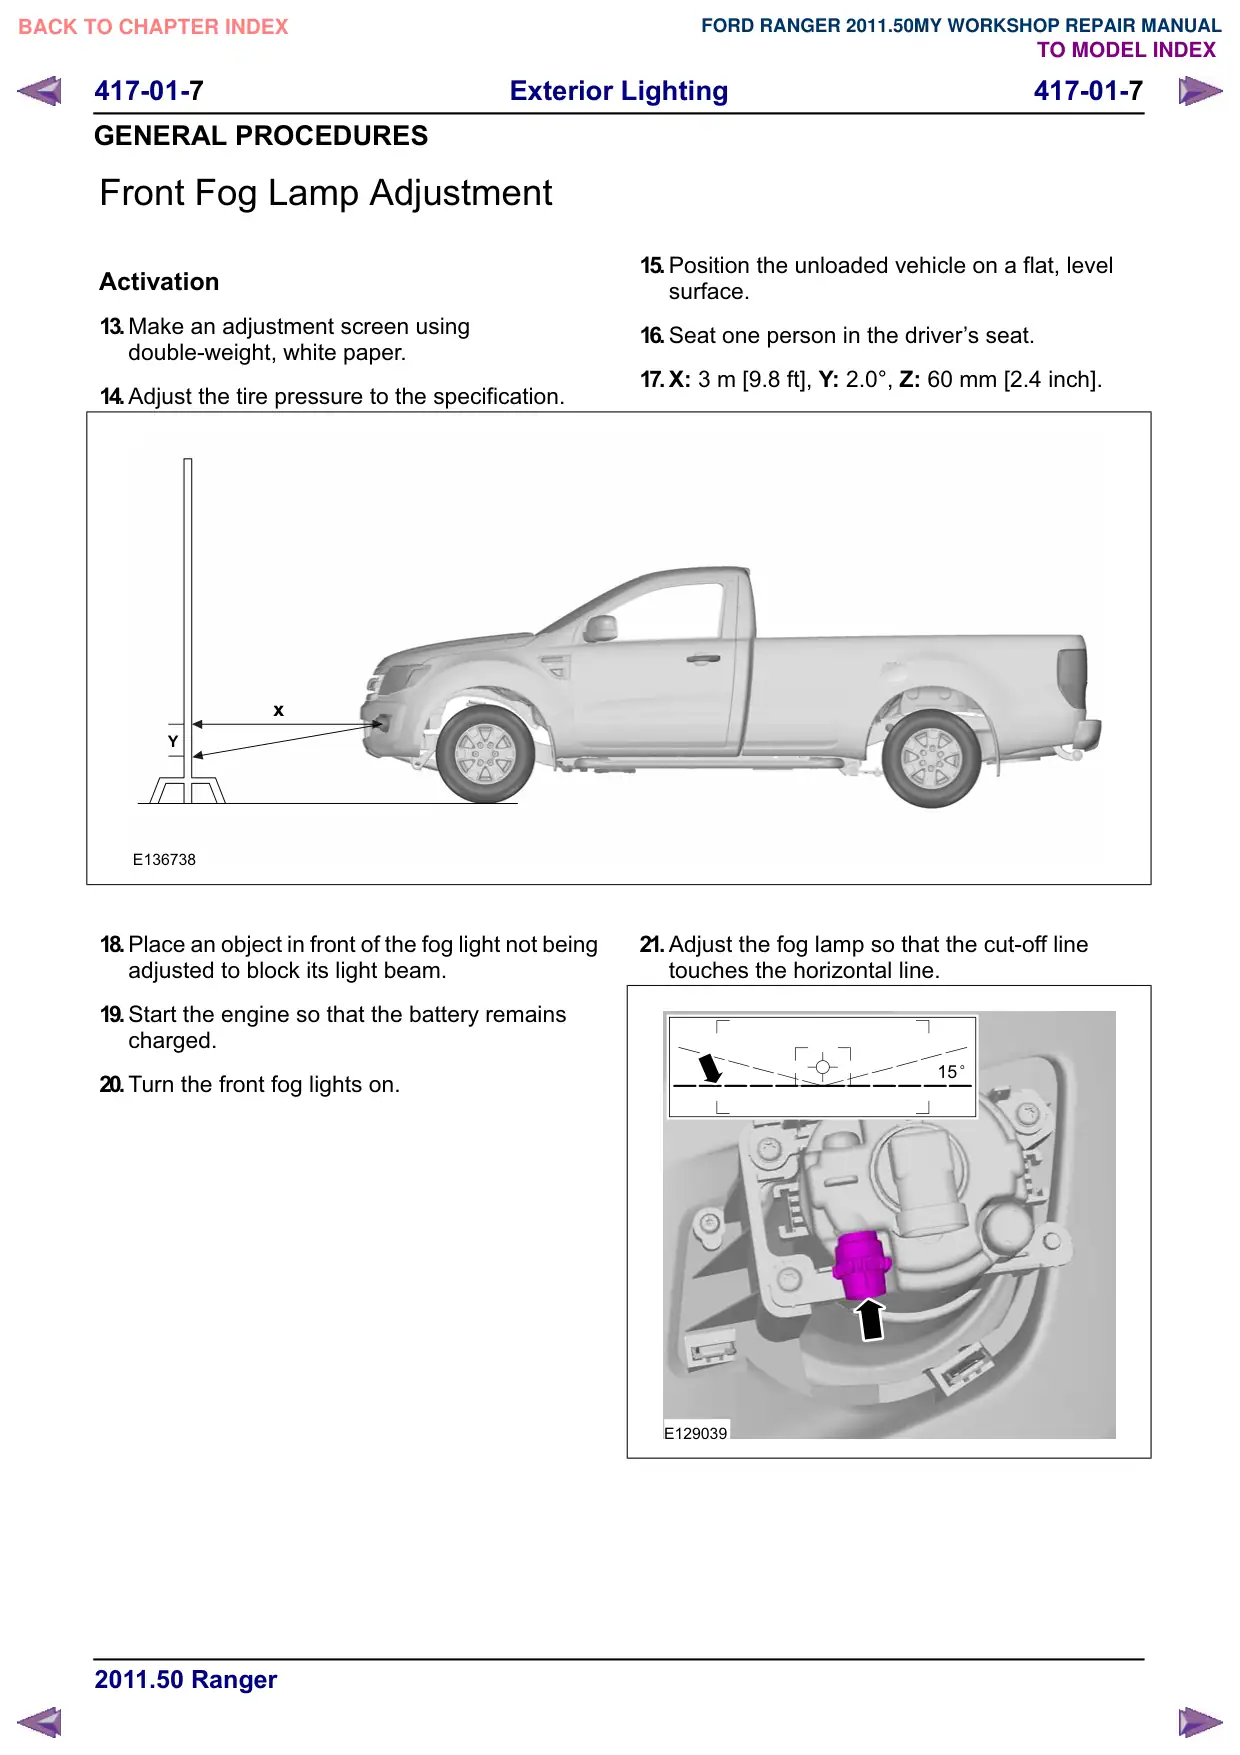
15.Position the unloaded vehicle on a flat, level
surface.
16.Seat one person in the driver‘s seat.
17.X: 3 m [9.8 ft], Y: 2.0°, Z: 60 mm [2.4 inch].
21.Adjust the fog lamp so that the cut-off line
touches the horizontal line.
15
E129039
417-01-8
Exterior Lighting
417-01-8
GENERAL PROCEDURES
Headlamp Masking
Activation
22.Print out the corresponding templates at the end
of this operation.
23.Measure dimension X on the printout of the
template.
24.Calculate the enlargement/reduction factor Y
for the photocopier using the following formula:
Y Z’Xþ100.
25.
X measurement on the printout of the
template in mm.
Y enlargement/reduction factor in %.
Z original dimension in mm 100.
26.Enlarge/reduce the printout with a photocopier
by the calculated percentage.
27.Compare dimension X on the photocopy with
the original dimension.
28.Cut out the prepared template for the headlamp.
Left-hand drive vehicles
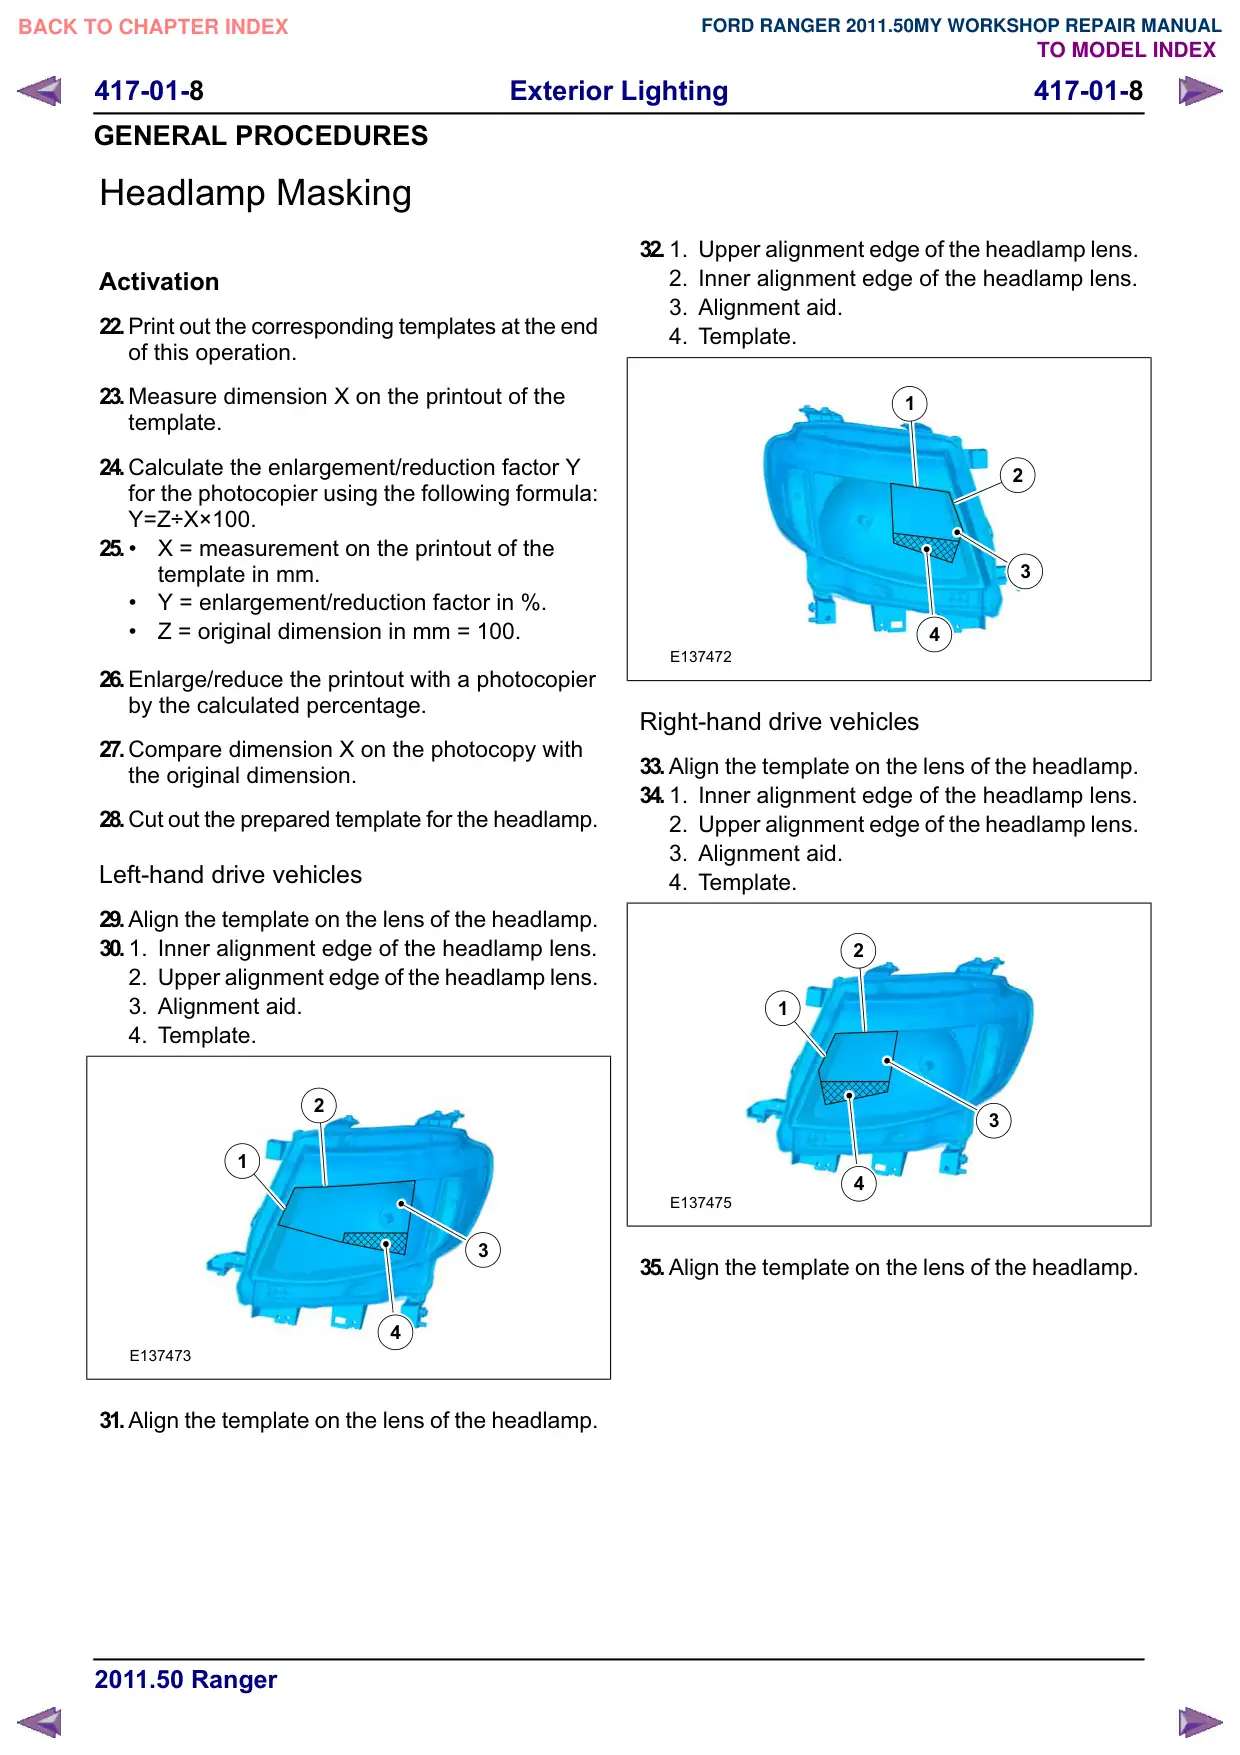
29.Align the template on the lens of the headlamp.
30.
1.
Inner alignment edge of the headlamp lens.
2. Upper alignment edge of the headlamp lens.
3. Alignment aid.
4. Template.
2
1
3
4
E137473
31.Align the template on the lens of the headlamp.
32.
1.
Upper alignment edge of the headlamp lens.
2. Inner alignment edge of the headlamp lens.
3. Alignment aid.
4. Template.
1
2
3
4
E137472
Right-hand drive vehicles
33.Align the template on the lens of the headlamp.
34.
1.
Inner alignment edge of the headlamp lens.
2. Upper alignment edge of the headlamp lens.
3. Alignment aid.
4. Template.
2
1
3
4
E137475
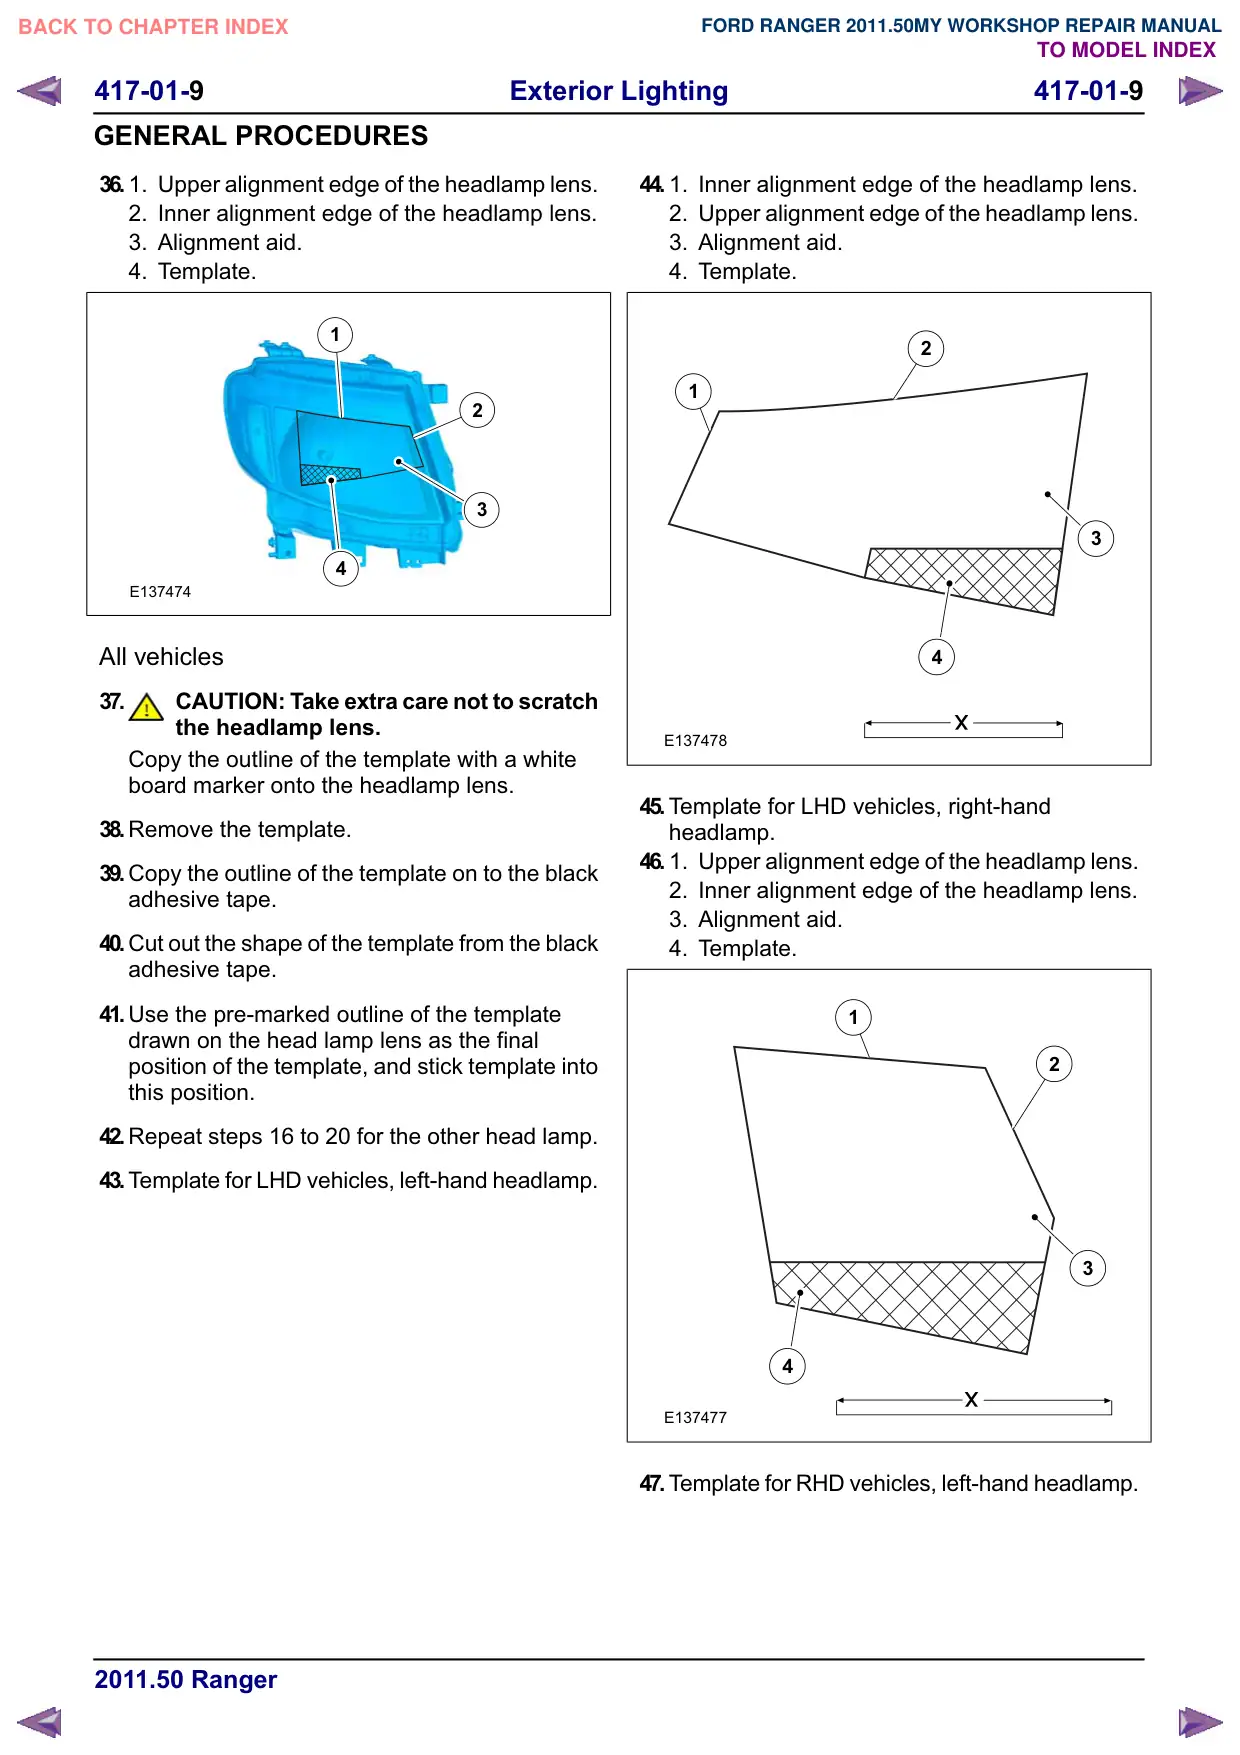
35.Align the template on the lens of the headlamp.
417-01-
Exterior Lighting
417-01-
GENERAL PROCEDURES
36.
1.
Upper alignment edge of the headlamp lens.
2. Inner alignment edge of the headlamp lens.
3. Alignment aid.
4. Template.
1
2
3
4
E137474
All vehicles
37.
CAUTION: Take extra care not to scratch
the headlamp lens.
Copy the outline of the template with a white
board marker onto the headlamp lens.
38.Remove the template.
39.Copy the outline of the template on to the black
adhesive tape.
40.Cut out the shape of the template from the black
adhesive tape.
41.Use the pre-marked outline of the template
drawn on the head lamp lens as the final
position of the template, and stick template into
this position.
42.Repeat steps 16 to 20 for the other head lamp.
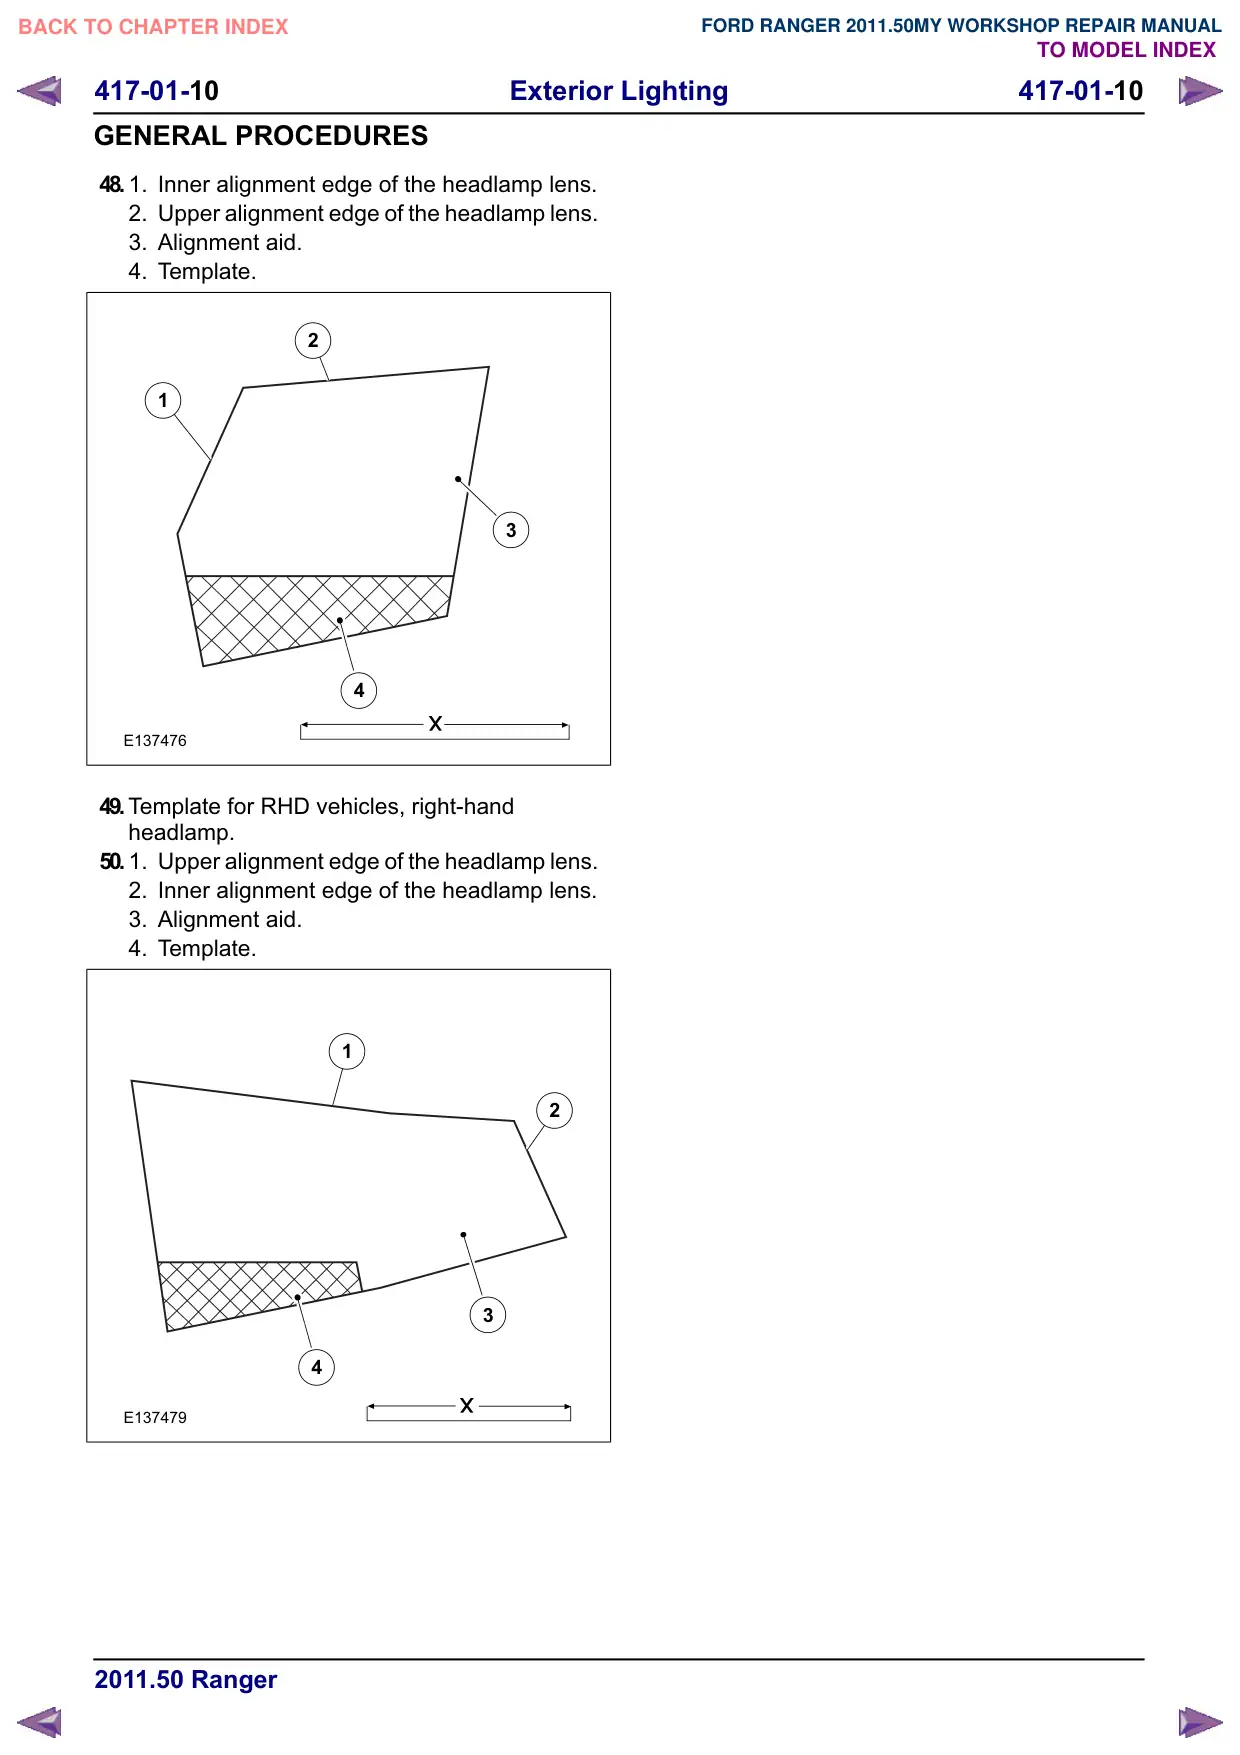
43.Template for LHD vehicles, left-hand headlamp.
44.
1.
Inner alignment edge of the headlamp lens.
2. Upper alignment edge of the headlamp lens.
3. Alignment aid.
4. Template.
2
1
3
4
[
E137478
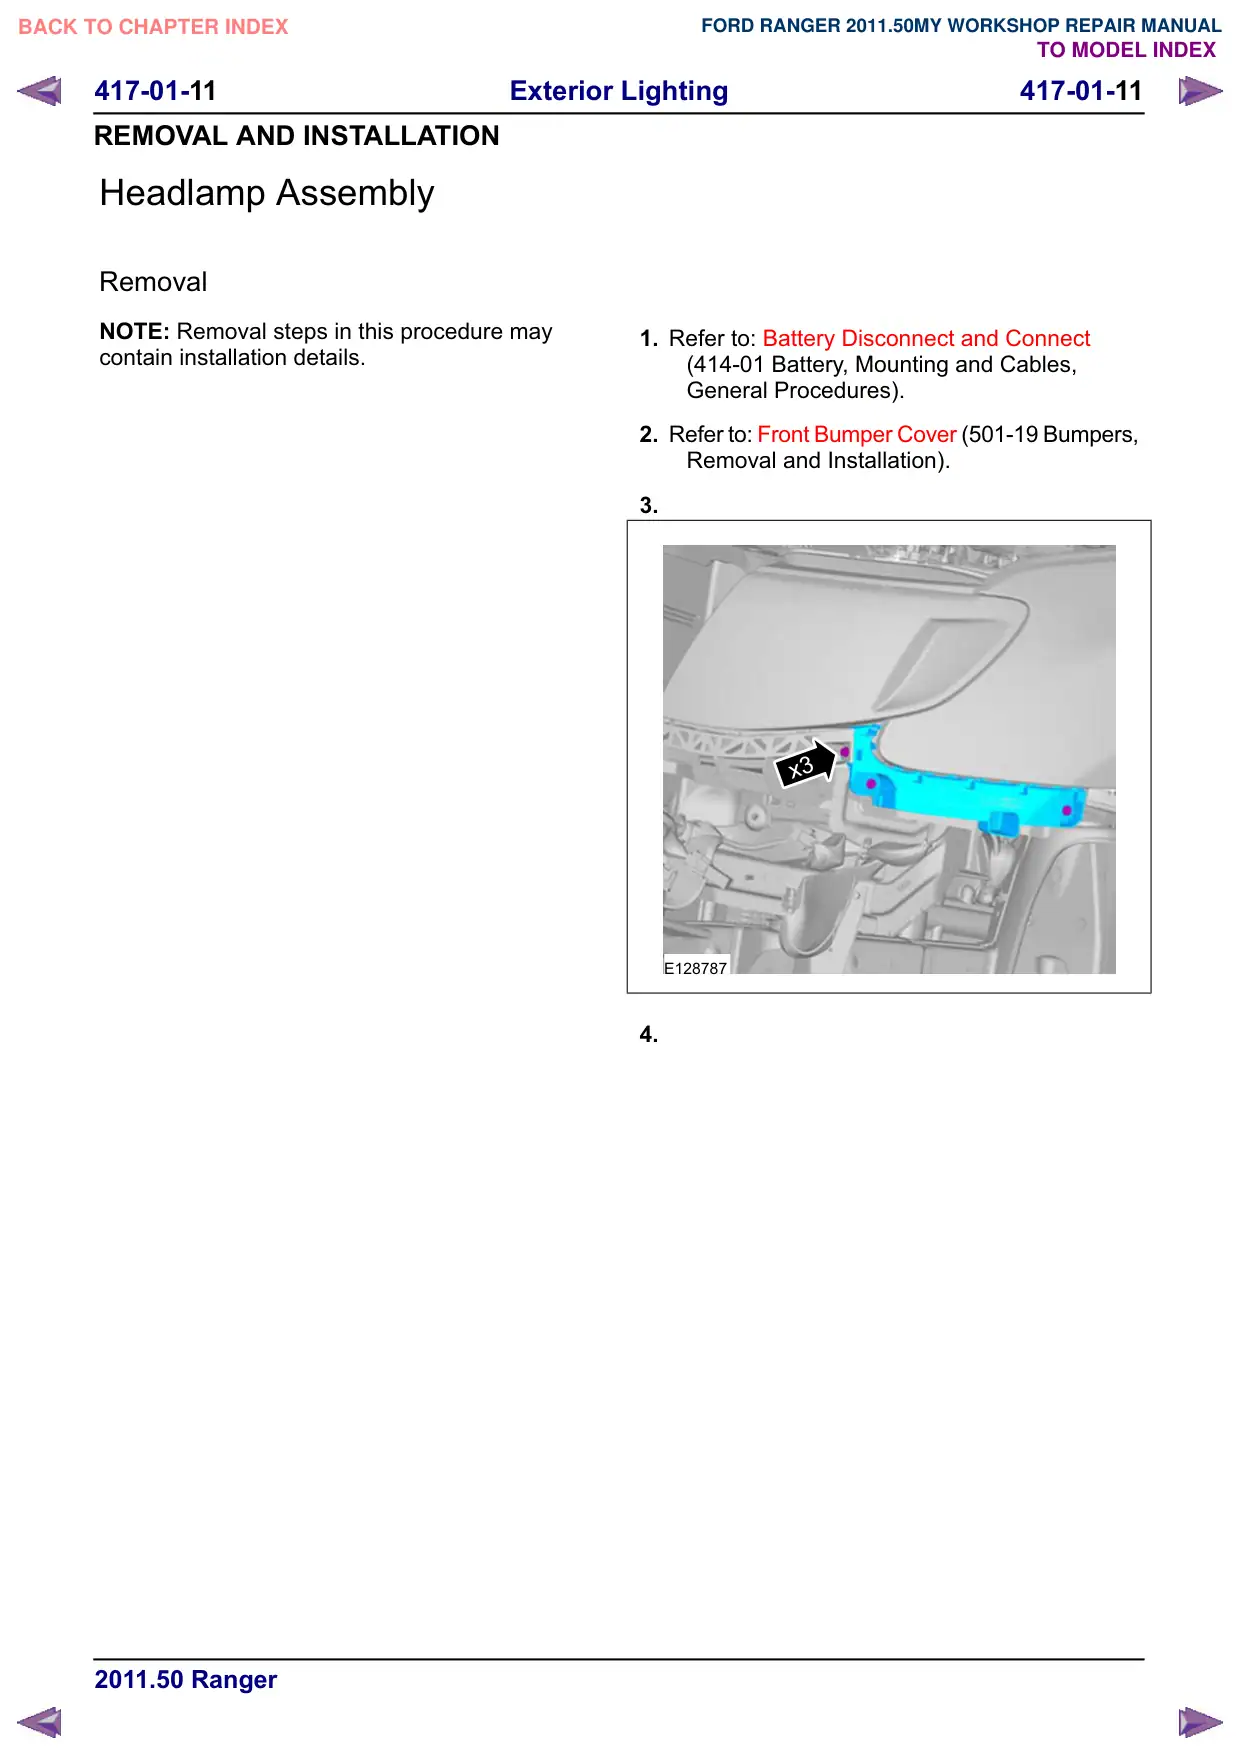
45.Template for LHD vehicles, right-hand
headlamp.
46.
1.
Upper alignment edge of the headlamp lens.
2. Inner alignment edge of the headlamp lens.
3. Alignment aid.
4. Template.
1
2
3
4
[
E137477
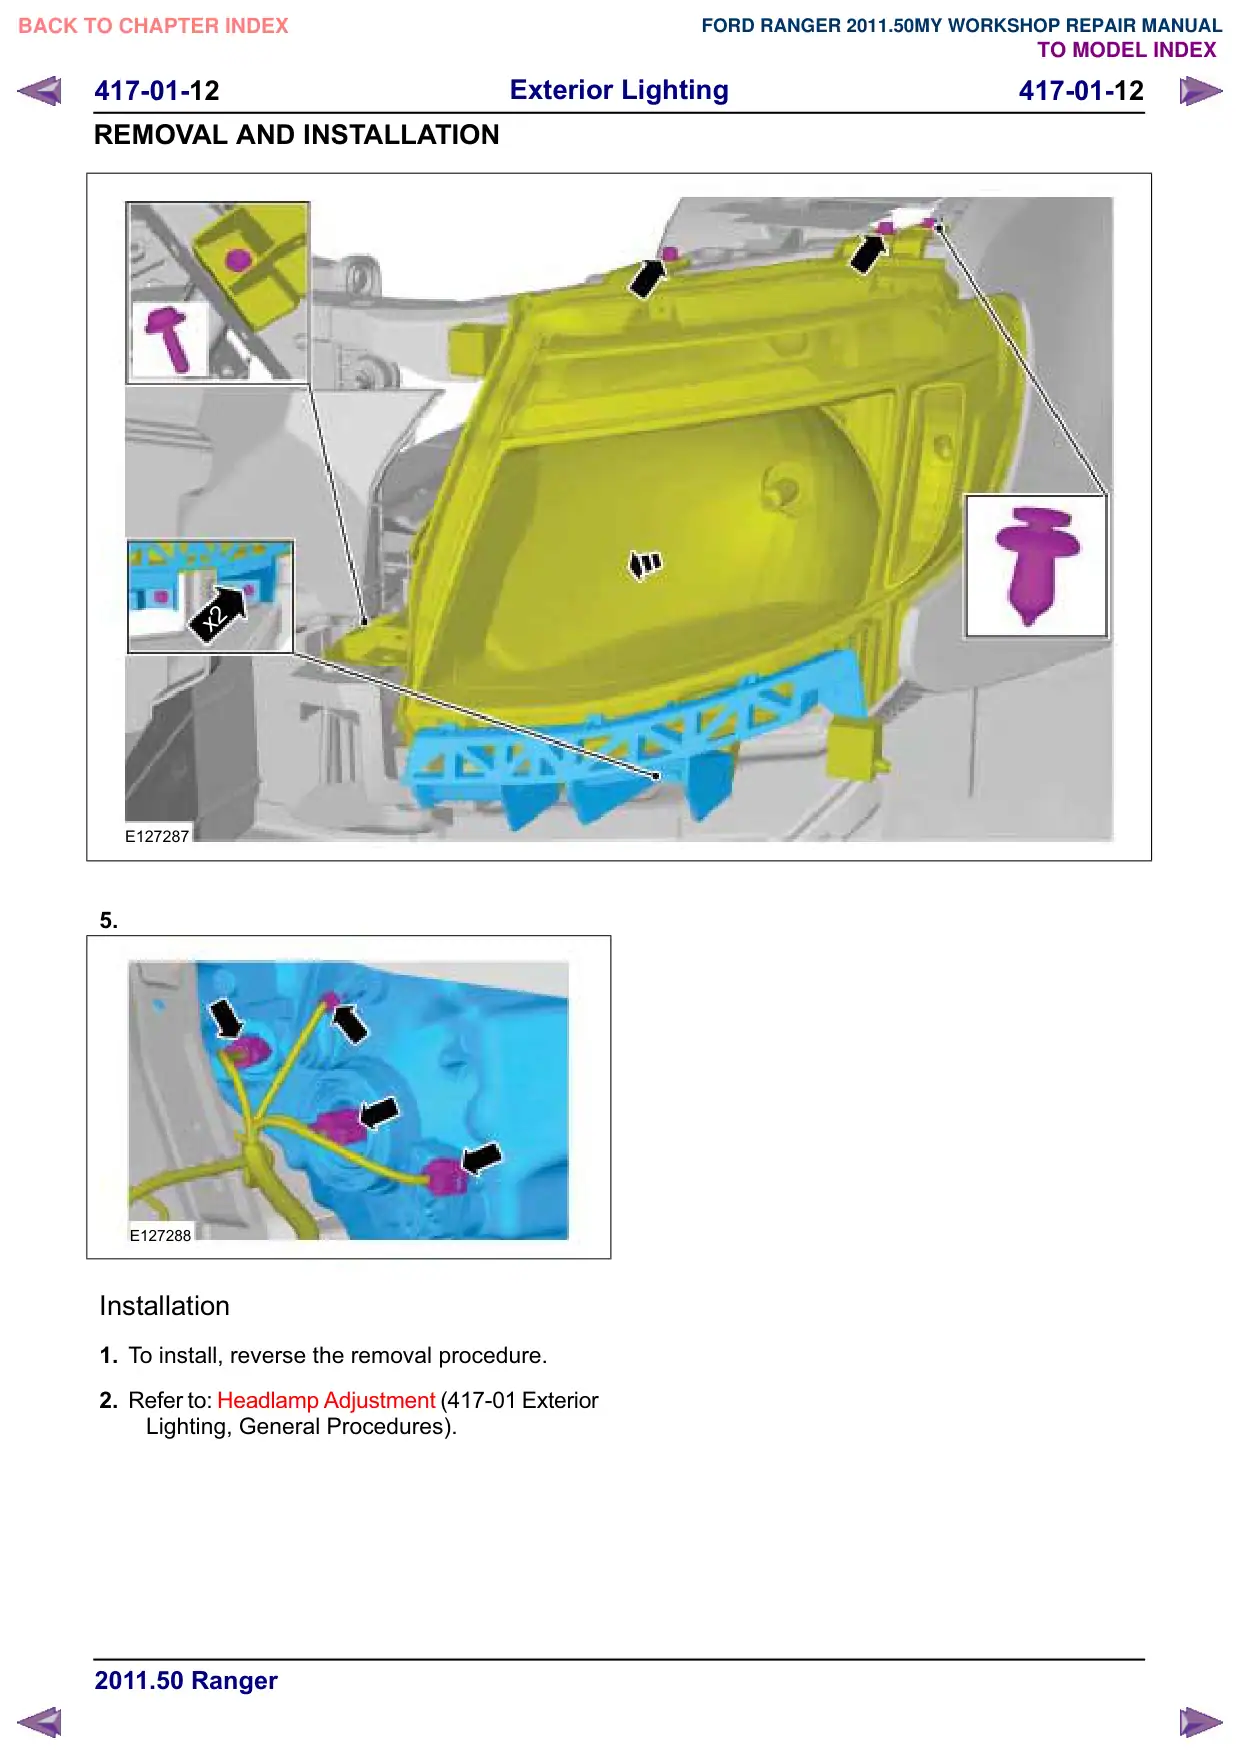
47.Template for RHD vehicles, left-hand headlamp.
417-01-11
Exterior Lighting
417-01-11
REMOVAL AND INSTALLATION
Headlamp Assembly
Removal
NOTE: Removal steps in this procedure may
contain installation details.
1. Refer to: Battery Disconnect and Connect
(414-01 Battery, Mounting and Cables,
General Procedures).
2. Refer to: Front Bumper Cover (501-19 Bumpers,
Removal and Installation).
3.
x3
E128787
4.
417-01-13
Exterior Lighting
417-01-13
REMOVAL AND INSTALLATION
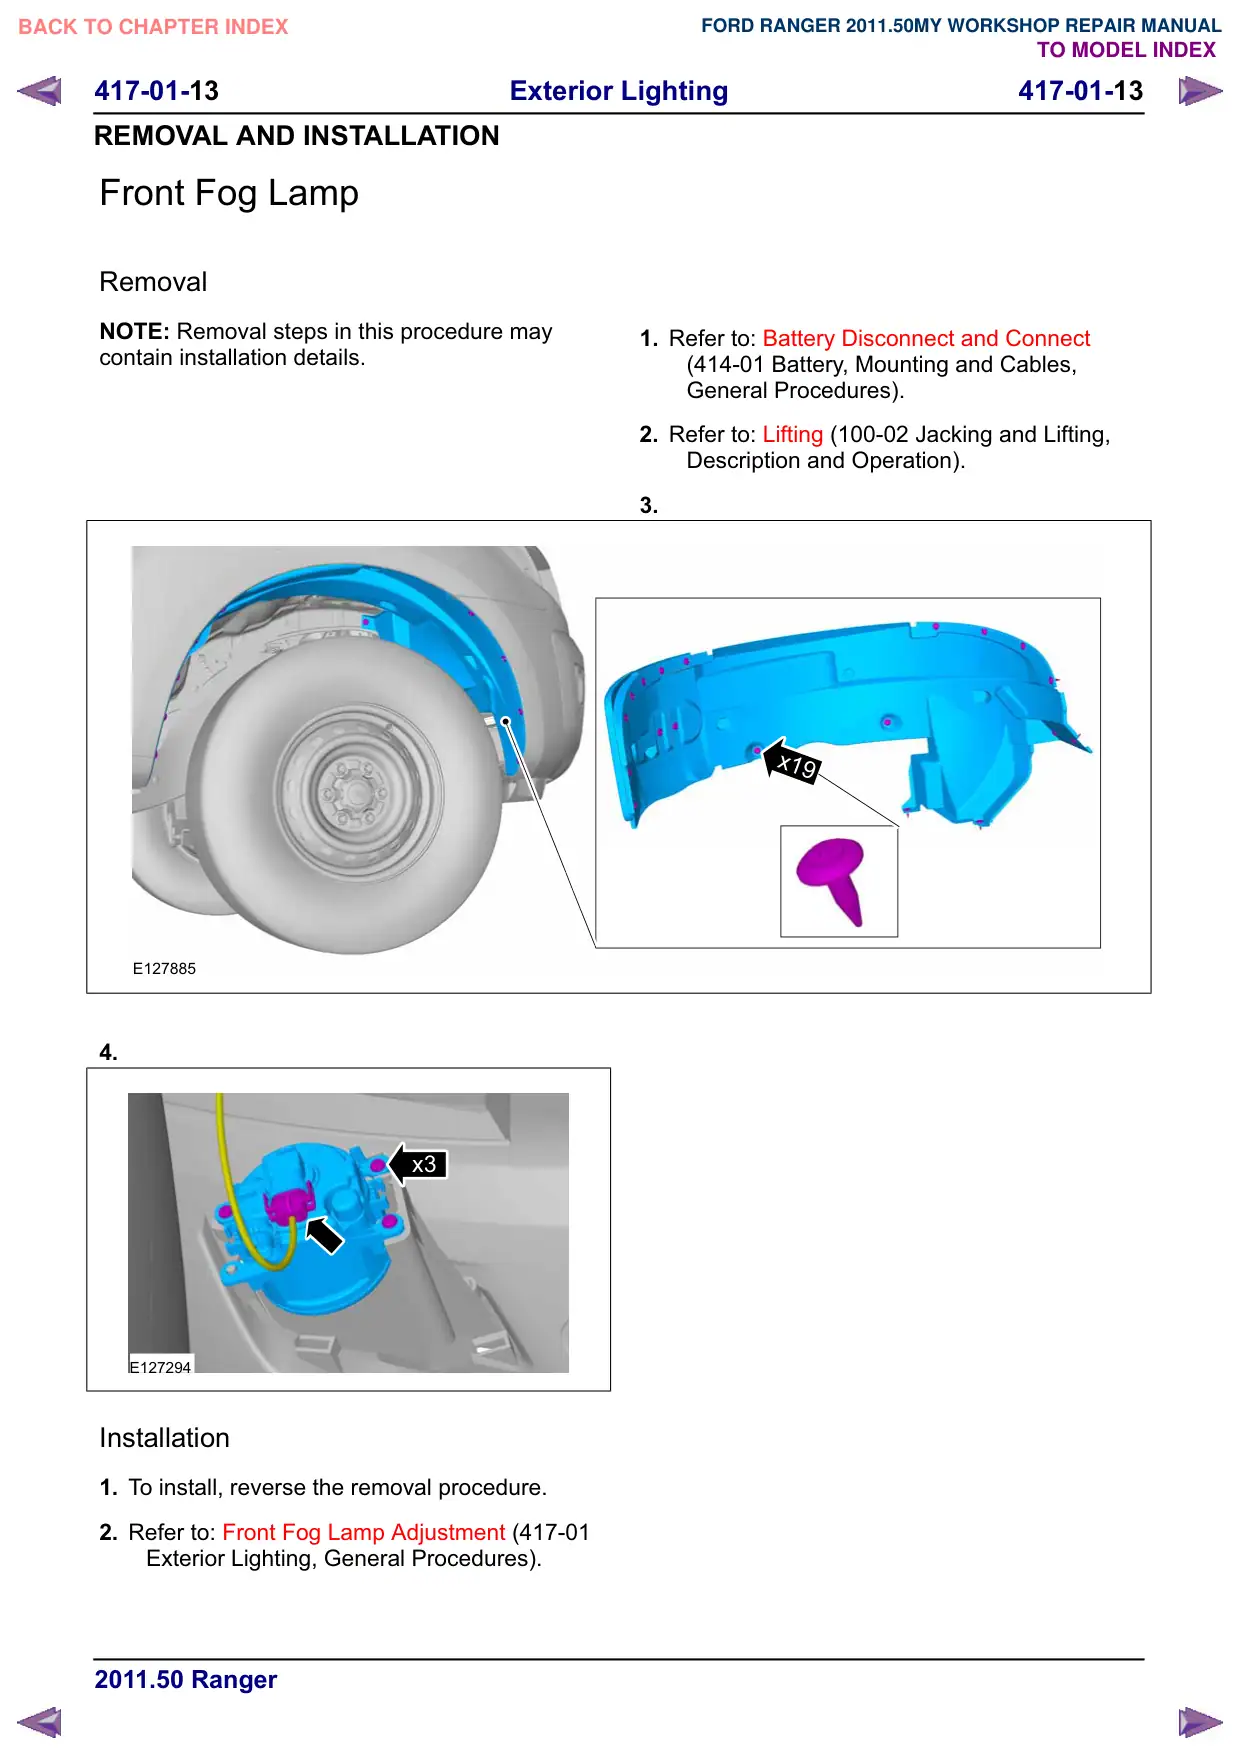
Front Fog Lamp
Removal
NOTE: Removal steps in this procedure may
contain installation details.
E127885
4.
x3
E127294
Installation
1. To install, reverse the removal procedure.
2. Refer to: Front Fog Lamp Adjustment (417-01
Exterior Lighting, General Procedures).
1. Refer to: Battery Disconnect and Connect
(414-01 Battery, Mounting and Cables,
General Procedures).
2. Refer to: Lifting (100-02 Jacking and Lifting,
Description and Operation).
3.
x19
417-01-14
Exterior Lighting
417-01-14
REMOVAL AND INSTALLATION
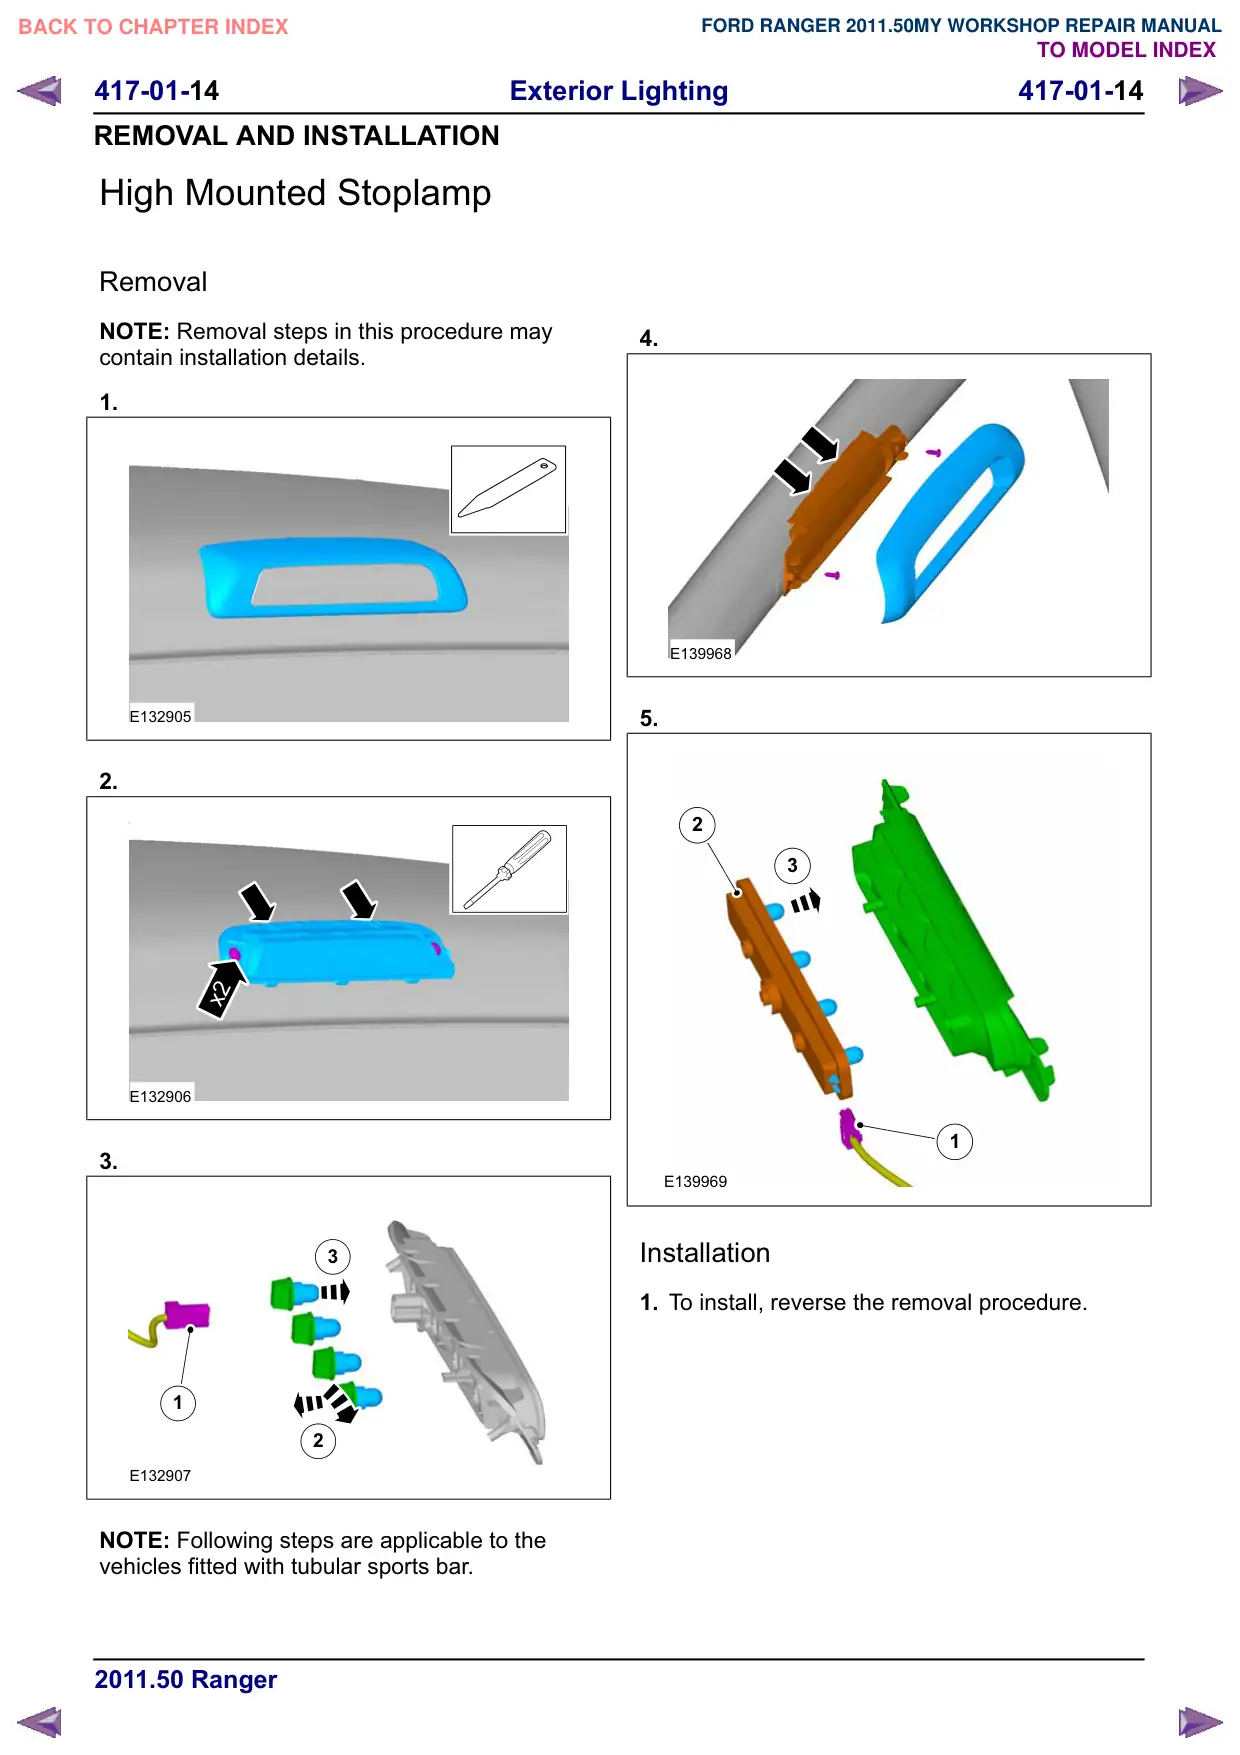
High Mounted Stoplamp
Removal
NOTE: Removal steps in this procedure may
contain installation details.
1.
E132905
2.
x2
E132906
3.
3
1
2
E132907
NOTE: Following steps are applicable to the
vehicles fitted with tubular sports bar.
4.
E139968
5.
2
3
1
E139969
Installation
1. To install, reverse the removal procedure.
417-01-15
Exterior Lighting
417-01-15
REMOVAL AND INSTALLATION
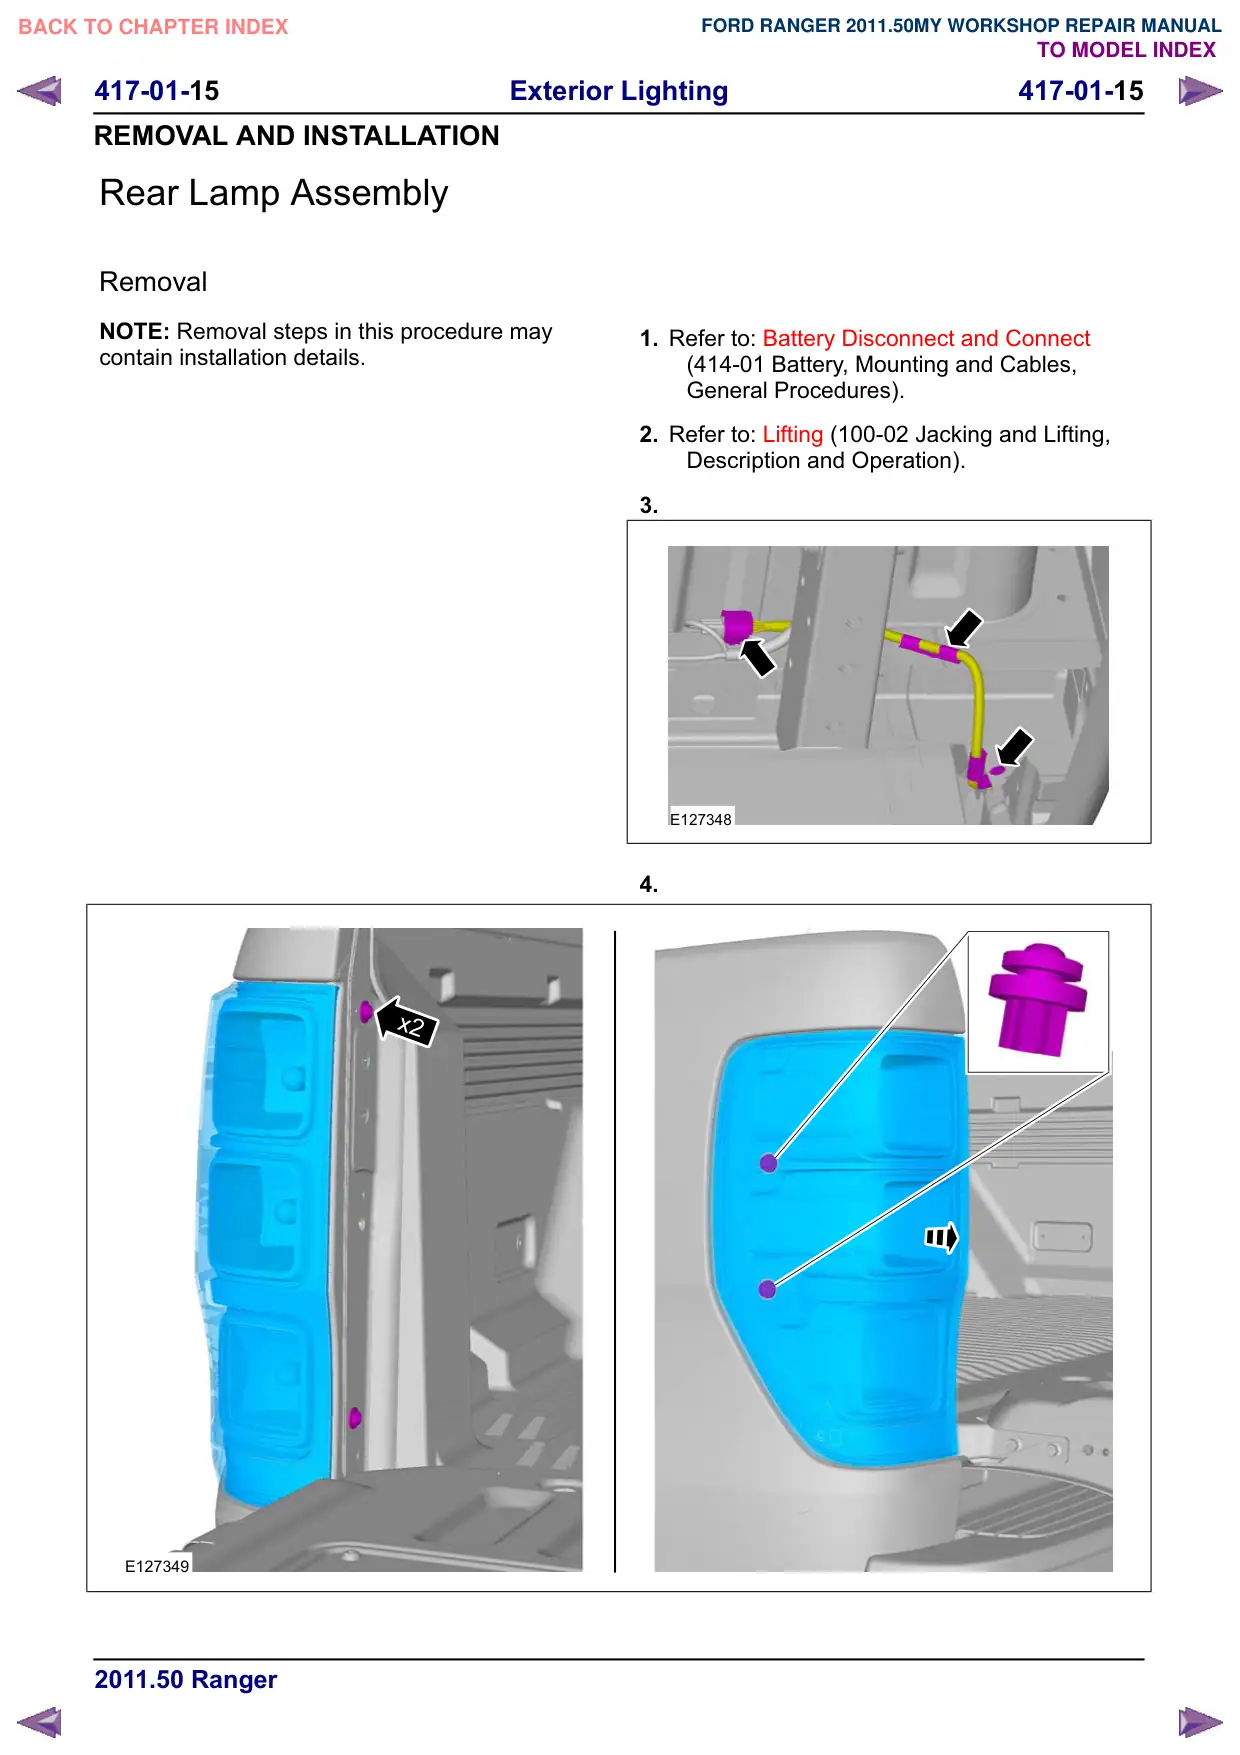
Rear Lamp Assembly
Removal
NOTE: Removal steps in this procedure may
contain installation details.
x2
E127349
1. Refer to: Battery Disconnect and Connect
(414-01 Battery, Mounting and Cables,
General Procedures).
2. Refer to: Lifting (100-02 Jacking and Lifting,
Description and Operation).
3.
E127348
4.
417-01-17
Exterior Lighting
417-01-17
REMOVAL AND INSTALLATION
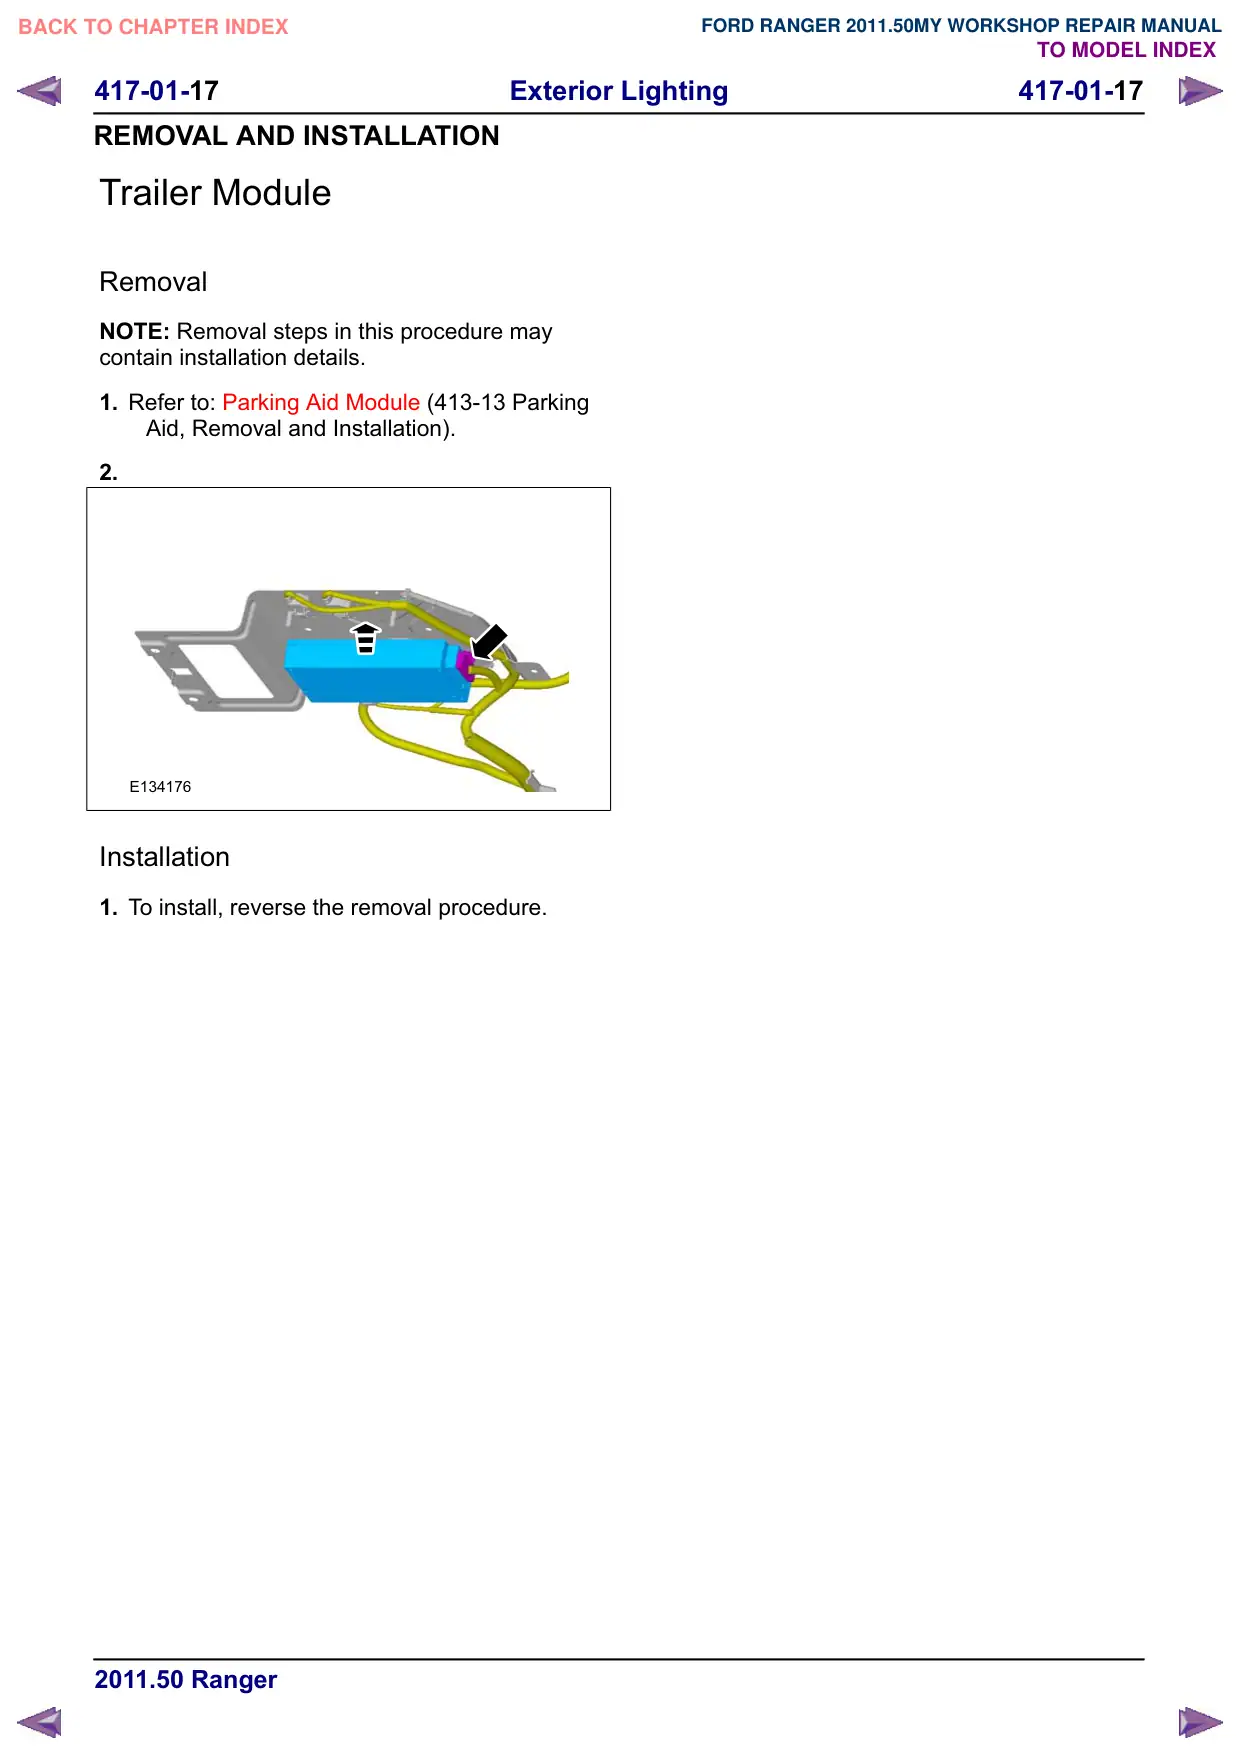
Trailer Module
Removal
NOTE: Removal steps in this procedure may
contain installation details.
1. Refer to: Parking Aid Module (413-13 Parking
Aid, Removal and Installation).
2.
E134176
Installation
1. To install, reverse the removal procedure.