501-11-1
Glass, Frames and Mechanisms
501-11-1
.
SECTION 501-11 Glass, Frames and Mechanisms
VEHICLE APPLICATION: 2011.50 Ranger
CONTENTS
DESCRIPTION AND OPERATION
Glass, Frames and Mechanisms........................................................................................
GENERAL PROCEDURES
Door Window Motor Initialization........................................................................................
Heated Window Grid Wire Repair......................................................................................
REMOVAL AND INSTALLATION
Windshield Glass................................................................................................................
Front Door Window Glass...................................................................................................
Front Door Window Regulator............................................................................................
Front Door Window Regulator Motor..................................................................................
Rear Door Window Glass...................................................................................................
Rear Door Window Regulator.............................................................................................
Rear Door Window Regulator Motor..................................................................................
Rear Window Glass............................................................................................................
PAGE
501-11-2
501-11-4
501-11-5
501-11-6
501-11-11
501-11-13
501-11-16
501-11-17
501-11-19
501-11-21
501-11-22
501-11-2
Glass, Frames and Mechanisms
501-11-2
DESCRIPTION AND OPERATION
Glass, Frames and Mechanisms
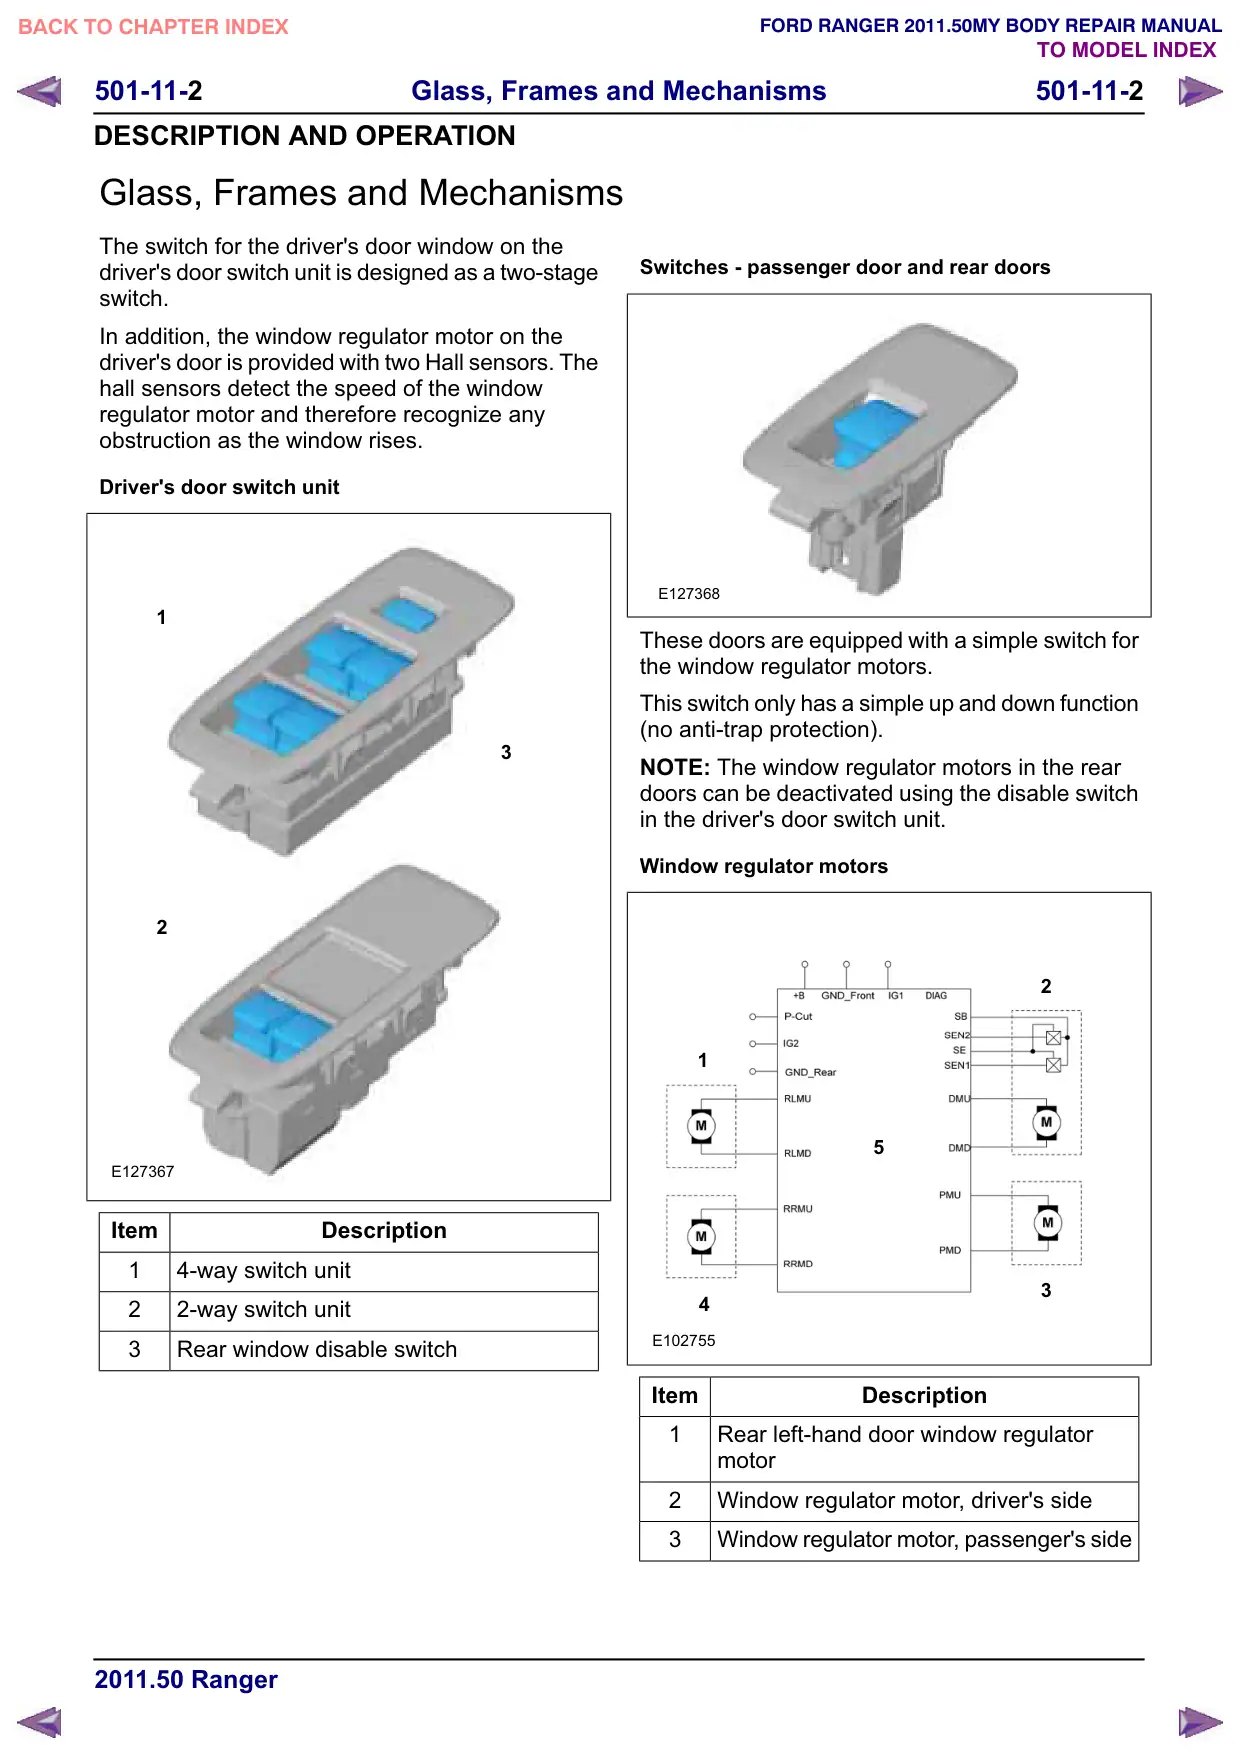
The switch for the driver's door window on the
driver's door switch unit is designed as a two-stage
switch.
In addition, the window regulator motor on the
driver's door is provided with two Hall sensors. The
hall sensors detect the speed of the window
regulator motor and therefore recognize any
obstruction as the window rises.
Driver's door switch unit
1
3
2
E127367
Item
Description
1
4-way switch unit
2
2-way switch unit
3
Rear window disable switch
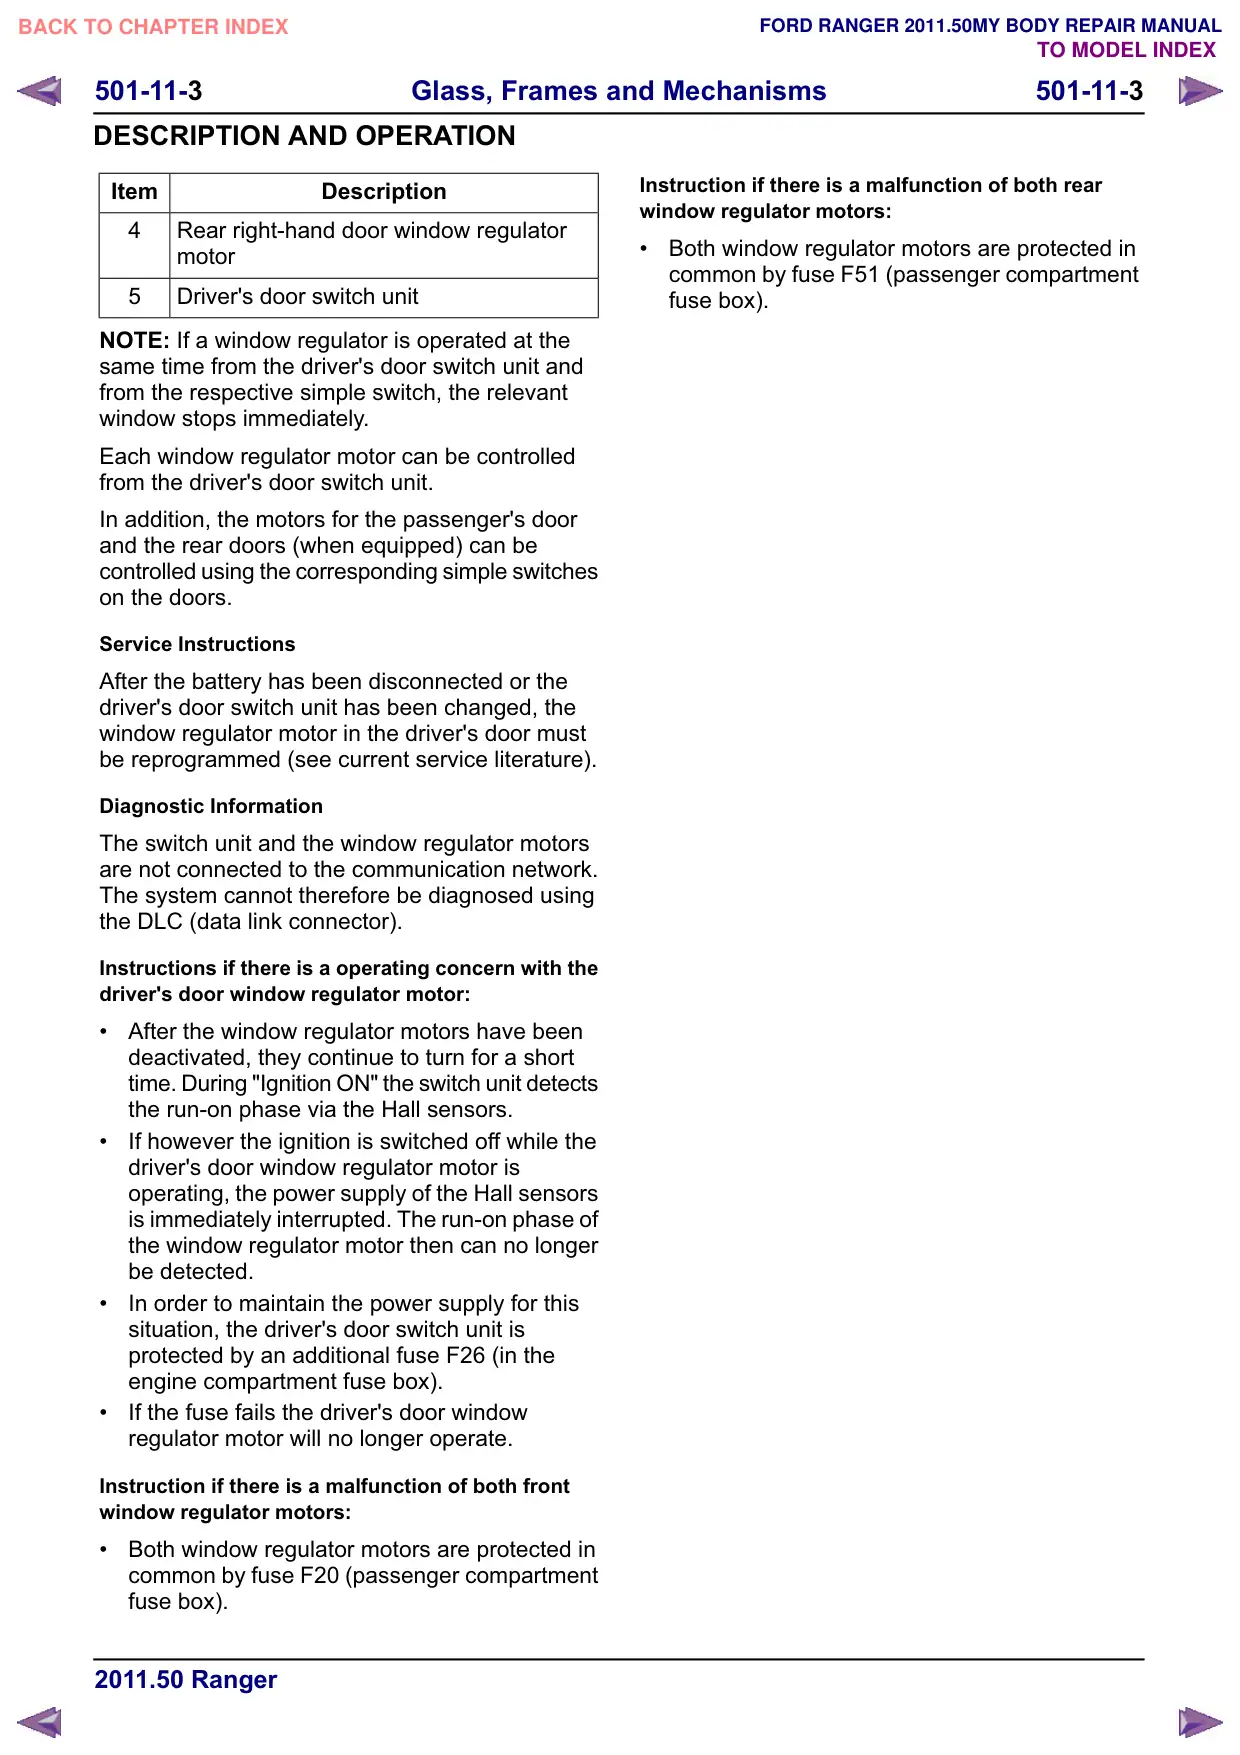
Switches - passenger door and rear doors
E127368
These doors are equipped with a simple switch for
the window regulator motors.
This switch only has a simple up and down function
(no anti-trap protection).
NOTE: The window regulator motors in the rear
doors can be deactivated using the disable switch
in the driver's door switch unit.
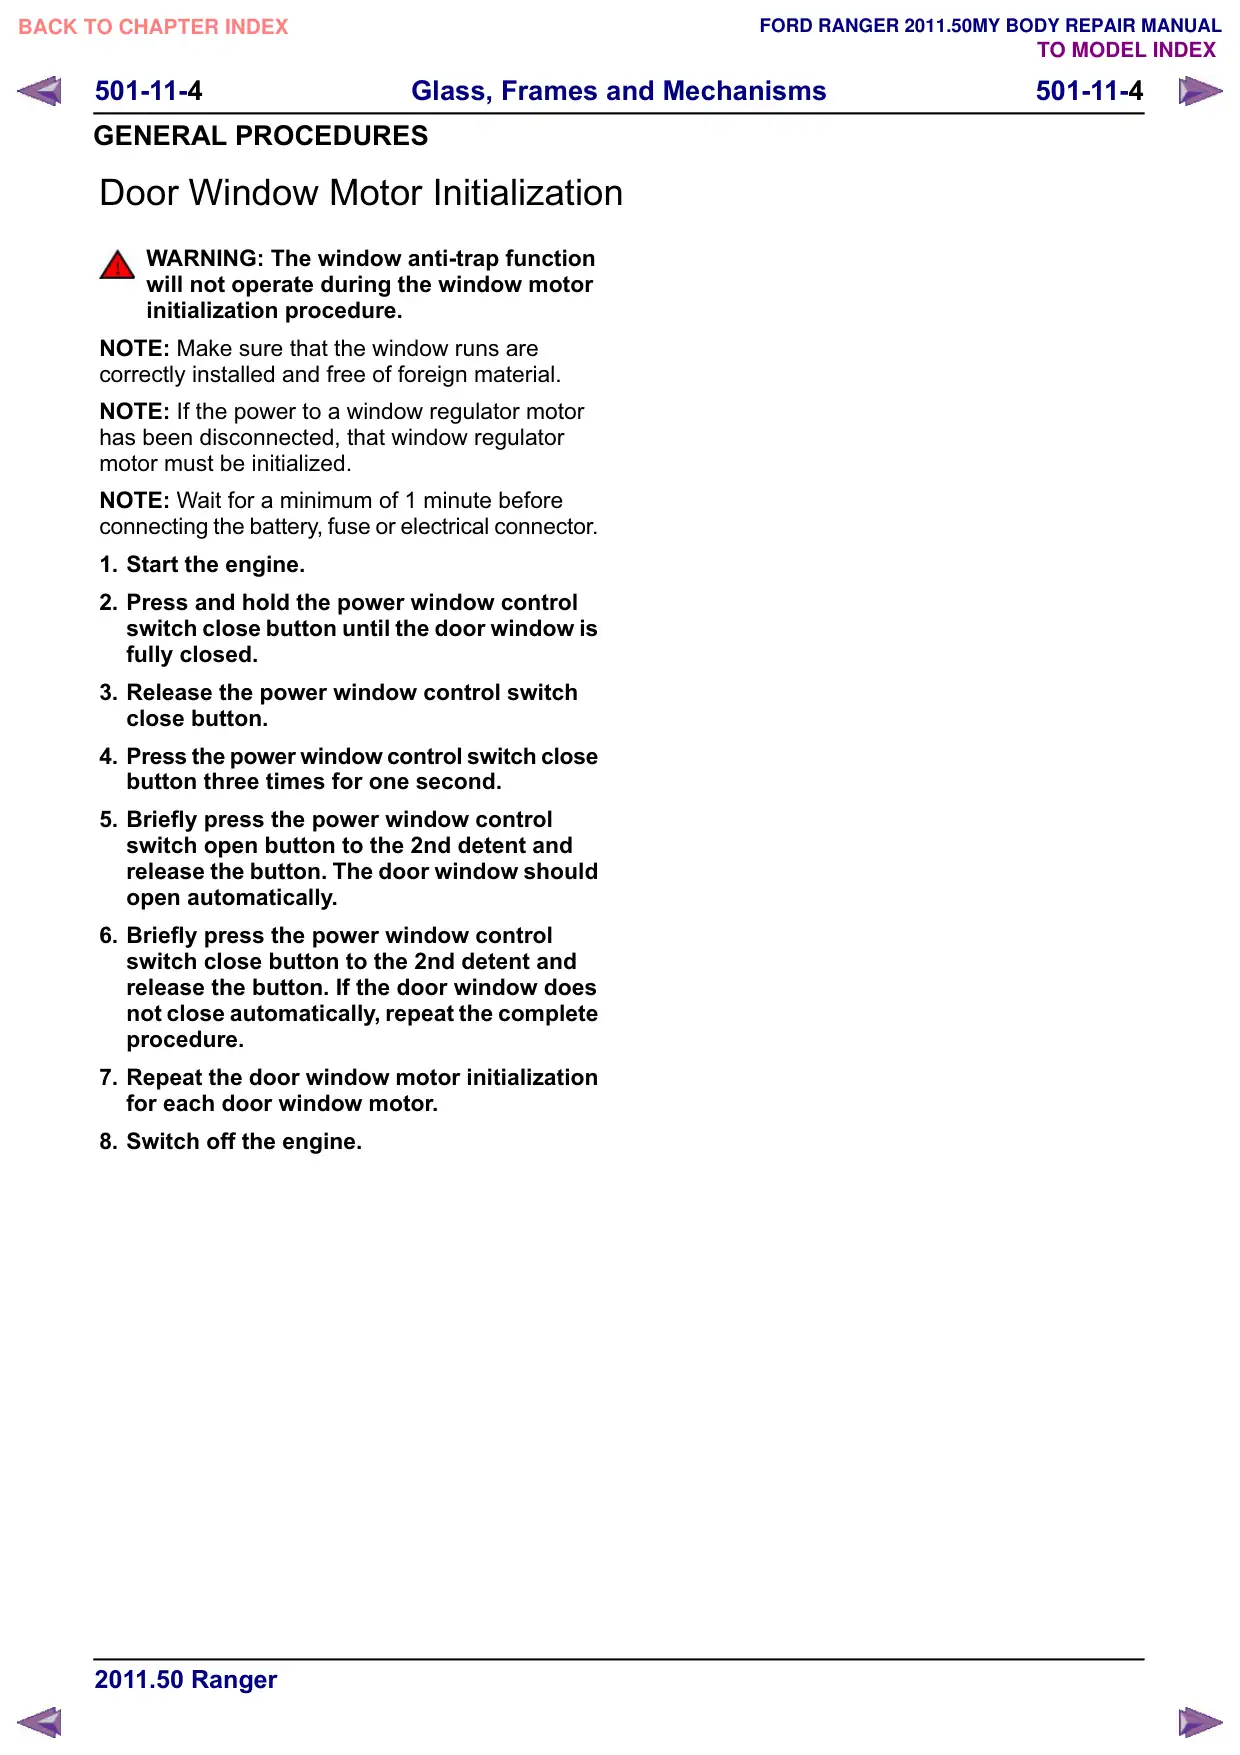
Window regulator motors
2
1
5
3
4
E102755
Item
Description
1
Rear left-hand door window regulator
motor
2
Window regulator motor, driver's side
3
Window regulator motor, passenger's side
501-11-3
Glass, Frames and Mechanisms
501-11-3
DESCRIPTION AND OPERATION
Item
Description
4
Rear right-hand door window regulator
motor
5
Driver's door switch unit
NOTE: If a window regulator is operated at the
same time from the driver's door switch unit and
from the respective simple switch, the relevant
window stops immediately.
Each window regulator motor can be controlled
from the driver's door switch unit.
In addition, the motors for the passenger's door
and the rear doors (when equipped) can be
controlled using the corresponding simple switches
on the doors.
Service Instructions
After the battery has been disconnected or the
driver's door switch unit has been changed, the
window regulator motor in the driver's door must
be reprogrammed (see current service literature).
Diagnostic Information
The switch unit and the window regulator motors
are not connected to the communication network.
The system cannot therefore be diagnosed using
the DLC (data link connector).
Instructions if there is a operating concern with the
driver's door window regulator motor:
After the window regulator motors have been
deactivated, they continue to turn for a short
time. During "Ignition ON" the switch unit detects
the run-on phase via the Hall sensors.
If however the ignition is switched off while the
driver's door window regulator motor is
operating, the power supply of the Hall sensors
is immediately interrupted. The run-on phase of
the window regulator motor then can no longer
be detected.
In order to maintain the power supply for this
situation, the driver's door switch unit is
protected by an additional fuse F26 (in the
engine compartment fuse box).
If the fuse fails the driver's door window
regulator motor will no longer operate.
Instruction if there is a malfunction of both front
window regulator motors:
Both window regulator motors are protected in
common by fuse F20 (passenger compartment
fuse box).
Instruction if there is a malfunction of both rear
window regulator motors:
Both window regulator motors are protected in
common by fuse F51 (passenger compartment
fuse box).
501-11-4
Glass, Frames and Mechanisms
501-11-4
GENERAL PROCEDURES
Door Window Motor Initialization
WARNING: The window anti-trap function
will not operate during the window motor
initialization procedure.
NOTE: Make sure that the window runs are
correctly installed and free of foreign material.
NOTE: If the power to a window regulator motor
has been disconnected, that window regulator
motor must be initialized.
NOTE: Wait for a minimum of 1 minute before
connecting the battery, fuse or electrical connector.
1. Start the engine.
2. Press and hold the power window control
switch close button until the door window is
fully closed.
3. Release the power window control switch
close button.
4. Press the power window control switch close
button three times for one second.
5. Briefly press the power window control
switch open button to the 2nd detent and
release the button. The door window should
open automatically.
6. Briefly press the power window control
switch close button to the 2nd detent and
release the button. If the door window does
not close automatically, repeat the complete
procedure.
7. Repeat the door window motor initialization
for each door window motor.
8. Switch off the engine.
501-11-5
Glass, Frames and Mechanisms
501-11-5
GENERAL PROCEDURES
Heated Window Grid Wire Repair
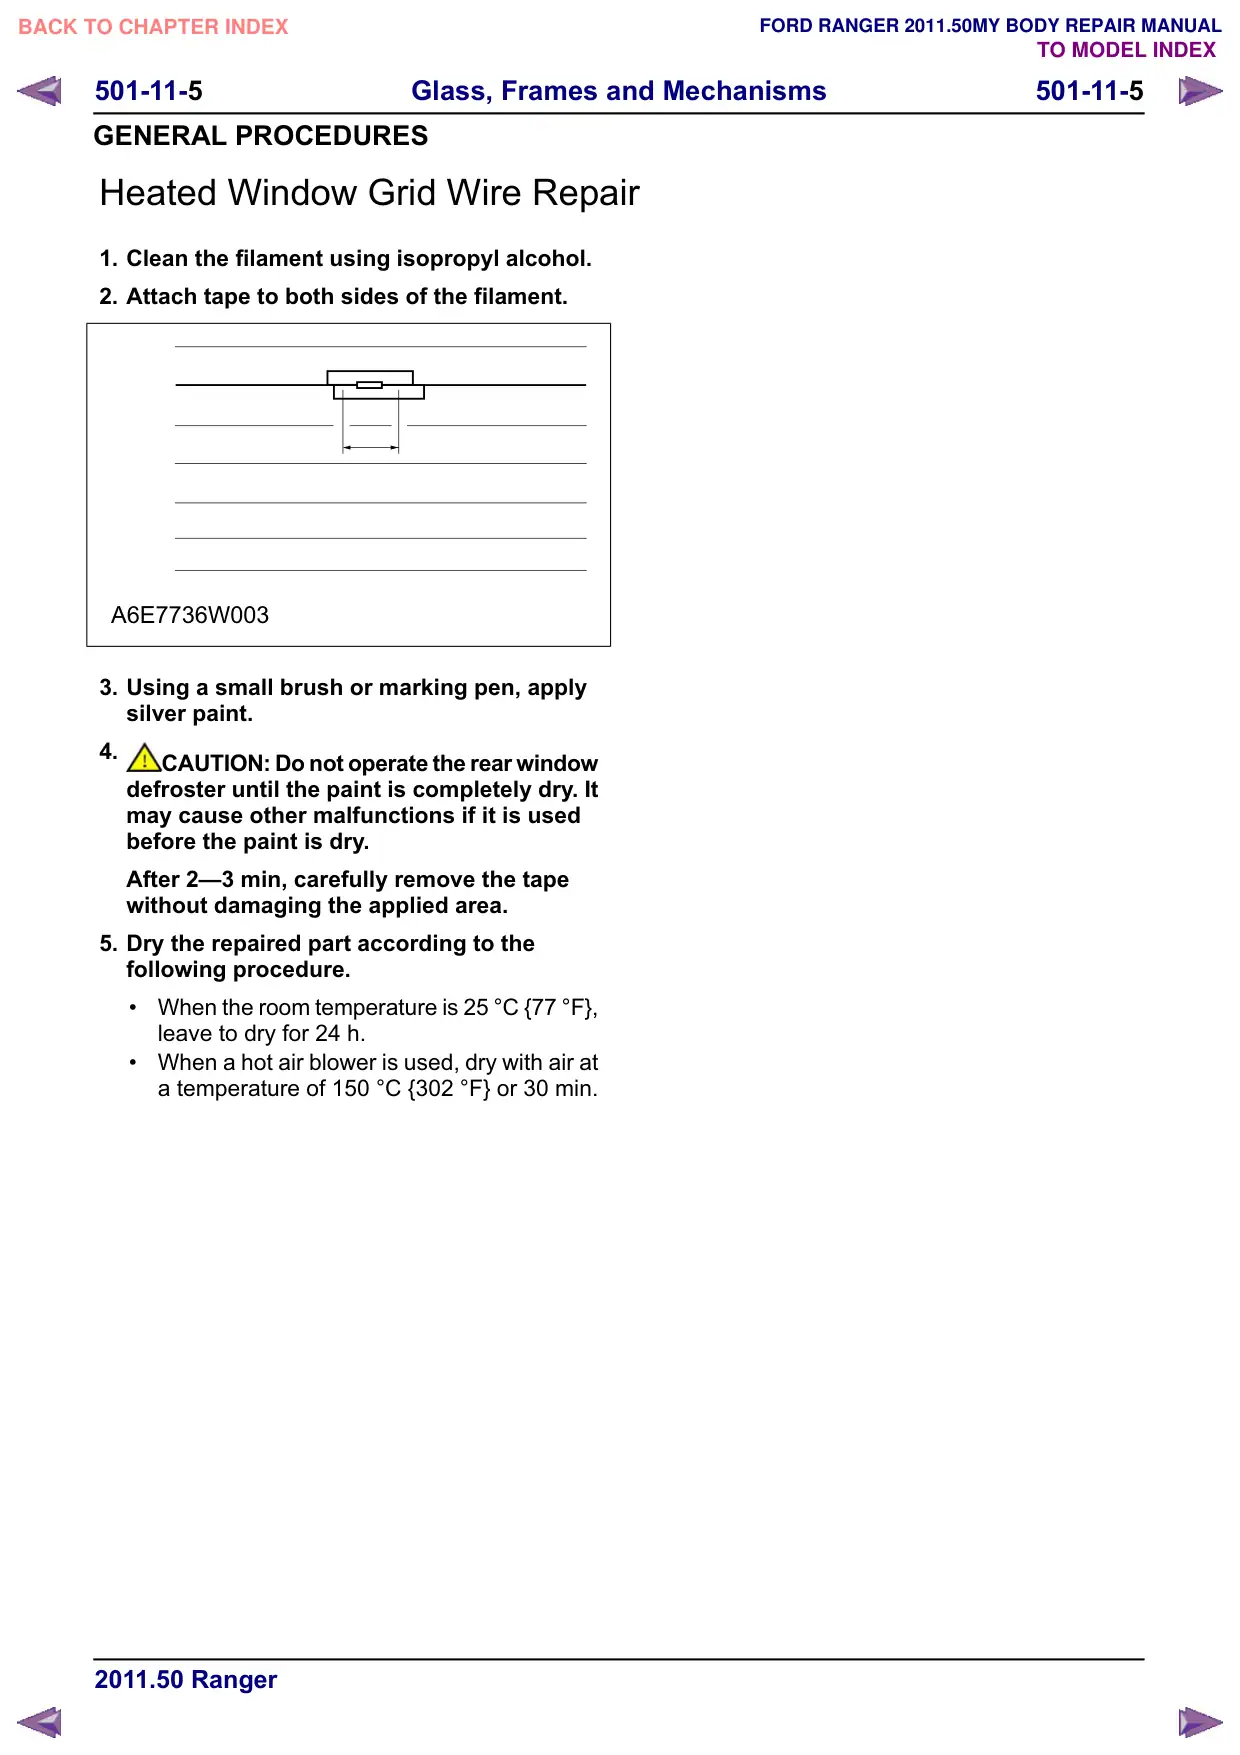
1. Clean the filament using isopropyl alcohol.
2. Attach tape to both sides of the filament.
A6E7736W003
3. Using a small brush or marking pen, apply
silver paint.
4.
CAUTION: Do not operate the rear window
defroster until the paint is completely dry. It
may cause other malfunctions if it is used
before the paint is dry.
After 2–3 min, carefully remove the tape
without damaging the applied area.
5. Dry the repaired part according to the
following procedure.
When the room temperature is 25 °C {77 °F},
leave to dry for 24 h.
When a hot air blower is used, dry with air at
a temperature of 150 °C {302 °F} or 30 min.
501-11-6
Glass, Frames and Mechanisms
501-11-6
REMOVAL AND INSTALLATION
Windshield Glass
General Equipment
Adhesive Tape
Direct Glazing Removal/Replacement Equipment
Knife
Removal
NOTE: Removal steps in this procedure may
contain installation details.
1. Refer to: Health and Safety Precautions (100-00
General Information, Description and
Operation).
2.
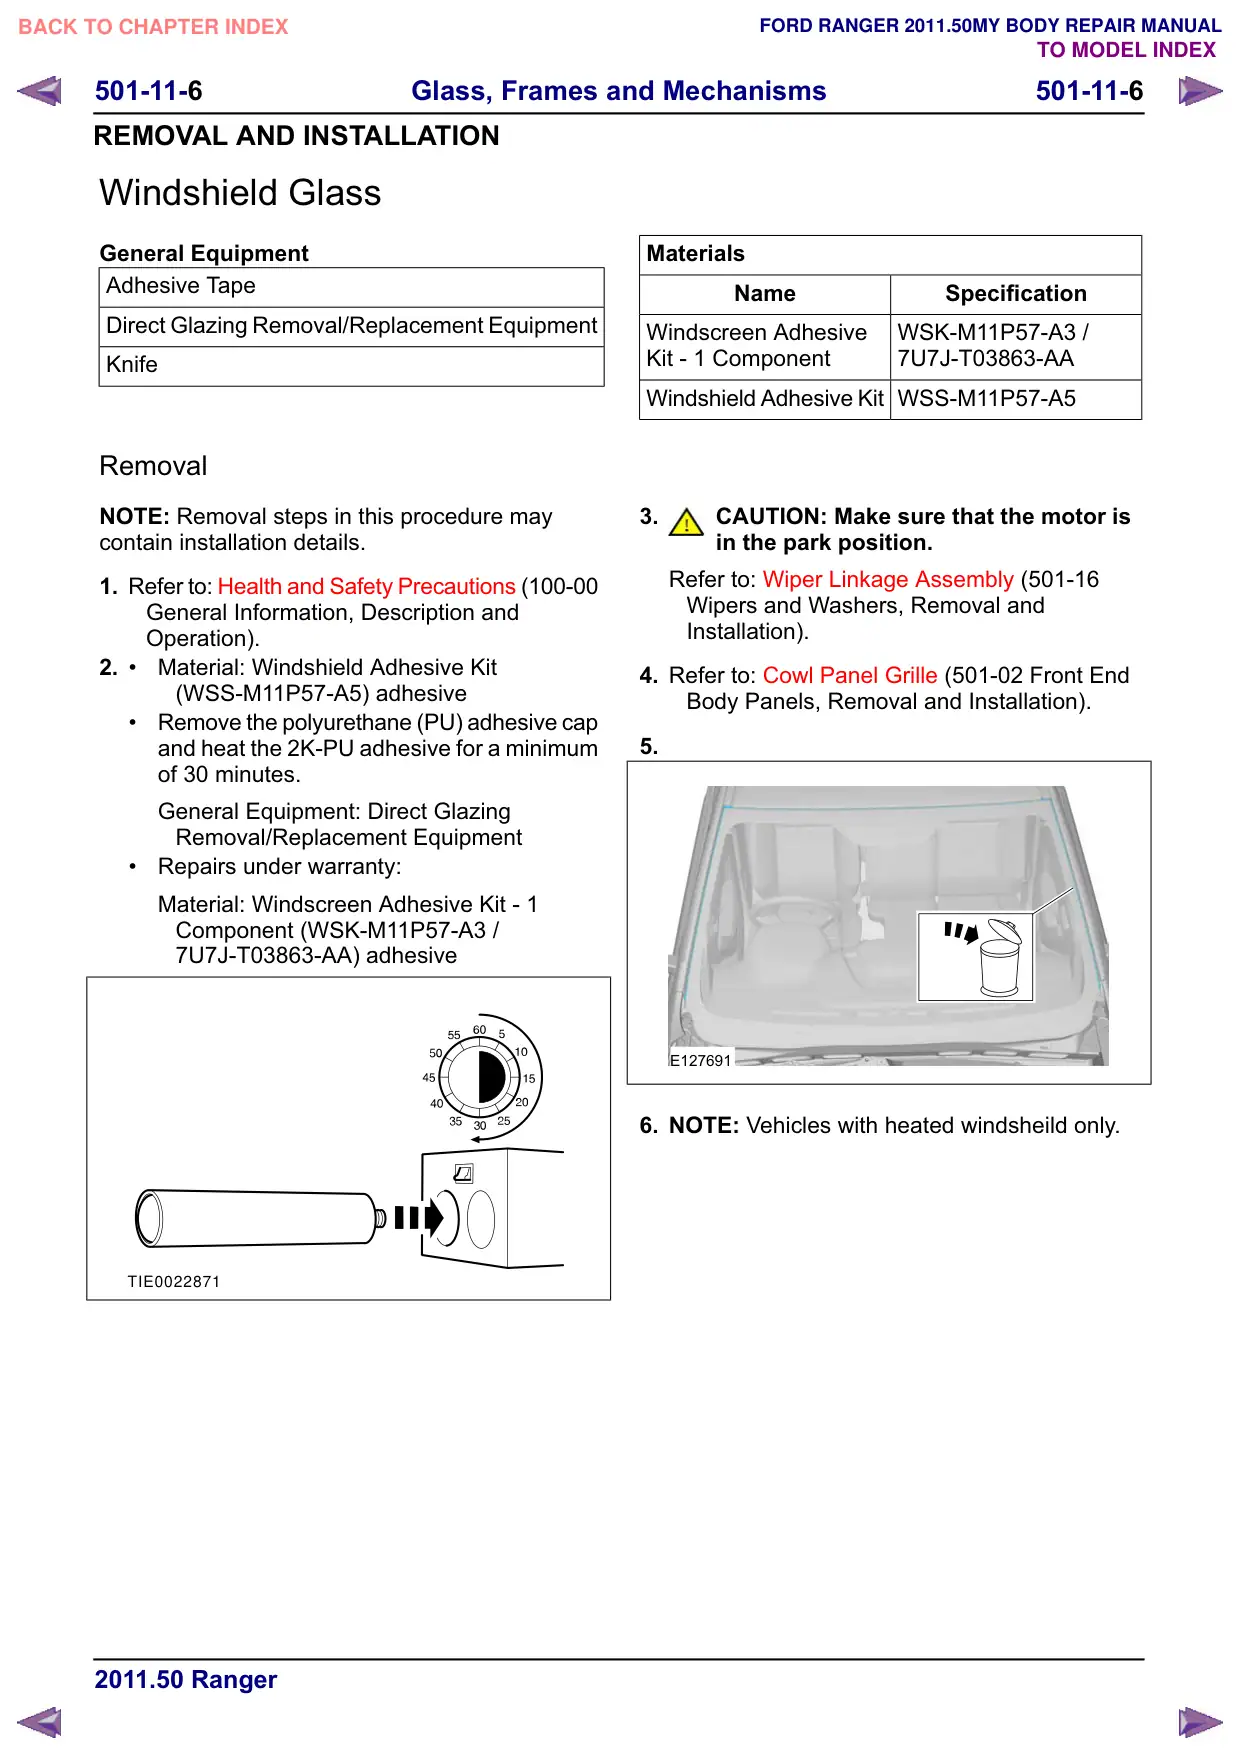
Material: Windshield Adhesive Kit
(WSS-M11P57-A5) adhesive
Remove the polyurethane (PU) adhesive cap
and heat the 2K-PU adhesive for a minimum
of 30 minutes.
General Equipment: Direct Glazing
Removal/Replacement Equipment
Repairs under warranty:
Material: Windscreen Adhesive Kit - 1
Component (WSK-M11P57-A3 /
7U7J-T03863-AA) adhesive
TIE0022871
Materials
Name
Specification
Windscreen Adhesive
WSK-M11P57-A3 /
Kit - 1 Component
7U7J-T03863-AA
Windshield Adhesive Kit
WSS-M11P57-A5
3.
CAUTION: Make sure that the motor is
in the park position.
Refer to: Wiper Linkage Assembly (501-16
Wipers and Washers, Removal and
Installation).
4. Refer to: Cowl Panel Grille (501-02 Front End
Body Panels, Removal and Installation).
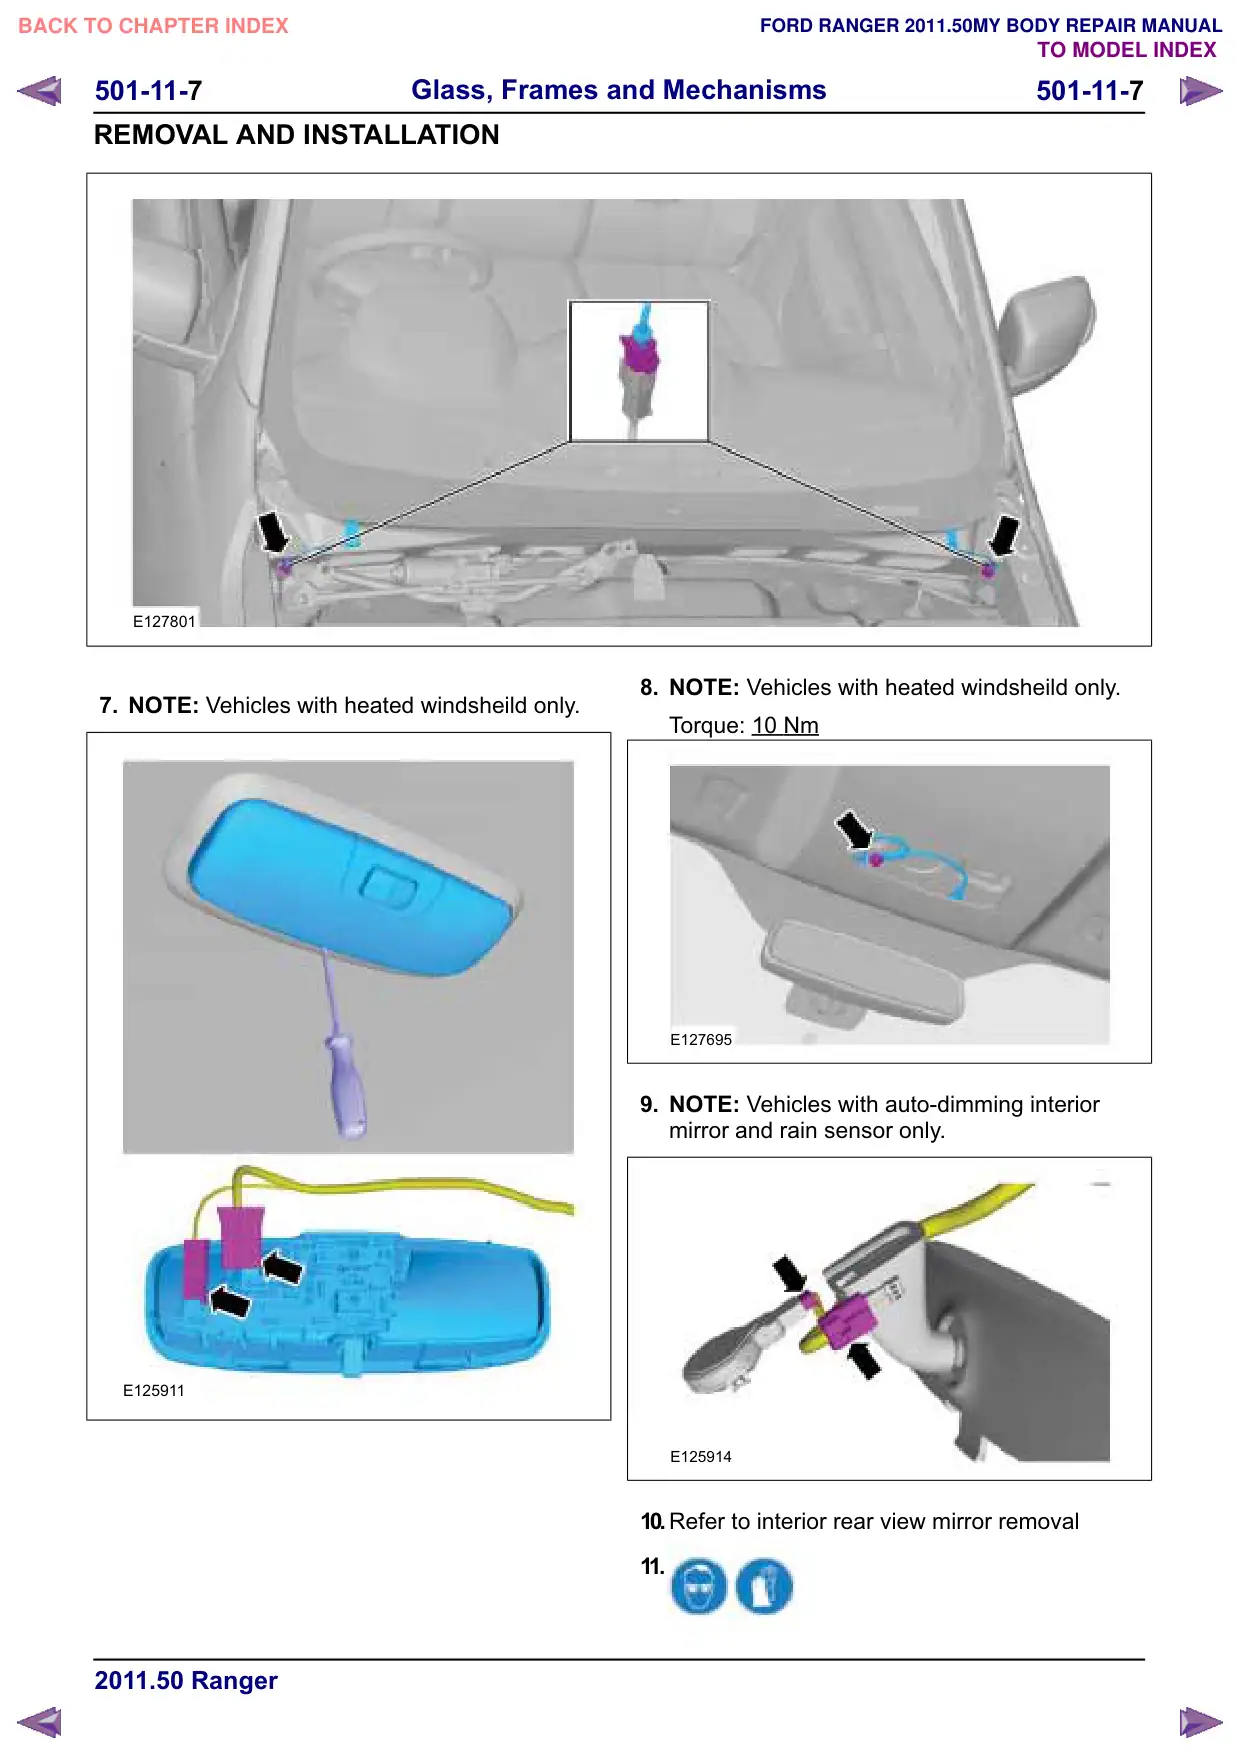
5.
E127691
6. NOTE: Vehicles with heated windsheild only.
501-11-8
Glass, Frames and Mechanisms
501-11-8
REMOVAL AND INSTALLATION
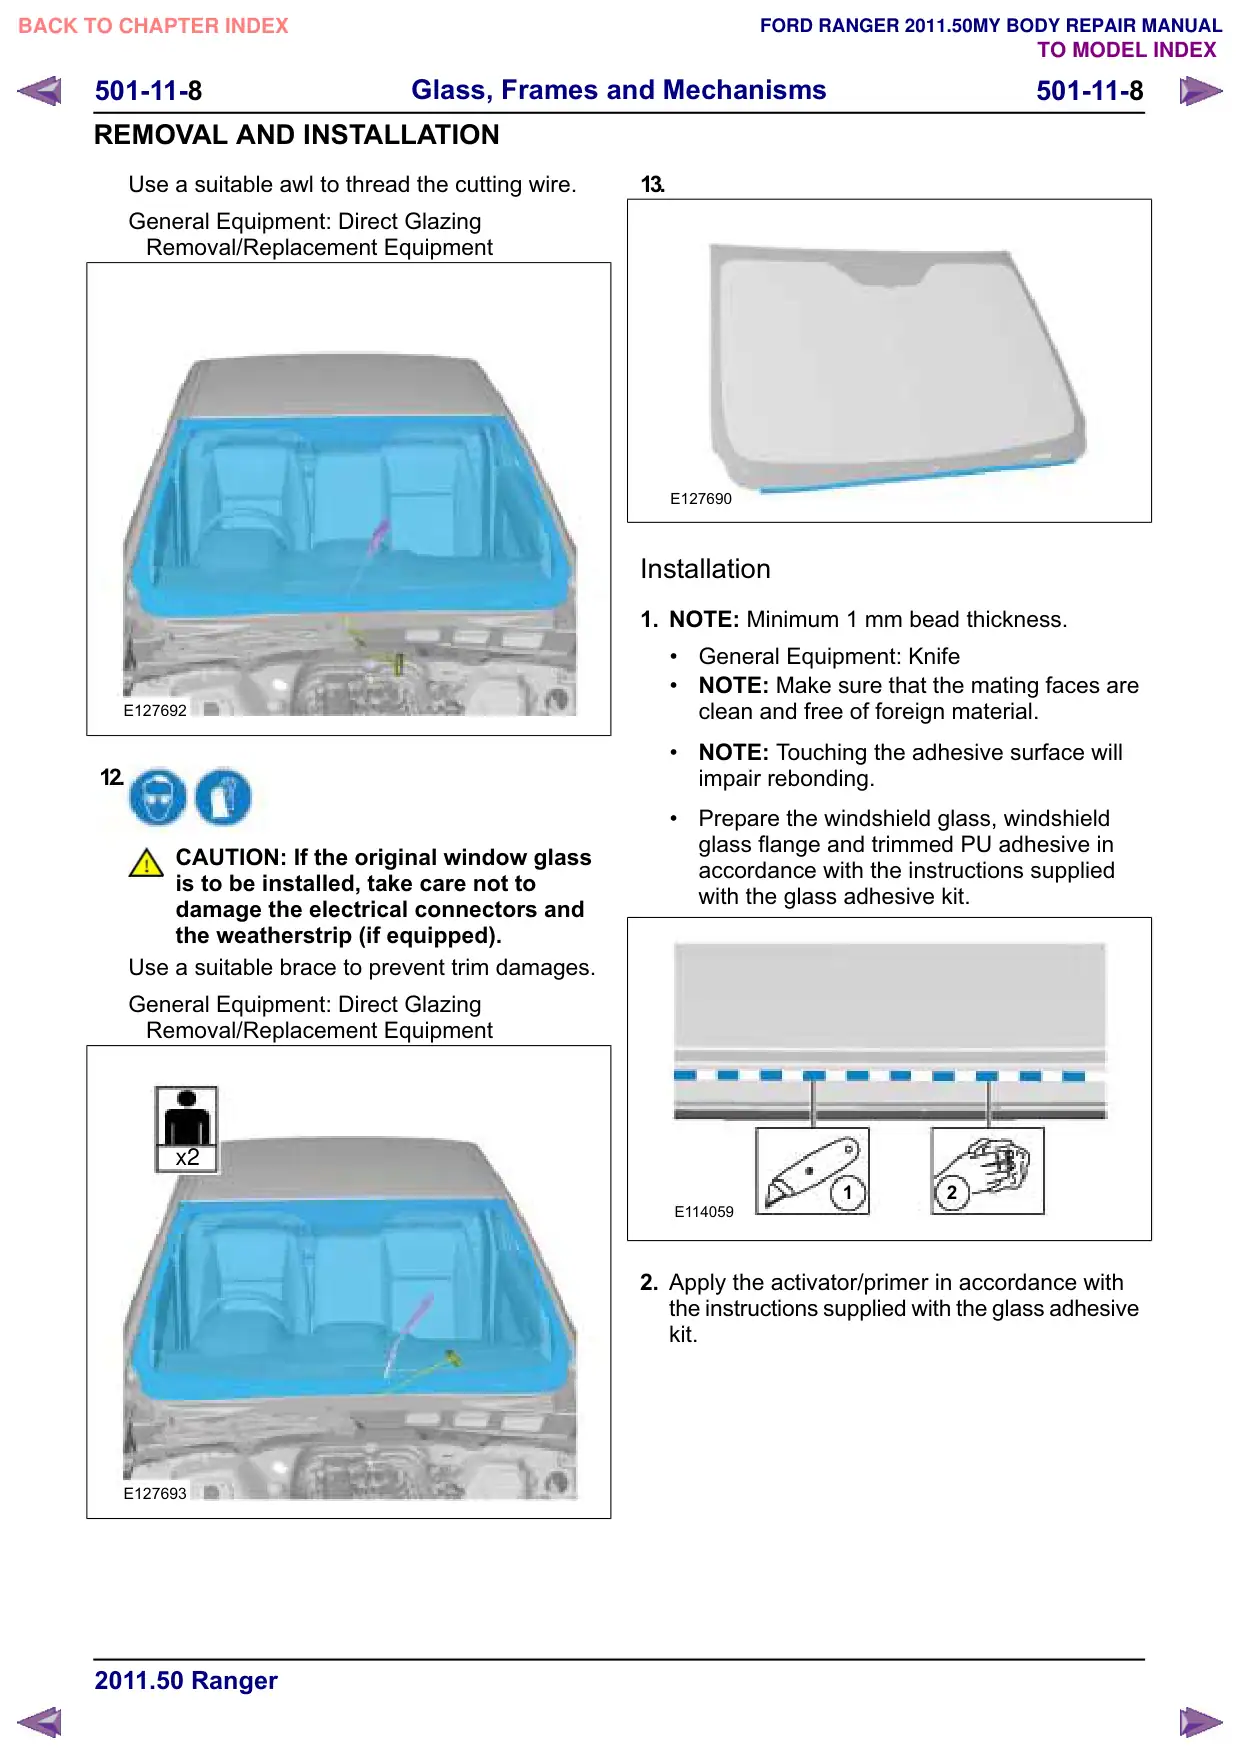
Use a suitable awl to thread the cutting wire.
General Equipment: Direct Glazing
Removal/Replacement Equipment
E127692
12.
CAUTION: If the original window glass
is to be installed, take care not to
damage the electrical connectors and
the weatherstrip (if equipped).
Use a suitable brace to prevent trim damages.
General Equipment: Direct Glazing
Removal/Replacement Equipment
x2
E127693
13.
E127690
Installation
1. NOTE: Minimum 1 mm bead thickness.
General Equipment: Knife
NOTE: Make sure that the mating faces are
clean and free of foreign material.
NOTE: Touching the adhesive surface will
impair rebonding.
Prepare the windshield glass, windshield
glass flange and trimmed PU adhesive in
accordance with the instructions supplied
with the glass adhesive kit.
1
2
E114059
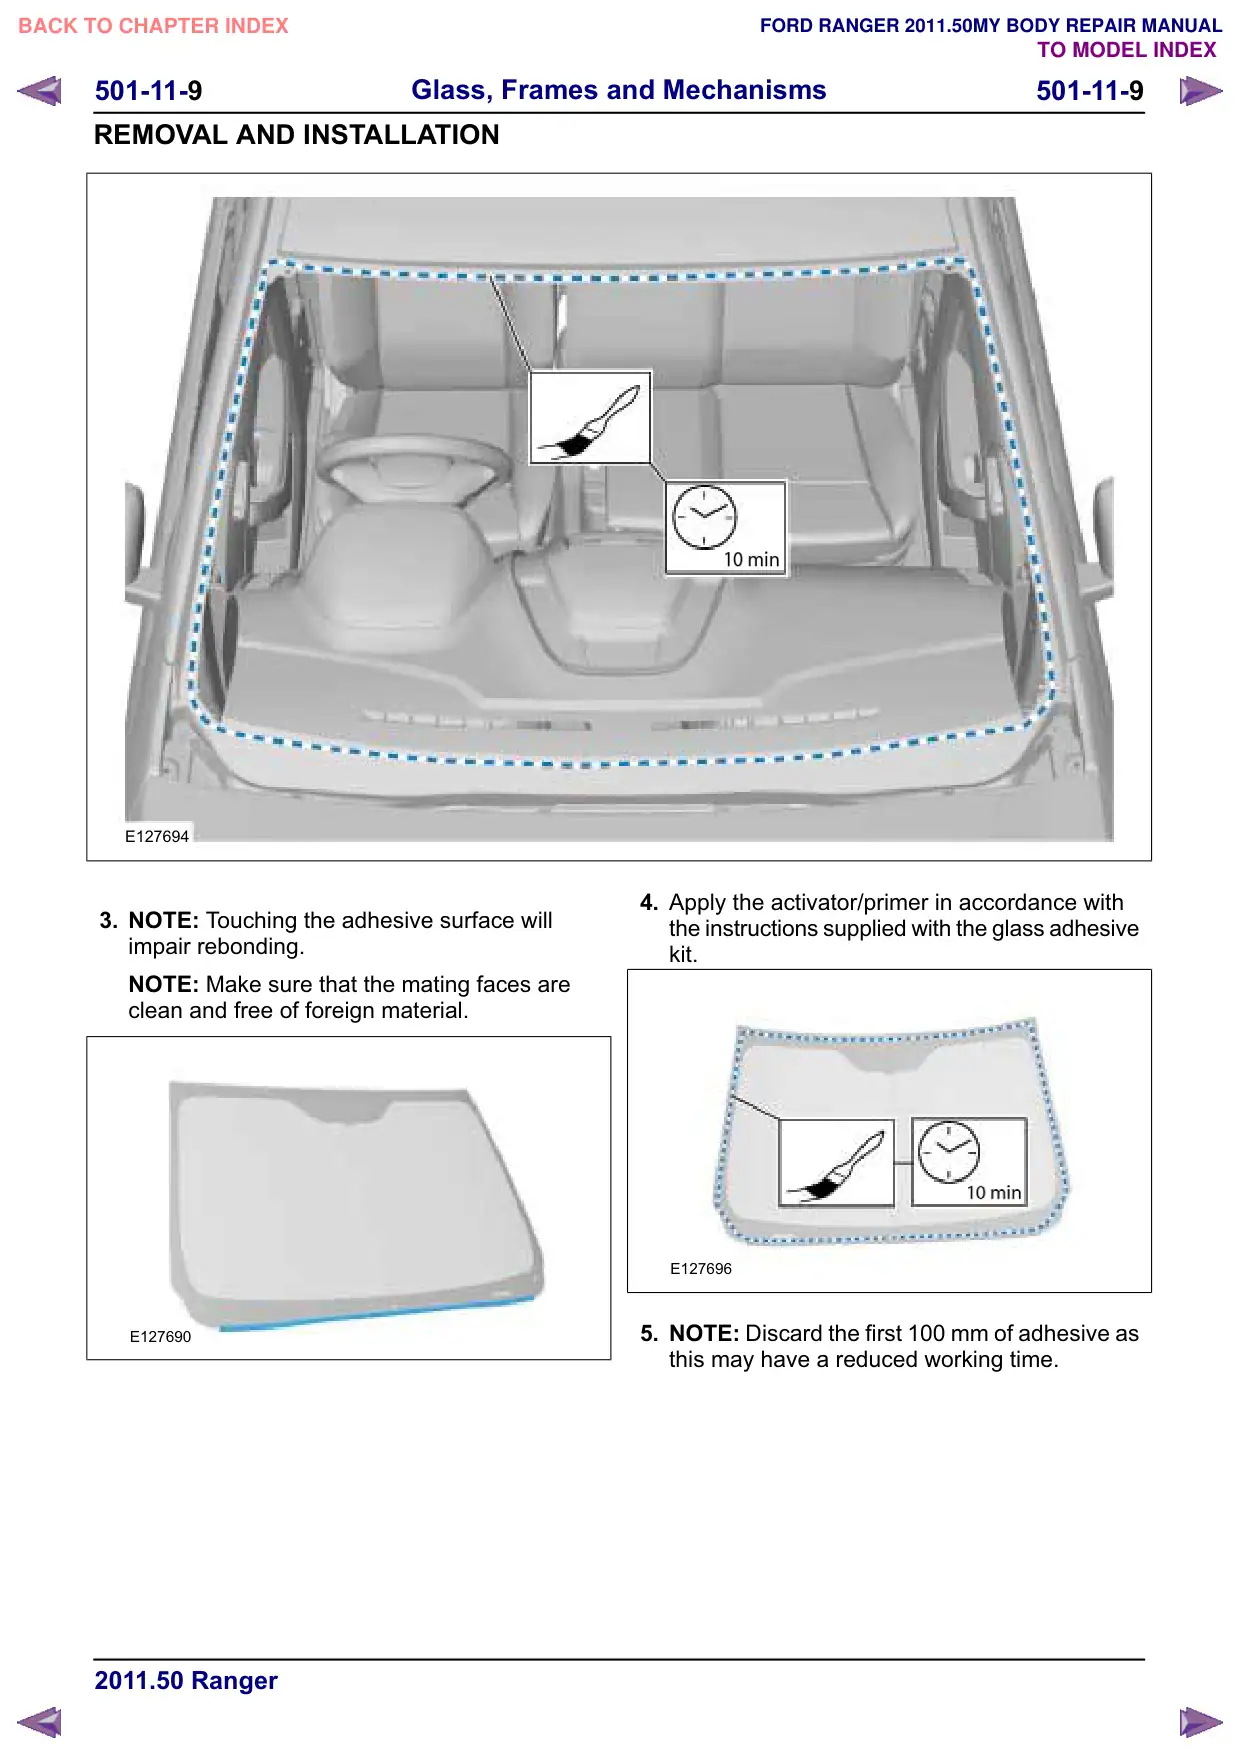
2. Apply the activator/primer in accordance with
the instructions supplied with the glass adhesive
kit.
501-11-
Glass, Frames and Mechanisms
501-11-
REMOVAL AND INSTALLATION
E127694
3. NOTE: Touching the adhesive surface will
impair rebonding.
NOTE: Make sure that the mating faces are
clean and free of foreign material.
E127690
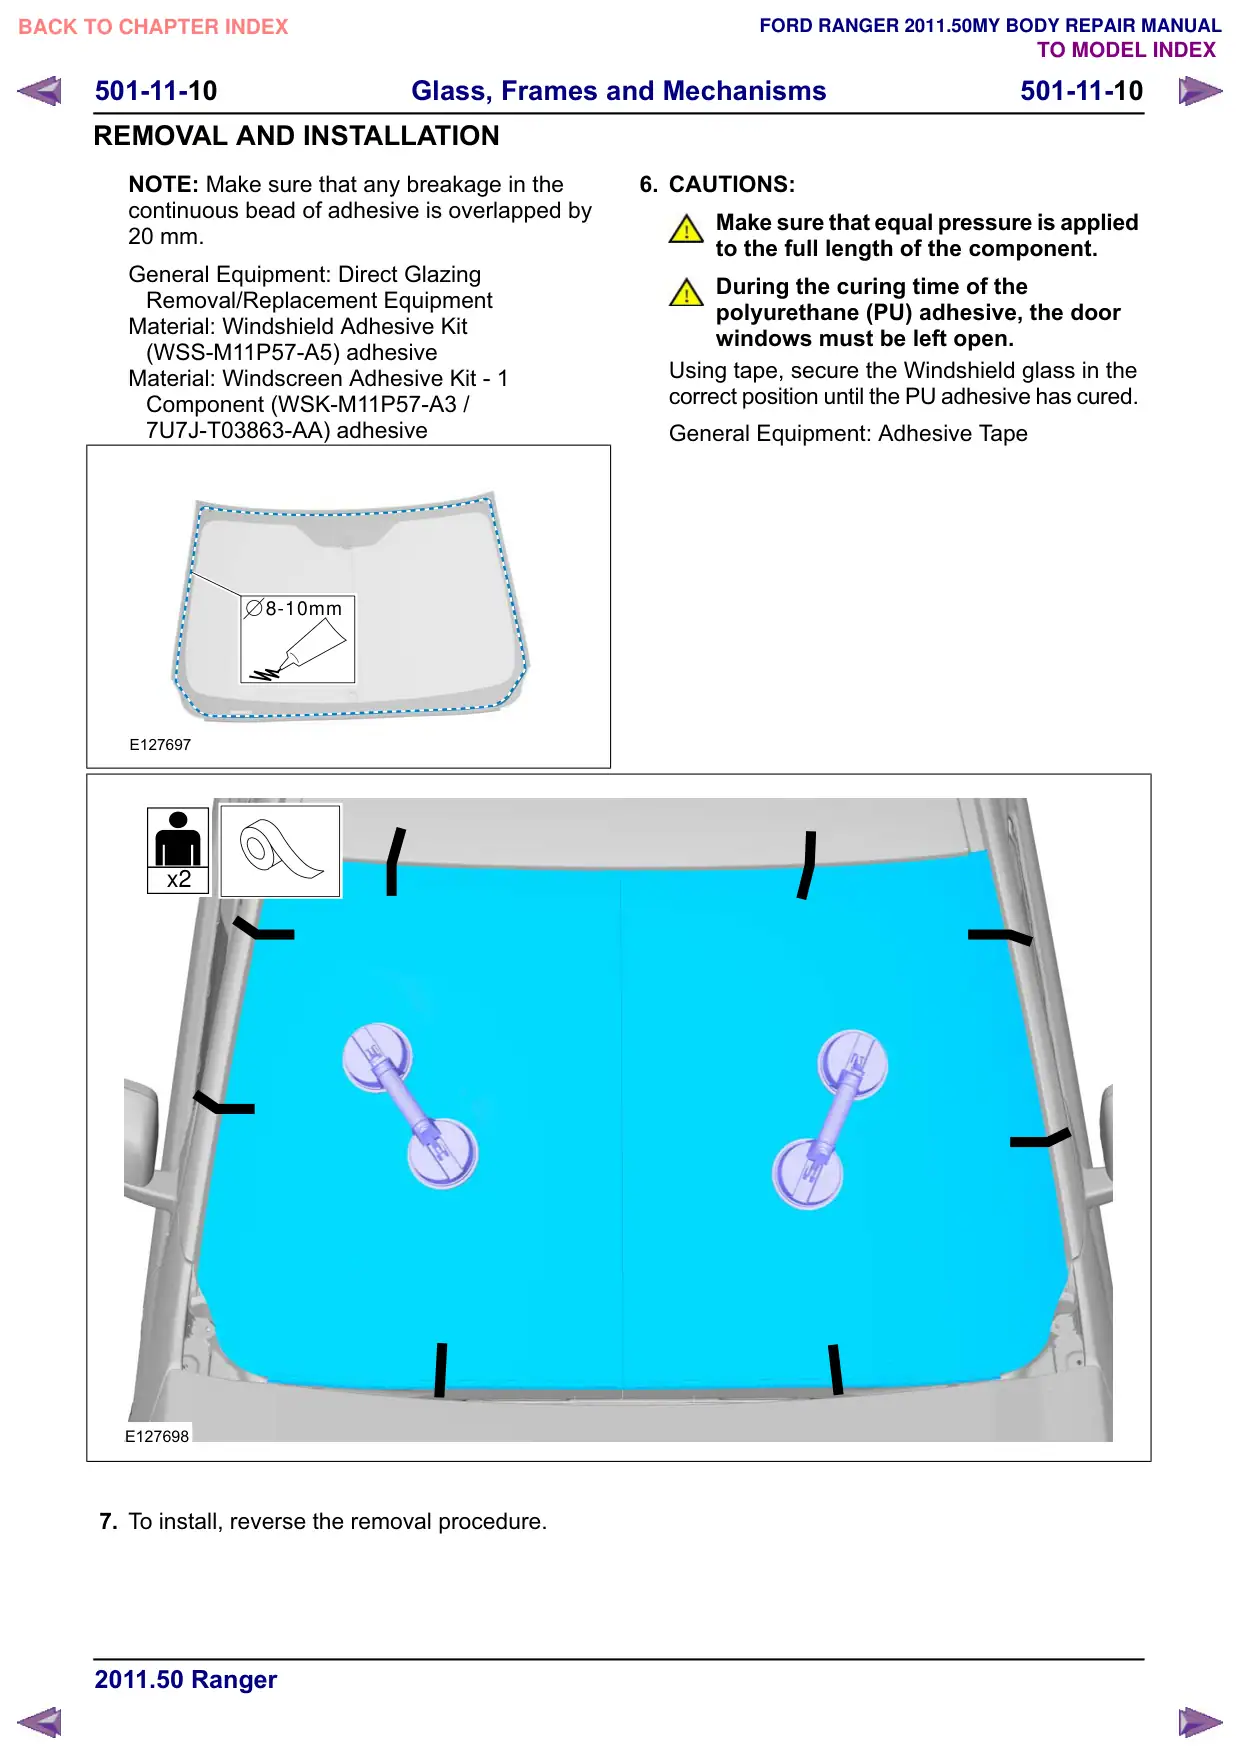
4. Apply the activator/primer in accordance with
the instructions supplied with the glass adhesive
kit.
E127696
5. NOTE: Discard the first 100 mm of adhesive as
this may have a reduced working time.
501-11-10
Glass, Frames and Mechanisms
501-11-10
REMOVAL AND INSTALLATION
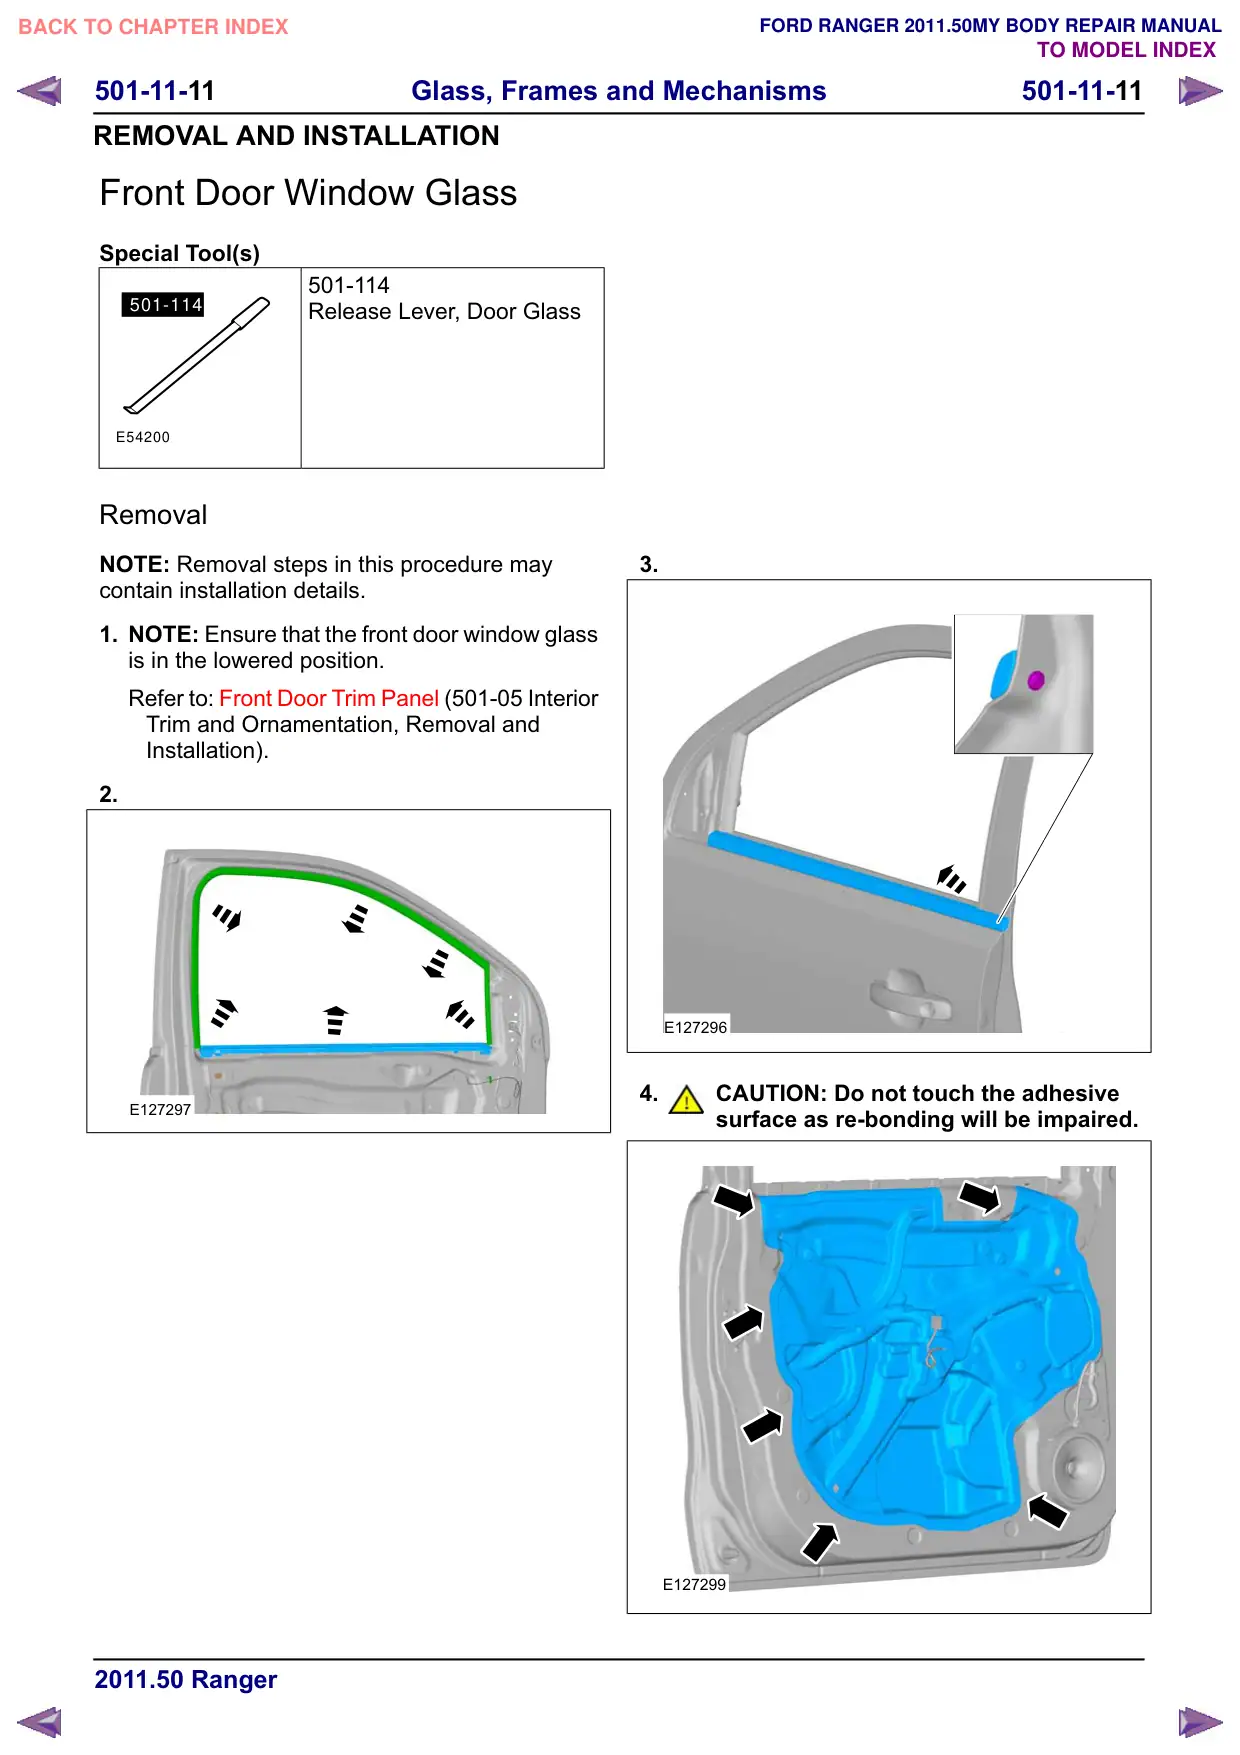
NOTE: Make sure that any breakage in the
continuous bead of adhesive is overlapped by
20 mm.
General Equipment: Direct Glazing
Removal/Replacement Equipment
Material: Windshield Adhesive Kit
(WSS-M11P57-A5) adhesive
Material: Windscreen Adhesive Kit - 1
Component (WSK-M11P57-A3 /
7U7J-T03863-AA) adhesive
8-10mm
E127697
x2
E127698
7. To install, reverse the removal procedure.
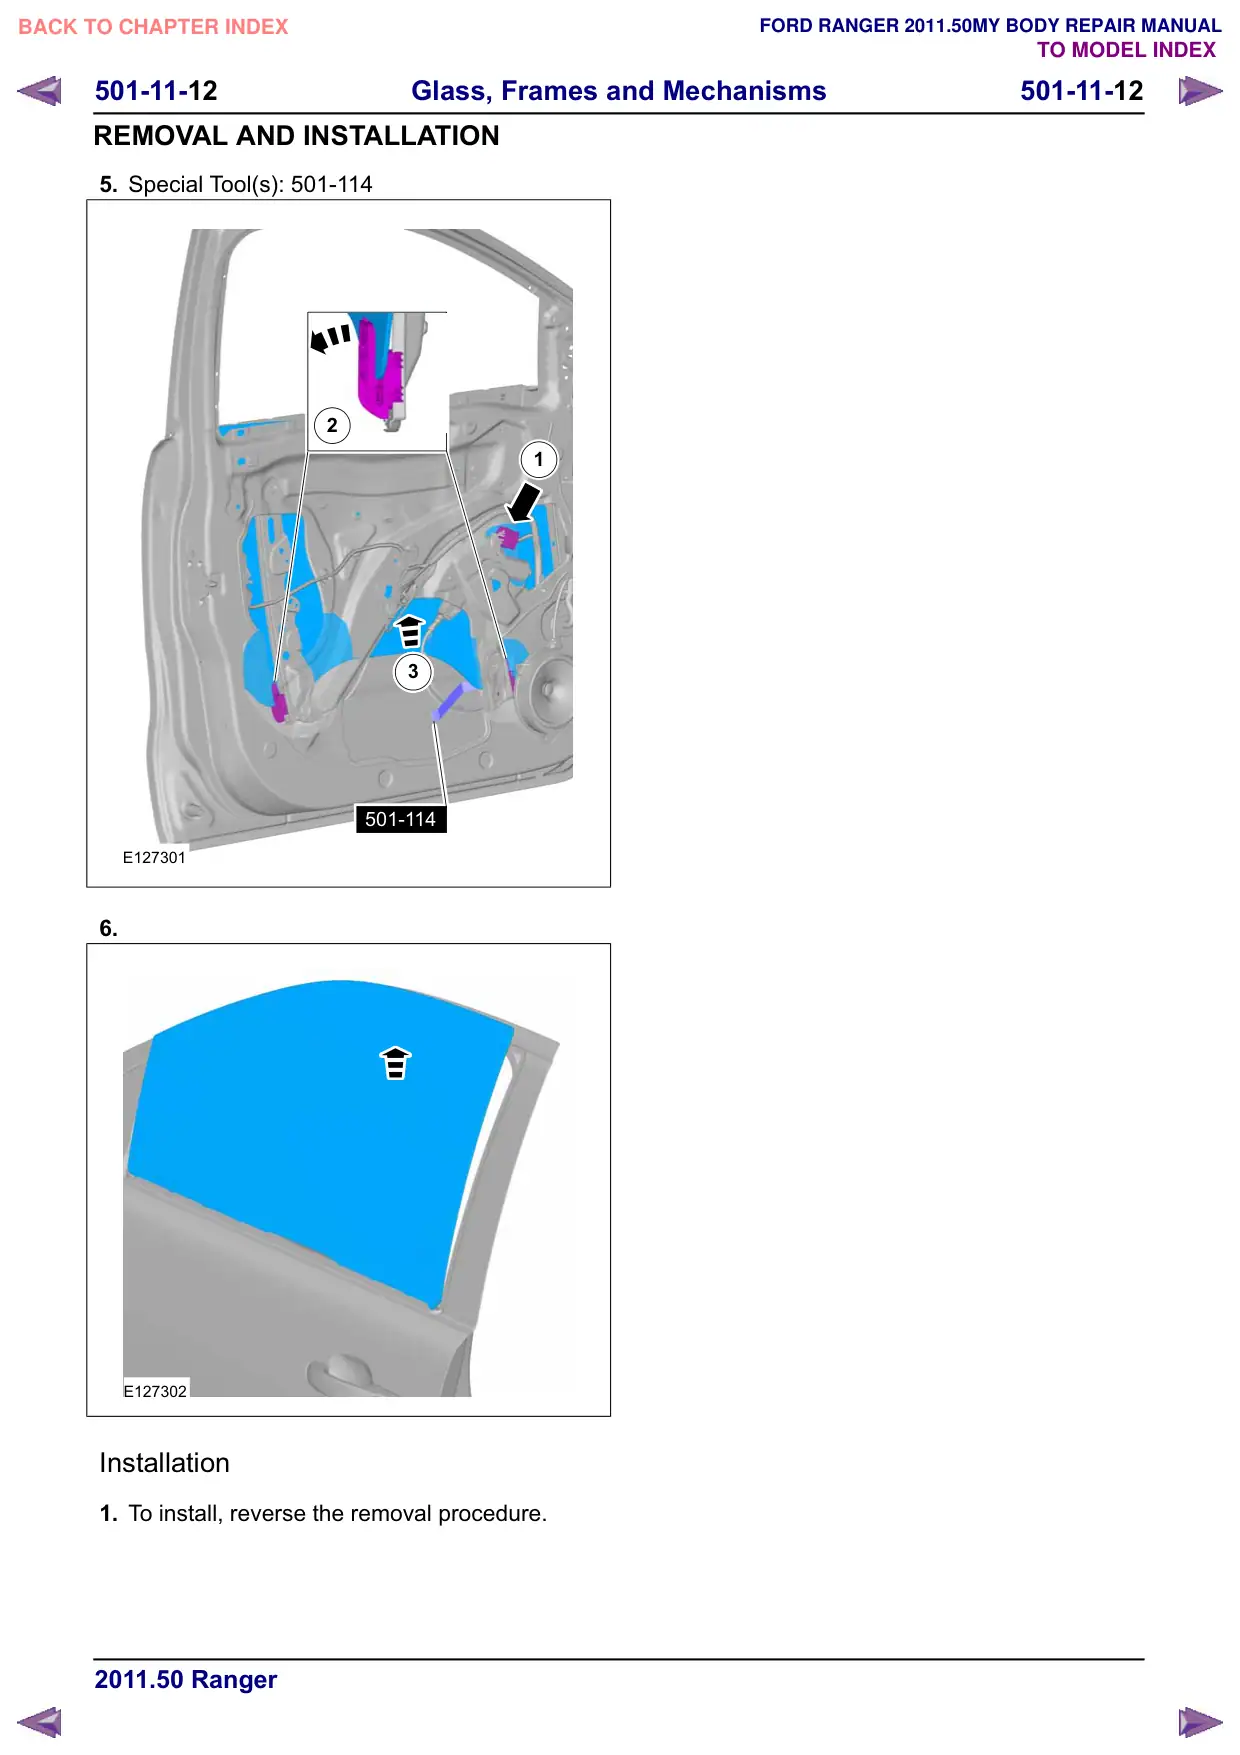
6. CAUTIONS:
Make sure that equal pressure is applied
to the full length of the component.
During the curing time of the
polyurethane (PU) adhesive, the door
windows must be left open.
Using tape, secure the Windshield glass in the
correct position until the PU adhesive has cured.
General Equipment: Adhesive Tape
501-11-11
Glass, Frames and Mechanisms
501-11-11
REMOVAL AND INSTALLATION
Front Door Window Glass
Special Tool(s)
501-114
501-114
Release Lever, Door Glass
E54200
Removal
NOTE: Removal steps in this procedure may
contain installation details.
1. NOTE: Ensure that the front door window glass
is in the lowered position.
Refer to: Front Door Trim Panel (501-05 Interior
Trim and Ornamentation, Removal and
Installation).
2.
E127297
3.
E127296
4.
CAUTION: Do not touch the adhesive
surface as re-bonding will be impaired.
E127299
501-11-13
Glass, Frames and Mechanisms
501-11-13
REMOVAL AND INSTALLATION
Front Door Window Regulator
General Equipment
Adhesive Tape
Removal
NOTE: Removal steps in this procedure may
contain installation details.
1. Refer to: Front Door Trim Panel (501-05 Interior
Trim and Ornamentation, Removal and
Installation).
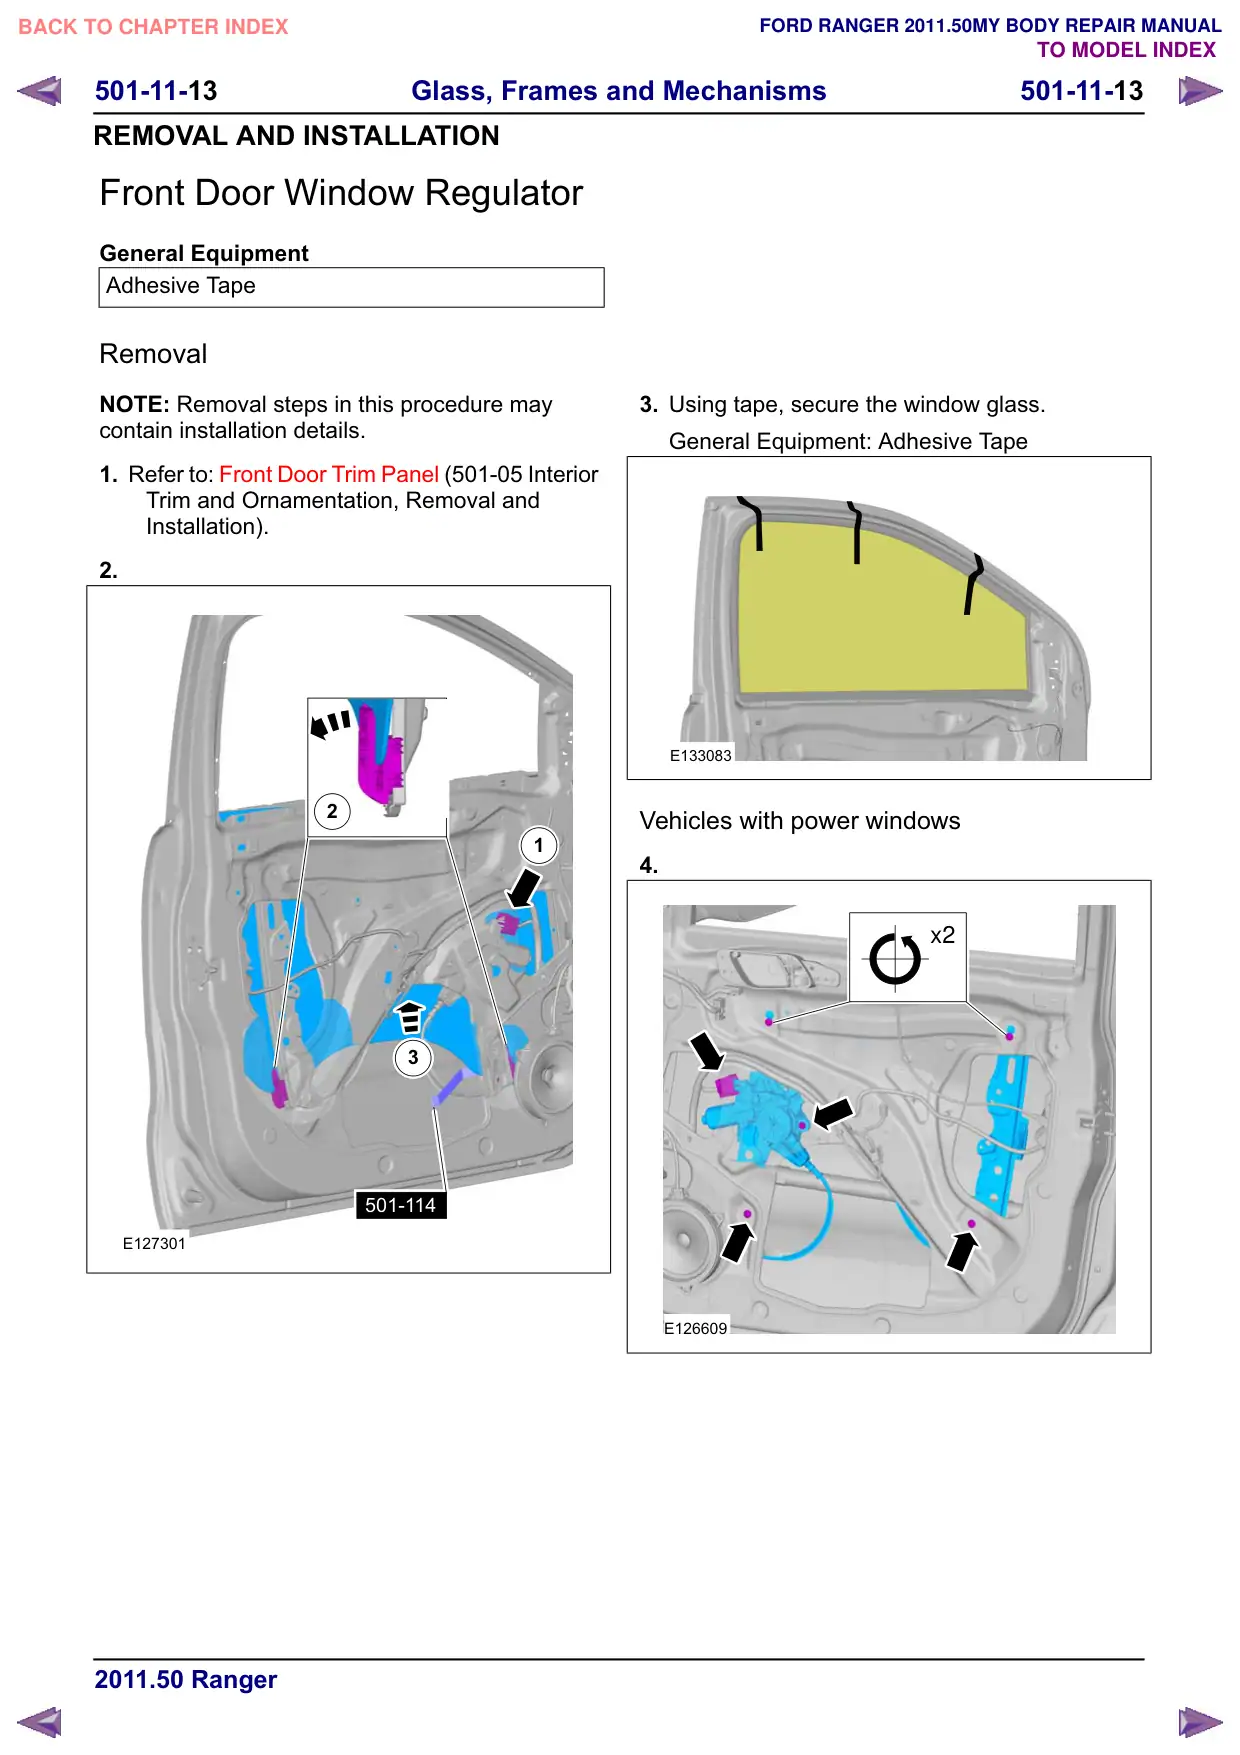
2.
2
1
3
501-114
E127301
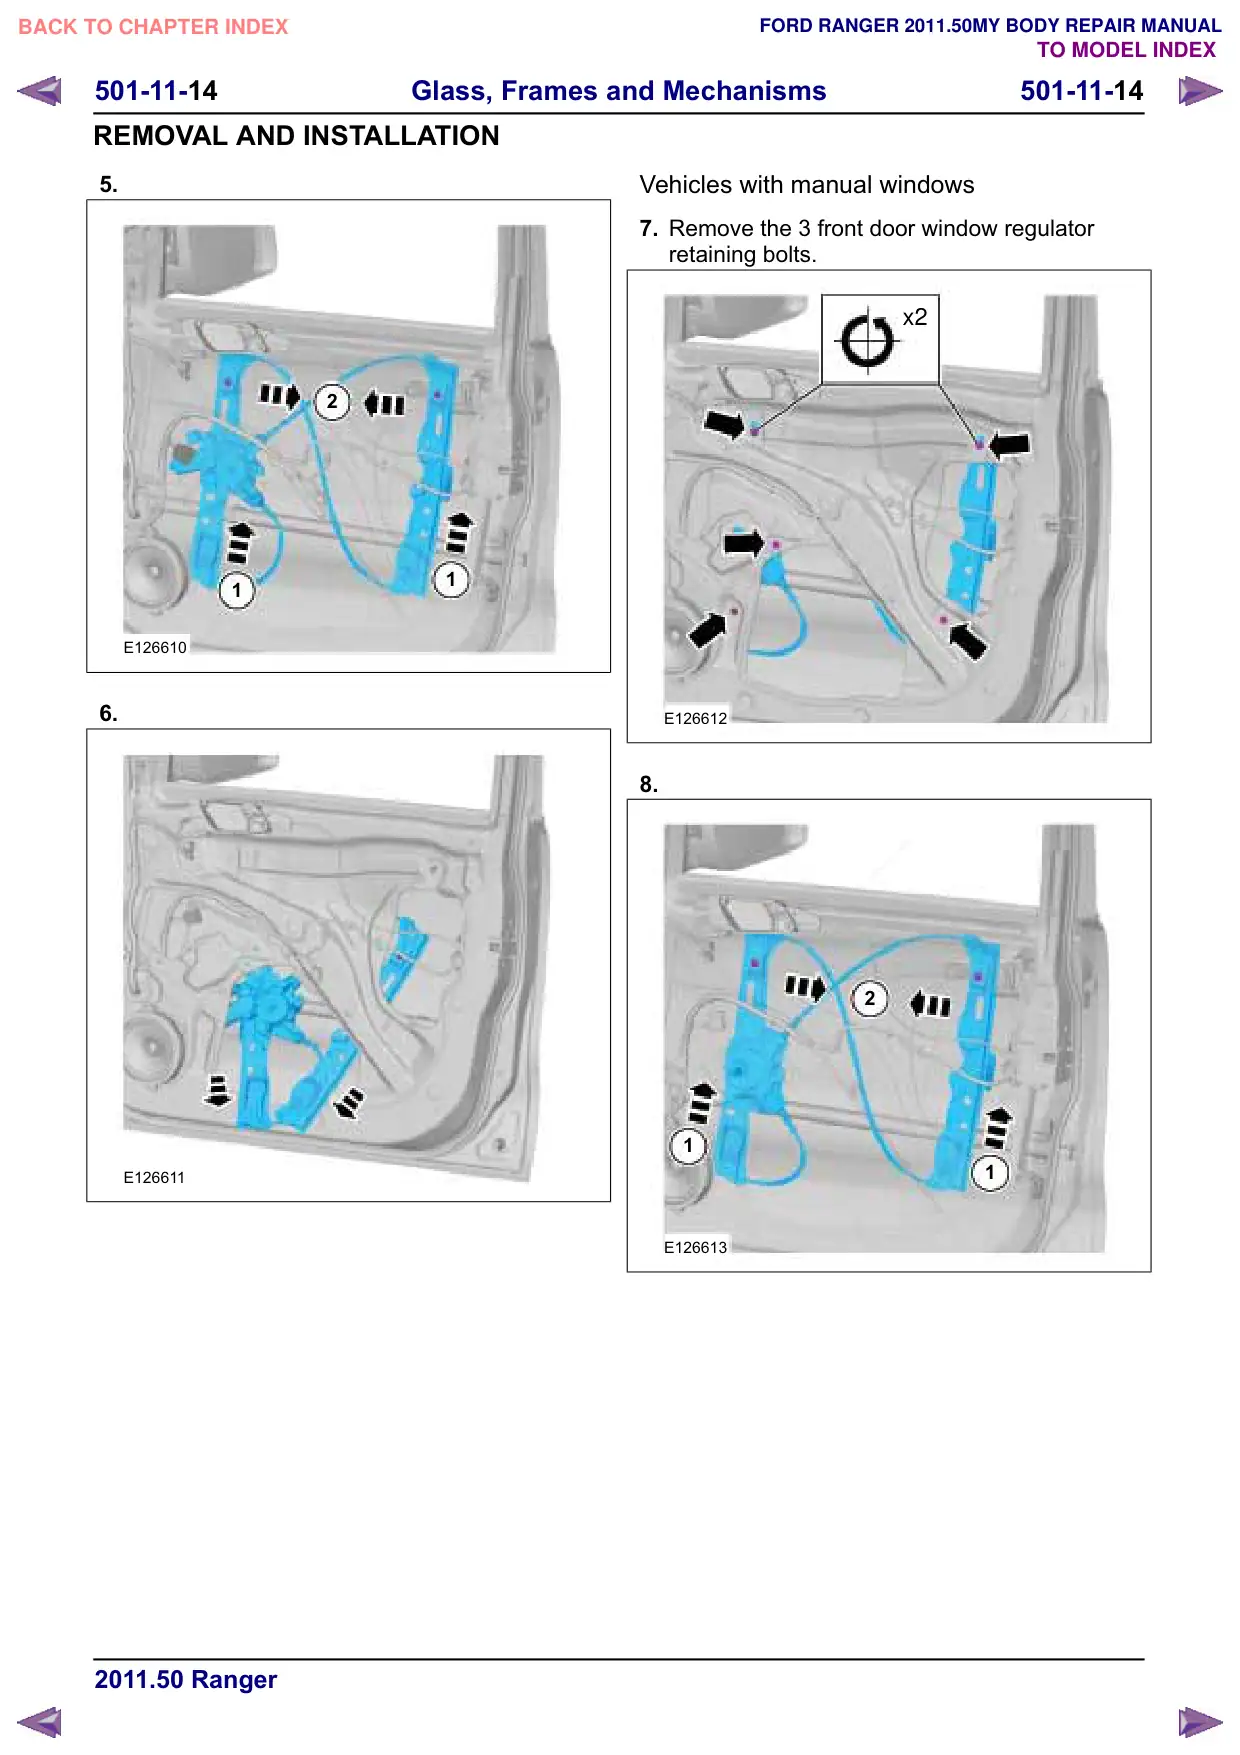
3. Using tape, secure the window glass.
General Equipment: Adhesive Tape
E133083
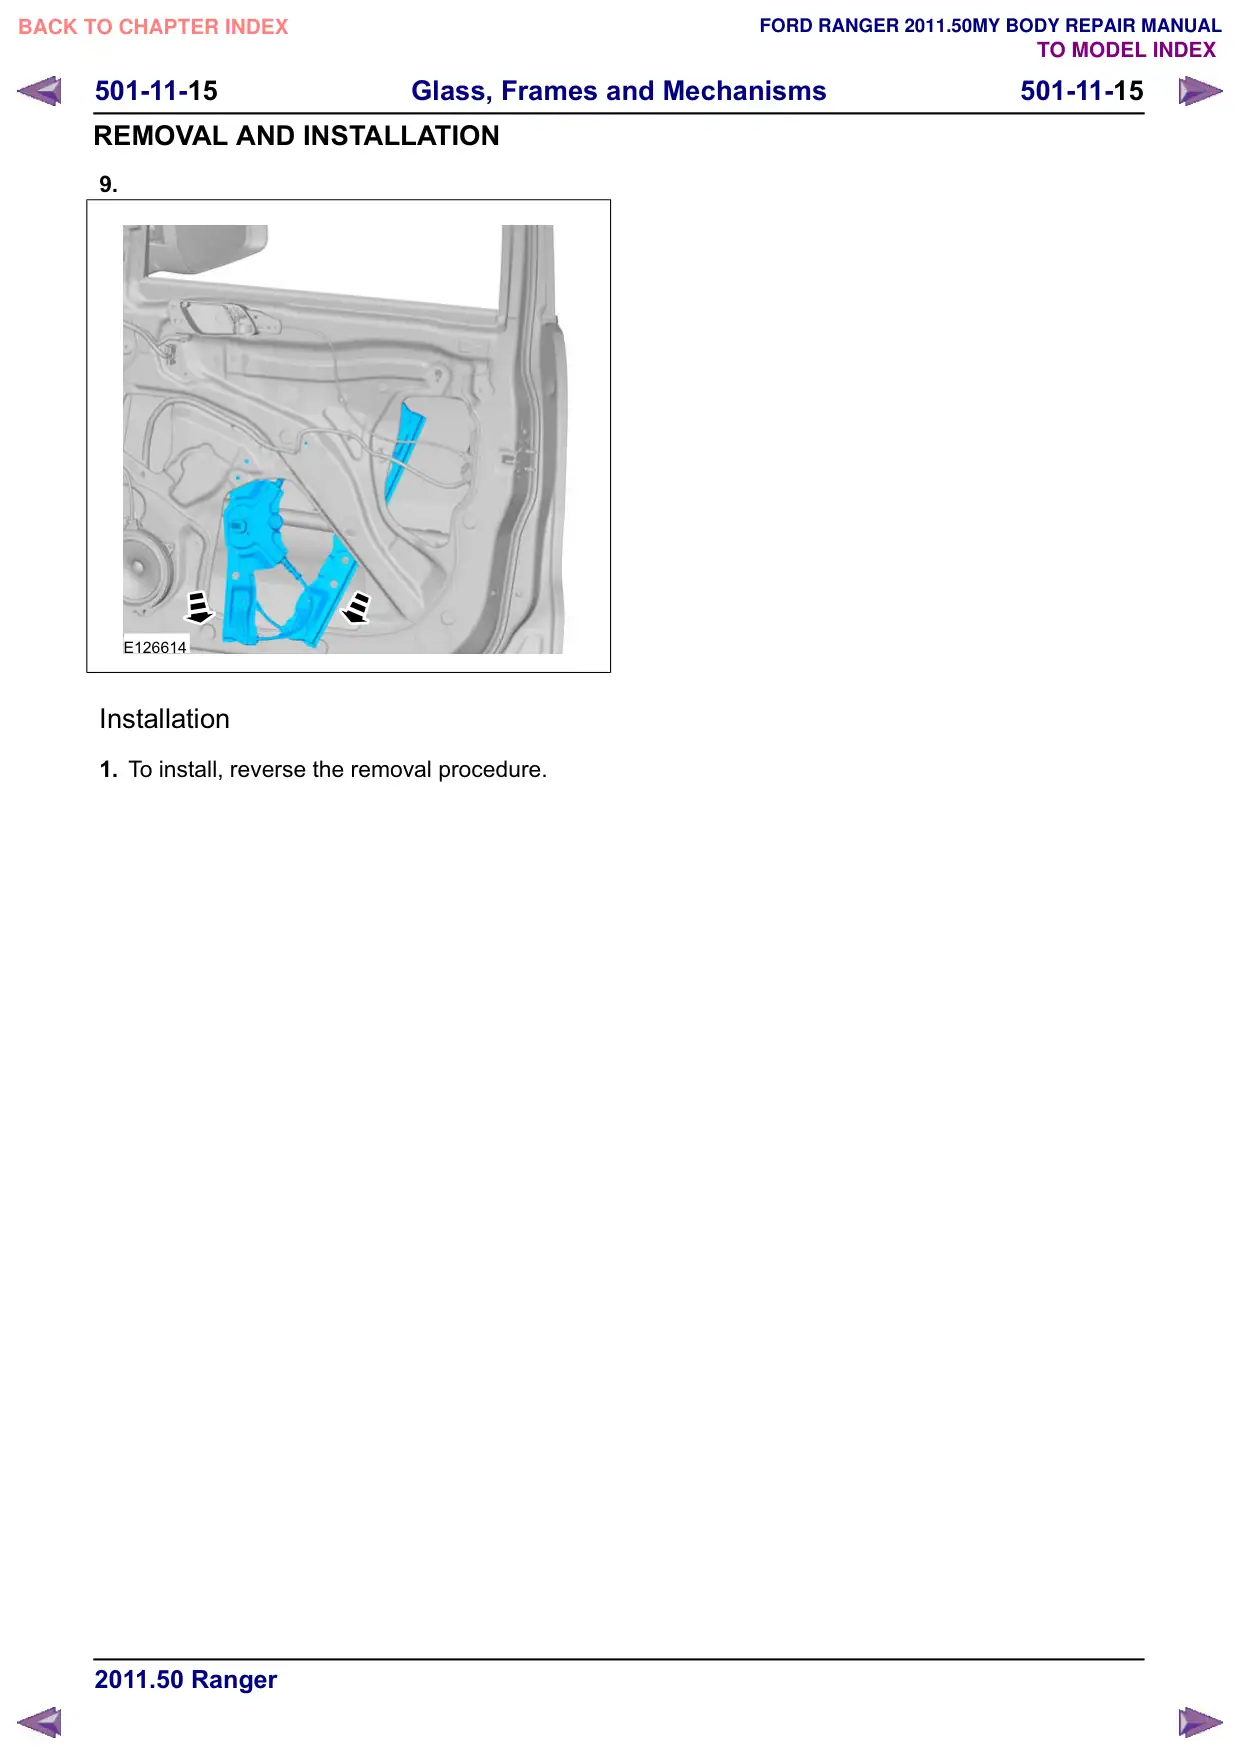
Vehicles with power windows
4.
x2
E126609
501-11-16
Glass, Frames and Mechanisms
501-11-16
REMOVAL AND INSTALLATION
Front Door Window Regulator Motor
Removal
1. Refer to: Front Door Window Regulator (501-11
Glass, Frames and Mechanisms, Removal
and Installation).
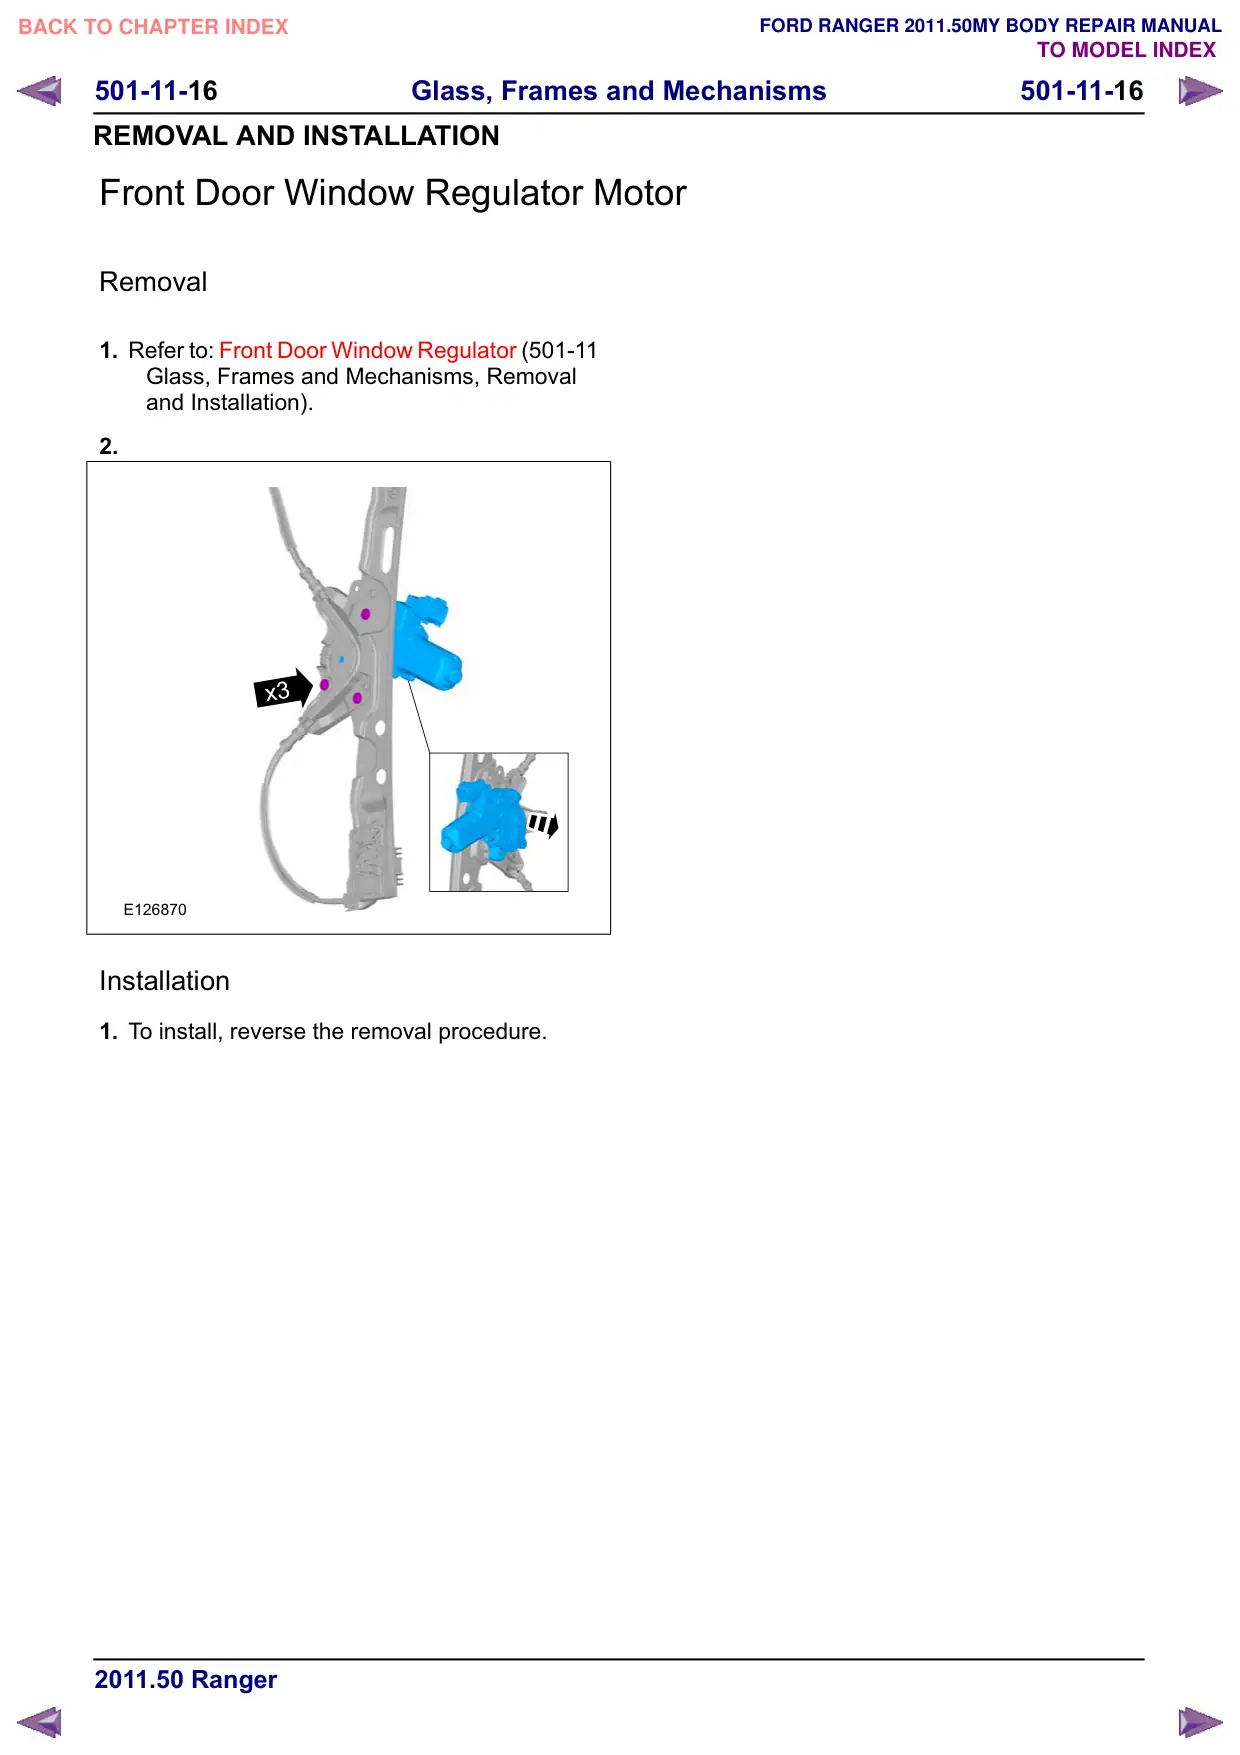
2.
x3
E126870
Installation
1. To install, reverse the removal procedure.
501-11-17
Glass, Frames and Mechanisms
501-11-17
REMOVAL AND INSTALLATION
Rear Door Window Glass
Special Tool(s)
501-114
501-114
Release Lever, Door Glass
E54200
Removal
NOTE: Removal steps in this procedure may
contain installation details.
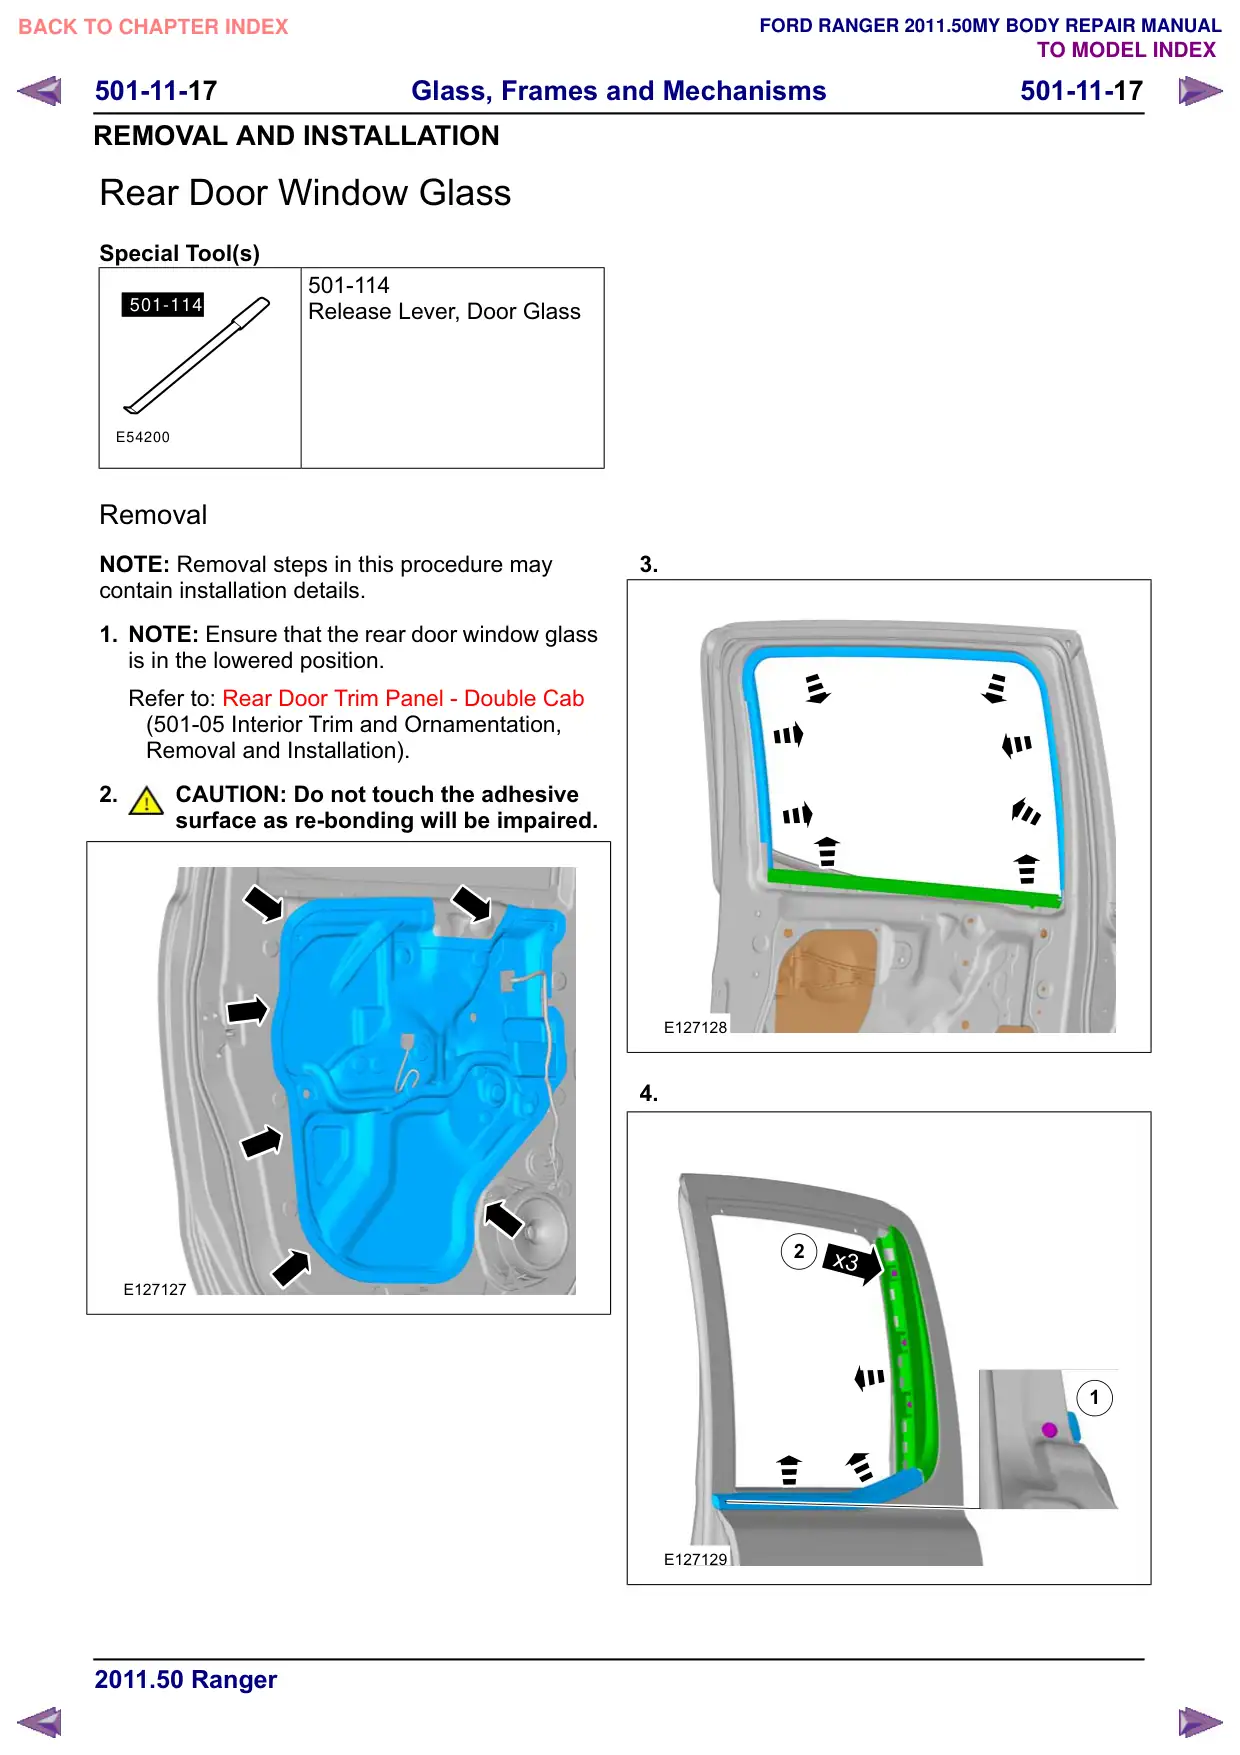
1. NOTE: Ensure that the rear door window glass
is in the lowered position.
Refer to: Rear Door Trim Panel - Double Cab
(501-05 Interior Trim and Ornamentation,
Removal and Installation).
2.
CAUTION: Do not touch the adhesive
surface as re-bonding will be impaired.
E127127
3.
E127128
4.
2
x3
1
E127129
501-11-18
Glass, Frames and Mechanisms
501-11-18
REMOVAL AND INSTALLATION
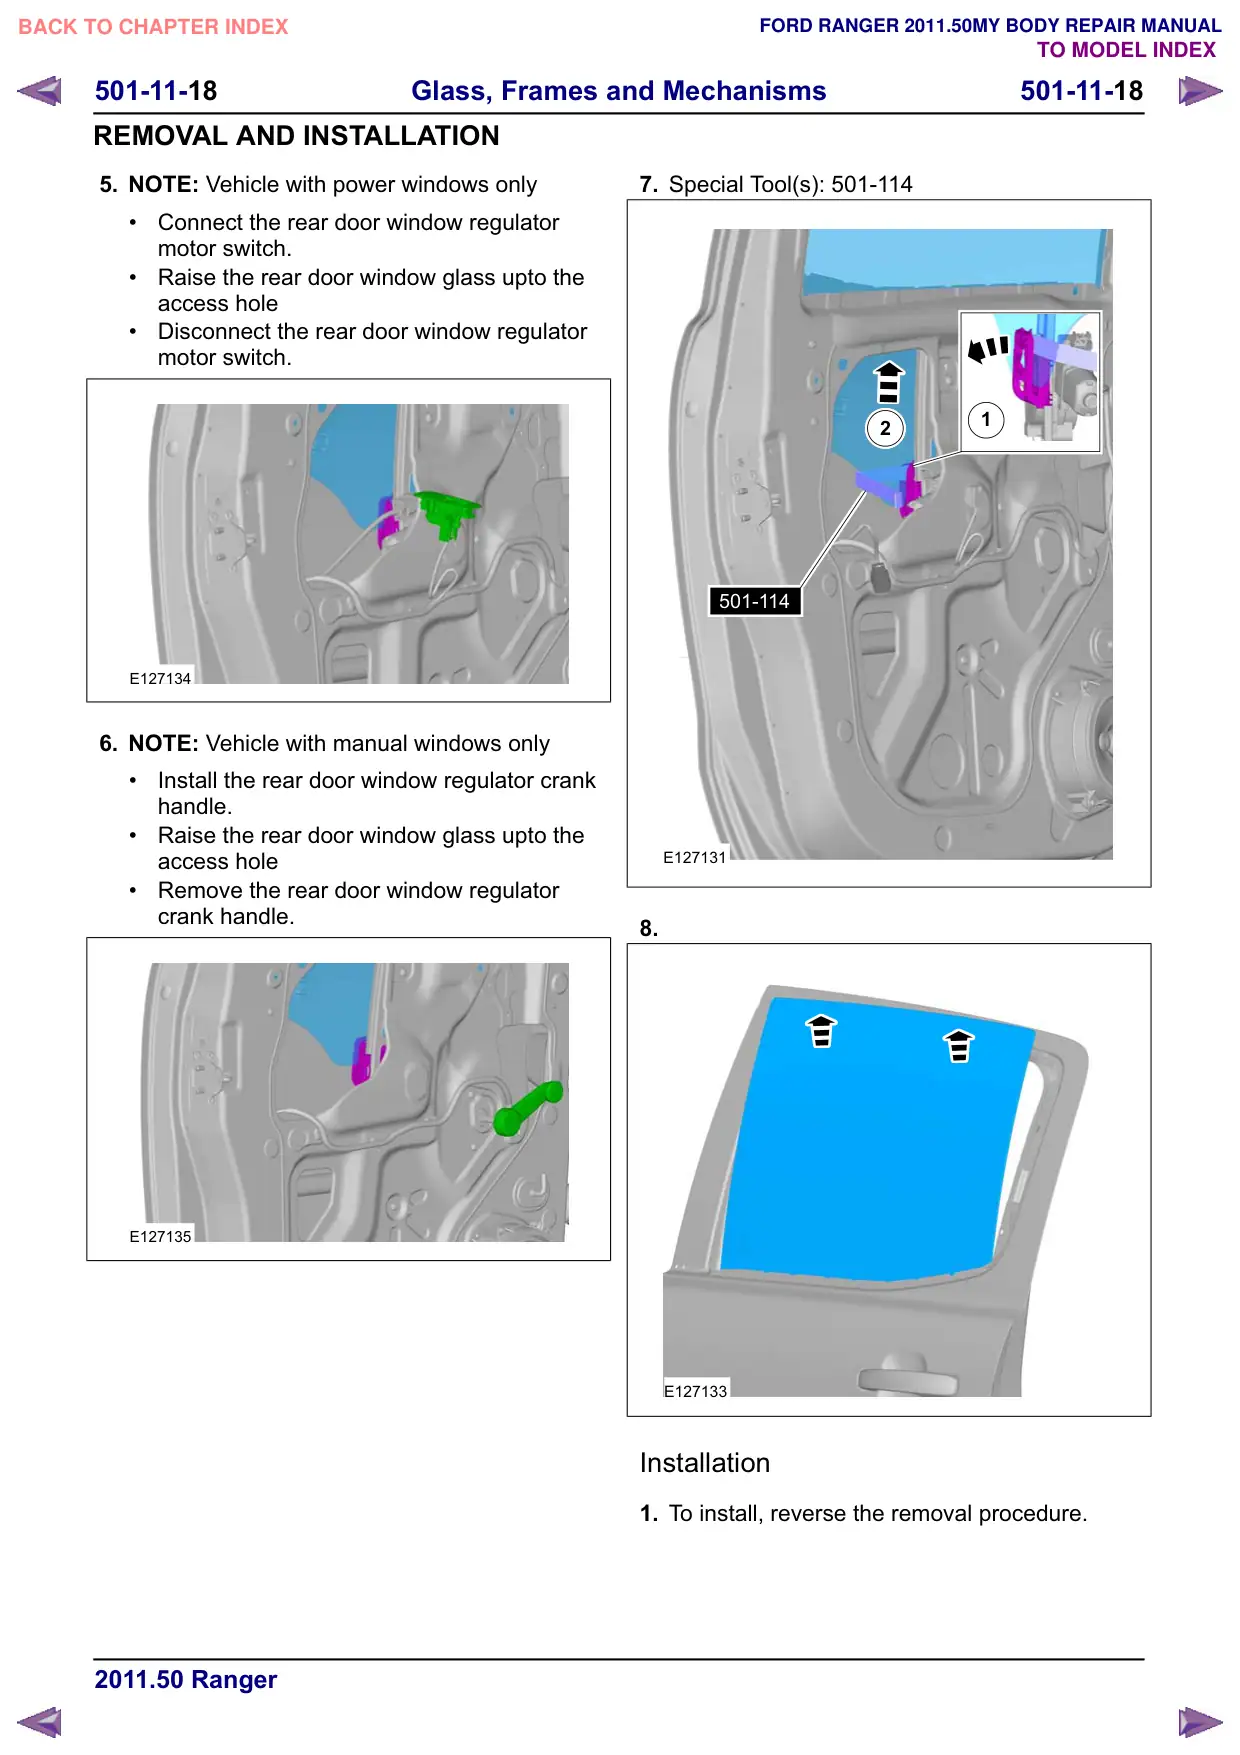
5. NOTE: Vehicle with power windows only
Connect the rear door window regulator
motor switch.
Raise the rear door window glass upto the
access hole
Disconnect the rear door window regulator
motor switch.
E127134
6. NOTE: Vehicle with manual windows only
Install the rear door window regulator crank
handle.
Raise the rear door window glass upto the
access hole
Remove the rear door window regulator
crank handle.
E127135
7. Special Tool(s): 501-114
1
2
501-114
E127131
8.
E127133
Installation
1. To install, reverse the removal procedure.
501-11-19
Glass, Frames and Mechanisms
501-11-19
REMOVAL AND INSTALLATION
Rear Door Window Regulator
General Equipment
Adhesive Tape
Removal
1. Refer to: Rear Door Trim Panel - Double Cab
(501-05 Interior Trim and Ornamentation,
Removal and Installation).
2.
1
2
501-114
E127131
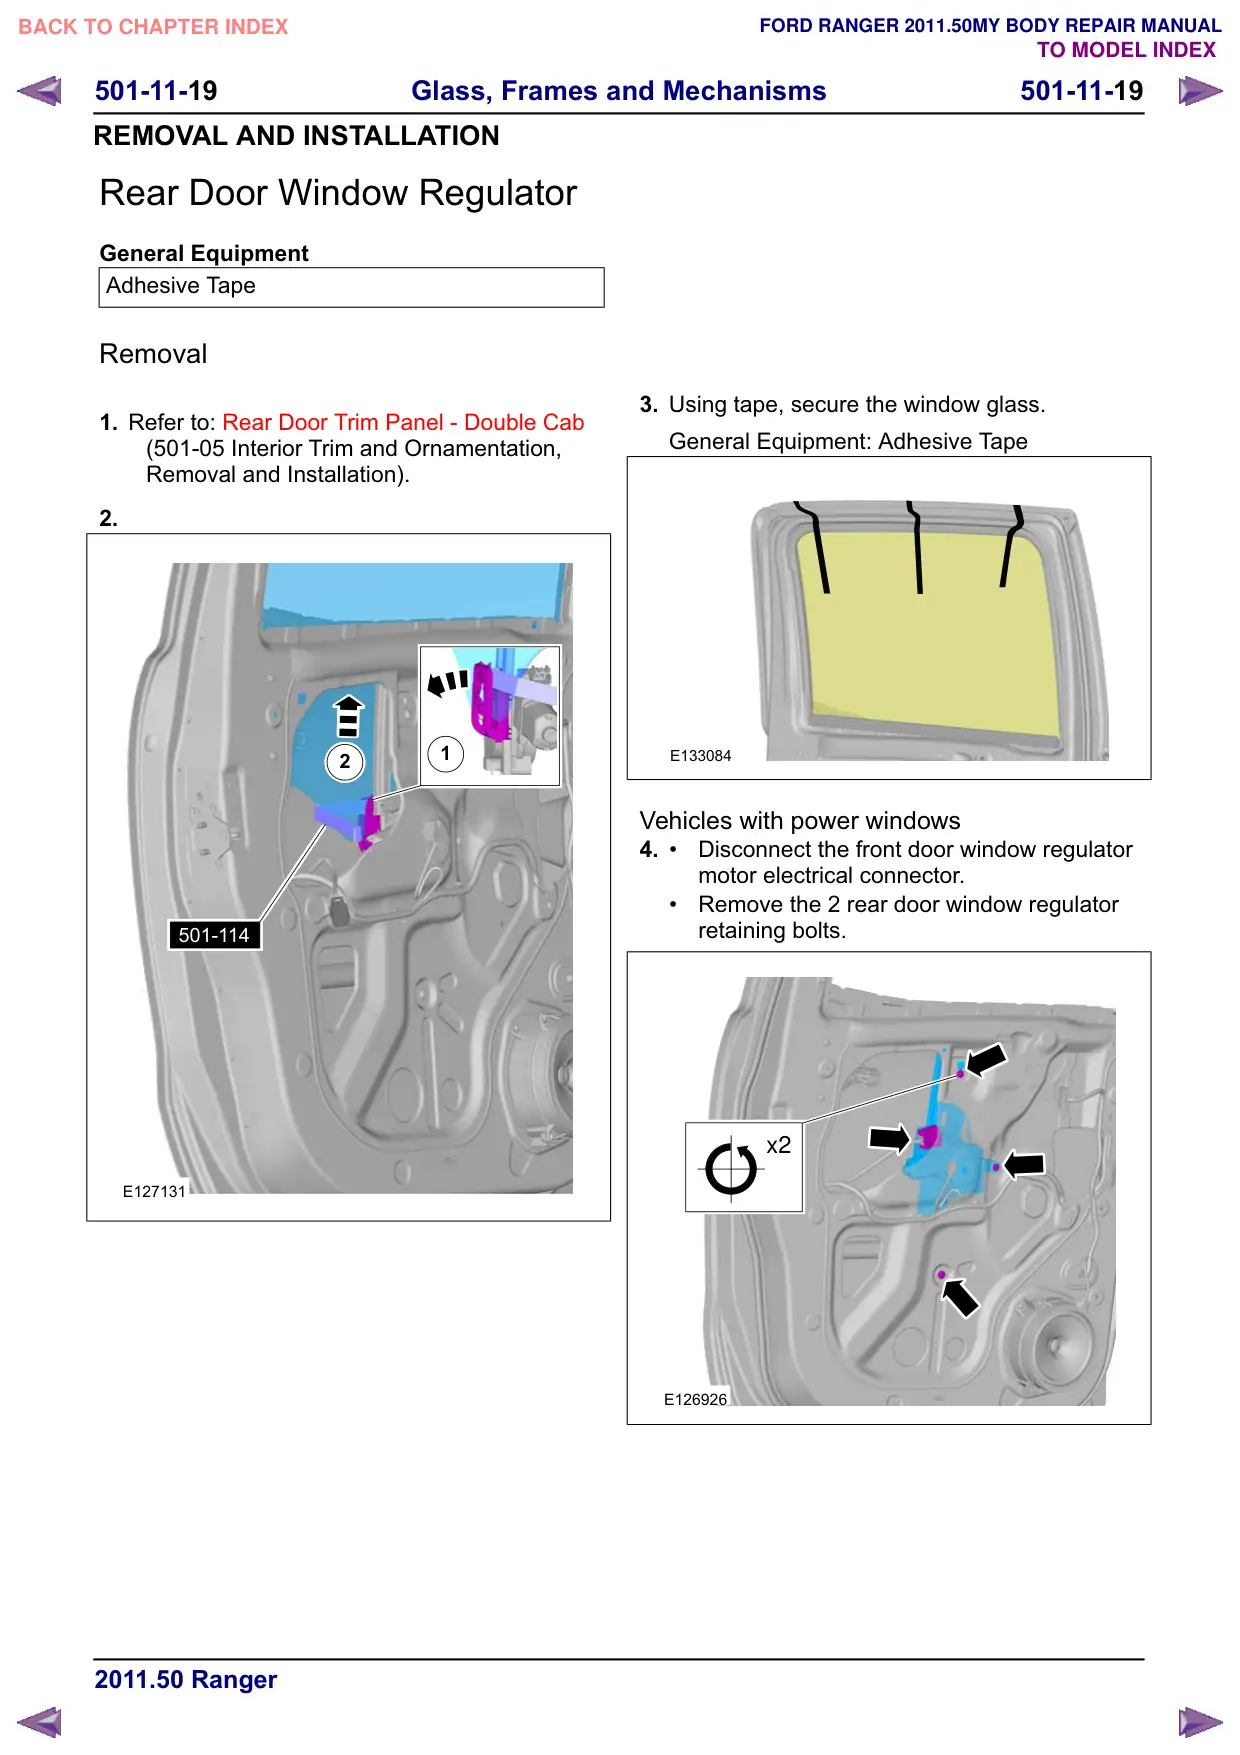
3. Using tape, secure the window glass.
General Equipment: Adhesive Tape
E133084
Vehicles with power windows
4.
Disconnect the front door window regulator
motor electrical connector.
Remove the 2 rear door window regulator
retaining bolts.
x2
E126926
501-11-20
Glass, Frames and Mechanisms
501-11-20
REMOVAL AND INSTALLATION
5.
E126927
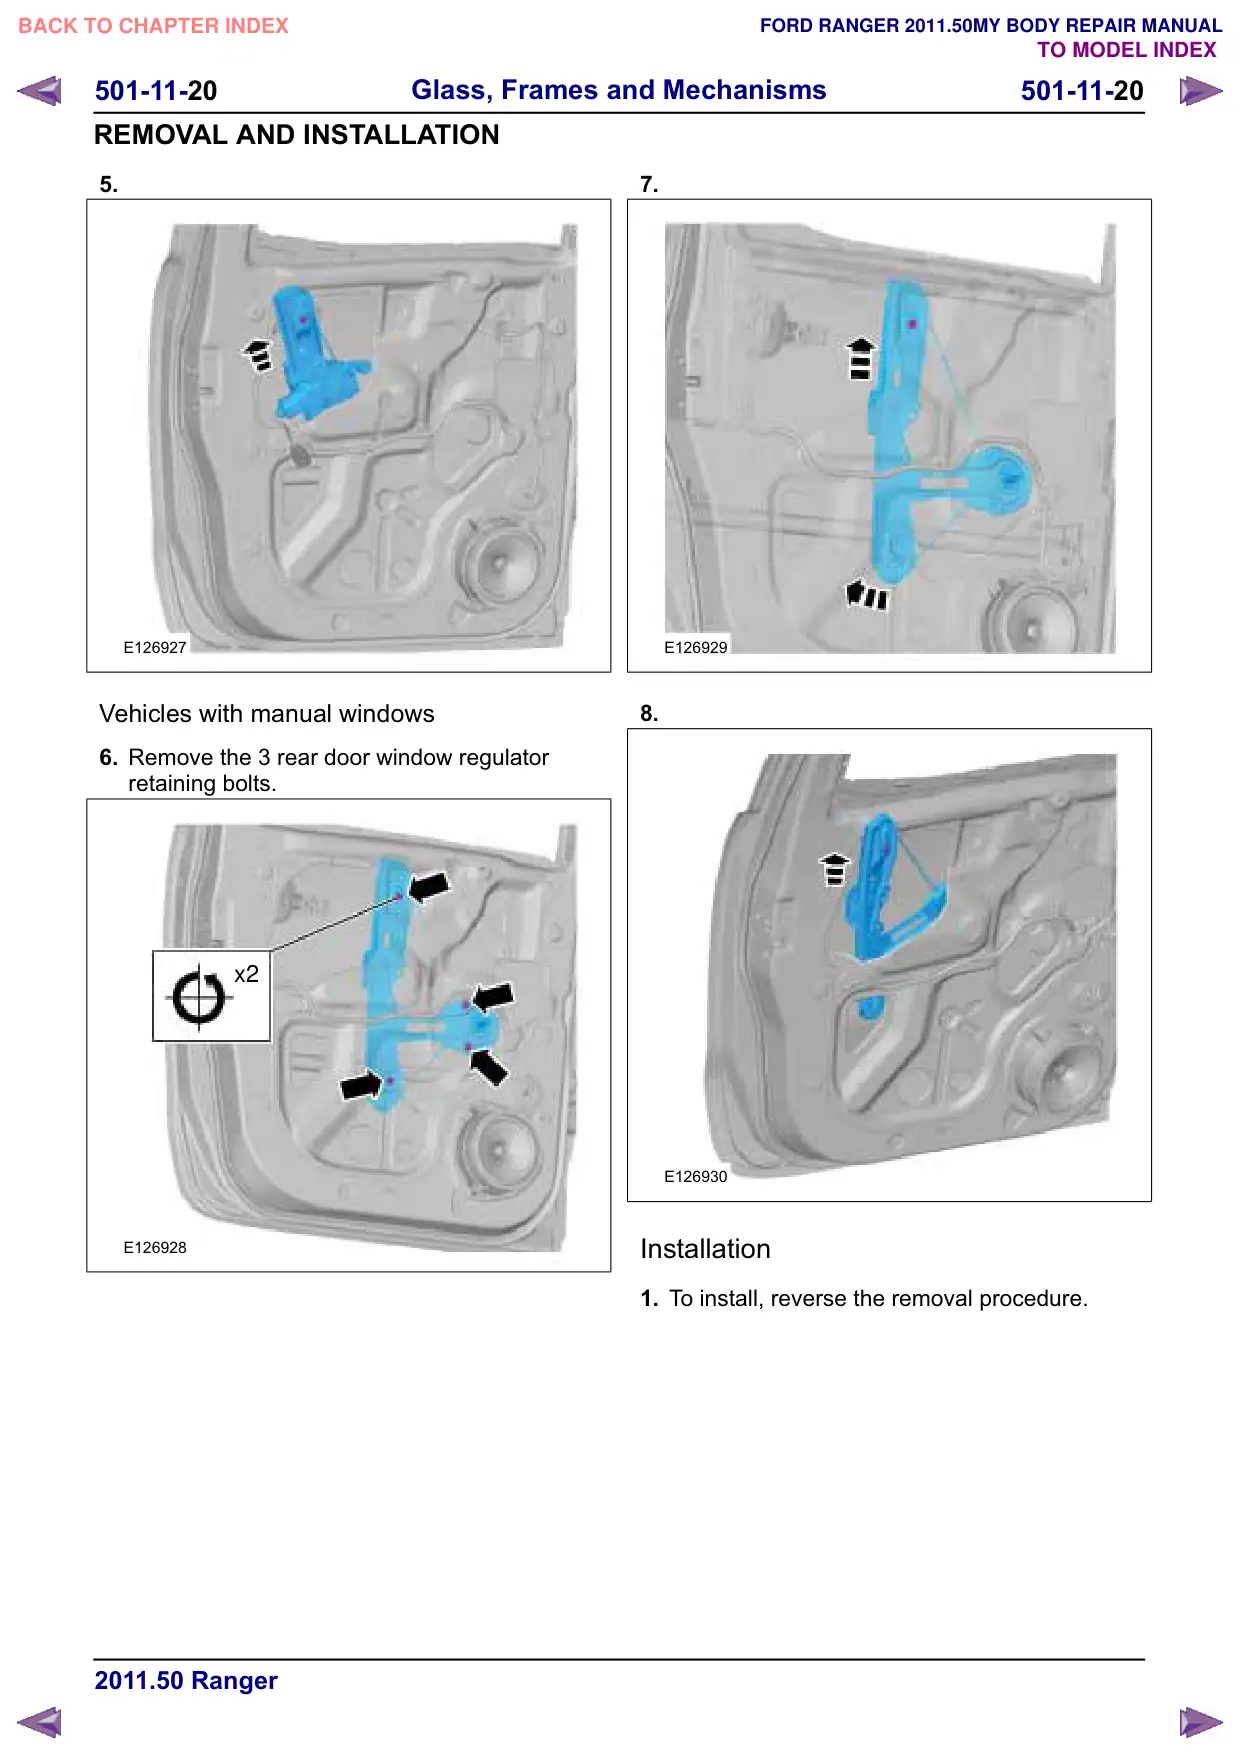
Vehicles with manual windows
6. Remove the 3 rear door window regulator
retaining bolts.
x2
E126928
7.
E126929
8.
E126930
Installation
1. To install, reverse the removal procedure.
501-11-21
Glass, Frames and Mechanisms
501-11-21
REMOVAL AND INSTALLATION
Rear Door Window Regulator Motor
Removal
1. Refer to: Rear Door Window Regulator (501-11
Glass, Frames and Mechanisms, Removal
and Installation).
2.
x3
E126940
Installation
1. To install, reverse the removal procedure.
501-11-22
Glass, Frames and Mechanisms
501-11-22
REMOVAL AND INSTALLATION
Rear Window Glass
General Equipment
Adhesive Tape
Direct Glazing Removal/Replacement Equipment
Knife
Removal
1. Refer to: Health and Safety Precautions (100-00
General Information, Description and
Operation).
2. Refer to: C-Pillar Upper Trim Panel (501-05
Interior Trim and Ornamentation, Removal
and Installation).
3. Refer to: Headliner (501-05 Interior Trim and
Ornamentation, Removal and Installation).
4. Refer to: Rear Seat (501-10 Seating, Removal
and Installation).
5.
Material: Windshield Adhesive Kit
(WSS-M11P57-A5) adhesive
Remove the polyurethane (PU) adhesive cap
and heat the 2K-PU adhesive for a minimum
of 30 minutes.
General Equipment: Direct Glazing
Removal/Replacement Equipment
Repairs under warranty:
Material: Windscreen Adhesive Kit - 1
Component (WSK-M11P57-A3 /
7U7J-T03863-AA) adhesive
TIE0022871
Materials
Name
Specification
Windscreen Adhesive
WSK-M11P57-A3 /
Kit - 1 Component
7U7J-T03863-AA
Windshield Adhesive Kit
WSS-M11P57-A5
6.
E129042
7. NOTE: Vehicles with heated windsheild only.
E129011
8.
Use a suitable awl to thread the cutting wire.
General Equipment: Direct Glazing
Removal/Replacement Equipment
501-11-23
Glass, Frames and Mechanisms
501-11-23
REMOVAL AND INSTALLATION
x2
E129012
9.
CAUTION: If the original window glass
is to be installed, take care not to
x2
E129013
damage the electrical connectors and
the weatherstrip (if equipped).
Use a suitable brace to prevent trim damages.
General Equipment: Direct Glazing
Removal/Replacement Equipment
501-11-24
Glass, Frames and Mechanisms
501-11-24
REMOVAL AND INSTALLATION
10.
E129025
Installation
1. NOTE: Minimum 1 mm bead thickness.
General Equipment: Knife
NOTE: Make sure that the mating faces are
clean and free of foreign material.
NOTE: Touching the adhesive surface will
impair rebonding.
Prepare the windshield glass, windshield
glass flange and trimmed PU adhesive in
accordance with the instructions supplied
with the glass adhesive kit.
E114059
2. Apply the activator/primer in accordance with
the instructions supplied with the glass adhesive
kit.
E129026
3. Apply the activator/primer in accordance with
the instructions supplied with the glass adhesive
kit.
E129027
4. NOTE: Discard the first 100 mm of adhesive as
this may have a reduced working time.
501-11-25
Glass, Frames and Mechanisms
501-11-25
REMOVAL AND INSTALLATION
NOTE: Make sure that any breakage in the
continuous bead of adhesive is overlapped by
20 mm.
General Equipment: Direct Glazing
Removal/Replacement Equipment
Material: Windshield Adhesive Kit
(WSS-M11P57-A5) adhesive
Material: Windscreen Adhesive Kit - 1
Component (WSK-M11P57-A3 /
7U7J-T03863-AA) adhesive
8-10mm
E129037
x2
E129038
6. To install reverse the removal procedure.
5. CAUTIONS:
Make sure that equal pressure is applied
to the full length of the component.
During the curing time of the
polyurethane (PU) adhesive, the door
windows must be left open.
Using tape, secure the windshield glass in the
correct position until the PU adhesive has
cured.Adhesive tape
General Equipment: Adhesive Tape