412-00-1
Climate Control System - General Information
412-00-1
.
SECTION 412-00 Climate Control System - General
Information
VEHICLE APPLICATION: 2011.50 Ranger
CONTENTS
SPECIFICATIONS
Specifications......................................................................................................................
GENERAL PROCEDURES
Air Conditioning (A/C) Clutch Air Gap Adjustment.............................................................
Air Conditioning (A/C) System Recovery, Evacuation and Charging.................................
Refrigerant Oil Adding........................................................................................................
Contaminated Refrigerant Handling...................................................................................
Electronic Leak Detection...................................................................................................
Fluorescent Dye Leak Detection........................................................................................
Vacuum Leak Detection......................................................................................................
PAGE
412-00-2
412-00-3
412-00-4
412-00-6
412-00-7
412-00-8
412-00-9
412-00-10
412-00-2
Climate Control System - General Information
412-00-2
SPECIFICATIONS
Lubricants, Fluids, Sealers and Adhesives
Refrigerant R134a
Refrigerant oil
Refrigerant Capacities (When Charging)
Air Conditioning
Refrigerant Oil Capacities (When Charging)
Air Conditioning
Addition of Refrigerant Oil (When a new compressor is installed)
Air conditioning compressor if the amount of refrigerant oil taken from the
faulty compressor is 50 to 90 ml
Air conditioning compressor if the amount of refrigerant oil taken from the
faulty compressor is 91 to 120 ml
Air conditioning compressor if the amount of refrigerant oil taken from the
faulty compressor is more than 121 to 150 ml
Addition of Refrigerant Oil (When new components are installed)
Condenser
Evaporator
Every time refrigerant is evacuated.
When all new components are installed (including compressor).
When A/C system is flushed.
Clutch air gap
Compressor clutch air gap
Torque Specifications
Item
Compressor drive plate retaining bolt
Specifications
WSH-M17B19-A
WSH-M1C231-B
Grams
650 ± 10
Milliliters
150
Milliliters
Drain 70 from new
compressor.
Drain 40 from new
compressor.
Drain 0 from new
compressor.
Milliliters
add 80.
add 40.
as taken from the system
add 0.
150
mm
0,35 - 0,65
Nm
lb-ft
lb-in
13
10
±
412-00-3
Climate Control System - General Information
412-00-3
GENERAL PROCEDURES
Air Conditioning (A/C) Clutch Air Gap Adjustment
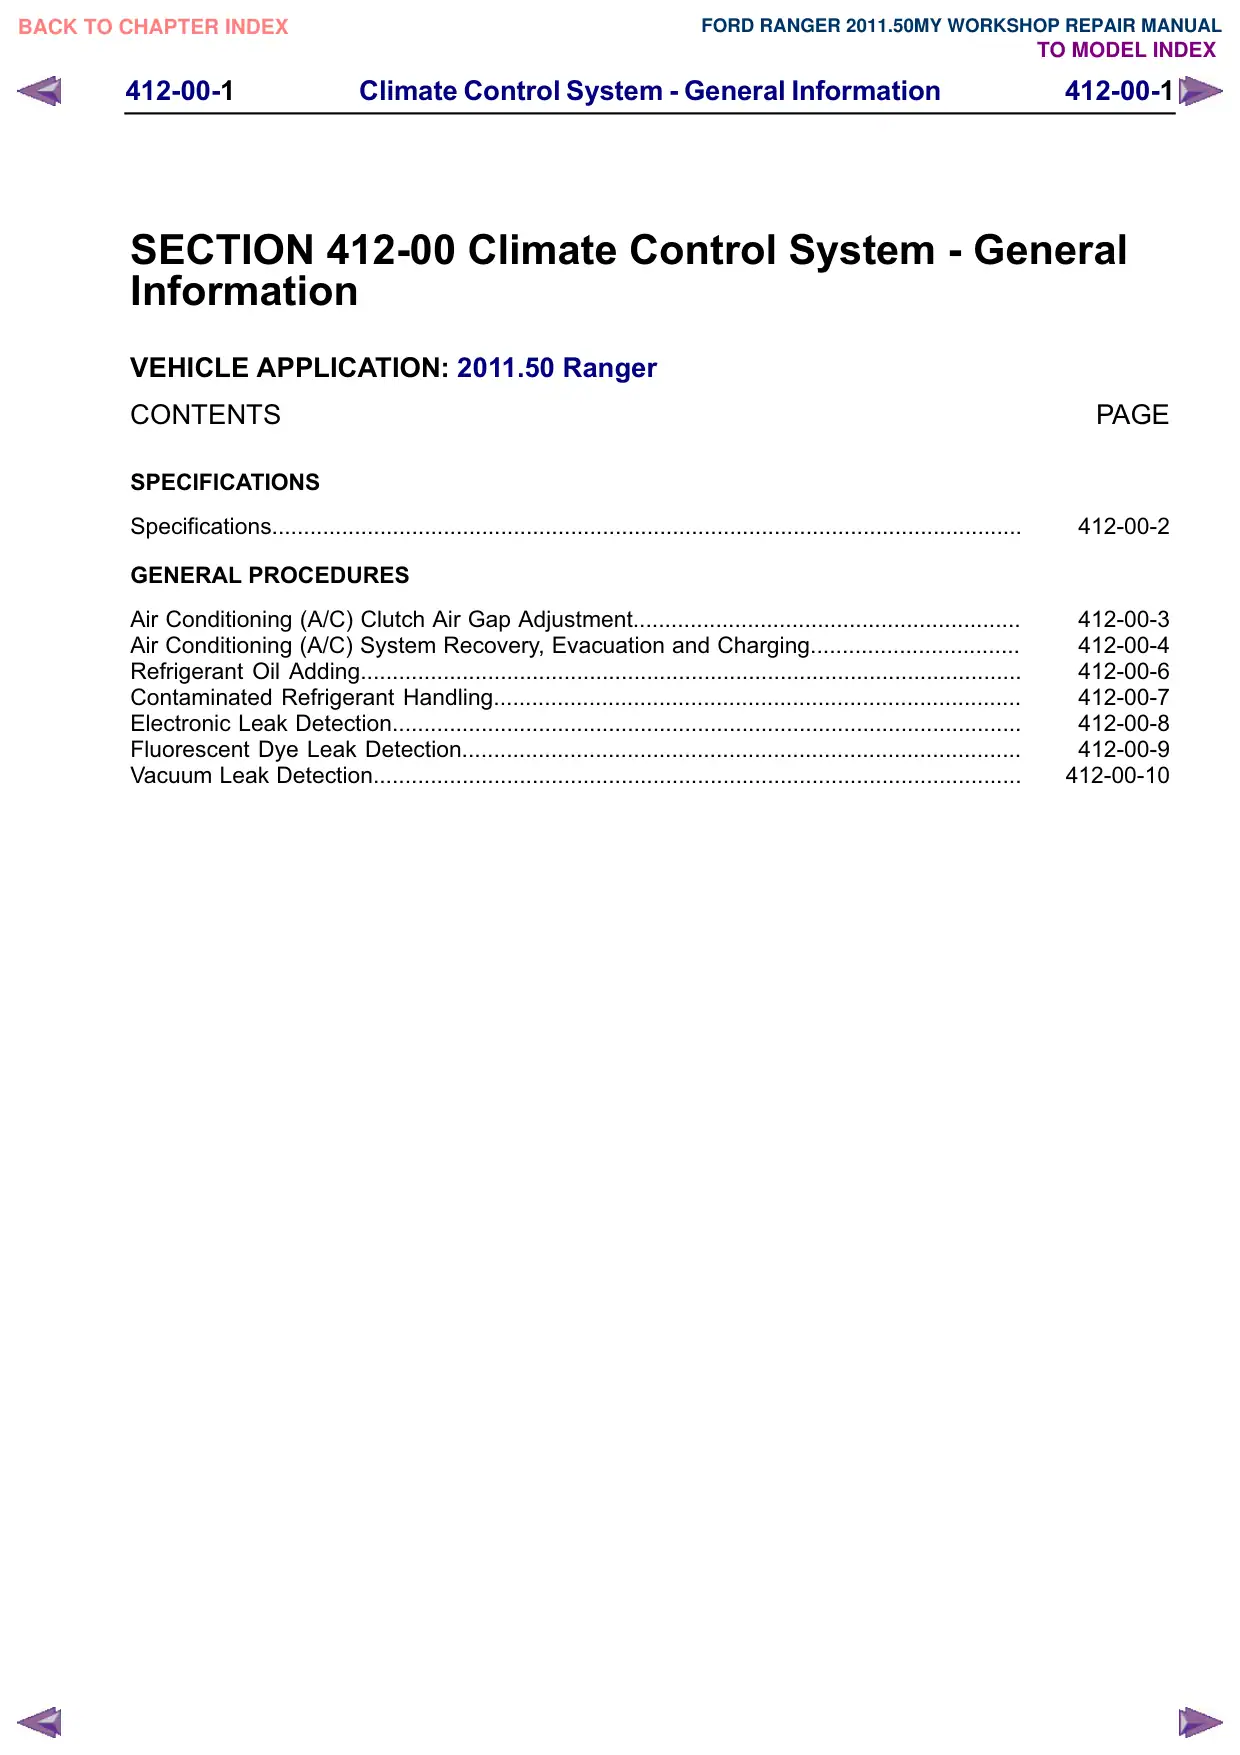
1. Check the gap A (measure the difference
between the engaged and disengaged positions
of the air conditioning clutch) at 60° intervals
around the circumference of the pulley. Operate
the air conditioning clutch several times with the
aid of a 5 A fused cable. Refer to the relevant
wiring diagram for the correct electrical
connection.
Refer to: Specifications (412-00 Climate Control
System - General Information, Specifications).
$
E92144
2.
E68442
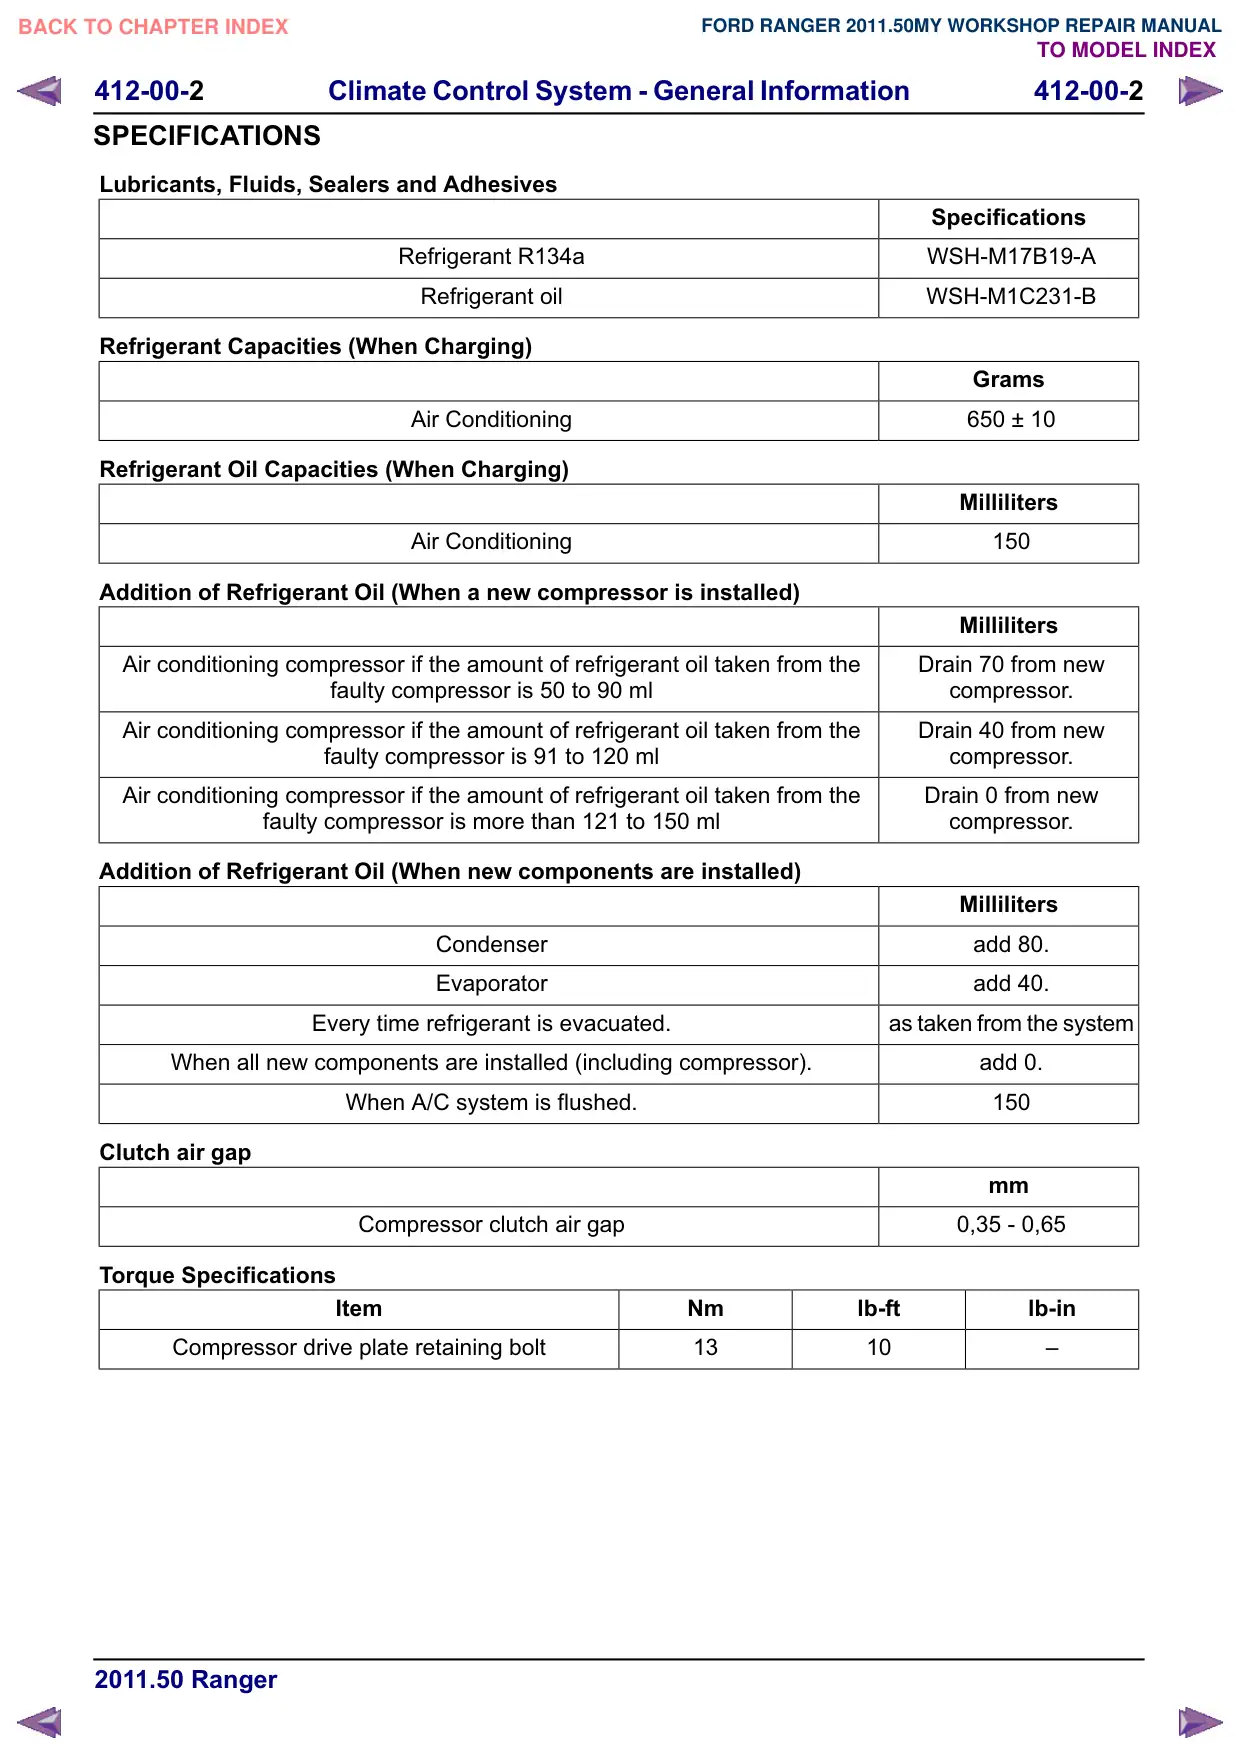
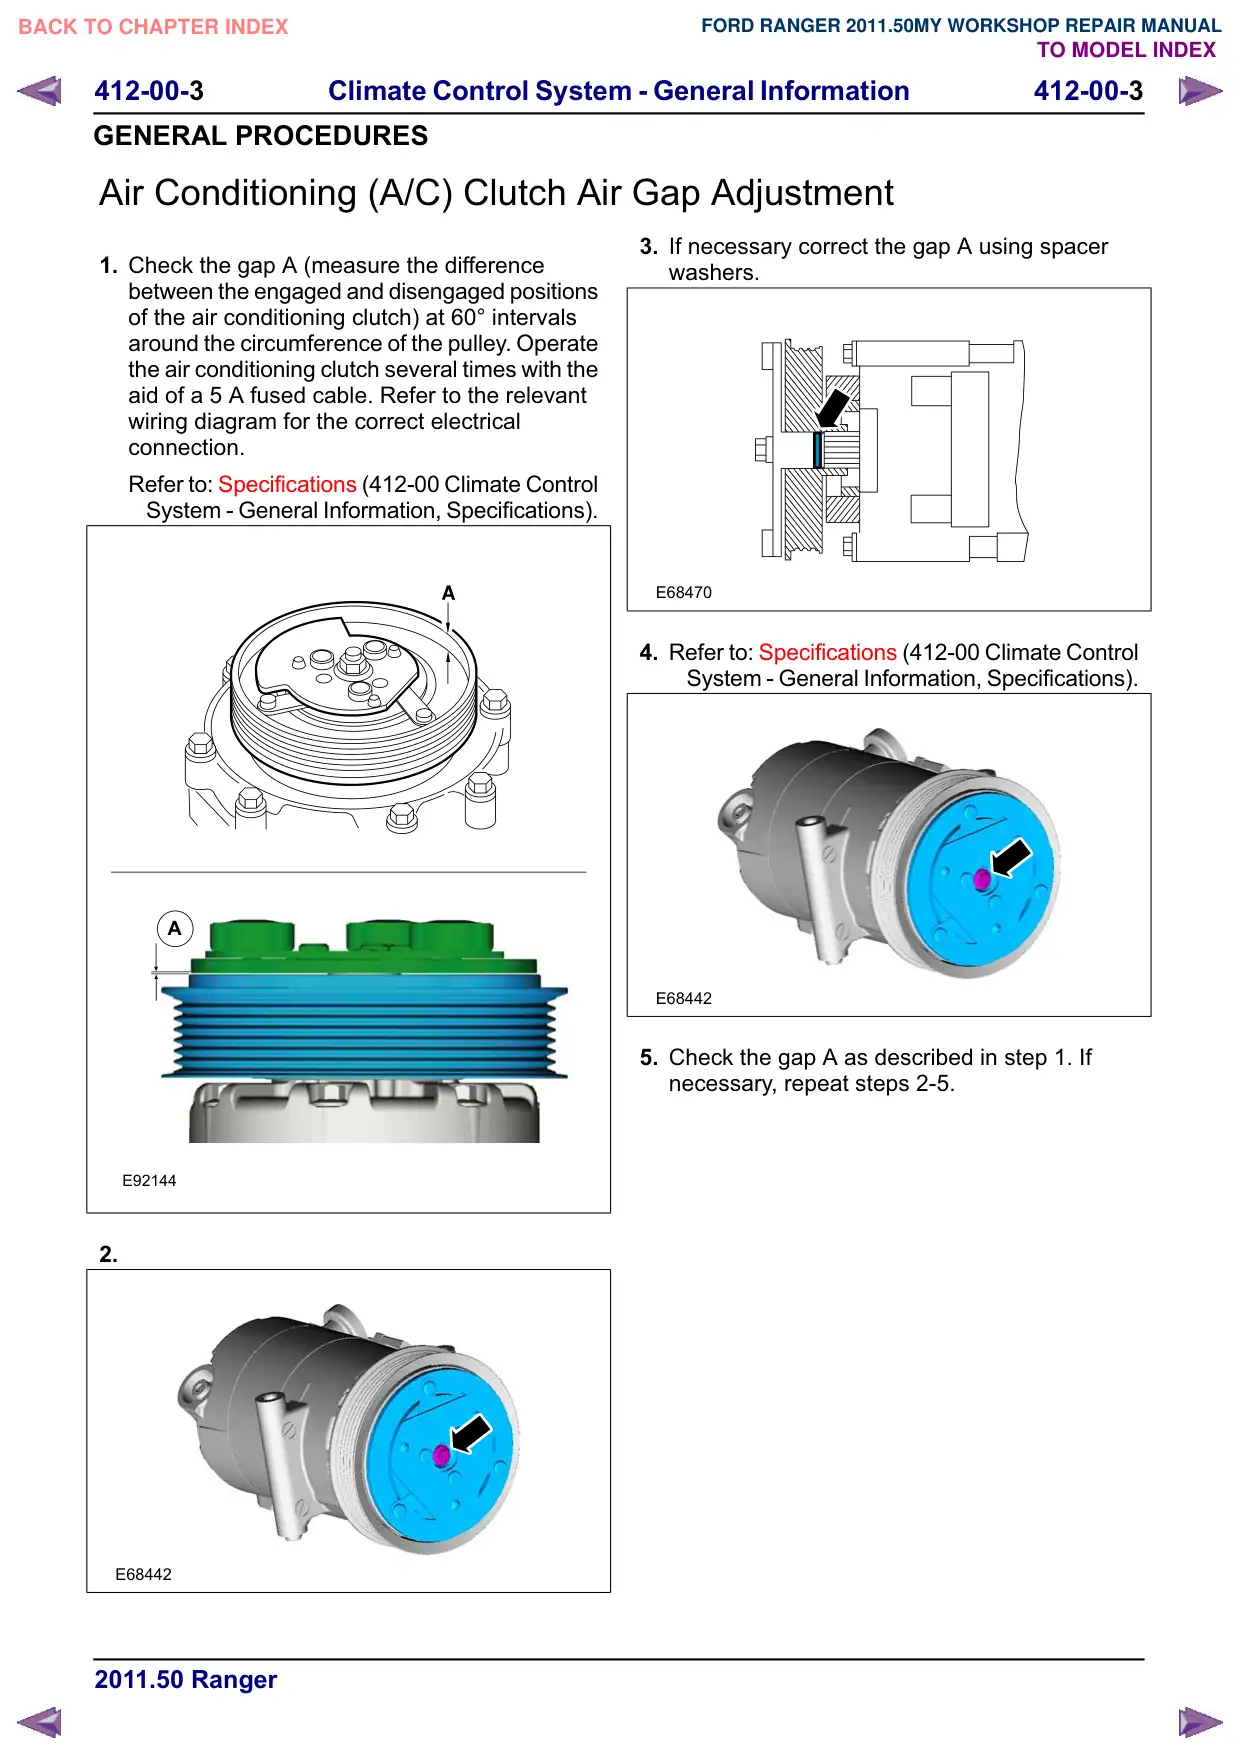
3. If necessary correct the gap A using spacer
washers.
E68470
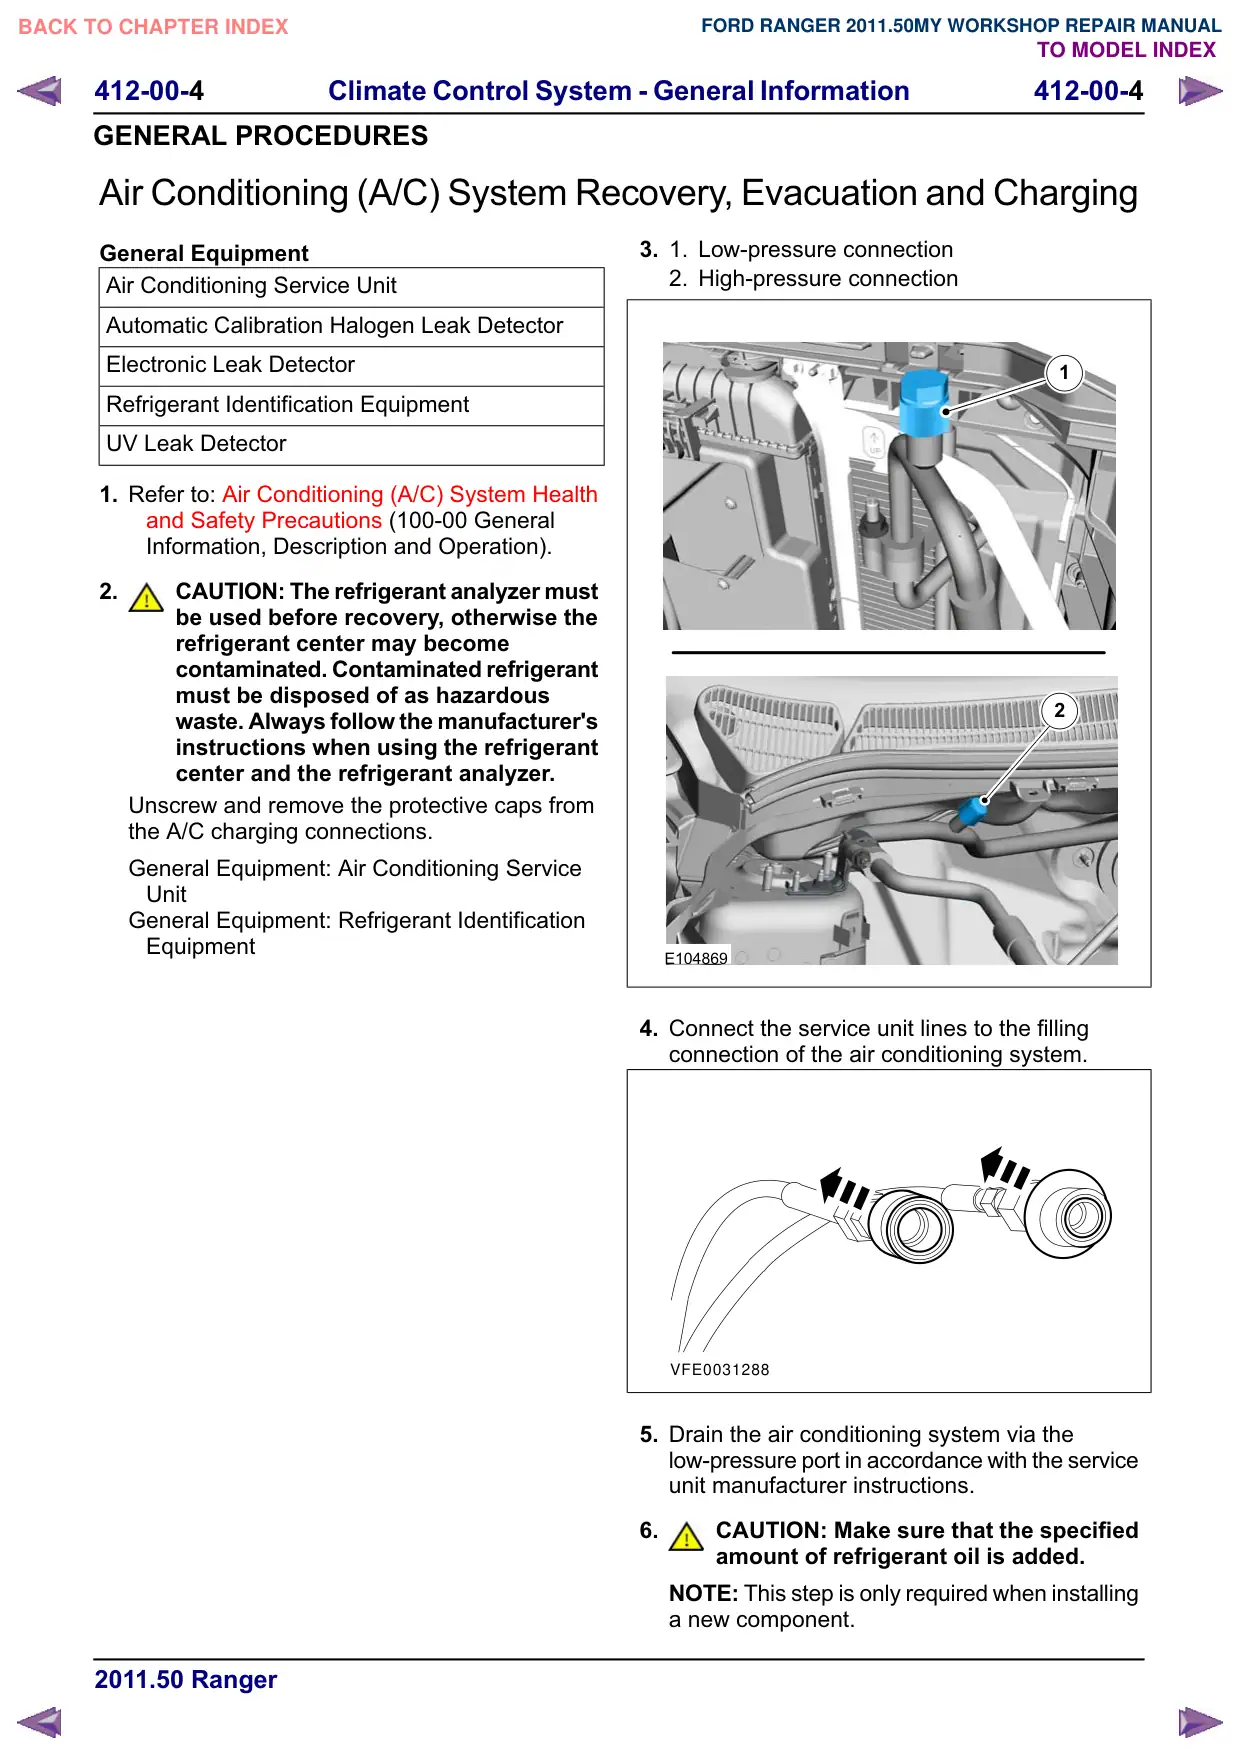
4. Refer to: Specifications (412-00 Climate Control
System - General Information, Specifications).
E68442
5. Check the gap A as described in step 1. If
necessary, repeat steps 2-5.
412-00-4
Climate Control System - General Information
412-00-4
GENERAL PROCEDURES
Air Conditioning (A/C) System Recovery, Evacuation and Charging
General Equipment
Air Conditioning Service Unit
Automatic Calibration Halogen Leak Detector
Electronic Leak Detector
Refrigerant Identification Equipment
UV Leak Detector
1. Refer to: Air Conditioning (A/C) System Health
and Safety Precautions (100-00 General
Information, Description and Operation).
2.
CAUTION: The refrigerant analyzer must
be used before recovery, otherwise the
refrigerant center may become
contaminated. Contaminated refrigerant
must be disposed of as hazardous
waste. Always follow the manufacturer's
instructions when using the refrigerant
center and the refrigerant analyzer.
Unscrew and remove the protective caps from
the A/C charging connections.
General Equipment: Air Conditioning Service
Unit
General Equipment: Refrigerant Identification
Equipment
3.
1.
Low-pressure connection
2. High-pressure connection
1
2
E104869
4. Connect the service unit lines to the filling
connection of the air conditioning system.
VFE0031288
5. Drain the air conditioning system via the
low-pressure port in accordance with the service
unit manufacturer instructions.
6.
CAUTION: Make sure that the specified
amount of refrigerant oil is added.
NOTE: This step is only required when installing
a new component.
412-00-5
Climate Control System - General Information
412-00-5
GENERAL PROCEDURES
Fill up with refrigerant oil.
Refer to: Specifications (412-00 Climate Control
System - General Information, Specifications).
Refer to: Refrigerant Oil Adding (412-00 Climate
Control System - General Information, General
Procedures).
7. Evacuate the air conditioning system in
accordance with the service unit manufacturer
instructions.
8. NOTE: The system is leak-tight if the pressure
increase does not exceed 20 mbar.
Perform the leak test, by closing the hand valves
on the gauge set, switching off the service unit
vacuum pump and observing the low pressure
gauge.
9. NOTE: This step is only necessary if the
pressure increase exceeds 20 mbar.
Locate and rectify any leaks in the A/C
refrigerant circuit using a leak tester.
General Equipment: UV Leak Detector
General Equipment: Electronic Leak Detector
General Equipment: Automatic Calibration
Halogen Leak Detector
10.Add refrigerant oil to the air conditioning system.
Refer to: Specifications (412-00 Climate Control
System - General Information, Specifications).
Refer to: Refrigerant Oil $GGLQJ (412-00 Climate
Control System - General Information, General
Procedures).
11. Fill the air conditioning system with liquid
through the high-pressure connection.
Refer to: Specifications (412-00 Climate Control
System - General Information, Specifications).
12.
1.
Open the shut-off valve on the high-pressure
side.
2. Switch the service unit to "Fill" mode and fill
the system with the specified quantity of
liquid refrigerant (R134a).
13.Fill the air conditioning system with gas through
the low-pressure connection.
Refer to: Specifications (412-00 Climate Control
System - General Information, Specifications).
14.
1.
Open the shut-off valve on the low-pressure
side.
2. Switch the service unit to "Fill" mode and fill
the system with the specified quantity of
gaseous refrigerant.
3. Add the remaining amount of refrigerant with
the air conditioning switched on. To do so
run the engine at about 1200-1500 rev/min.
Set the air conditioning system to full cooling
power and fresh air mode. Set the blower
motor to the highest setting. Fill with the
remainder of the specified fill capacity.
15.Disconnect the service unit.
16.
1.
Close the shut-off valve.
2. Switch off the service unit.
3. Disconnect the service unit lines from the
filling connections of the air conditioning
system.
4. Screw the protective caps onto the charging
connections.
17.Install all components in reverse order.
412-00-6
Climate Control System - General Information
412-00-6
GENERAL PROCEDURES
Refrigerant Oil Adding
CAUTION: Collect the refrigerant oil in a
clean measuring cylinder.
1. NOTE: This step only needs to be carried out
when removing the A/C compressor.
NOTE: Rotate the compressor shaft at least 6
to 8 turns when draining the refrigerant oil.
Drain the refrigerant oil from the defective A/C
compressor and dispose of it.
2. CAUTIONS:
The refrigerant oil top-up quantity must
not exceed the refrigerant oil fill
quantity.
If other A/C components are being
renewed in addition to the A/C
compressor, there is no need to top up
with additional refrigerant oil, apart from
filling the compressor.
Top up with the calculated quantity of new
refrigerant oil. See: Specifications (412-00
Heating, Ventilation, Air-Conditioning - General
information, Specifications).
412-00-7
Climate Control System - General Information
412-00-7
GENERAL PROCEDURES
Contaminated Refrigerant Handling
1.
CAUTION: Any R134a or R12 refrigerant
which is contaminated with unsuitable
refrigerant should be extracted only by
means of a suitable servicing unit
designed for the purpose of collecting
and storing contaminated refrigerant,
so that the spread to other vehicles can
be prevented.
Use refrigerant identification equipment to check
that there is contaminated refrigerant in the air
conditioning system.
2. Inform the customer about the additional costs
involved to repair the system because of the
contamination.
3. Extract the contaminated refrigerant.
412-00-8
Climate Control System - General Information
412-00-8
GENERAL PROCEDURES
Electronic Leak Detection
Leak detection
4. Refer to: Air Conditioning (A/C) System Health
and Safety Precautions (100-00 General
Information, Description and Operation).
5. WARNINGS:
Before starting leak detection, make
sure that the area where it is to be done
is well ventilated. If the surrounding air
is contaminated with refrigerant gas, the
leak detector will indicate this gas all
the time. Odors from cigarette smoke
and other chemicals such as antifreeze,
diesel fuel, disc brake cleaner, or other
cleaning solvents can cause the same
problem. Prevent air movement while
performing leak detection.
The refrigerant identification equipment
must be used before attaching the
manifold gauge set. Otherwise the
manifold gauge set may become
contaminated. Contaminated refrigerant
must be disposed of as special waste.
Follow the manufacturer's instructions
when working with the service unit.
NOTE: At 24°C with the engine switched off,
both manifold gauges should show 4.1 to 5.5
bar.
Attach the manifold gauge set to the service
gauge port valves.
6. For the leak test, close the manual valves on
the gauge set.
7. If little or no pressure is indicated, charge the
system with approx. 300g of refrigerant.
Refer to: Air Conditioning (A/C) System
Recovery, Evacuation and Charging (412-00
Climate Control System - General Information,
General Procedures).
8.
WARNING: Make sure that the surface
is clean and free of foreign material.
NOTE: Make sure that the leak detector is
calibrated and set in accordance with the
operating instructions.
Use the R-134a automatic calibration halogen
leak detector to leak test the refrigerant system.
Follow the instructions included with leak
detector for handling and operation techniques.
9.
CAUTION: Do not let the detector
sensing tip contact any substance as
this could cause a false reading and
may damage the sensor.
Position the sensor about 5mm from the point
to be checked. Circle each fitting completely.
10.If a leak is detected, repeat the leak detection
process after blowing away the chemical
detected with compressed air.
11. If a leak is detected again, extract the refrigerant
under suction.
Refer to: Air Conditioning (A/C) System
Recovery, Evacuation and Charging (412-00
Climate Control System - General Information,
General Procedures).
412-00-
Climate Control System - General Information
412-00-
GENERAL PROCEDURES
Fluorescent Dye Leak Detection
General Equipment
UV Leak Detector
Leak detection
CAUTION: Make sure that the vehicle is in
a low sunlight area before performing any
actions.
12.Refer to: Air Conditioning (A/C) System Health
and Safety Precautions (100-00 General
Information, Description and Operation).
13.NOTE: The exact location of leaks can be
pinpointed by the bright yellow - green glow of
the tracer dye. Since more than one leak can
exist, always inspect each component.
Locate the leaks. Check all components,
fittings and lines of the A/C system for leaks.
General Equipment: UV Leak Detector
14.After the leak is found and rectified, remove any
traces of dye with a general purpose solvent.
15.Check the repair by operating the system for
some minutes and inspecting with the UV lamp
again.
412-00-10
Climate Control System - General Information
412-00-10
GENERAL PROCEDURES
Vacuum Leak Detection
1. Carry out the air conditioning (A/C) system
recovery procedure.
Refer to: Air Conditioning (A/C) System
Recovery, Evacuation and Charging (412-00
Climate Control System - General Information,
General Procedures).