Electronic Engine Controls – 2.2L Duratorq-TDCi (88kW/120PS)
- Puma/2.2L Duratorq-TDCi (96kW/130PS) - Puma/2.2L Duratorq-TDCi (110kW/150PS) -
303-14B-5
303-14B-5
Puma/3.2L Duratorq-TDCi (148kW/200PS) - Puma
REMOVAL AND INSTALLATION
Crankshaft Position (CKP) Sensor – 2.2L Duratorq-TDCi
(88kW/120PS) - Puma/2.2L Duratorq-TDCi (96kW/130PS) -
Puma/2.2L Duratorq-TDCi (110kW/150PS) - Puma(29 230 0)
Removal
NOTE: Removal steps in this procedure may
contain installation details.
1. Refer to: Battery Disconnect and Connect
(414-01 Battery, Mounting and Cables,
General Procedures).
2. Refer to: Lifting (100-02 Jacking and Lifting,
Description and Operation).
3. Torque: 7 Nm
E130648
Installation
1.
CAUTION: Only rotate the crankshaft
clockwise.
Rotate the crankshaft until a flywheel tooth is
visible through the CKP sensor housing.
E71692
2.
CAUTION: The tip of the sensor must
rest on a flywheel tooth.
NOTE: Make sure that a new component is
installed.
To install, reverse the removal procedure.
Electronic Engine Controls – 2.2L Duratorq-TDCi (88kW/120PS)
- Puma/2.2L Duratorq-TDCi (96kW/130PS) - Puma/2.2L Duratorq-TDCi (110kW/150PS) -
303-14B-6
303-14B-6
Puma/3.2L Duratorq-TDCi (148kW/200PS) - Puma
REMOVAL AND INSTALLATION
Crankshaft Position (CKP) Sensor – 3.2L Duratorq-TDCi
(148kW/200PS) - Puma(29 230 0)
Removal
NOTE: Removal steps in this procedure may
contain installation details.
1. Refer to: Battery Disconnect and Connect
(414-01 Battery, Mounting and Cables,
General Procedures).
2. Refer to: Lifting (100-02 Jacking and Lifting,
Description and Operation).
3. Torque: 25 Nm
E130647
4. Torque: 7 Nm
E130648
Installation
1.
CAUTION: Only rotate the crankshaft
clockwise.
Rotate the crankshaft until a flywheel tooth is
visible through the CKP sensor housing.
E71692
2.
CAUTION: The tip of the sensor must
rest on a flywheel tooth.
NOTE: Make sure that a new component is
installed.
To install, reverse the removal procedure.
Electronic Engine Controls – 2.2L Duratorq-TDCi (88kW/120PS)
- Puma/2.2L Duratorq-TDCi (96kW/130PS) - Puma/2.2L Duratorq-TDCi (110kW/150PS) -
303-14B-
303-14B-
Puma/3.2L Duratorq-TDCi (148kW/200PS) - Puma
REMOVAL AND INSTALLATION
Powertrain Control Module (PCM)(29 200 0)
General Equipment
Ford Diagnostic Equipment
Removal
CAUTION: If a new PCM is to be installed,
upload the PCM configuration information
using the Programmable Modules
Installation Routine, prior to commencing
the removal of the PCM.
NOTE: Removal steps in this procedure may
contain installation details.
All vehicles
1. Refer to: Battery Disconnect and Connect
(414-01 Battery, Mounting and Cables,
General Procedures).
2. Refer to: Battery (414-01 Battery, Mounting and
Cables, Removal and Installation).
3. Refer to: Battery Tray (414-01 Battery, Mounting
and Cables, Removal and Installation).
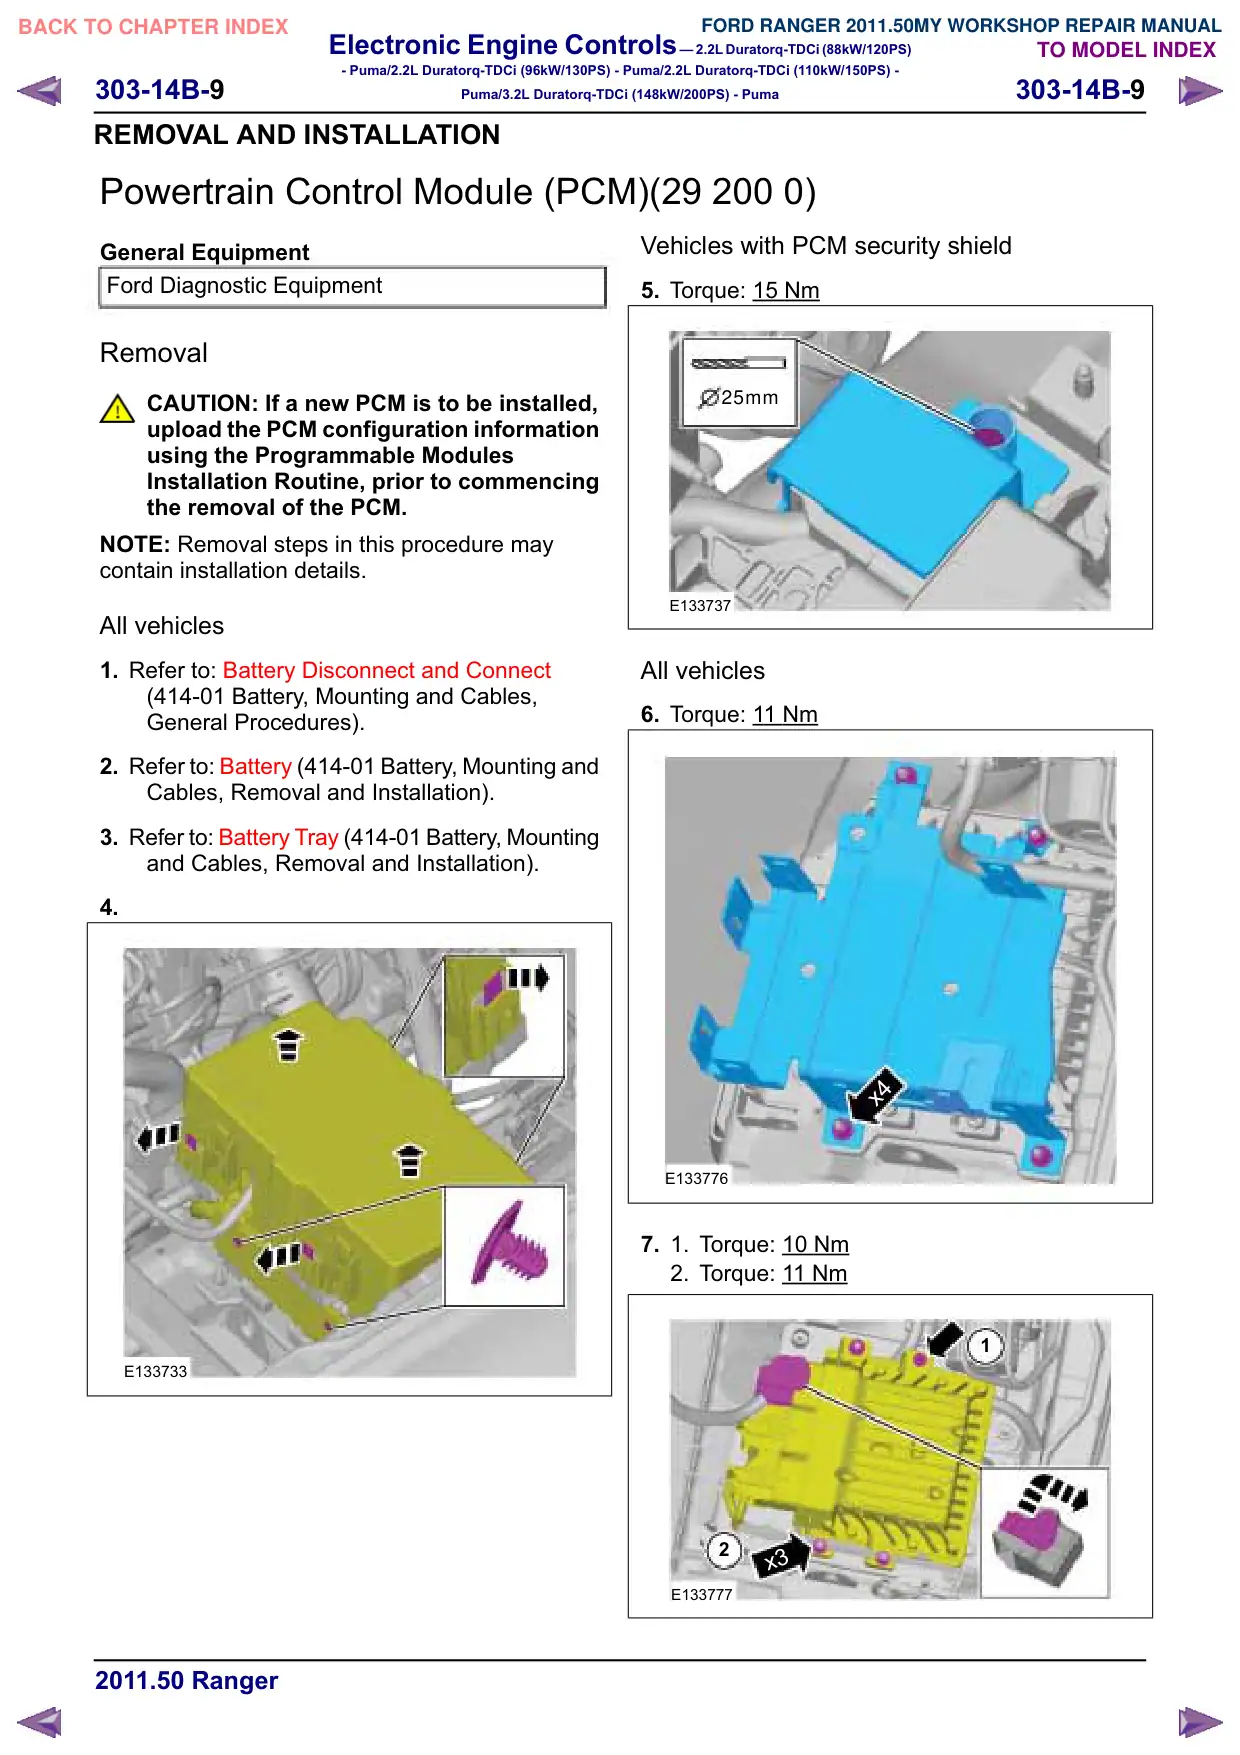
4.
E133733
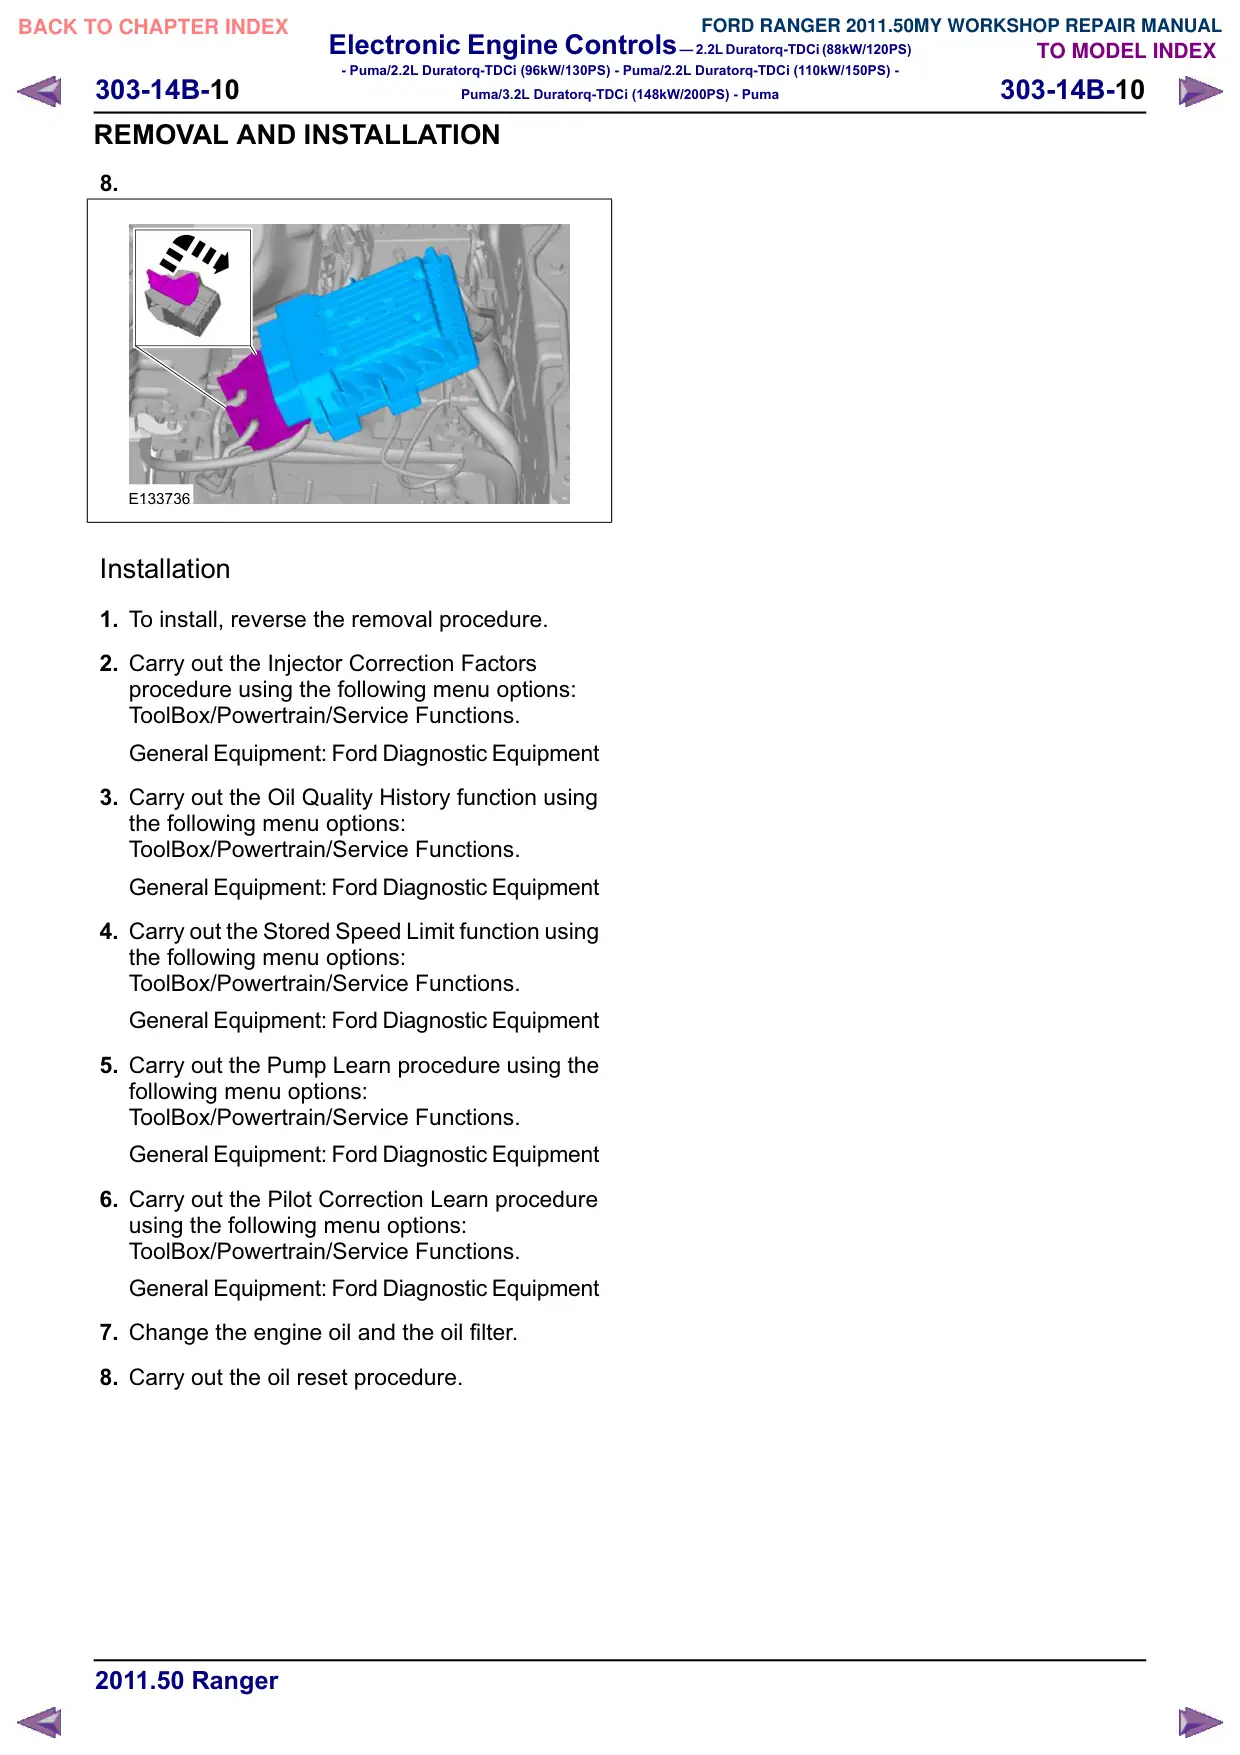
Vehicles with PCM security shield
5. Torque: 15
Nm
25mm
E133737
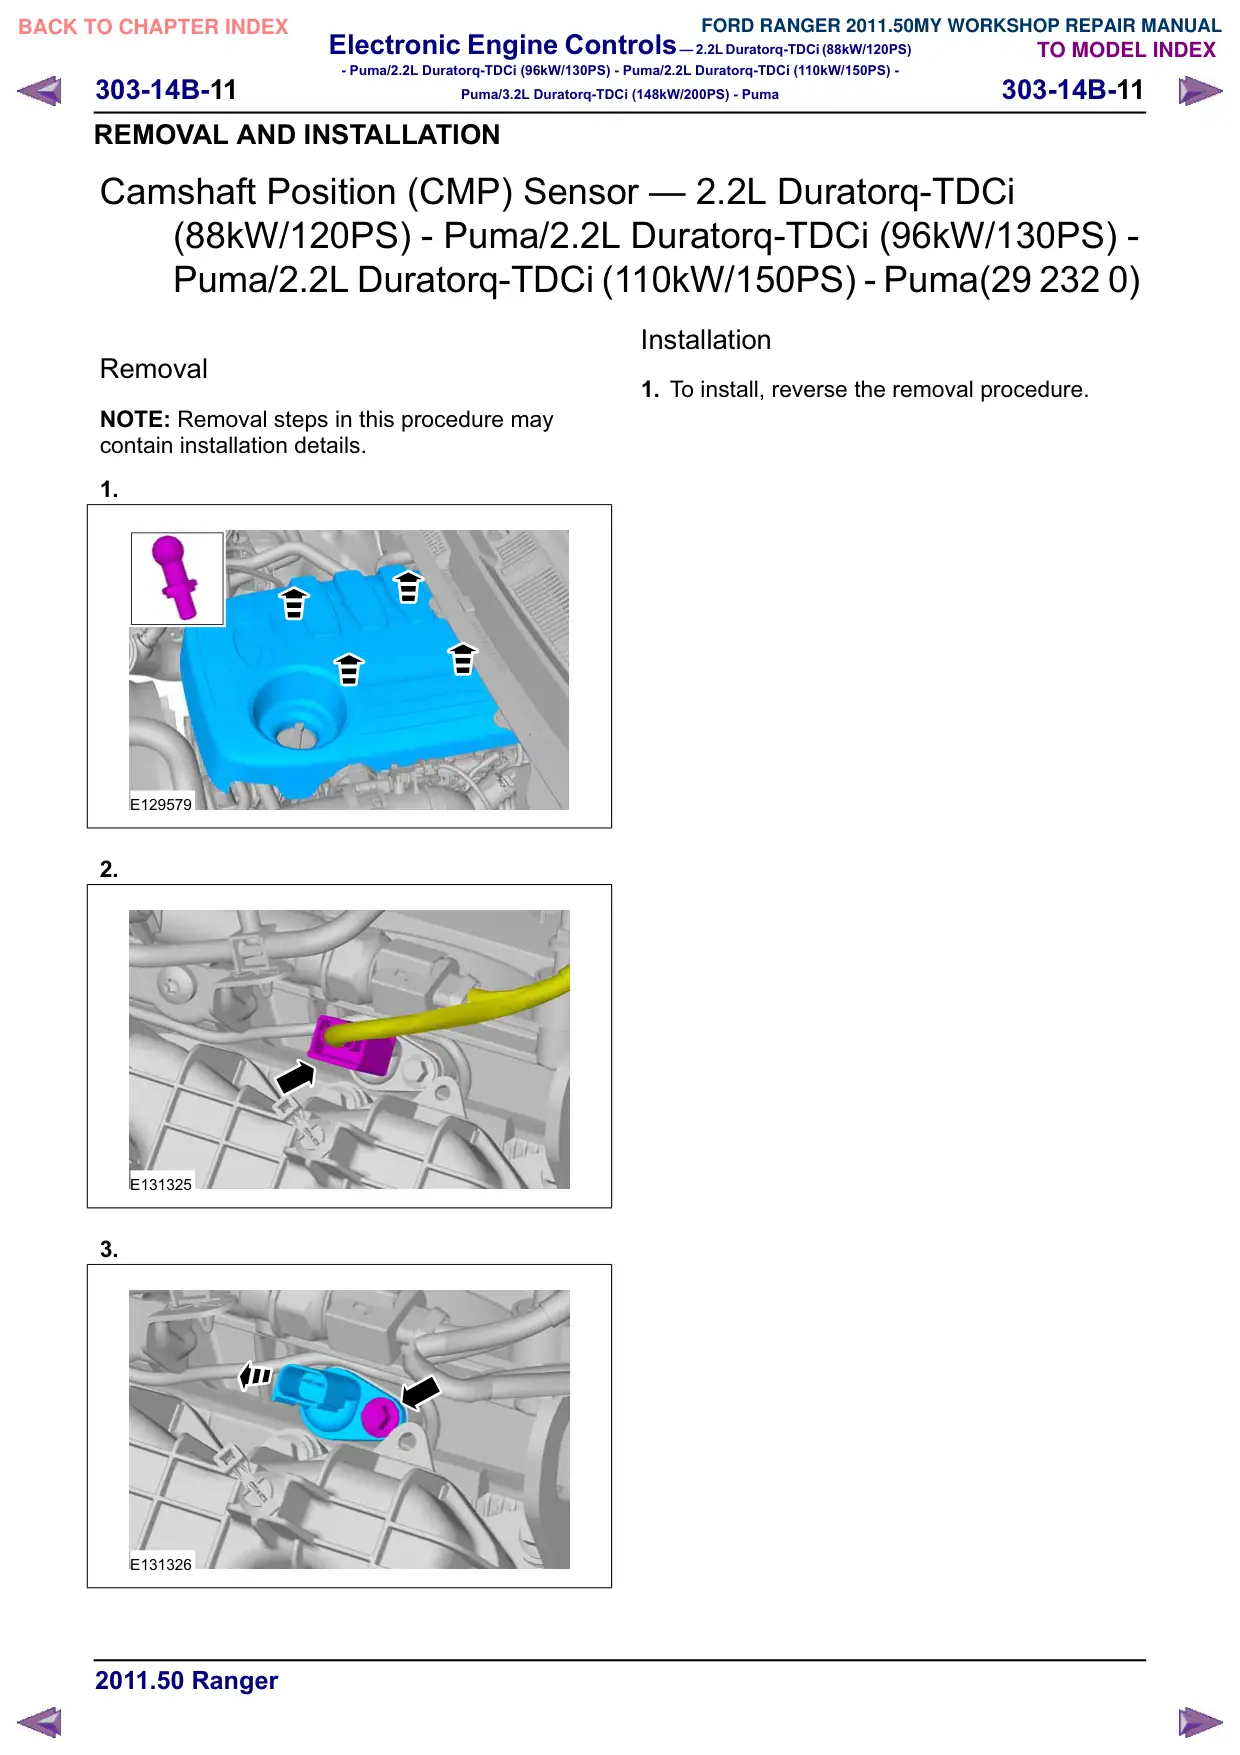
All vehicles
6. Torque: 1 Nm
1
x4
E133776
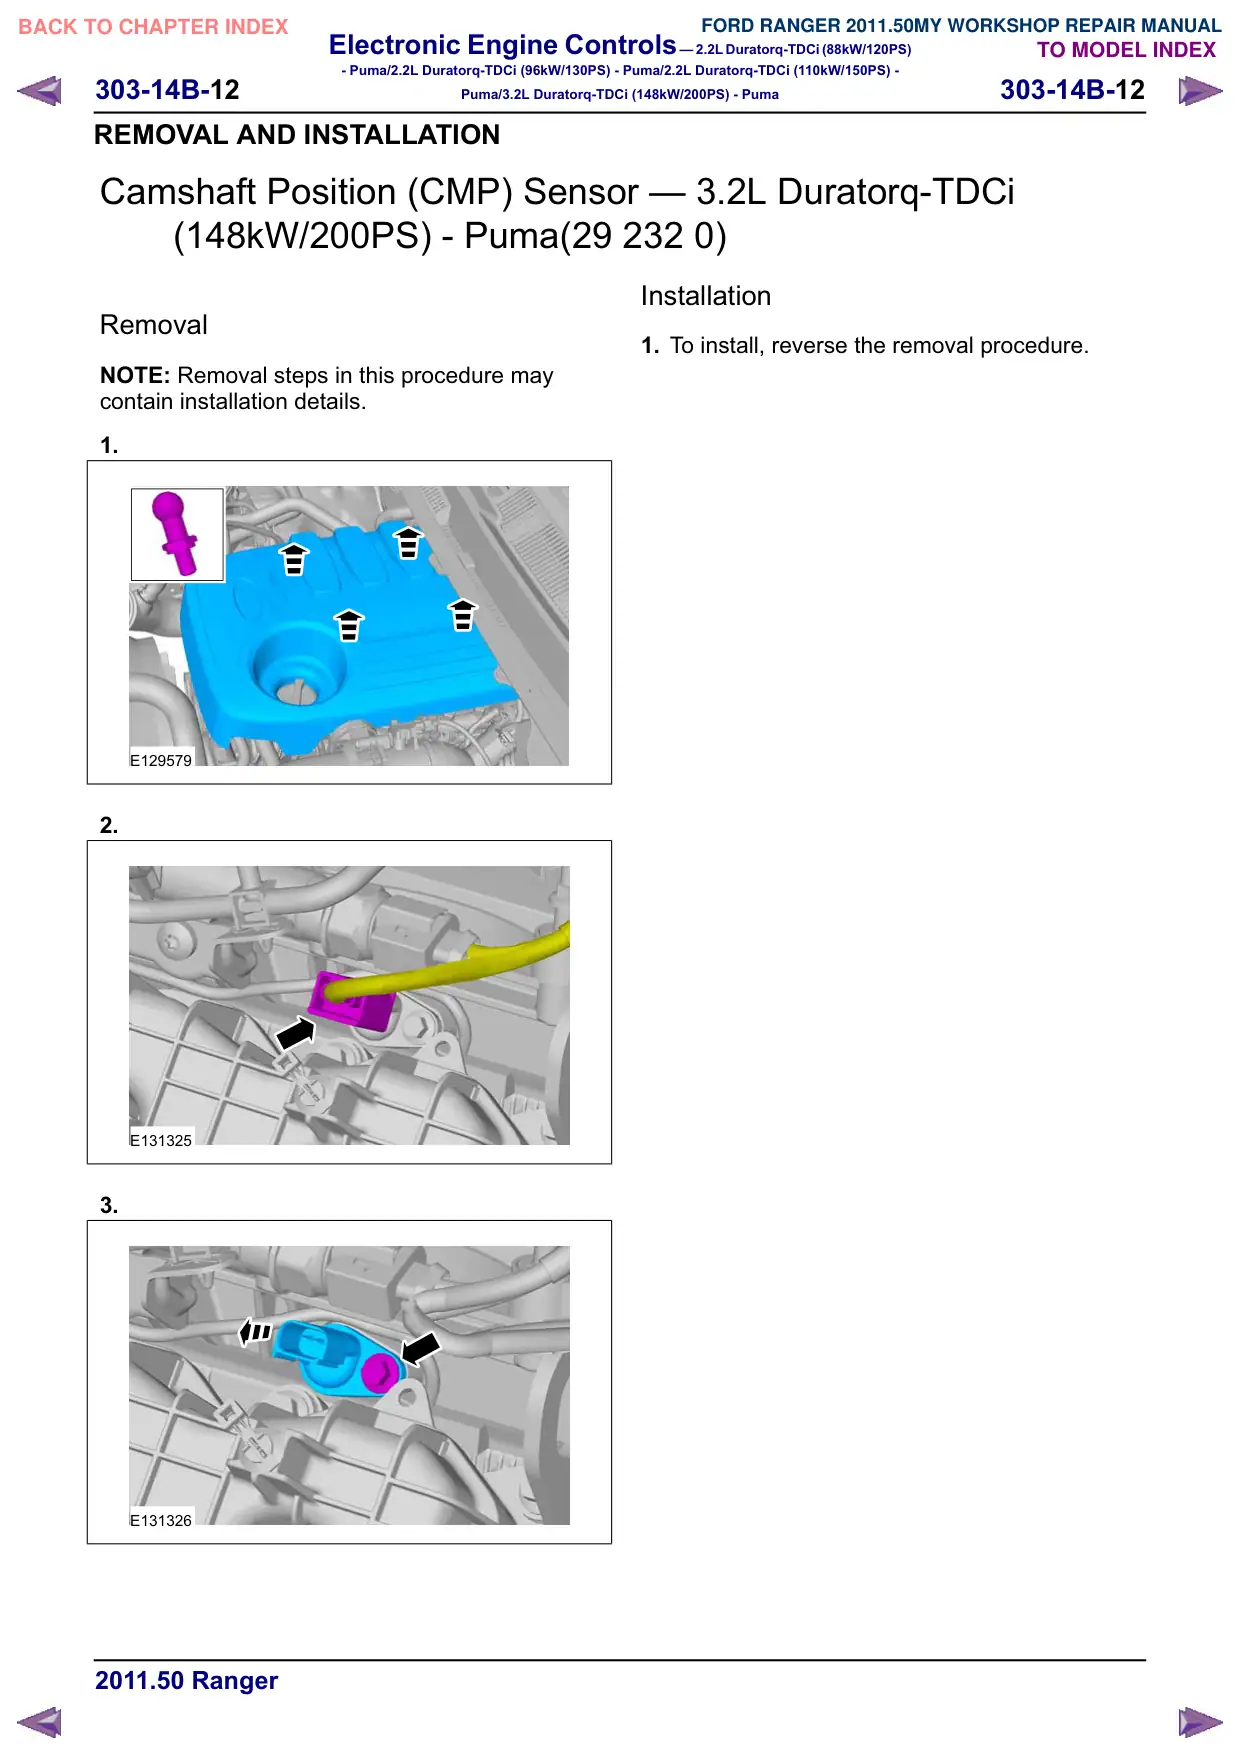
7.
1.
Torque: 10
Nm
2. Torque: 11 Nm
1
2
x3
E133777
Electronic Engine Controls – 2.2L Duratorq-TDCi (88kW/120PS)
- Puma/2.2L Duratorq-TDCi (96kW/130PS) - Puma/2.2L Duratorq-TDCi (110kW/150PS) -
303-14B-10
303-14B-10
Puma/3.2L Duratorq-TDCi (148kW/200PS) - Puma
REMOVAL AND INSTALLATION
8.
E133736
Installation
1. To install, reverse the removal procedure.
2. Carry out the Injector Correction Factors
procedure using the following menu options:
ToolBox/Powertrain/Service Functions.
General Equipment: Ford Diagnostic Equipment
3. Carry out the Oil Quality History function using
the following menu options:
ToolBox/Powertrain/Service Functions.
General Equipment: Ford Diagnostic Equipment
4. Carry out the Stored Speed Limit function using
the following menu options:
ToolBox/Powertrain/Service Functions.
General Equipment: Ford Diagnostic Equipment
5. Carry out the Pump Learn procedure using the
following menu options:
ToolBox/Powertrain/Service Functions.
General Equipment: Ford Diagnostic Equipment
6. Carry out the Pilot Correction Learn procedure
using the following menu options:
ToolBox/Powertrain/Service Functions.
General Equipment: Ford Diagnostic Equipment
7. Change the engine oil and the oil filter.
8. Carry out the oil reset procedure.