Rear Drive Axle/Differential
205-02-4
205-02-4
GENERAL PROCEDURES
Differential Draining and Filling
1. For additional information, refer to: Lifting
(100-02 Jacking and Lifting, Description
and Operation).
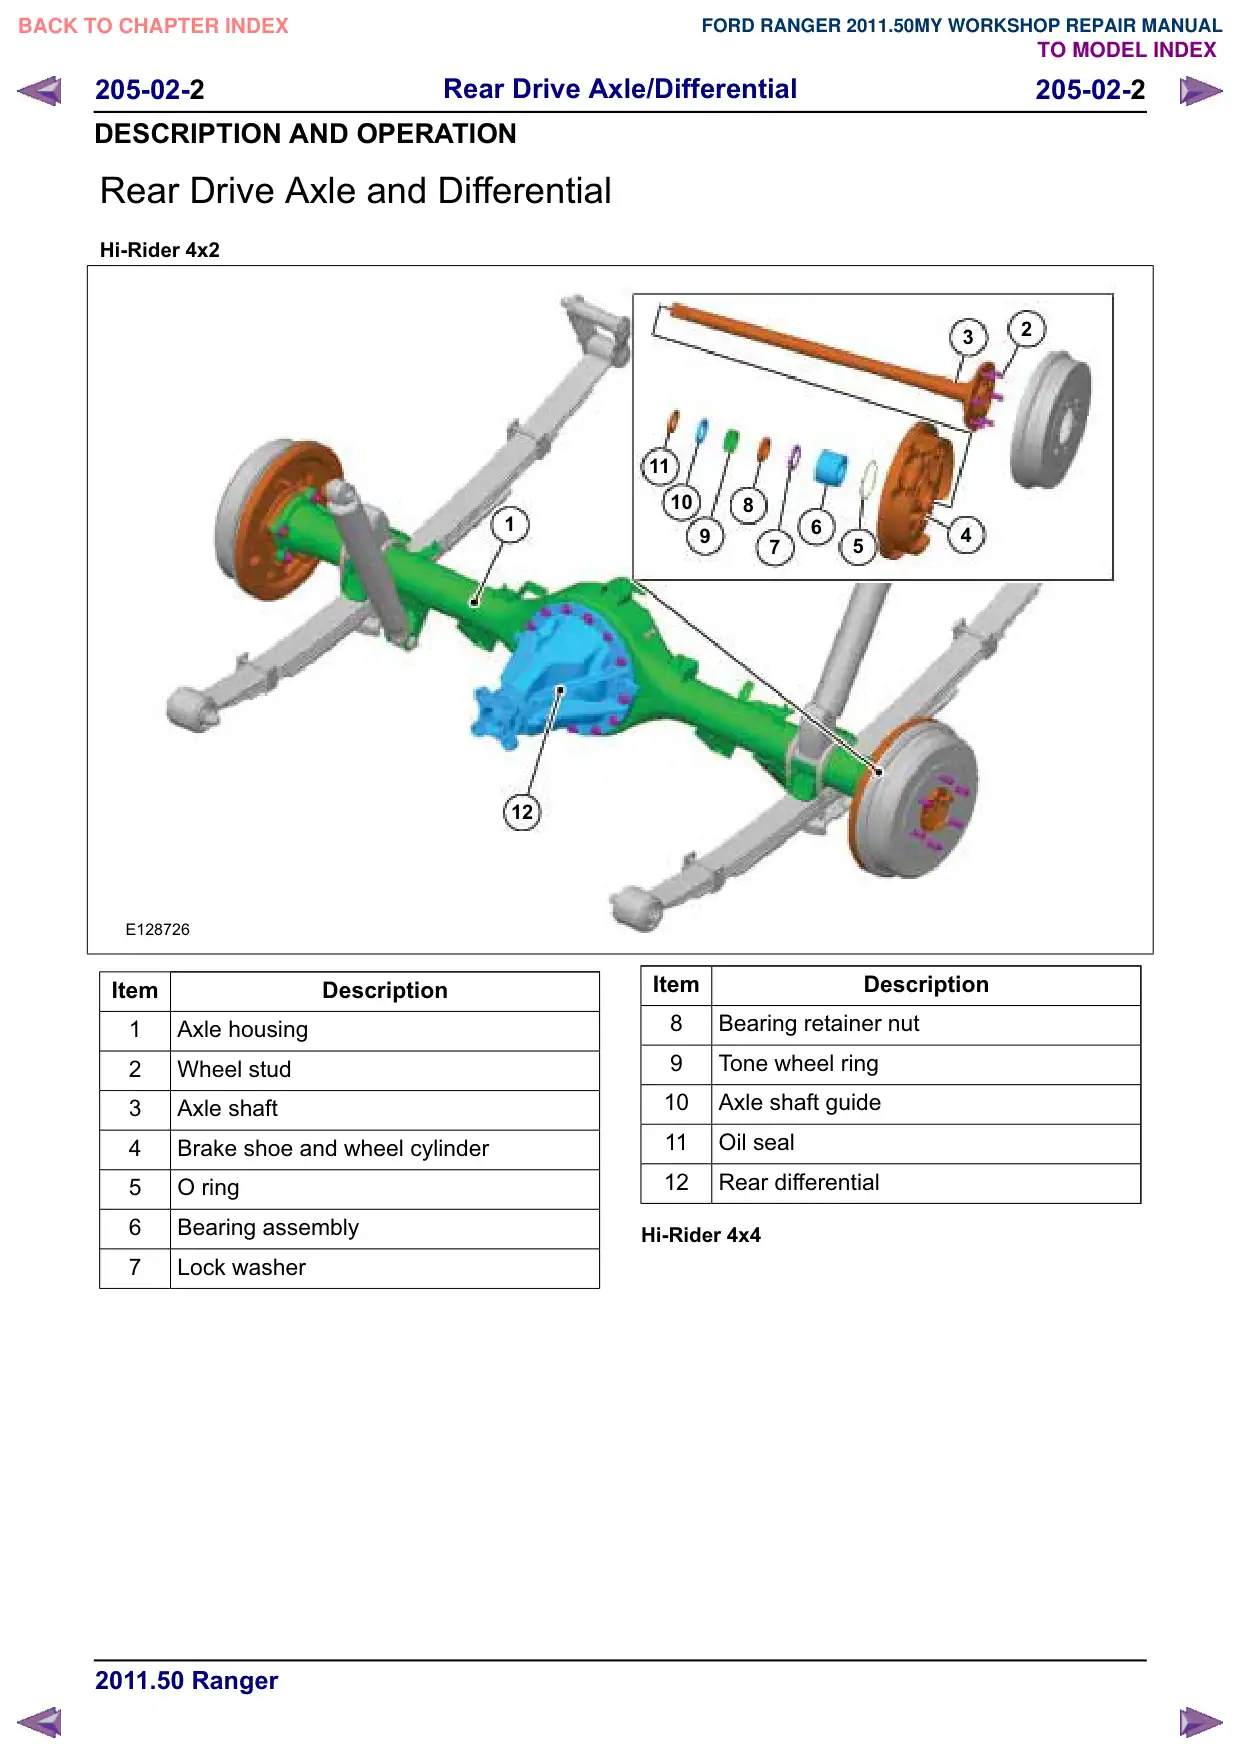
2. Remove the oil-fill plug.
E132032
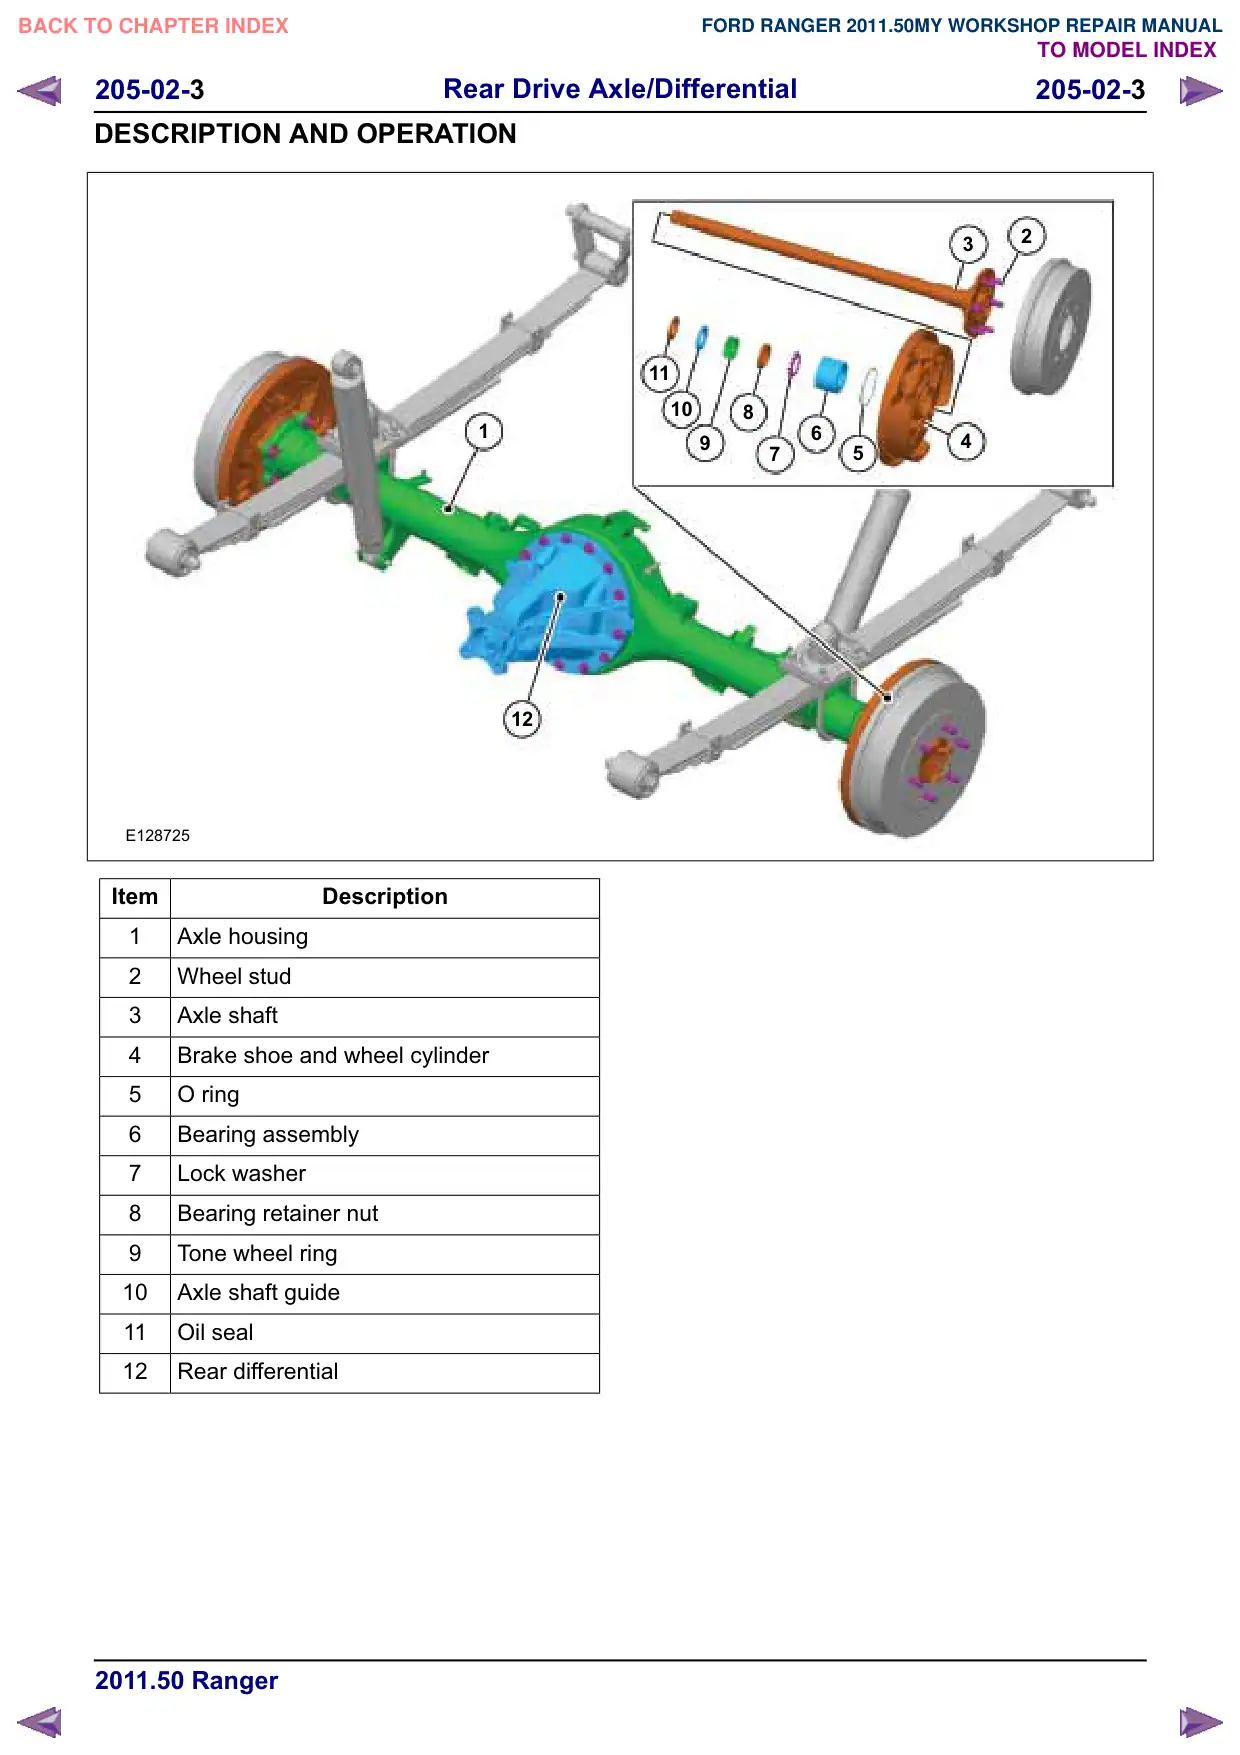
3. Remove the drain plug and drain the oil.
E132033
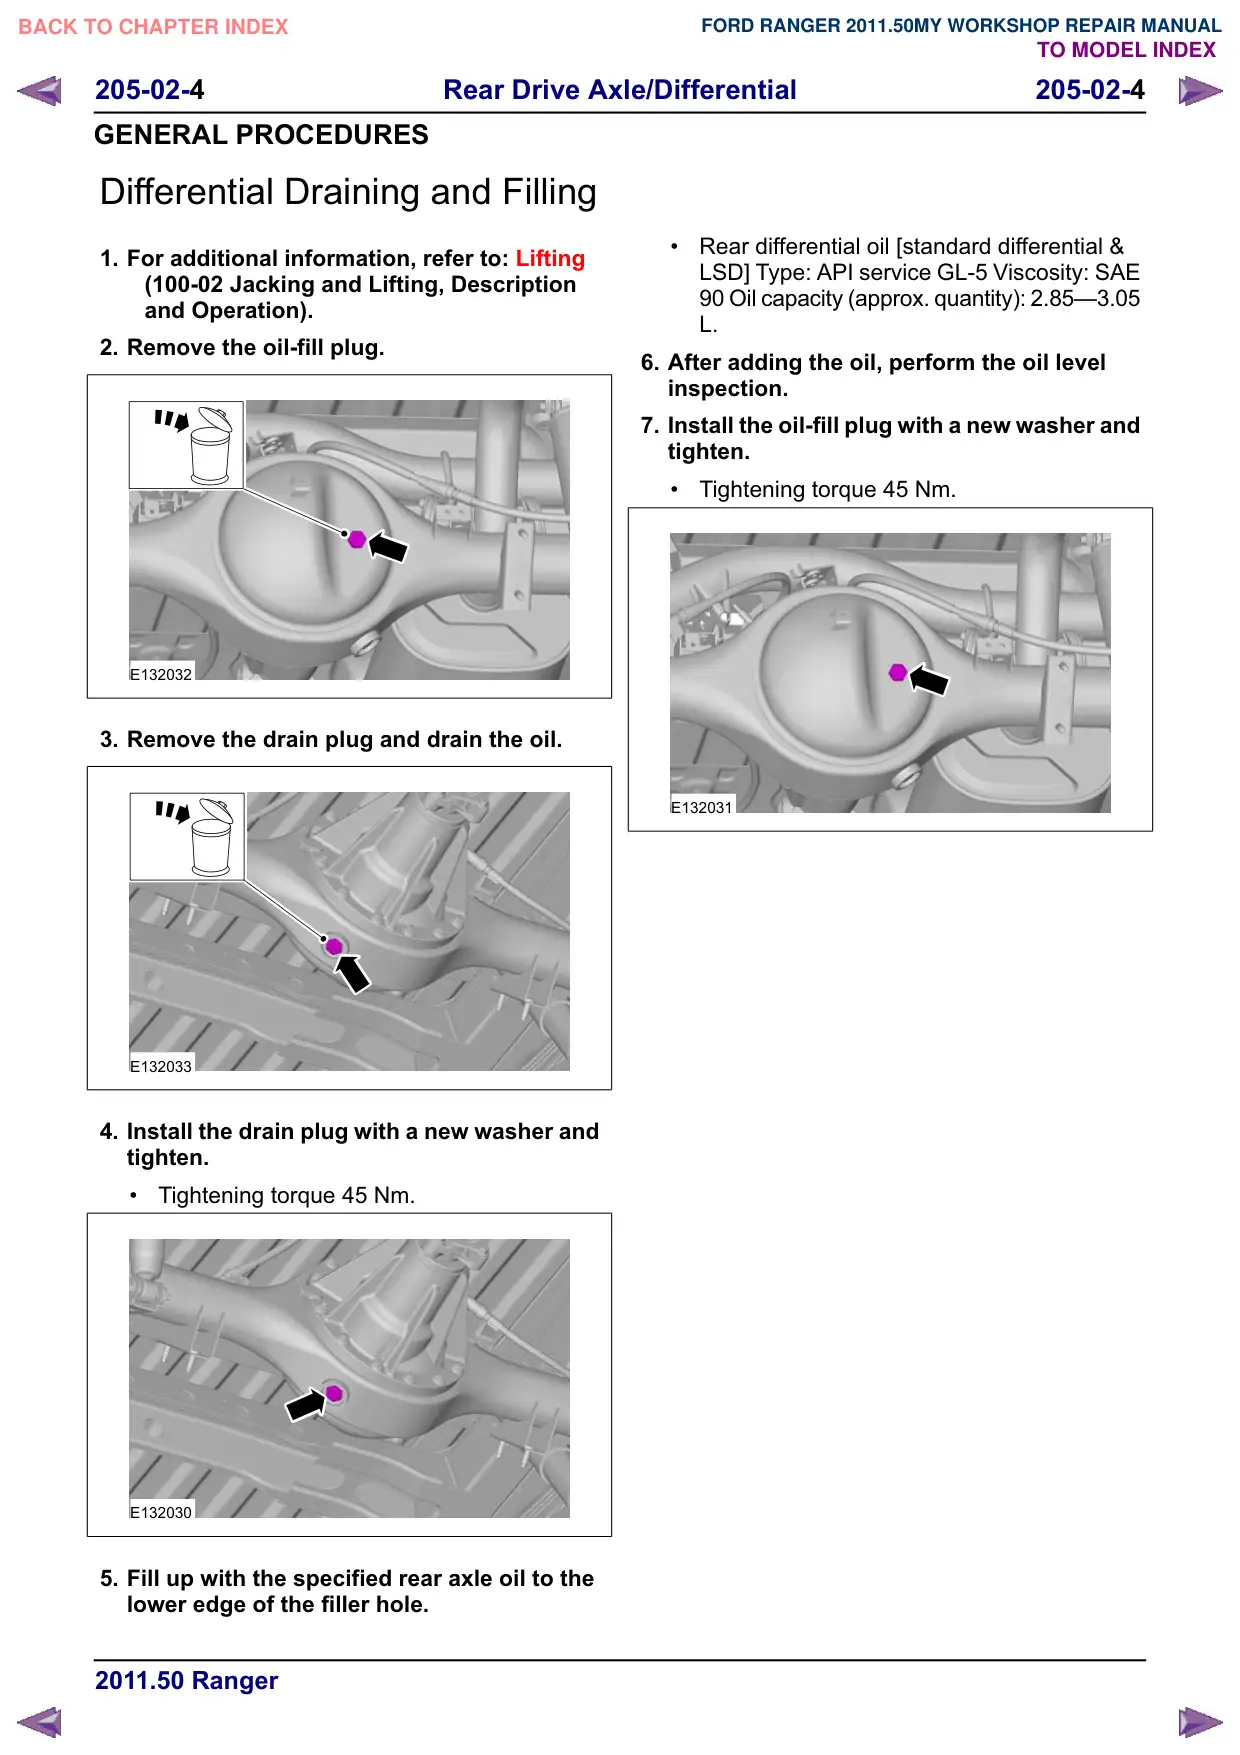
4. Install the drain plug with a new washer and
tighten.
Tightening torque 45 Nm.
E132030
5. Fill up with the specified rear axle oil to the
lower edge of the filler hole.
Rear differential oil [standard differential &
LSD] Type: API service GL-5 Viscosity: SAE
90 Oil capacity (approx. quantity): 2.85–3.05
L.
6. After adding the oil, perform the oil level
inspection.
7. Install the oil-fill plug with a new washer and
tighten.
Tightening torque 45 Nm.
E132031
Rear Drive Axle/Differential
205-02-5
205-02-5
REMOVAL AND INSTALLATION
Axle Assembly – 2WD
General Equipment
Trolley Jack
Removal
NOTE: Removal steps in this procedure may
contain installation details.
1. Refer to: Wheel and Tire (204-04 Wheels and
Tires, Removal and Installation).
2. Refer to: Lifting (100-02 Jacking and Lifting,
Description and Operation).
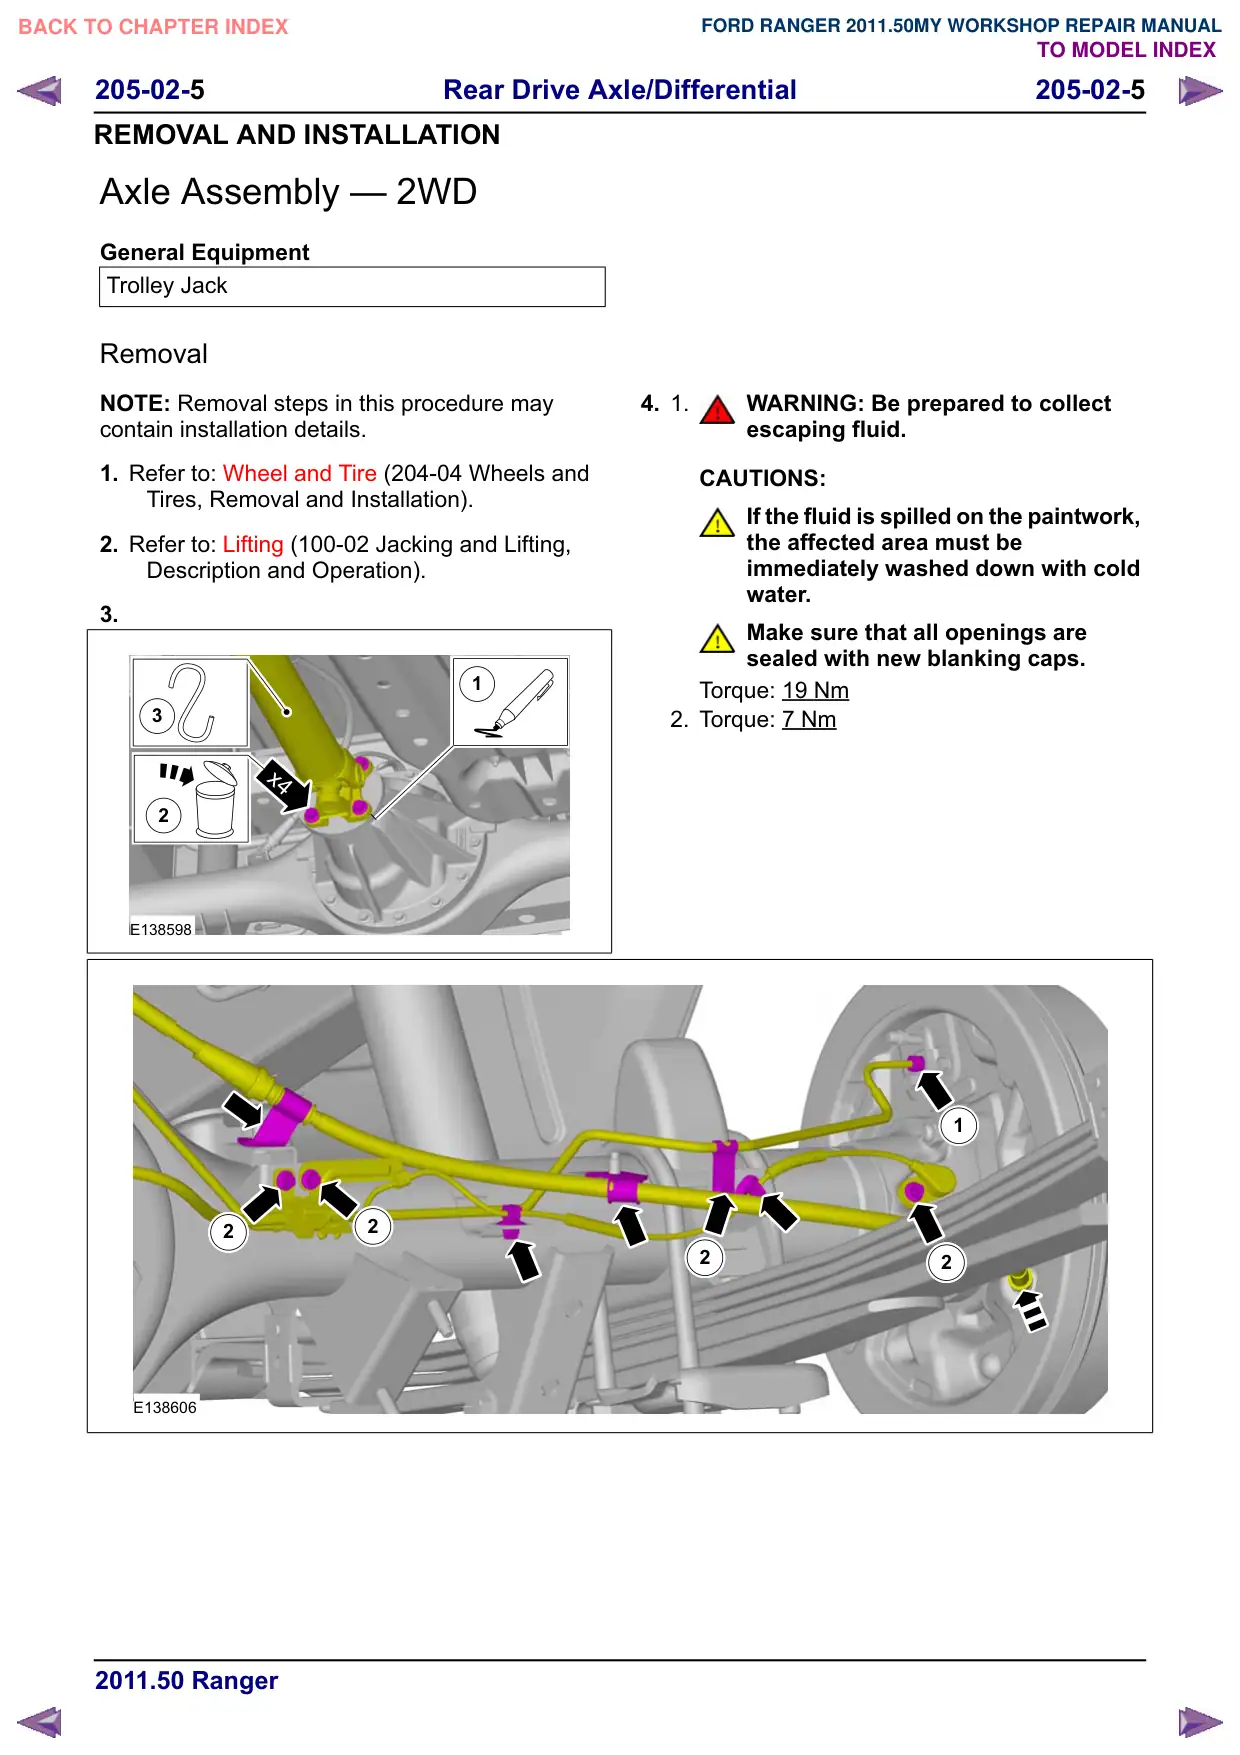
3.
1
3
x4
2
E138598
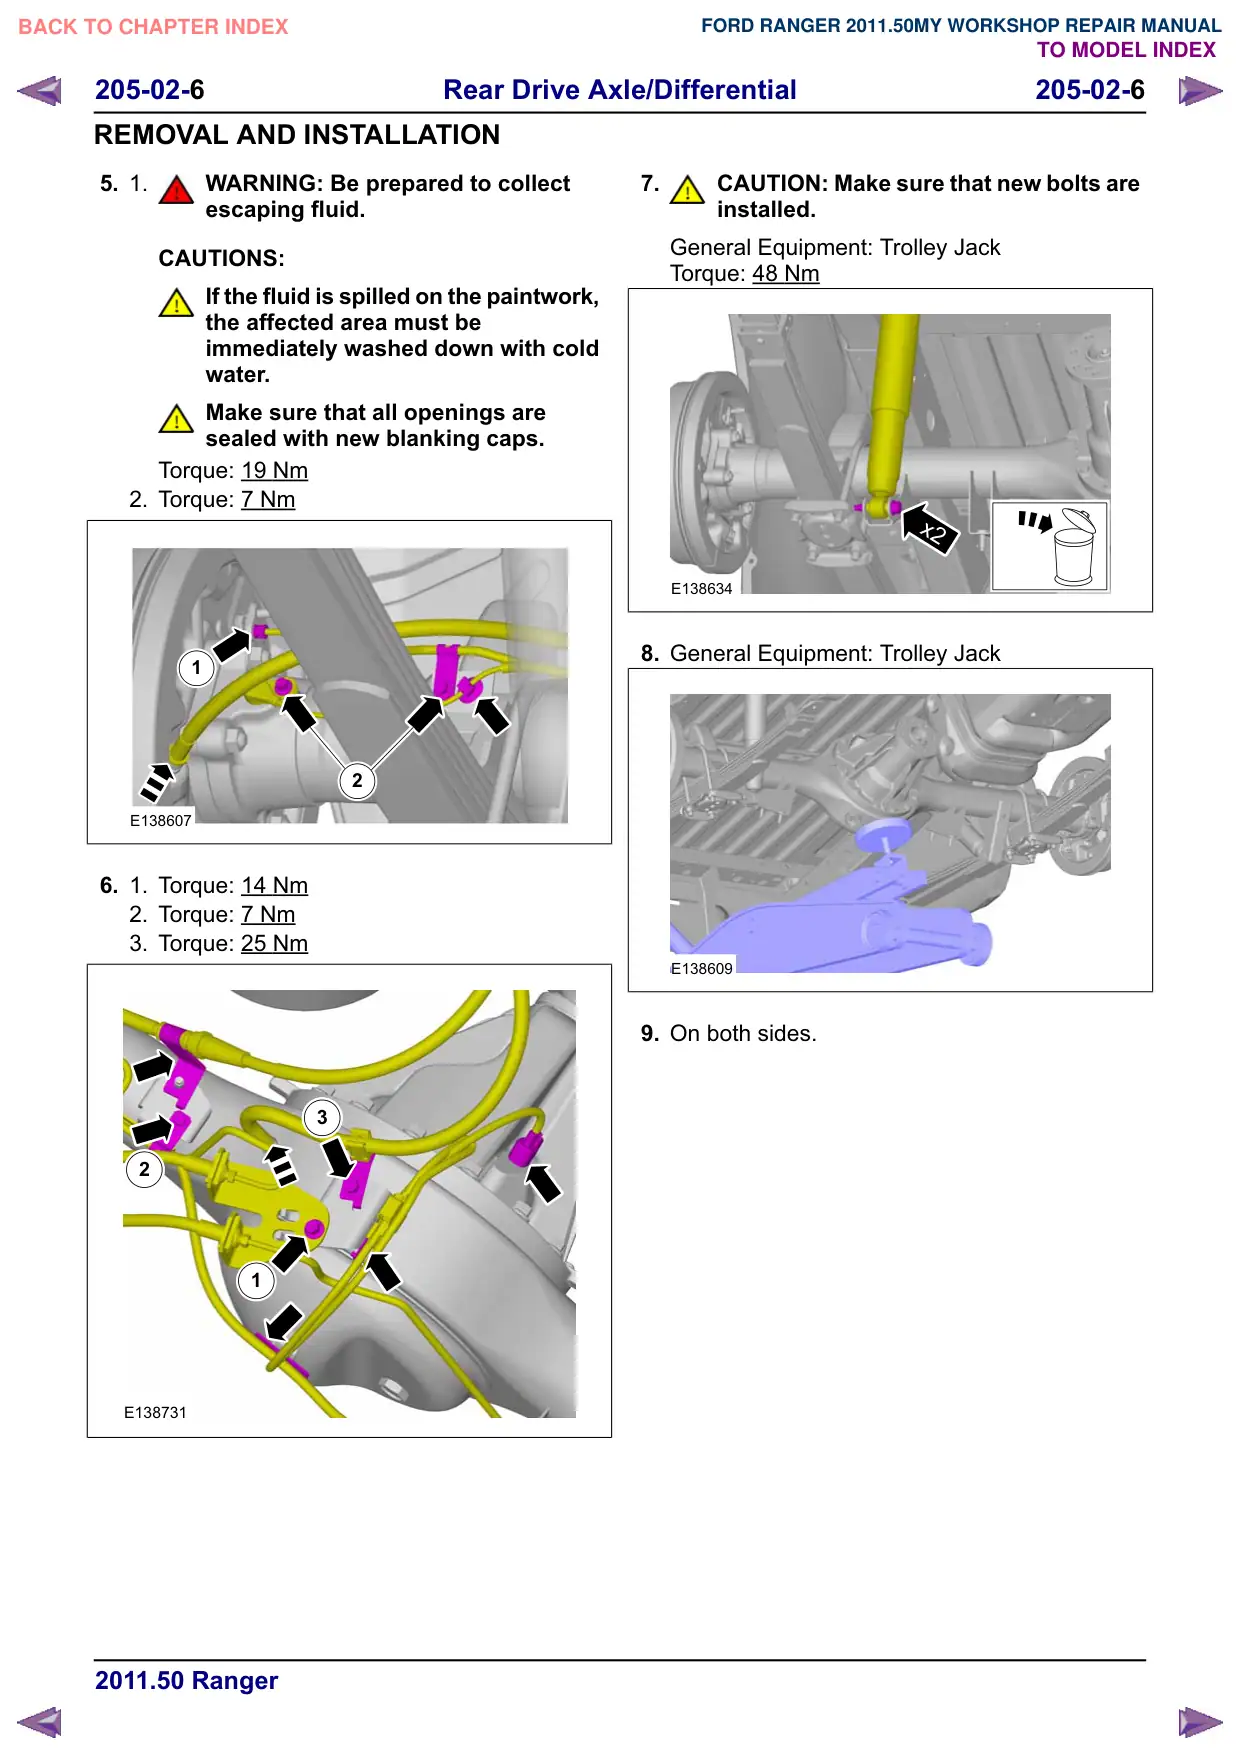
2
2
E138606
4. 1.
WARNING: Be prepared to collect
escaping fluid.
CAUTIONS:
If the fluid is spilled on the paintwork,
the affected area must be
immediately washed down with cold
water.
Make sure that all openings are
sealed with new blanking caps.
Torque: 19 Nm
2. Torque: 7 Nm
1
2
2
Rear Drive Axle/Differential
205-02-6
205-02-6
REMOVAL AND INSTALLATION
5. 1.
WARNING: Be prepared to collect
escaping fluid.
CAUTIONS:
If the fluid is spilled on the paintwork,
the affected area must be
immediately washed down with cold
water.
Make sure that all openings are
sealed with new blanking caps.
Torque: 19 Nm
2. Torque: 7 Nm
1
2
E138607
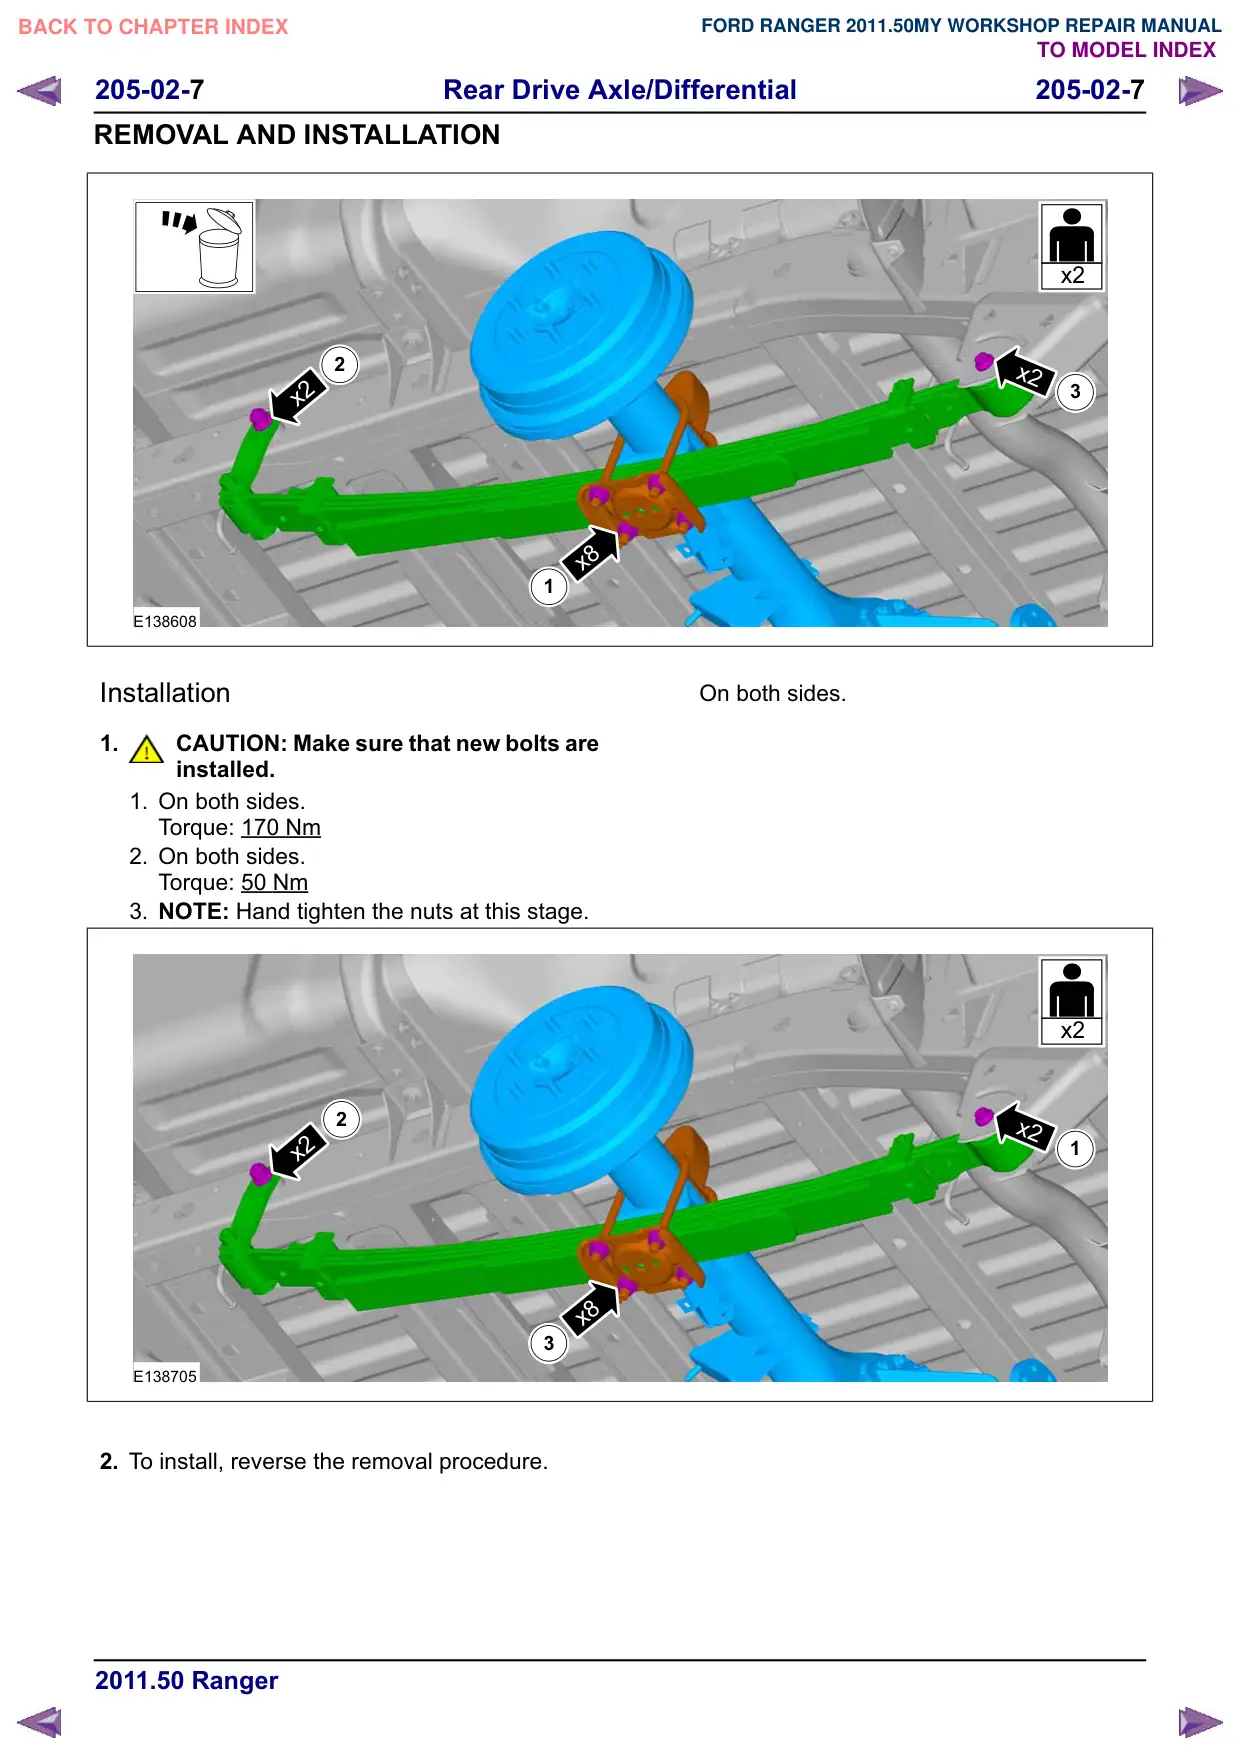
6.
1.
Torque: 14 Nm
2. Torque: 7 Nm
3. Torque: 25 Nm
3
2
1
E138731
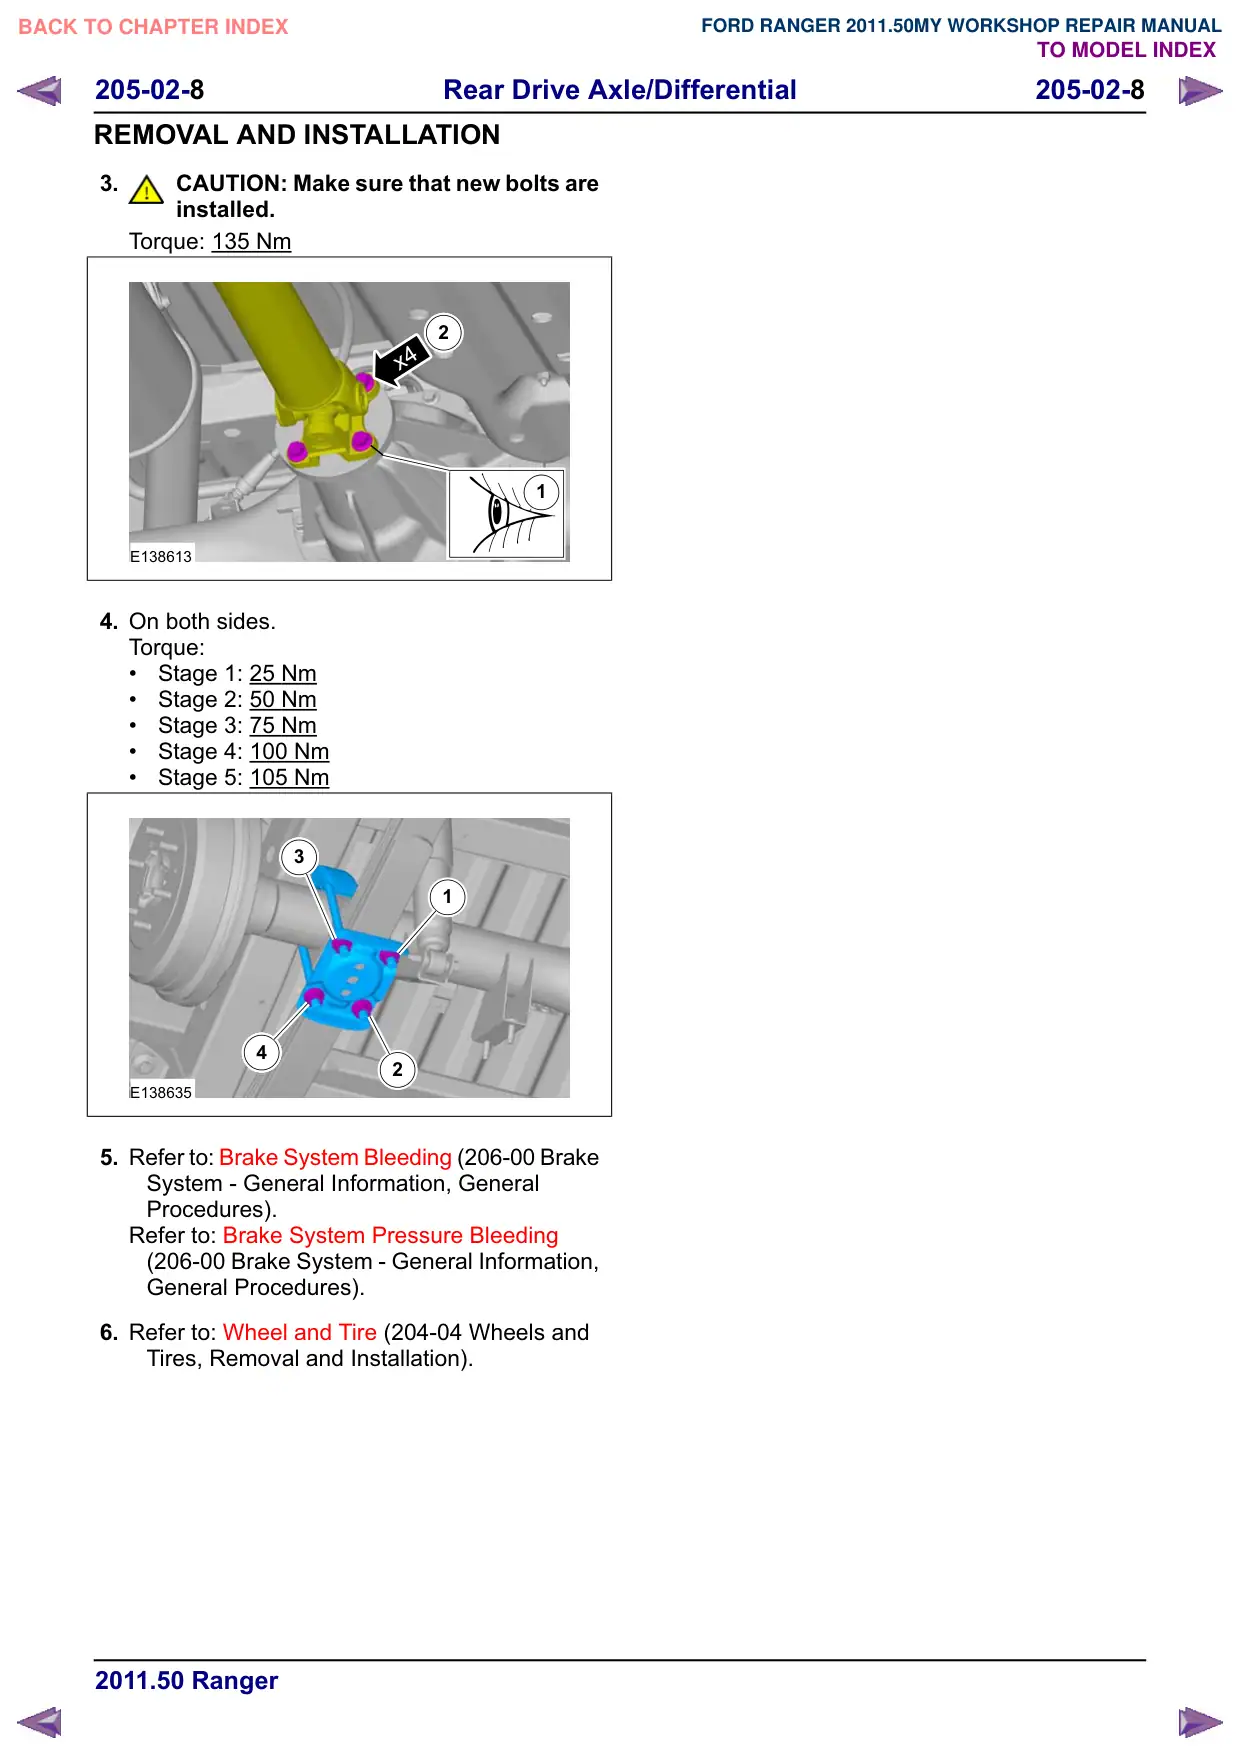
7.
CAUTION: Make sure that new bolts are
installed.
General Equipment: Trolley Jack
Torque: 48 Nm
x2
E138634
8. General Equipment: Trolley Jack
E138609
9. On both sides.
Rear Drive Axle/Differential
205-02-7
205-02-7
REMOVAL AND INSTALLATION
2
x2
x8
1
E138608
Installation
1.
CAUTION: Make sure that new bolts are
installed.
1. On both sides.
Torque: 170 Nm
2. On both sides.
Torque: 50 Nm
3. NOTE: Hand tighten the nuts at this stage.
2
x2
x8
3
E138705
2. To install, reverse the removal procedure.
x2
x2
3
On both sides.
x2
x2
1
Rear Drive Axle/Differential
205-02-8
205-02-8
REMOVAL AND INSTALLATION
3.
CAUTION: Make sure that new bolts are
installed.
Torque: 135 Nm
2
x4
1
E138613
4. On both sides.
Torque:
Stage 1: 25 Nm
Stage 2: 50 Nm
Stage 3: 75 Nm
Stage 4: 100 Nm
Stage 5: 105 Nm
3
1
4
2
E138635
5. Refer to: Brake System Bleeding (206-00 Brake
System - General Information, General
Procedures).
Refer to: Brake System Pressure Bleeding
(206-00 Brake System - General Information,
General Procedures).
6. Refer to: Wheel and Tire (204-04 Wheels and
Tires, Removal and Installation).
Rear Drive Axle/Differential
205-02-
205-02-
REMOVAL AND INSTALLATION
Axle Assembly – 4WD
General Equipment
Trolley Jack
Removal
NOTE: Removal steps in this procedure may
contain installation details.
1. Refer to: Wheel and Tire (204-04 Wheels and
Tires, Removal and Installation).
2. Refer to: Lifting (100-02 Jacking and Lifting,
Description and Operation).
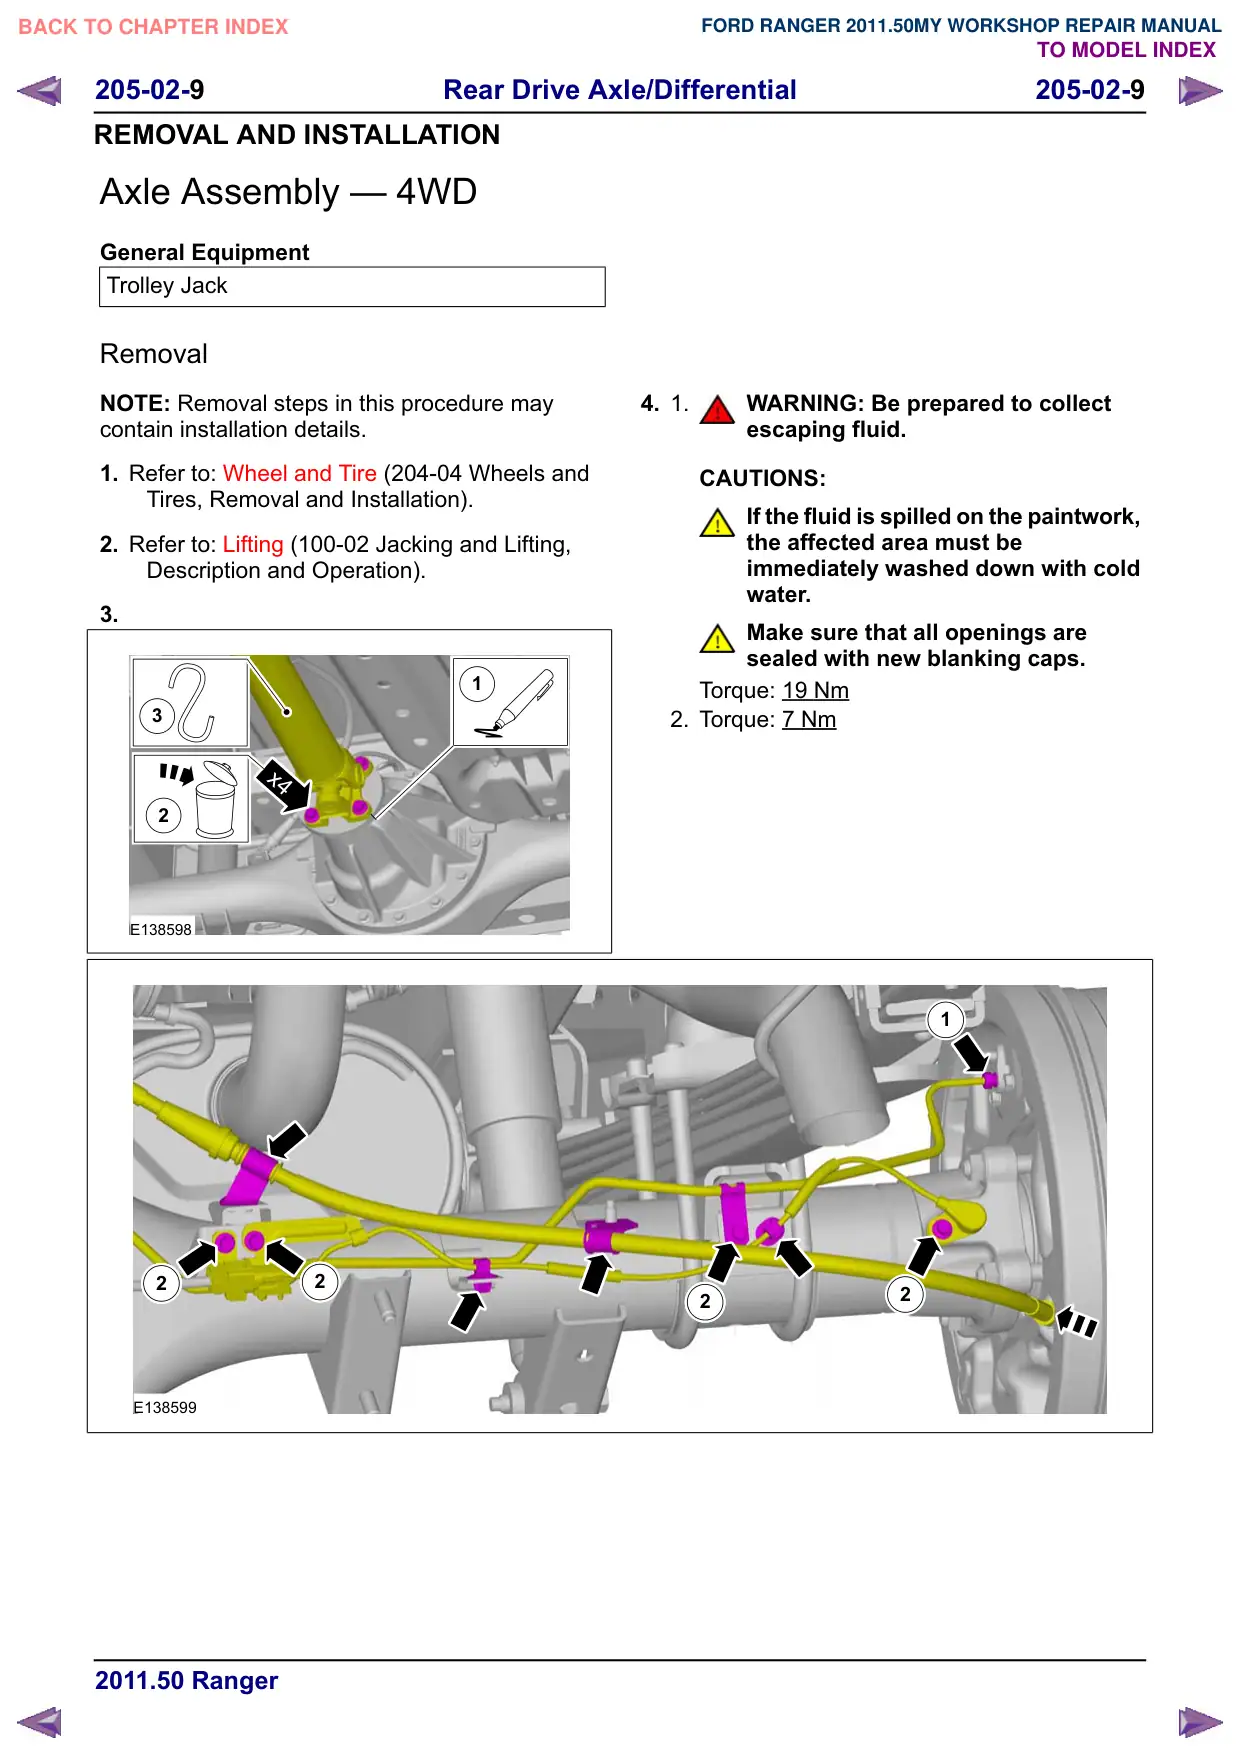
3.
1
3
x4
2
E138598
2
2
E138599
4. 1.
WARNING: Be prepared to collect
escaping fluid.
CAUTIONS:
If the fluid is spilled on the paintwork,
the affected area must be
immediately washed down with cold
water.
Make sure that all openings are
sealed with new blanking caps.
Torque: 19 Nm
2. Torque: 7 Nm
1
2
2
205-02-10
Rear Drive Axle/Differential
205-02-10
REMOVAL AND INSTALLATION
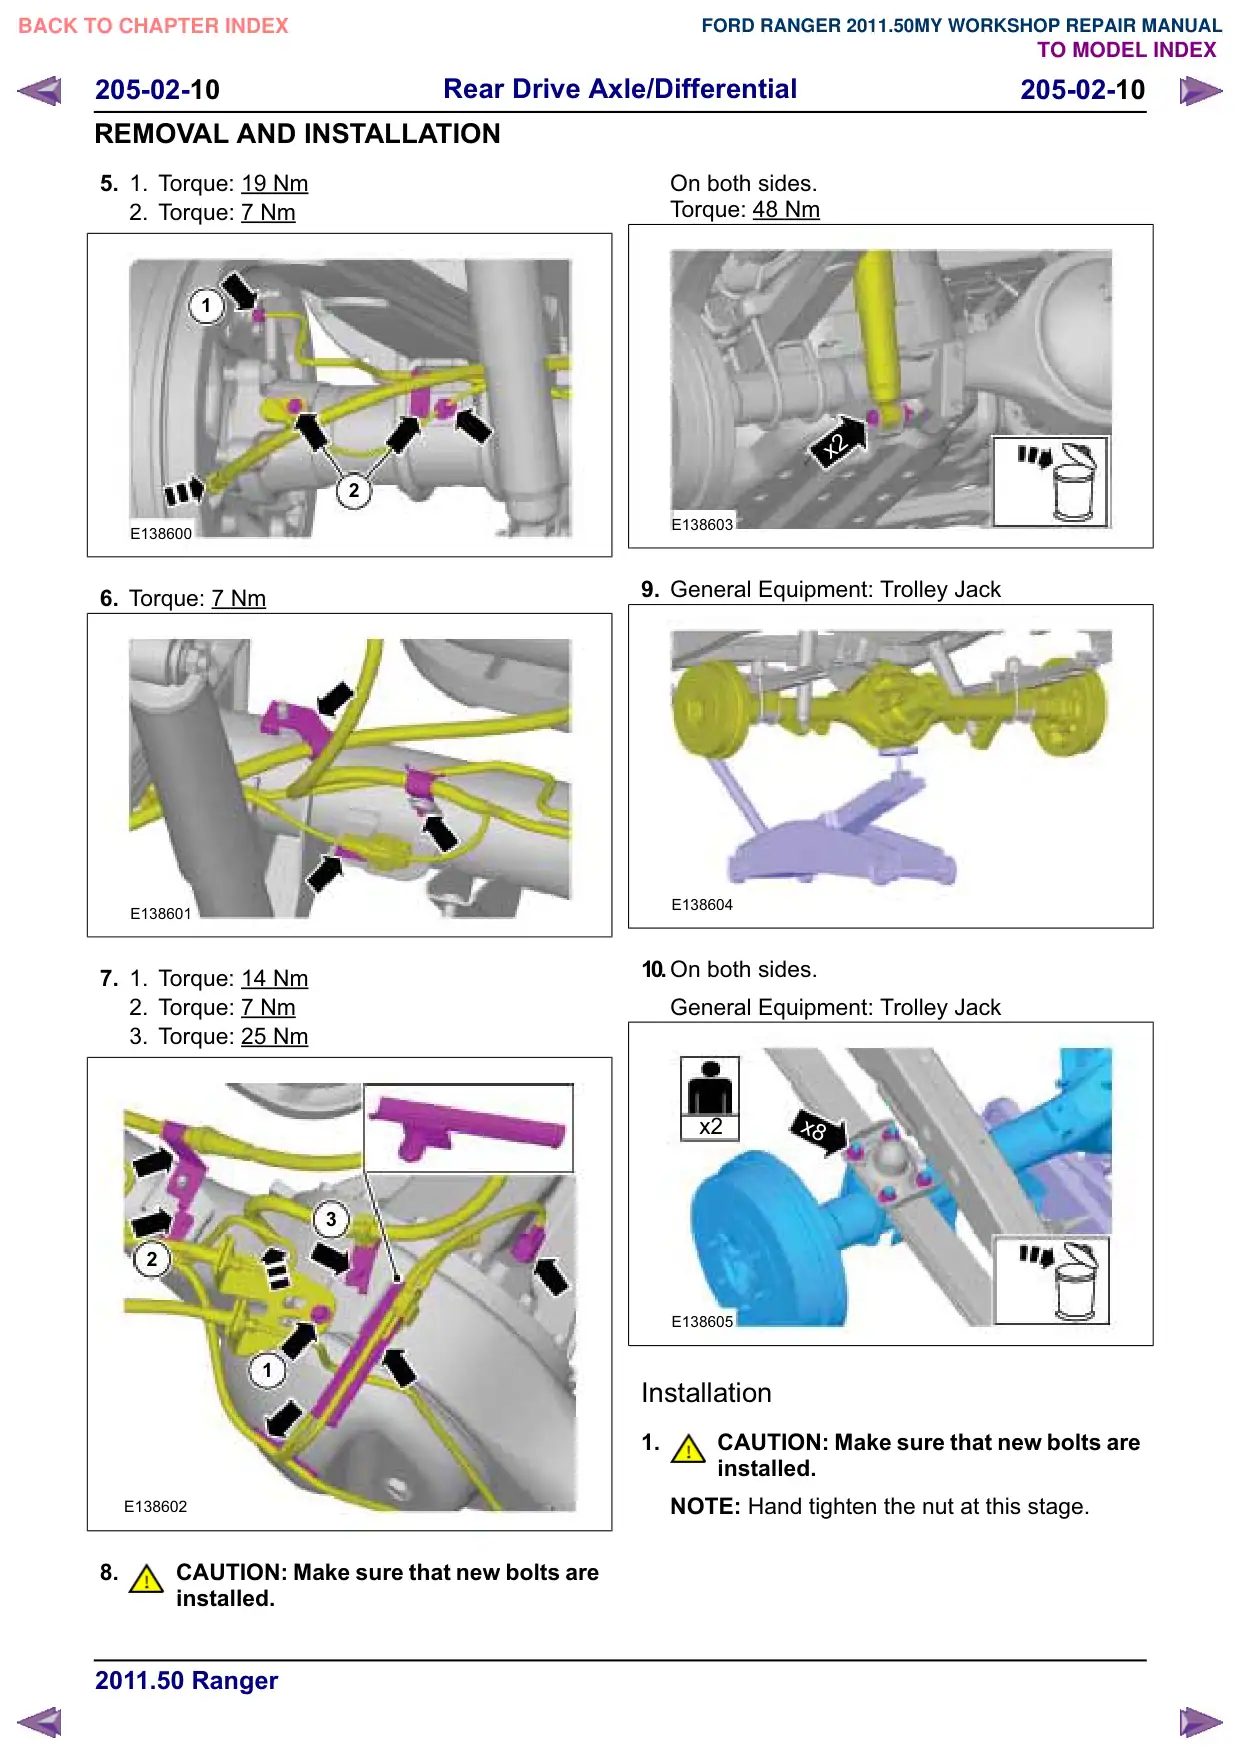
5.
1.
Torque: 19 Nm
2. Torque: 7 Nm
1
2
E138600
6. Torque: 7 Nm
E138601
7.
1.
Torque: 14
Nm
2. Torque: 7 Nm
3. Torque: 25 Nm
3
2
1
E138602
8.
CAUTION: Make sure that new bolts are
installed.
On both sides.
Torque: 48 Nm
x2
E138603
9. General Equipment: Trolley Jack
E138604
10.On both sides.
General Equipment: Trolley Jack
x8
x2
E138605
Installation
1.
CAUTION: Make sure that new bolts are
installed.
NOTE: Hand tighten the nut at this stage.
Rear Drive Axle/Differential
205-02-11
205-02-11
REMOVAL AND INSTALLATION
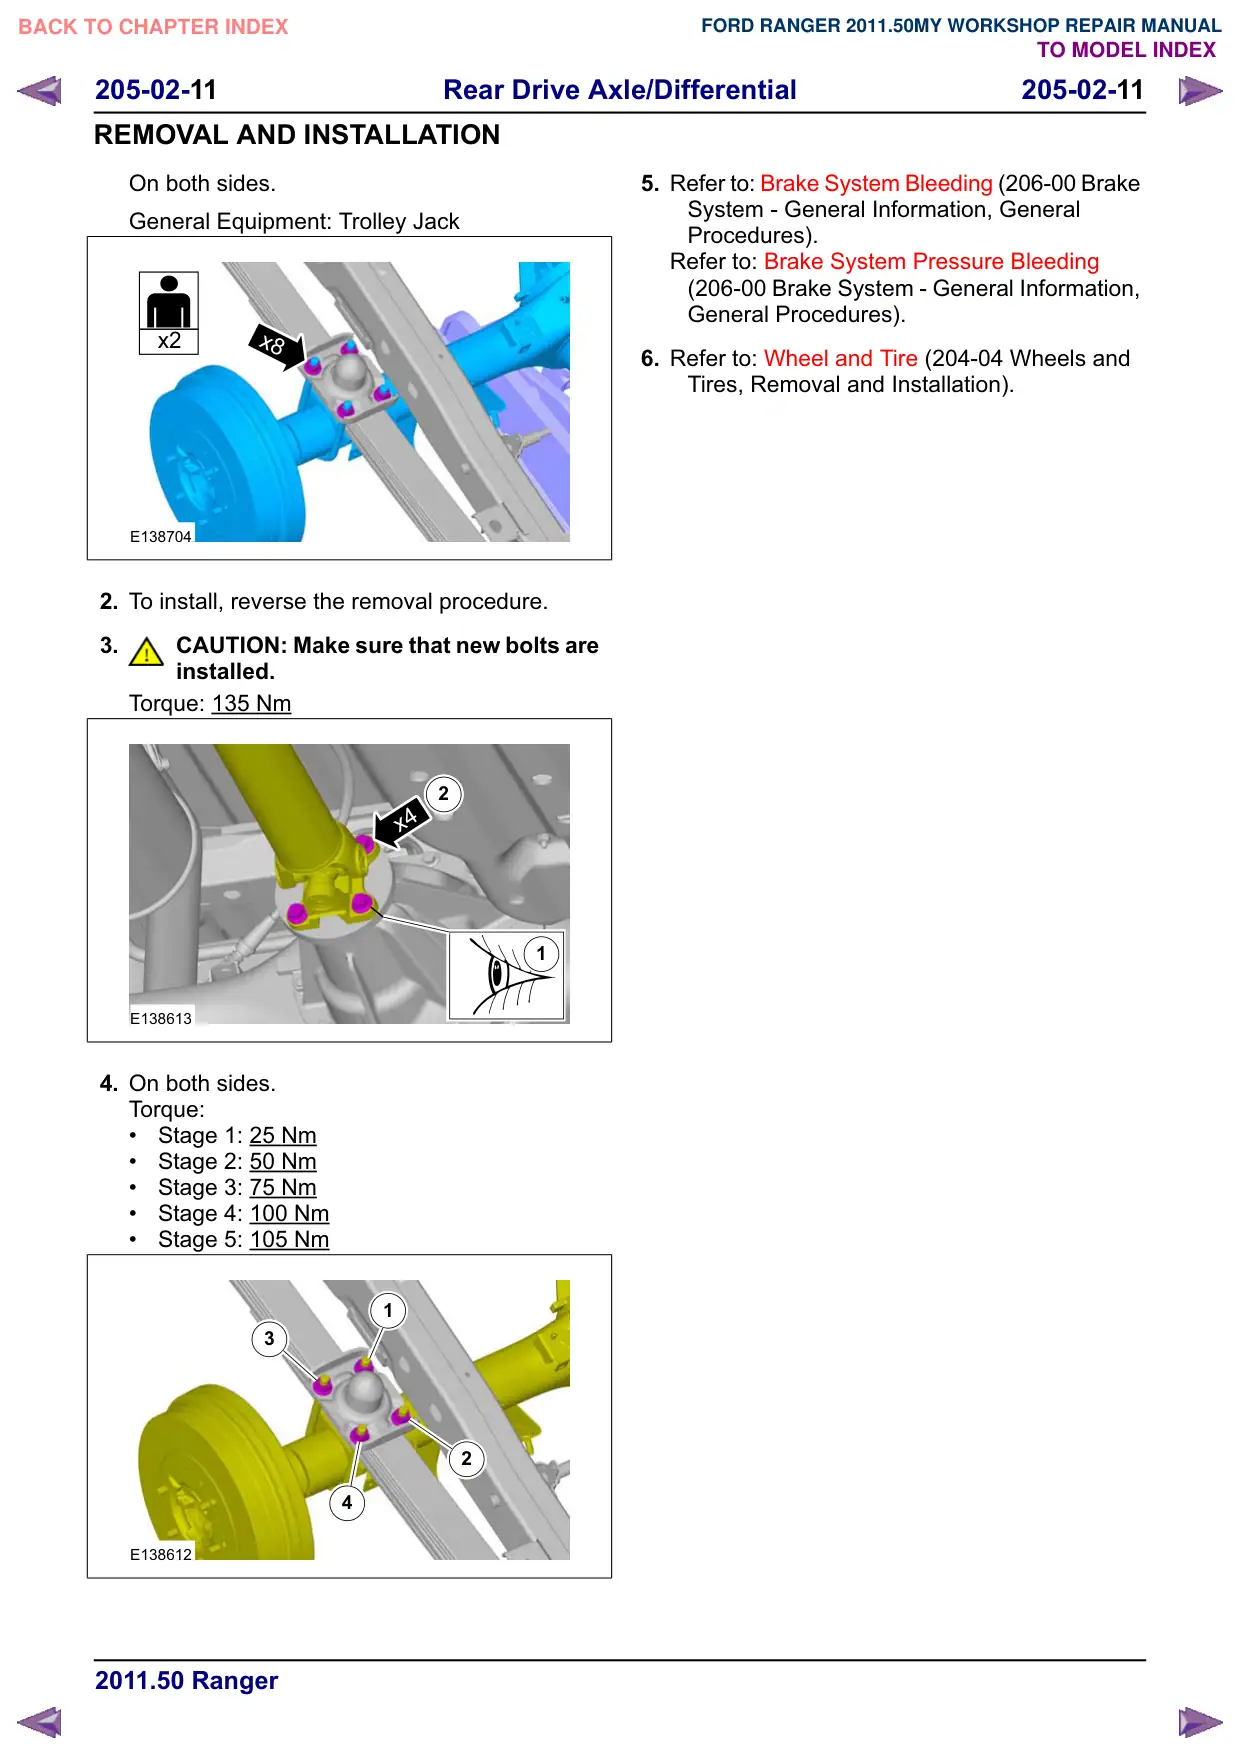
On both sides.
General Equipment: Trolley Jack
x2
x8
E138704
2. To install, reverse the removal procedure.
3.
CAUTION: Make sure that new bolts are
installed.
Torque: 135 Nm
2
x4
1
E138613
4. On both sides.
Torque:
Stage 1: 25 Nm
Stage 2: 50 Nm
Stage 3: 75 Nm
Stage 4: 100 Nm
Stage 5: 105 Nm
1
3
2
4
E138612
5. Refer to: Brake System Bleeding (206-00 Brake
System - General Information, General
Procedures).
Refer to: Brake System Pressure Bleeding
(206-00 Brake System - General Information,
General Procedures).
6. Refer to: Wheel and Tire (204-04 Wheels and
Tires, Removal and Installation).
Rear Drive Axle/Differential
205-02-12
205-02-12
REMOVAL AND INSTALLATION
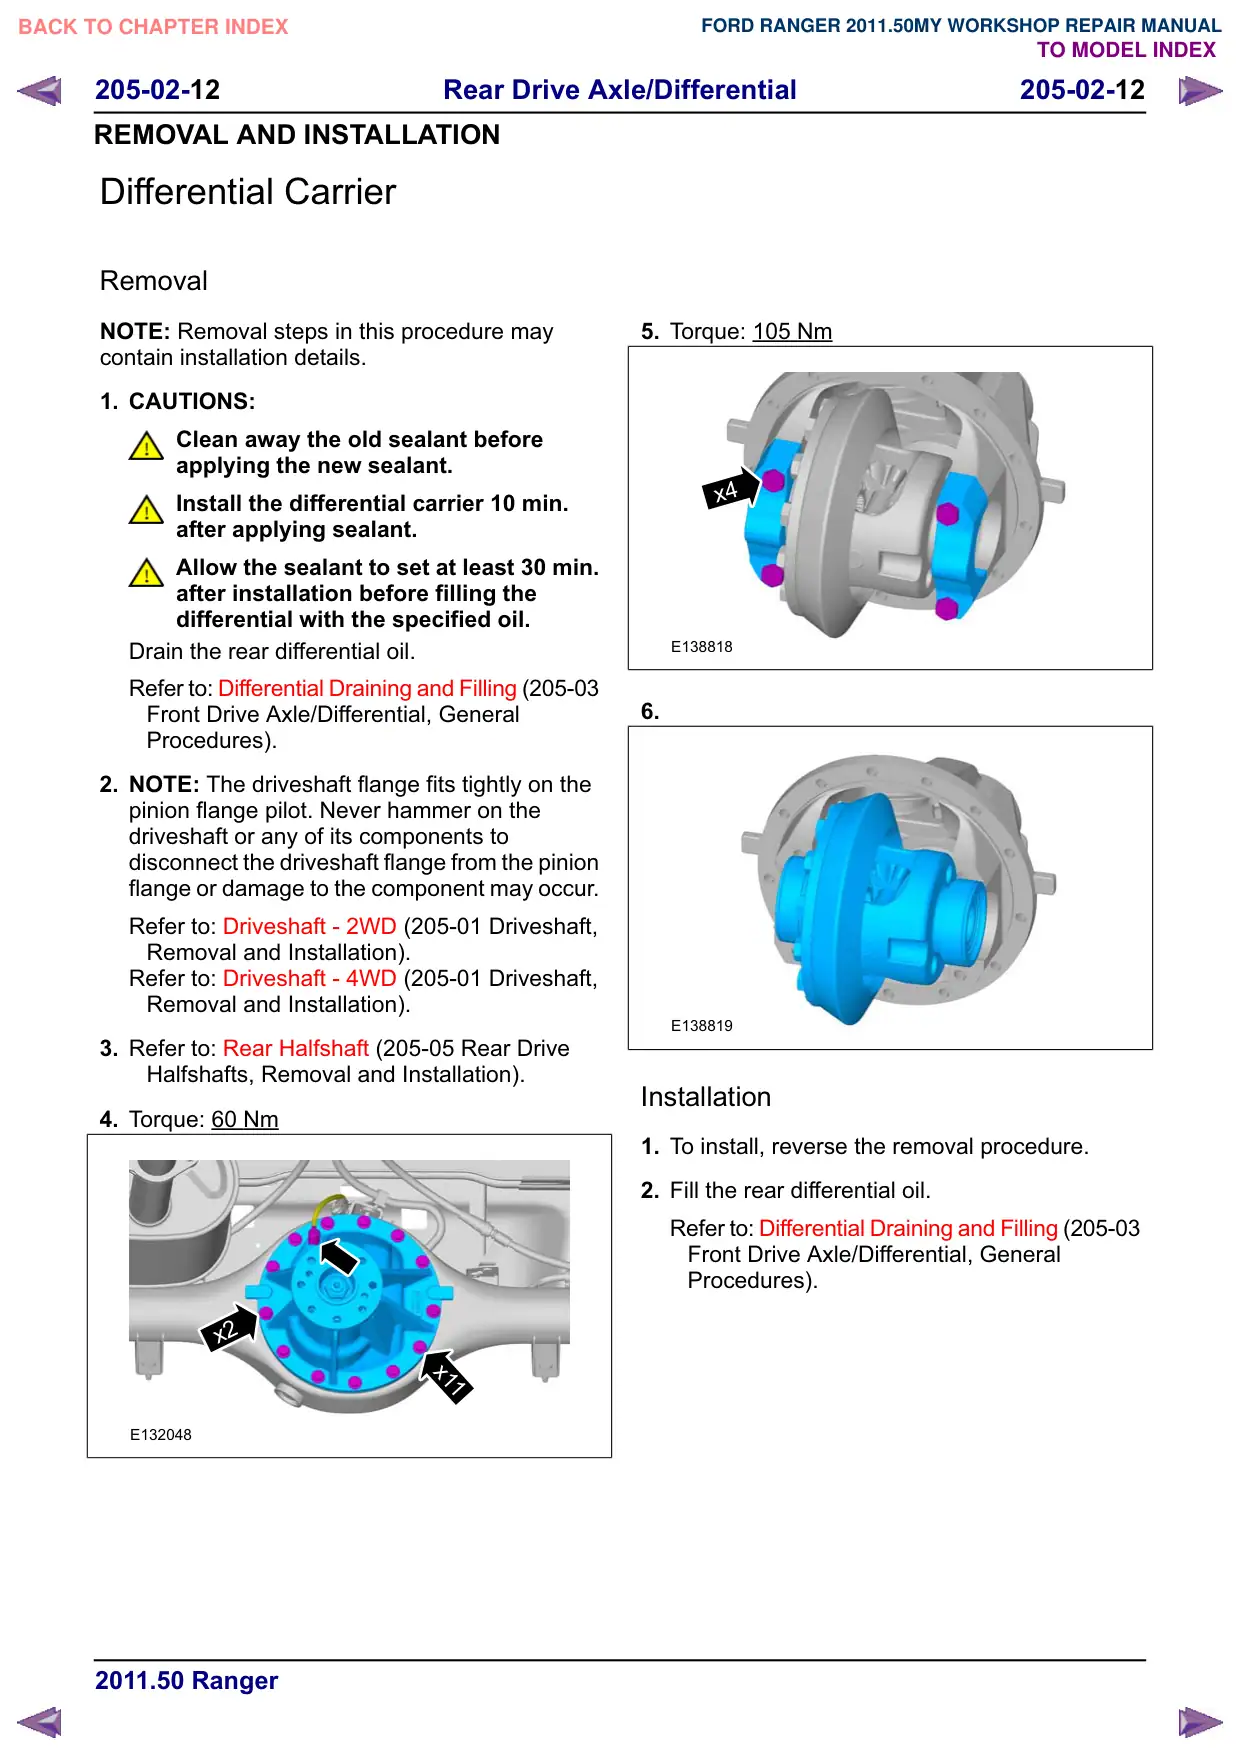
Differential Carrier
Removal
NOTE: Removal steps in this procedure may
contain installation details.
1. CAUTIONS:
Clean away the old sealant before
applying the new sealant.
Install the differential carrier 10 min.
after applying sealant.
Allow the sealant to set at least 30 min.
after installation before filling the
differential with the specified oil.
Drain the rear differential oil.
Refer to: Differential Draining and Filling (205-03
Front Drive Axle/Differential, General
Procedures).
2. NOTE: The driveshaft flange fits tightly on the
pinion flange pilot. Never hammer on the
driveshaft or any of its components to
disconnect the driveshaft flange from the pinion
flange or damage to the component may occur.
Refer to: Driveshaft - 2WD (205-01 Driveshaft,
Removal and Installation).
Refer to: Driveshaft - 4WD (205-01 Driveshaft,
Removal and Installation).
3. Refer to: Rear Halfshaft (205-05 Rear Drive
Halfshafts, Removal and Installation).
4. Torque: 60 Nm
x2
x11
E132048
5. Torque: 105 Nm
x4
E138818
6.
E138819
Installation
1. To install, reverse the removal procedure.
2. Fill the rear differential oil.
Refer to: Differential Draining and Filling (205-03
Front Drive Axle/Differential, General
Procedures).