Busca

501-05 Acabamento interno

Oficina · páginas 1363–1382

Texto completo da seção, página por página. Toque no título para ver a página com a imagem.

  1. Acabamento da coluna A p. 1363
  2. Acabamento superior da coluna B p. 1364
  3. Acabamento inferior da coluna B p. 1365
  4. Acabamento superior da coluna C p. 1366–1367
  5. Acabamento inferior da coluna C p. 1368–1369
  6. Acabamento lateral do cowl p. 1370
  7. Forro da porta dianteira p. 1371–1372
  8. Painel de acabamento da porta traseira – Cabine dupla p. 1373–1374
  9. Painel de acabamento da porta traseira – Cabine estendida p. 1375
  10. Acabamento da soleira dianteira p. 1376
  11. Painel de acabamento da soleira traseira p. 1377
  12. Forro do teto p. 1378–1382

Página 1363 · Acabamento da coluna A

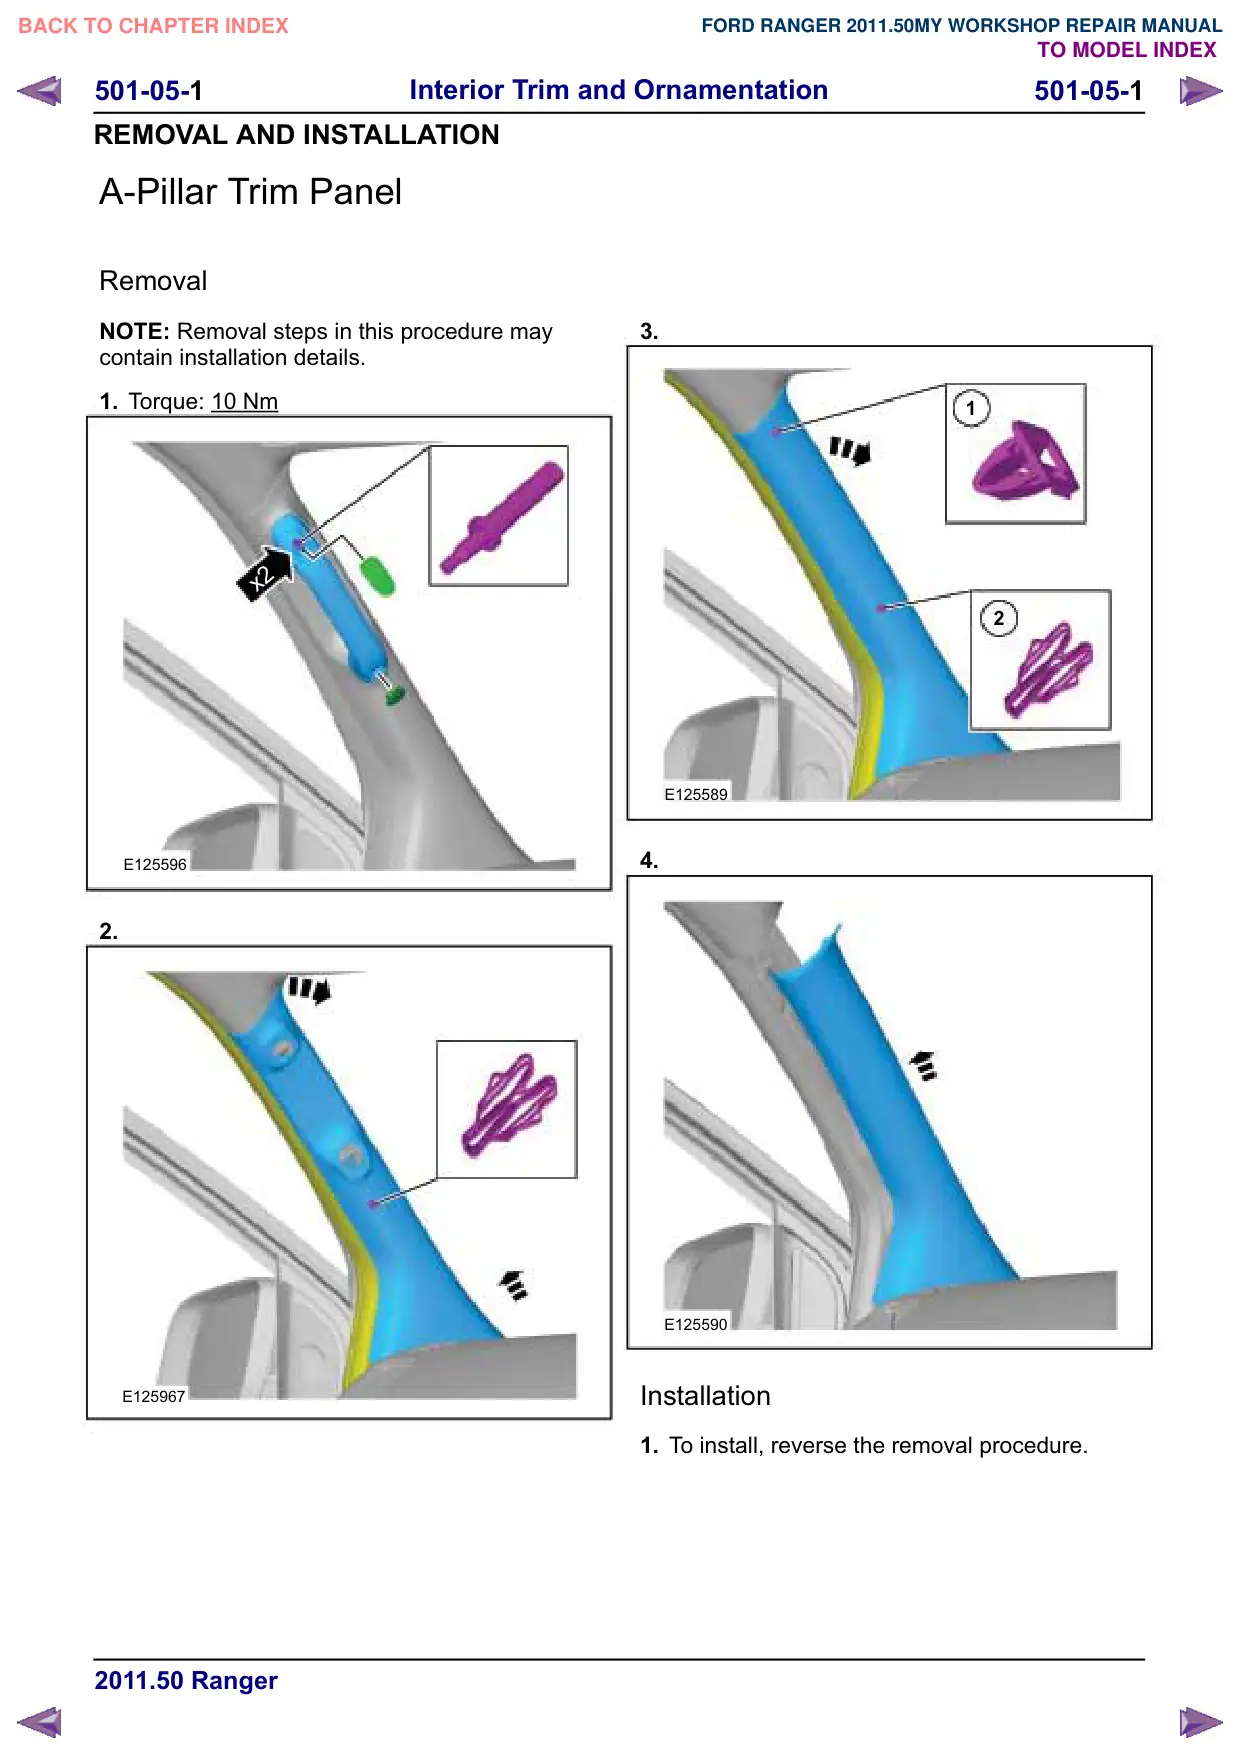
A-Pillar Trim Panel

501-05-1 501-05-1 Interior Trim and Ornamentation REMOVAL AND INSTALLATION A-Pillar Trim Panel Removal NOTE: Removal steps in this procedure may contain installation details. 1. Torque: 10 Nm x2 E125596 2. E125967 3. 1 2 E125589 4. E125590 Installation 1. To install, reverse the removal procedure.

Página 1364 · Acabamento superior da coluna B

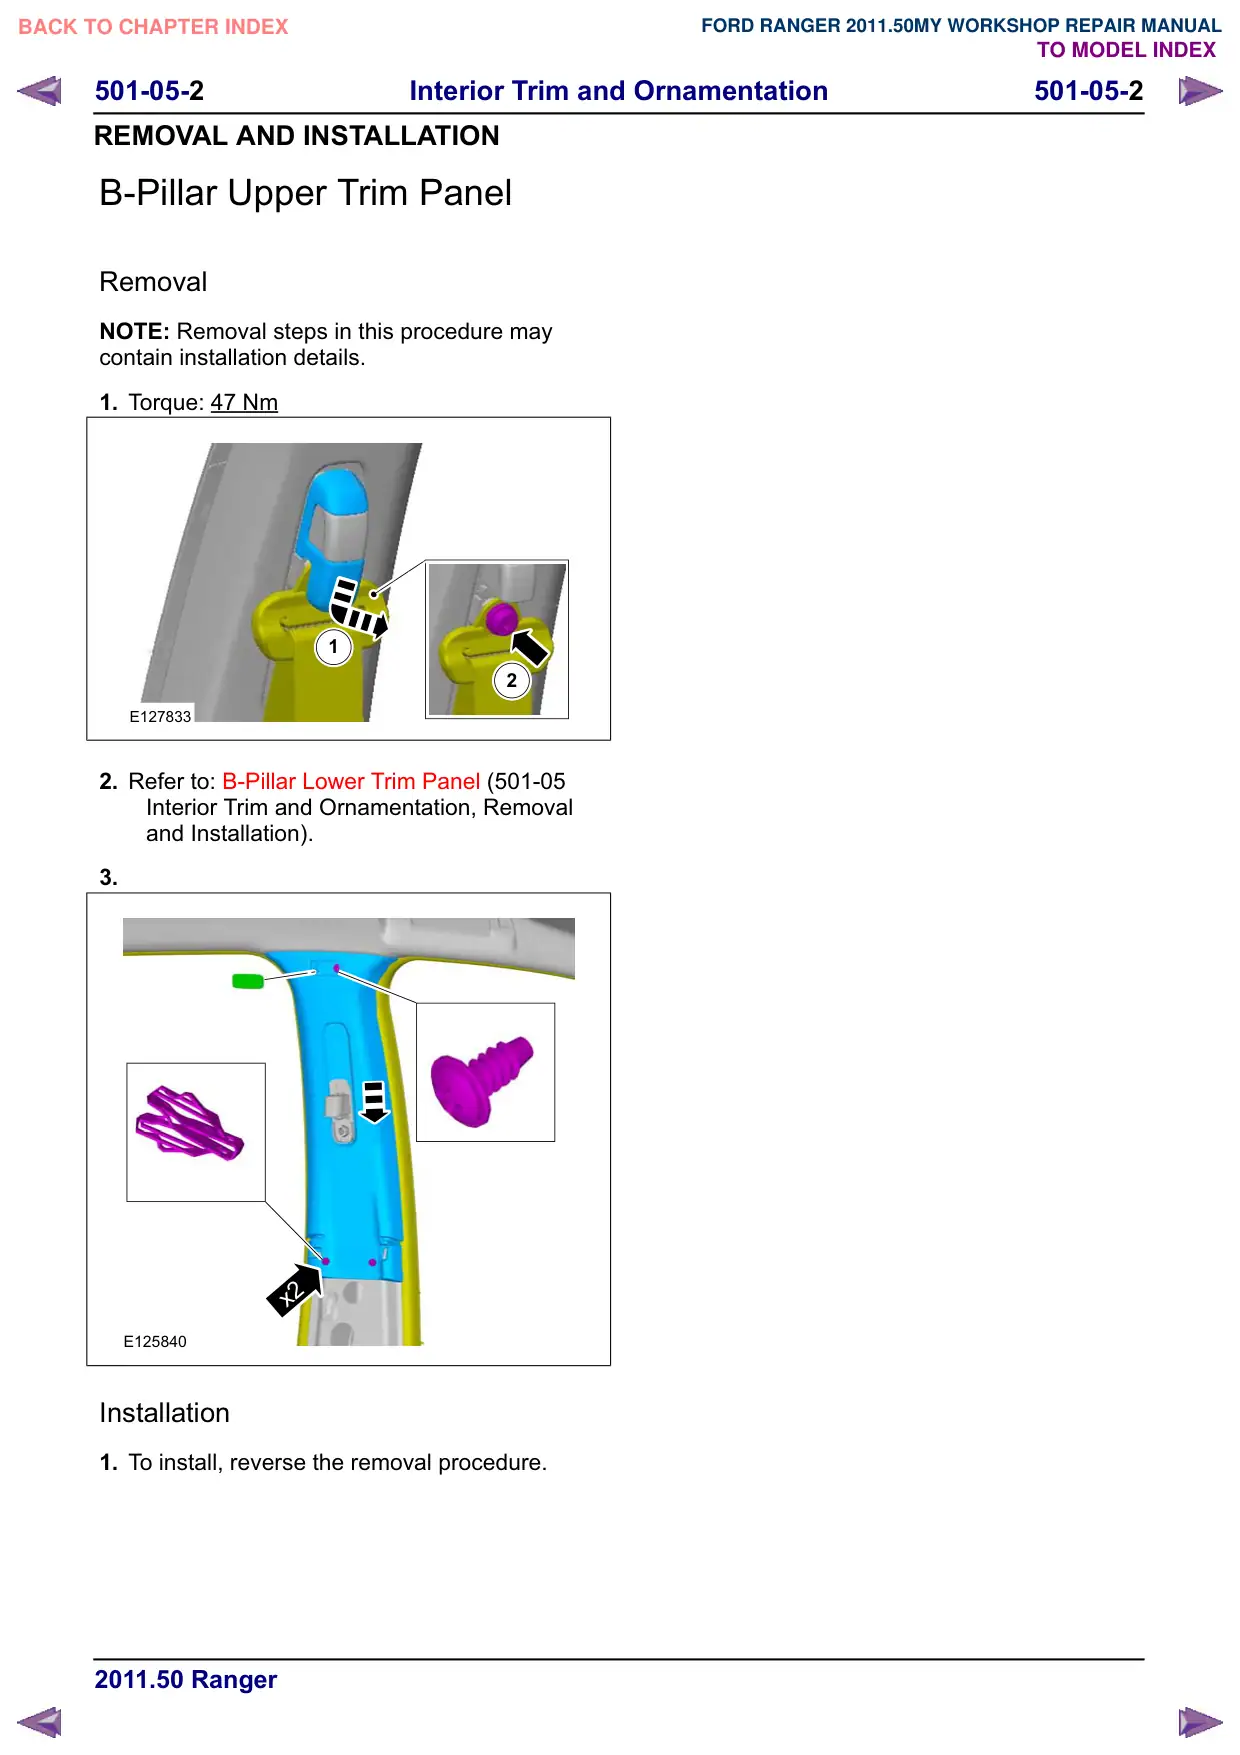
B-Pillar Upper Trim Panel

501-05-2 501-05-2 Interior Trim and Ornamentation REMOVAL AND INSTALLATION B-Pillar Upper Trim Panel Removal NOTE: Removal steps in this procedure may contain installation details. 1. Torque: 47 Nm 1 2 E127833 2. Refer to: B-Pillar Lower Trim Panel (501-05 Interior Trim and Ornamentation, Removal and Installation). 3. x2 E125840 Installation 1. To install, reverse the removal procedure.

Página 1365 · Acabamento inferior da coluna B

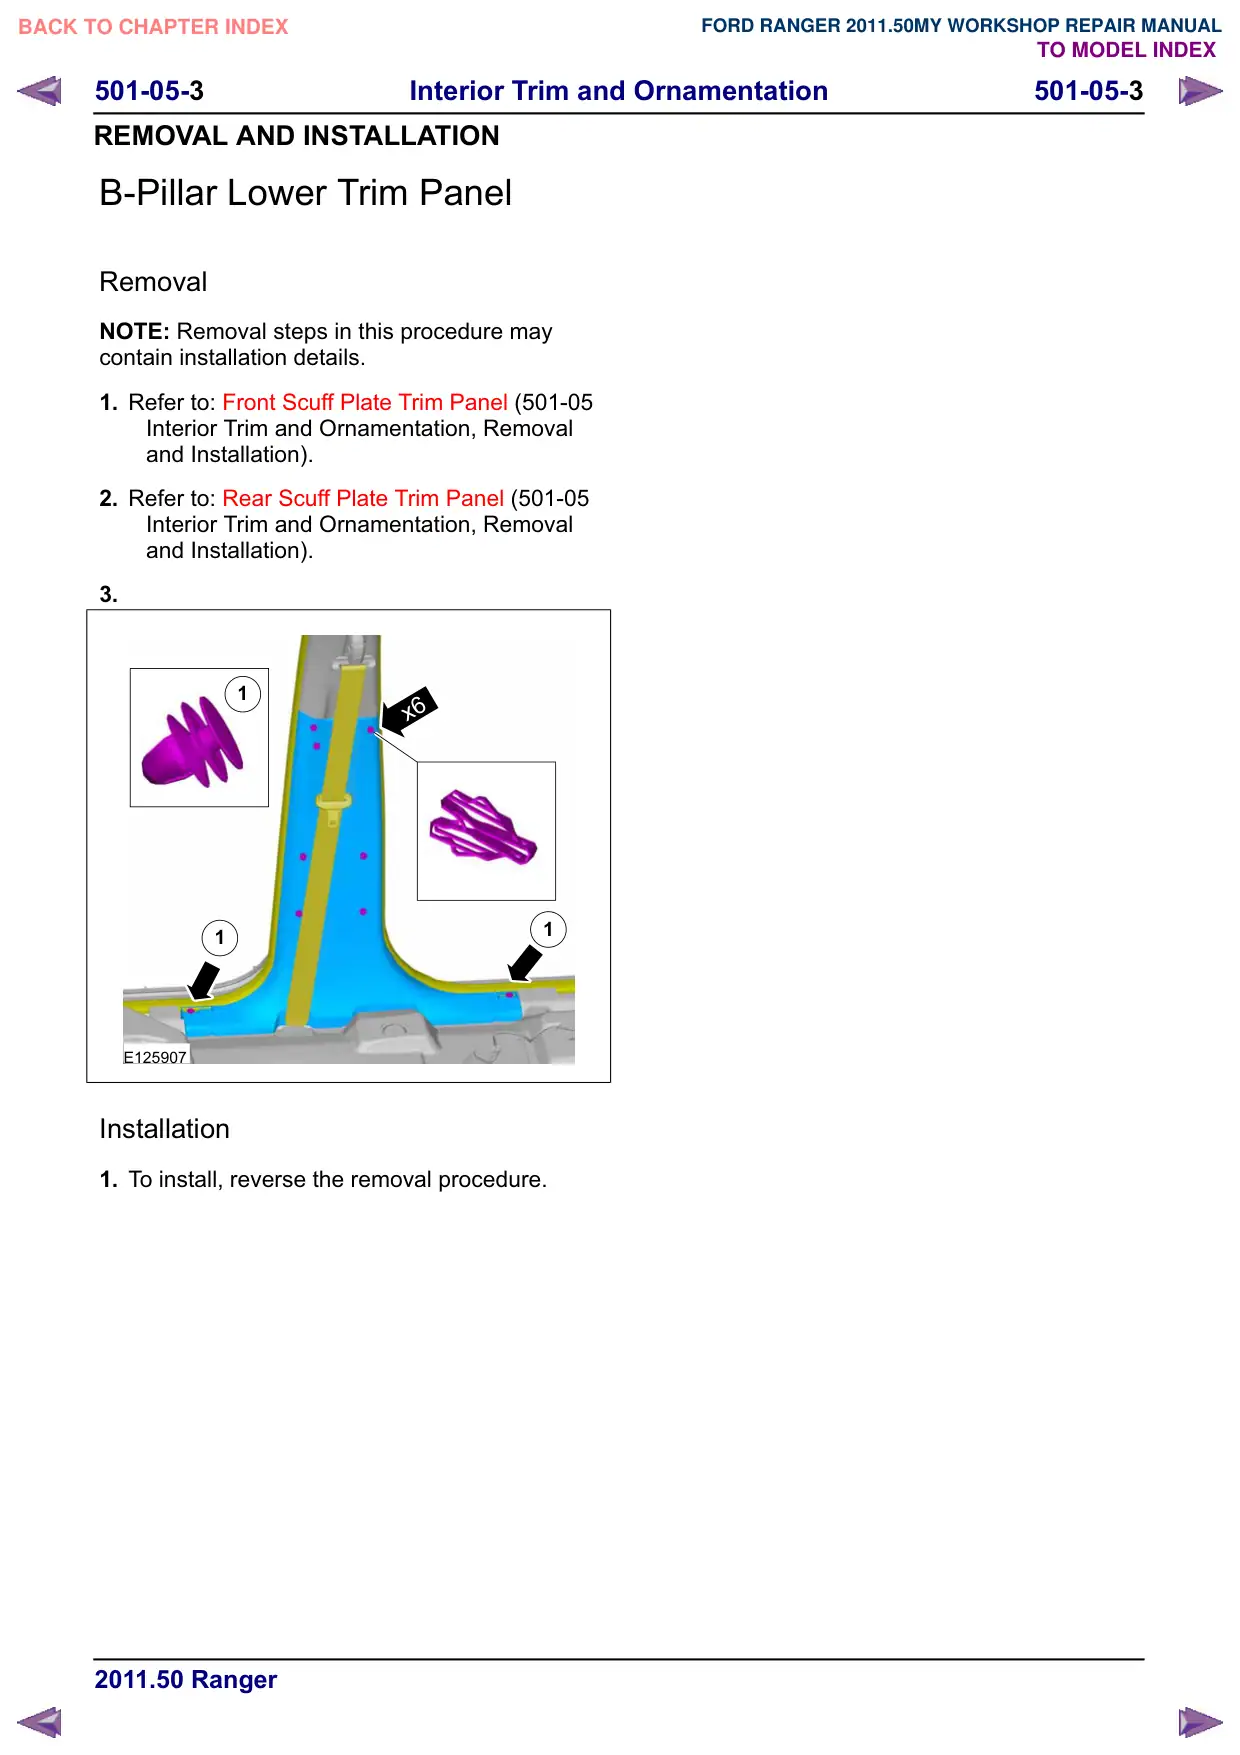
B-Pillar Lower Trim Panel

501-05-3 501-05-3 Interior Trim and Ornamentation REMOVAL AND INSTALLATION B-Pillar Lower Trim Panel Removal NOTE: Removal steps in this procedure may contain installation details. 1. Refer to: Front Scuff Plate Trim Panel (501-05 Interior Trim and Ornamentation, Removal and Installation). 2. Refer to: Rear Scuff Plate Trim Panel (501-05 Interior Trim and Ornamentation, Removal and Installation). 3. 1 x6 1 1 E125907 Installation 1. To install, reverse the removal procedure.

Página 1366 · Acabamento superior da coluna C

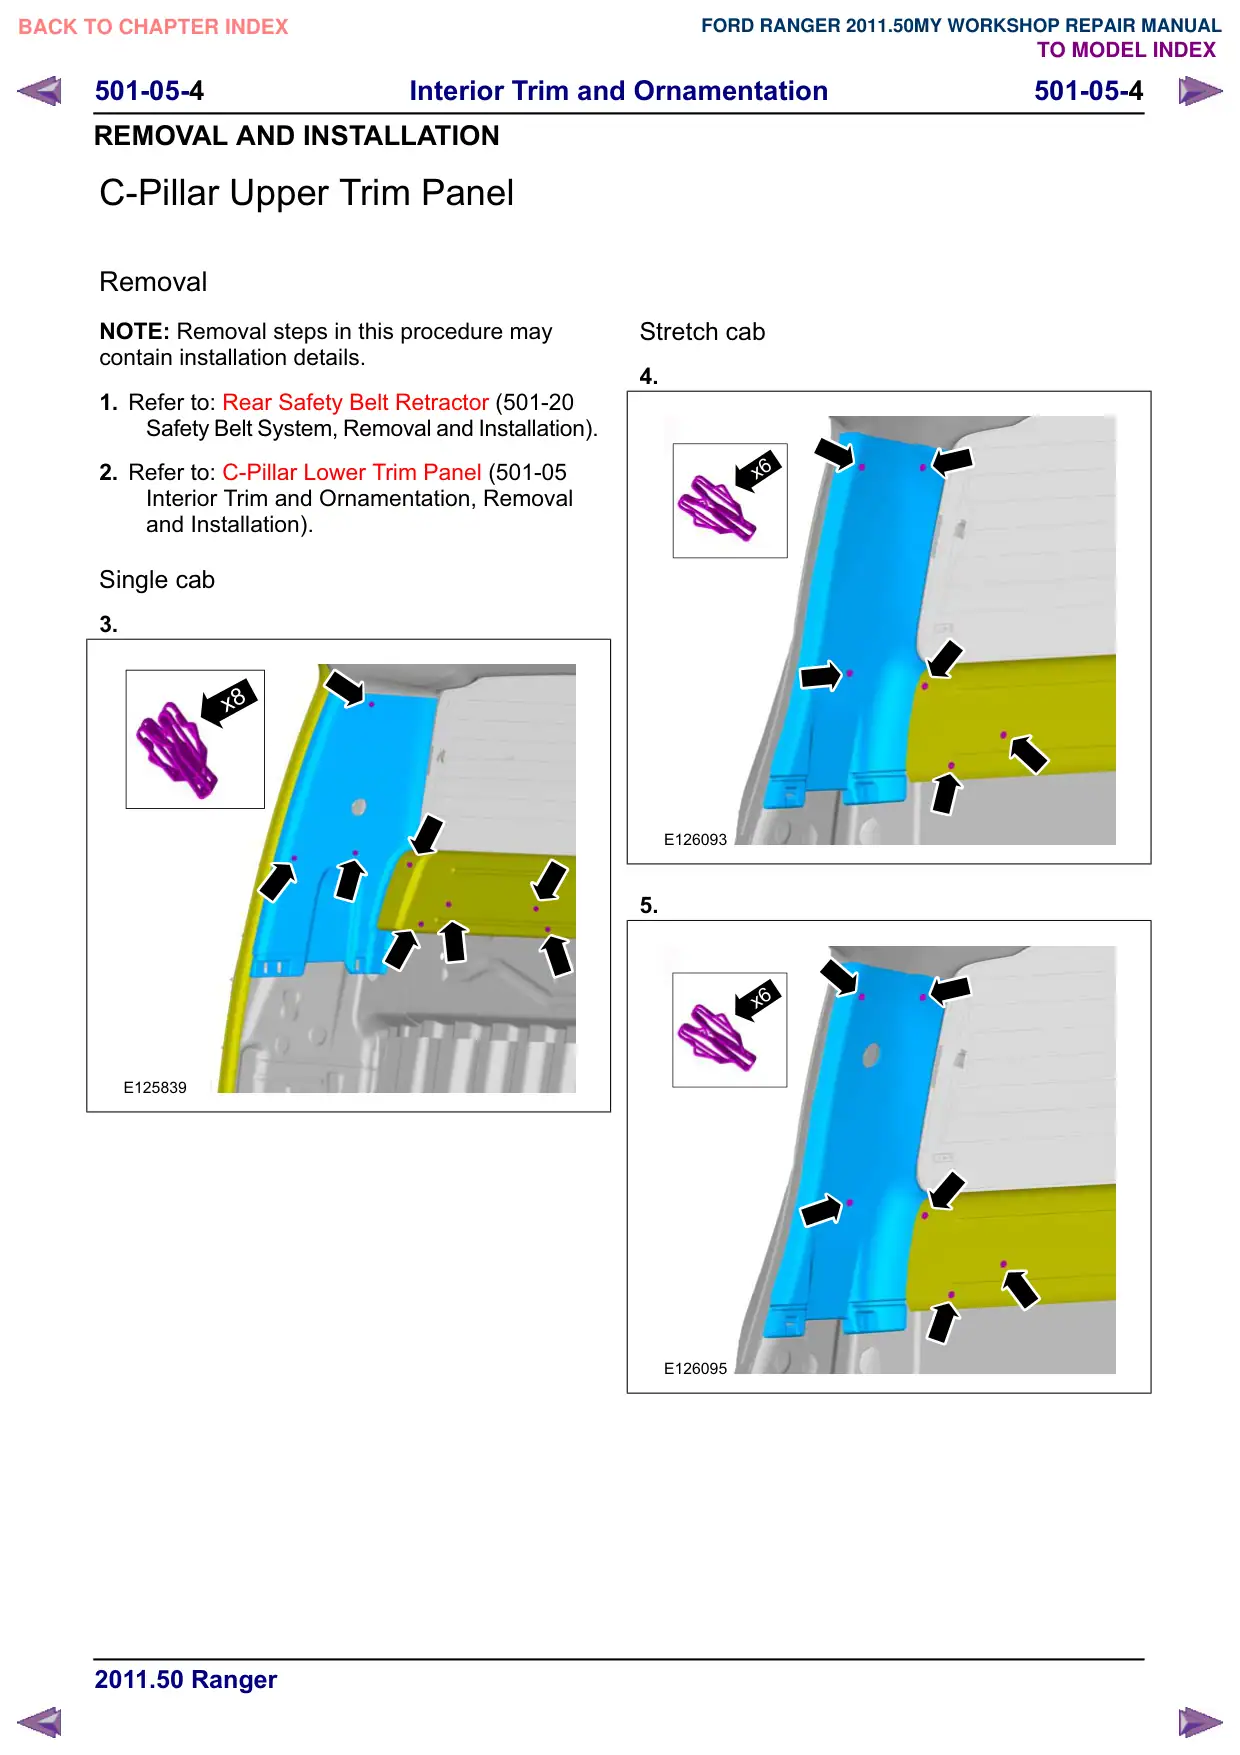
C-Pillar Upper Trim Panel

501-05-4 501-05-4 Interior Trim and Ornamentation REMOVAL AND INSTALLATION C-Pillar Upper Trim Panel Removal NOTE: Removal steps in this procedure may contain installation details. 1. Refer to: Rear Safety Belt Retractor (501-20 Safety Belt System, Removal and Installation). 2. Refer to: C-Pillar Lower Trim Panel (501-05 Interior Trim and Ornamentation, Removal and Installation). Single cab 3. x8 E125839 Stretch cab 4. x6 E126093 5. x6 E126095

Página 1367 · Acabamento superior da coluna C

C-Pillar Upper Trim Panel

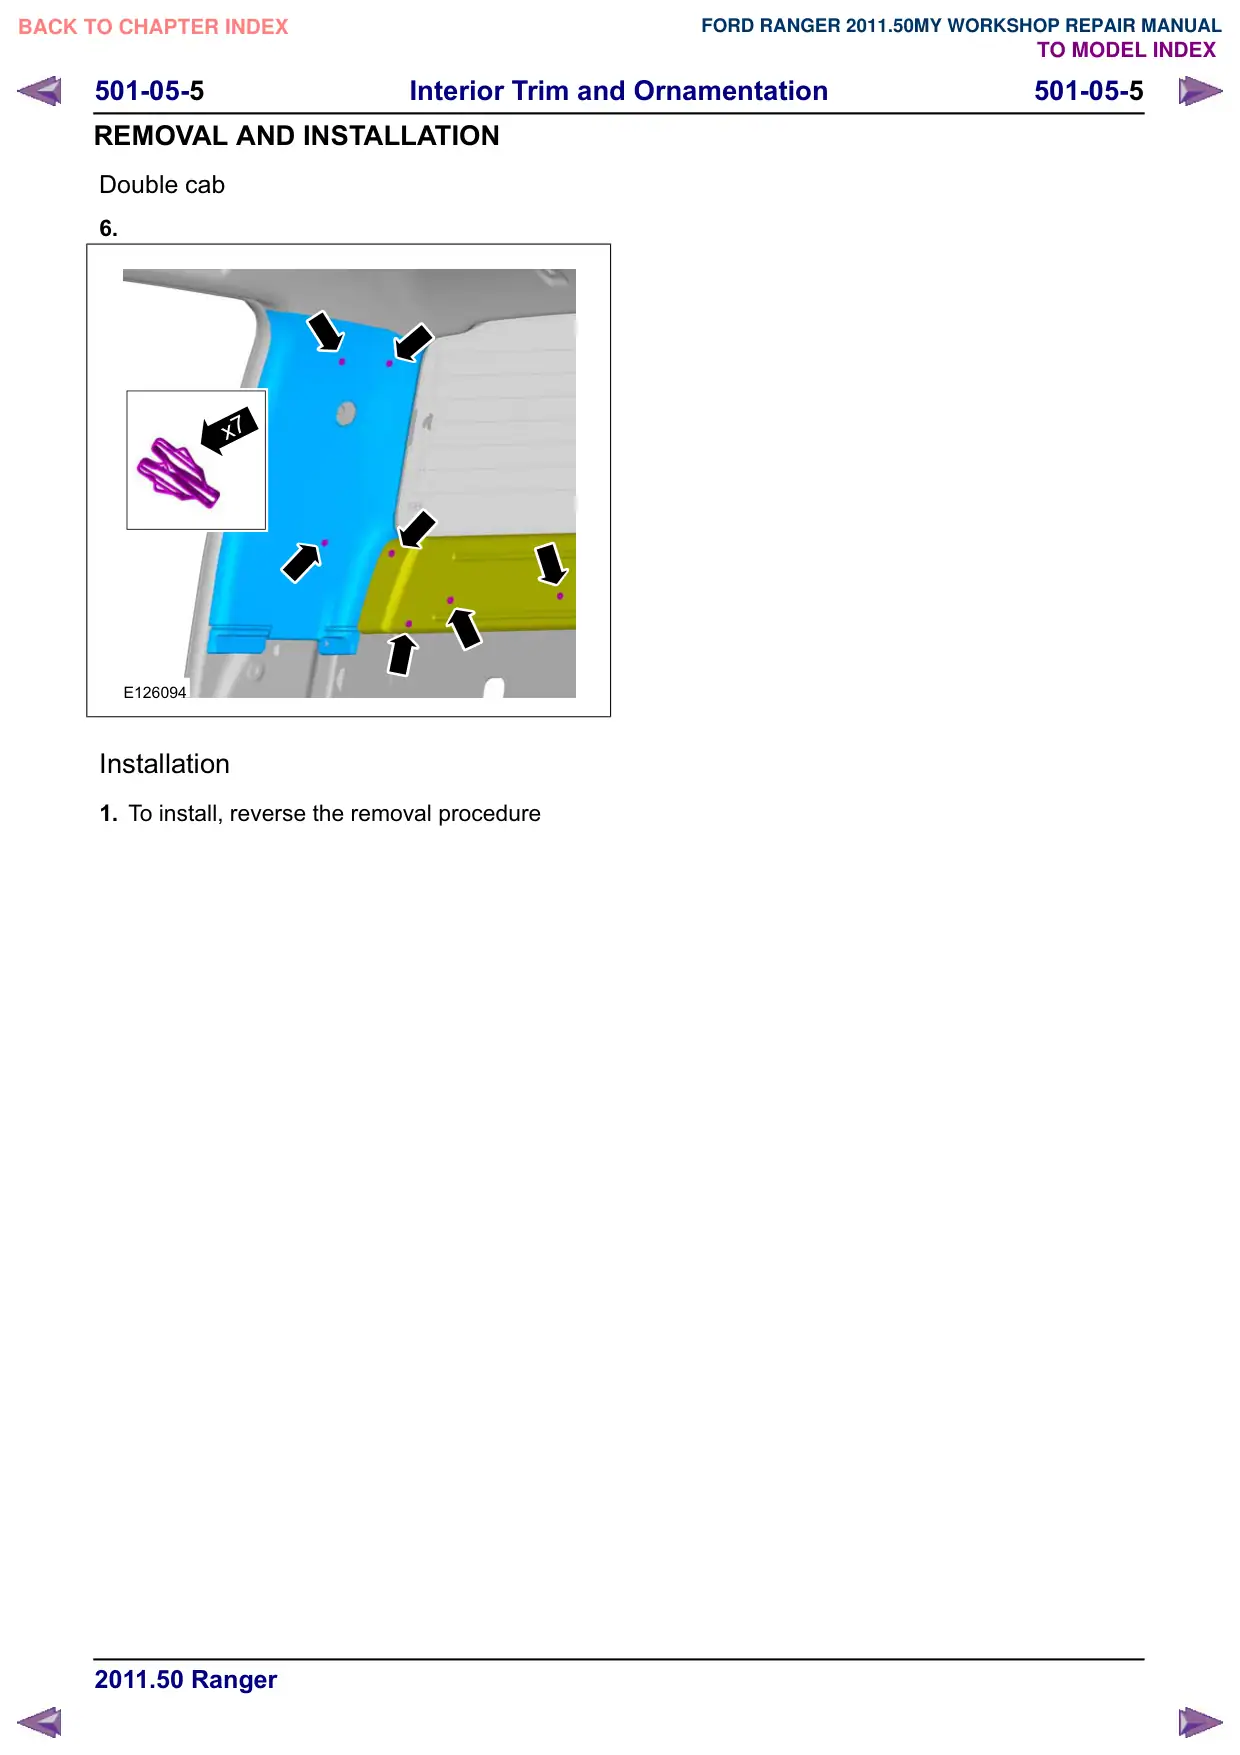
501-05-5 501-05-5 Interior Trim and Ornamentation REMOVAL AND INSTALLATION Double cab 6. x7 E126094 Installation 1. To install, reverse the removal procedure

Página 1368 · Acabamento inferior da coluna C

C-Pillar Lower Trim Panel

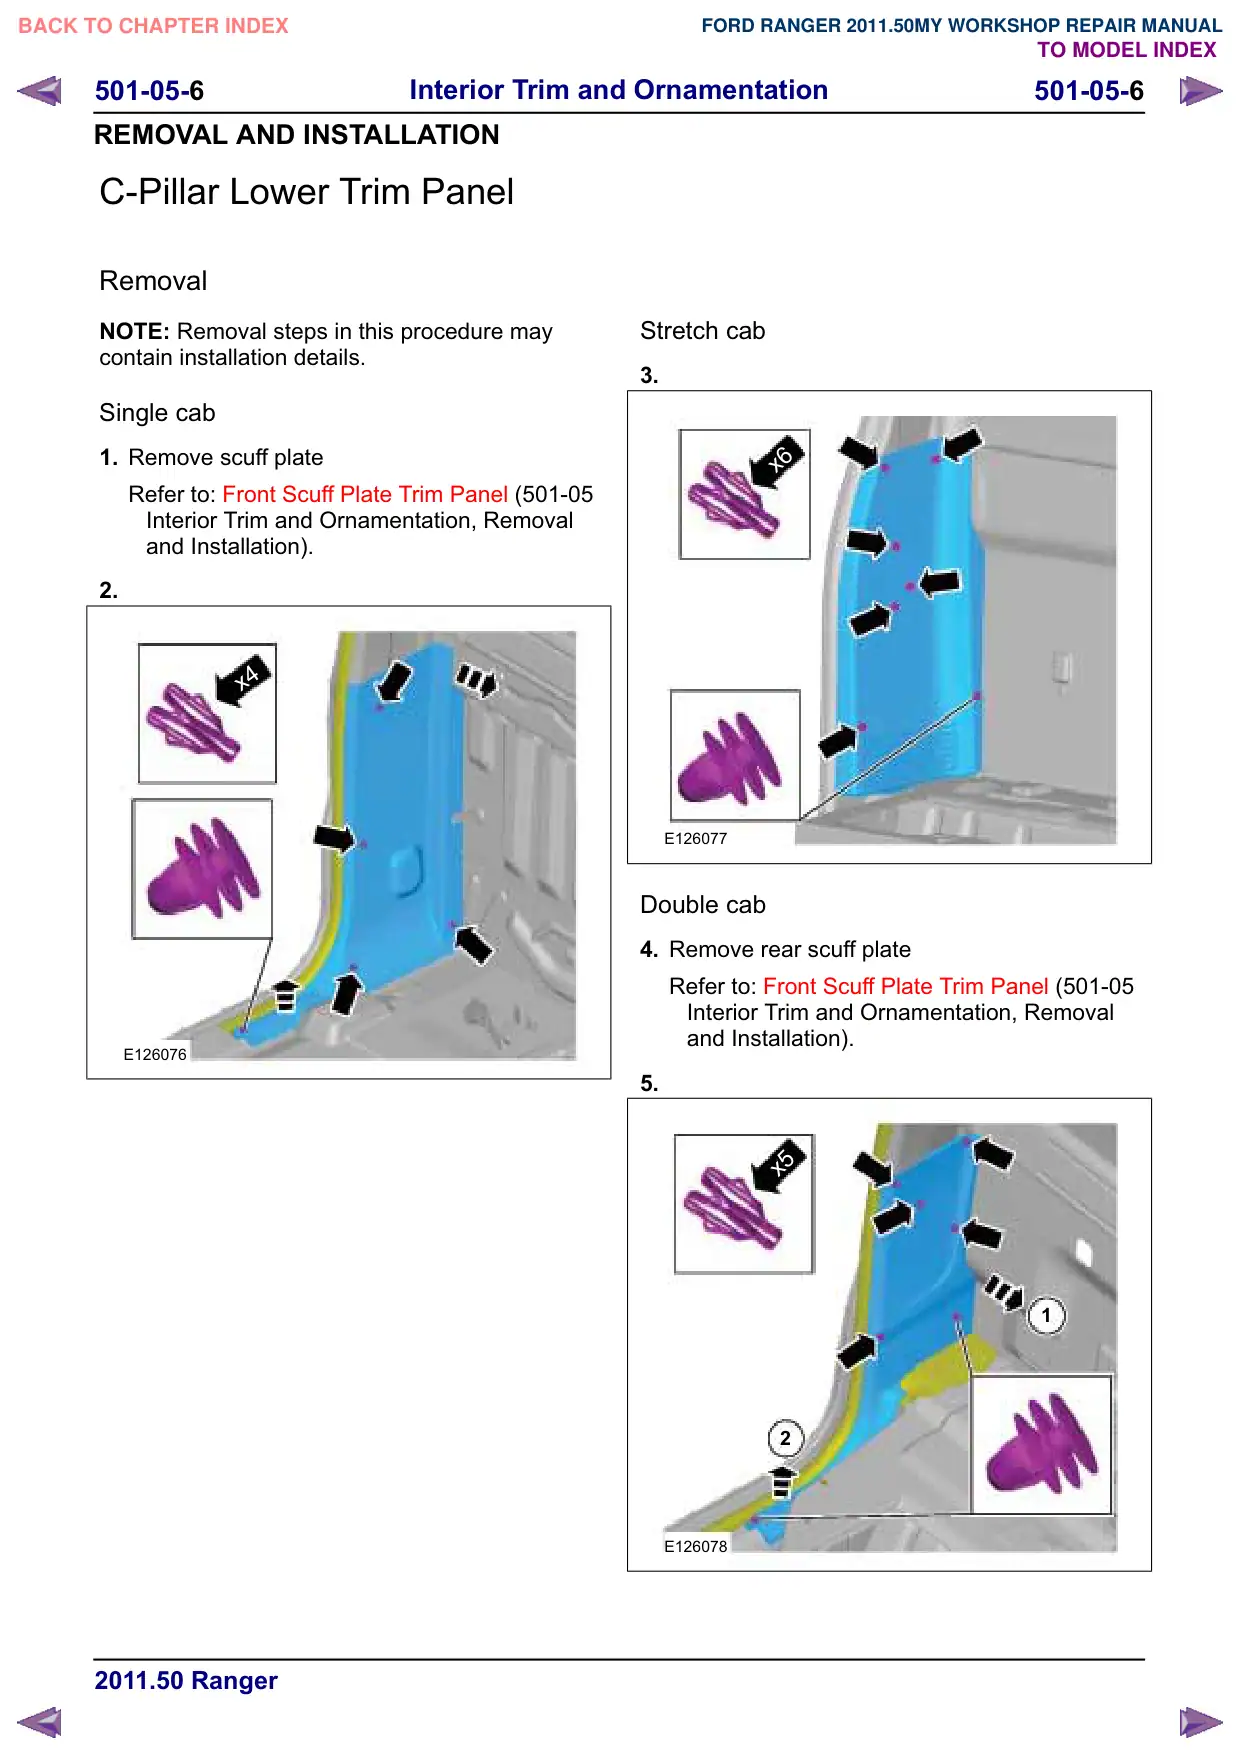
501-05-6 501-05-6 Interior Trim and Ornamentation REMOVAL AND INSTALLATION C-Pillar Lower Trim Panel Removal NOTE: Removal steps in this procedure may contain installation details. Single cab 1. Remove scuff plate Refer to: Front Scuff Plate Trim Panel (501-05 Interior Trim and Ornamentation, Removal and Installation). 2. x4 E126076 Stretch cab 3. x6 E126077 Double cab 4. Remove rear scuff plate Refer to: Front Scuff Plate Trim Panel (501-05 Interior Trim and Ornamentation, Removal and Installation). 5. x5 1 2 E126078

Página 1369 · Acabamento inferior da coluna C

C-Pillar Lower Trim Panel

501-05-7 501-05-7 Interior Trim and Ornamentation REMOVAL AND INSTALLATION Installation 1. To install reverse the removal procedure

Página 1370 · Acabamento lateral do cowl

Cowl Side Trim Panel

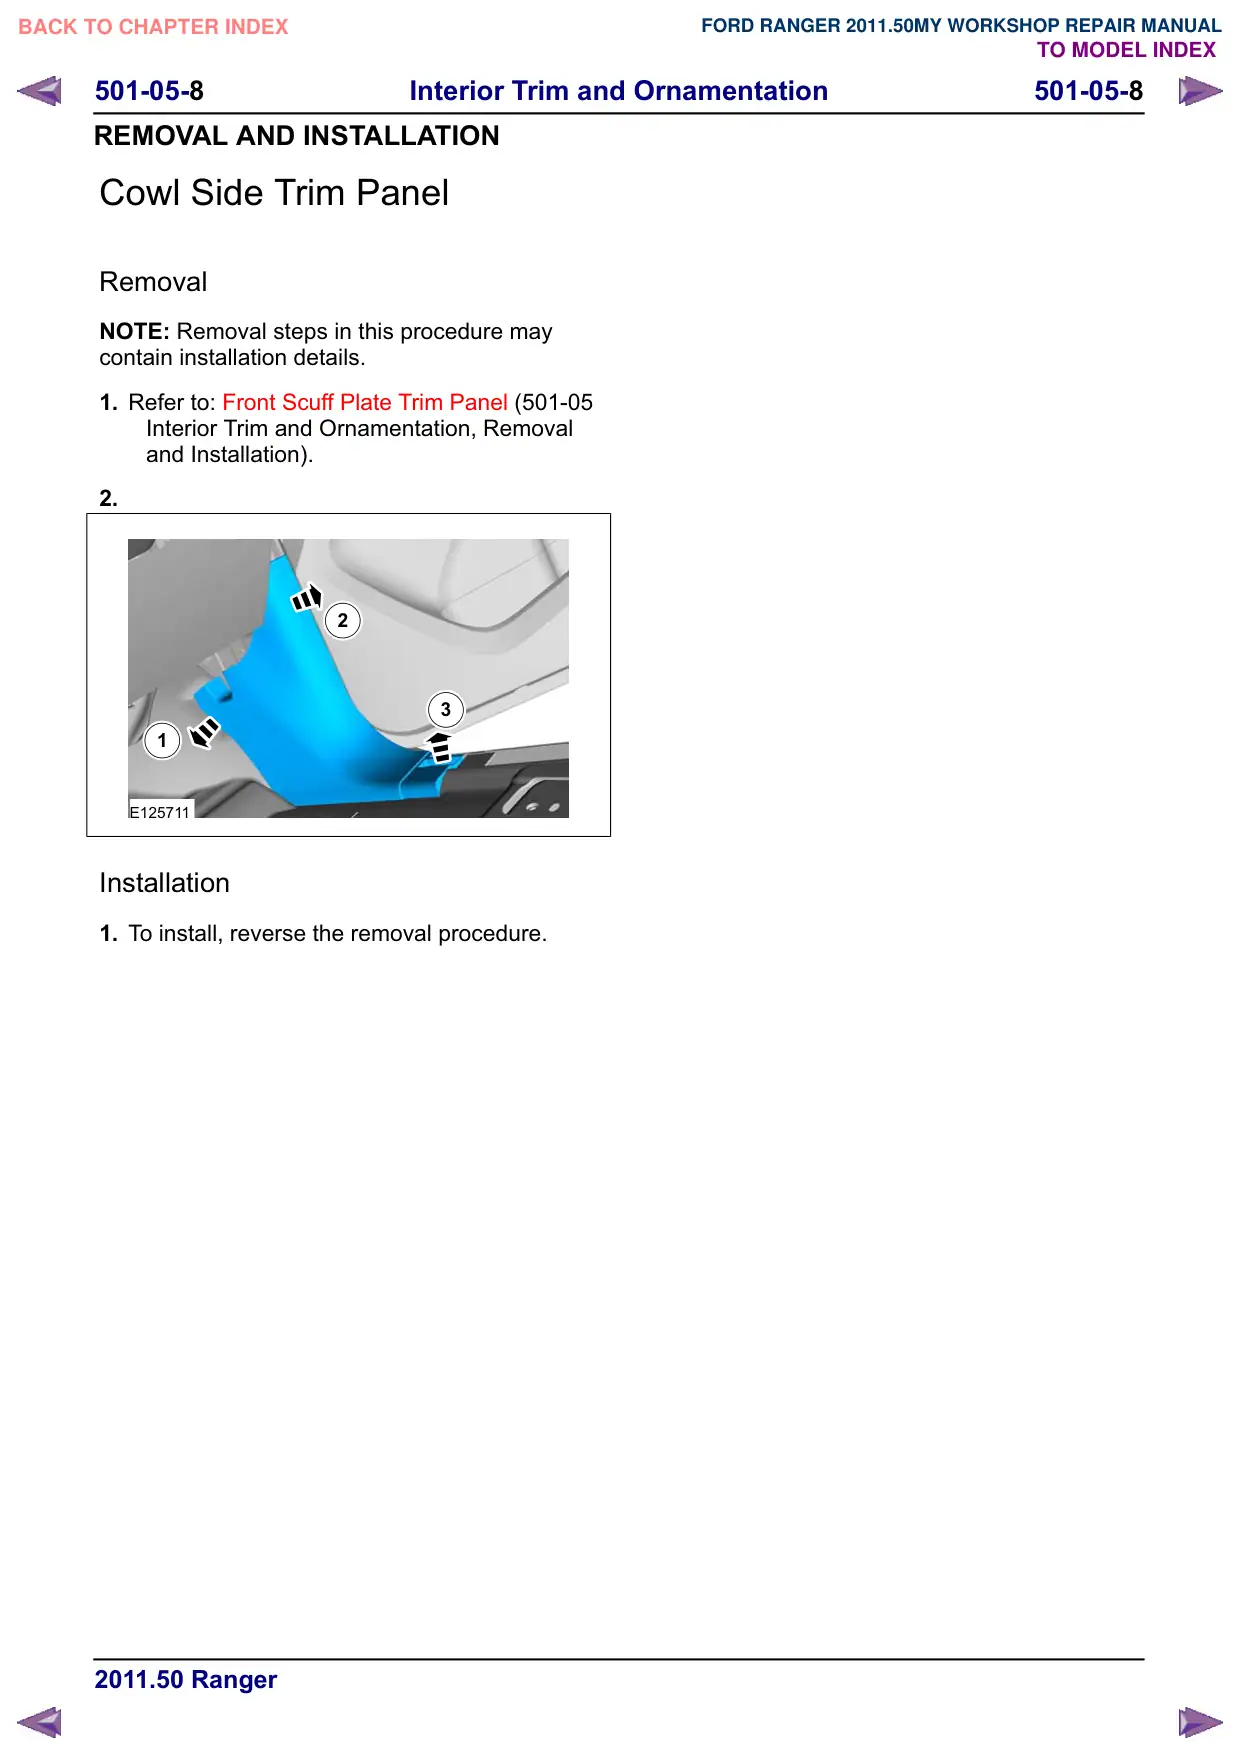
501-05-8 501-05-8 Interior Trim and Ornamentation REMOVAL AND INSTALLATION Cowl Side Trim Panel Removal NOTE: Removal steps in this procedure may contain installation details. 1. Refer to: Front Scuff Plate Trim Panel (501-05 Interior Trim and Ornamentation, Removal and Installation). 2. 2 3 1 E125711 Installation 1. To install, reverse the removal procedure.

Página 1371 · Forro da porta dianteira

Front Door Trim Panel

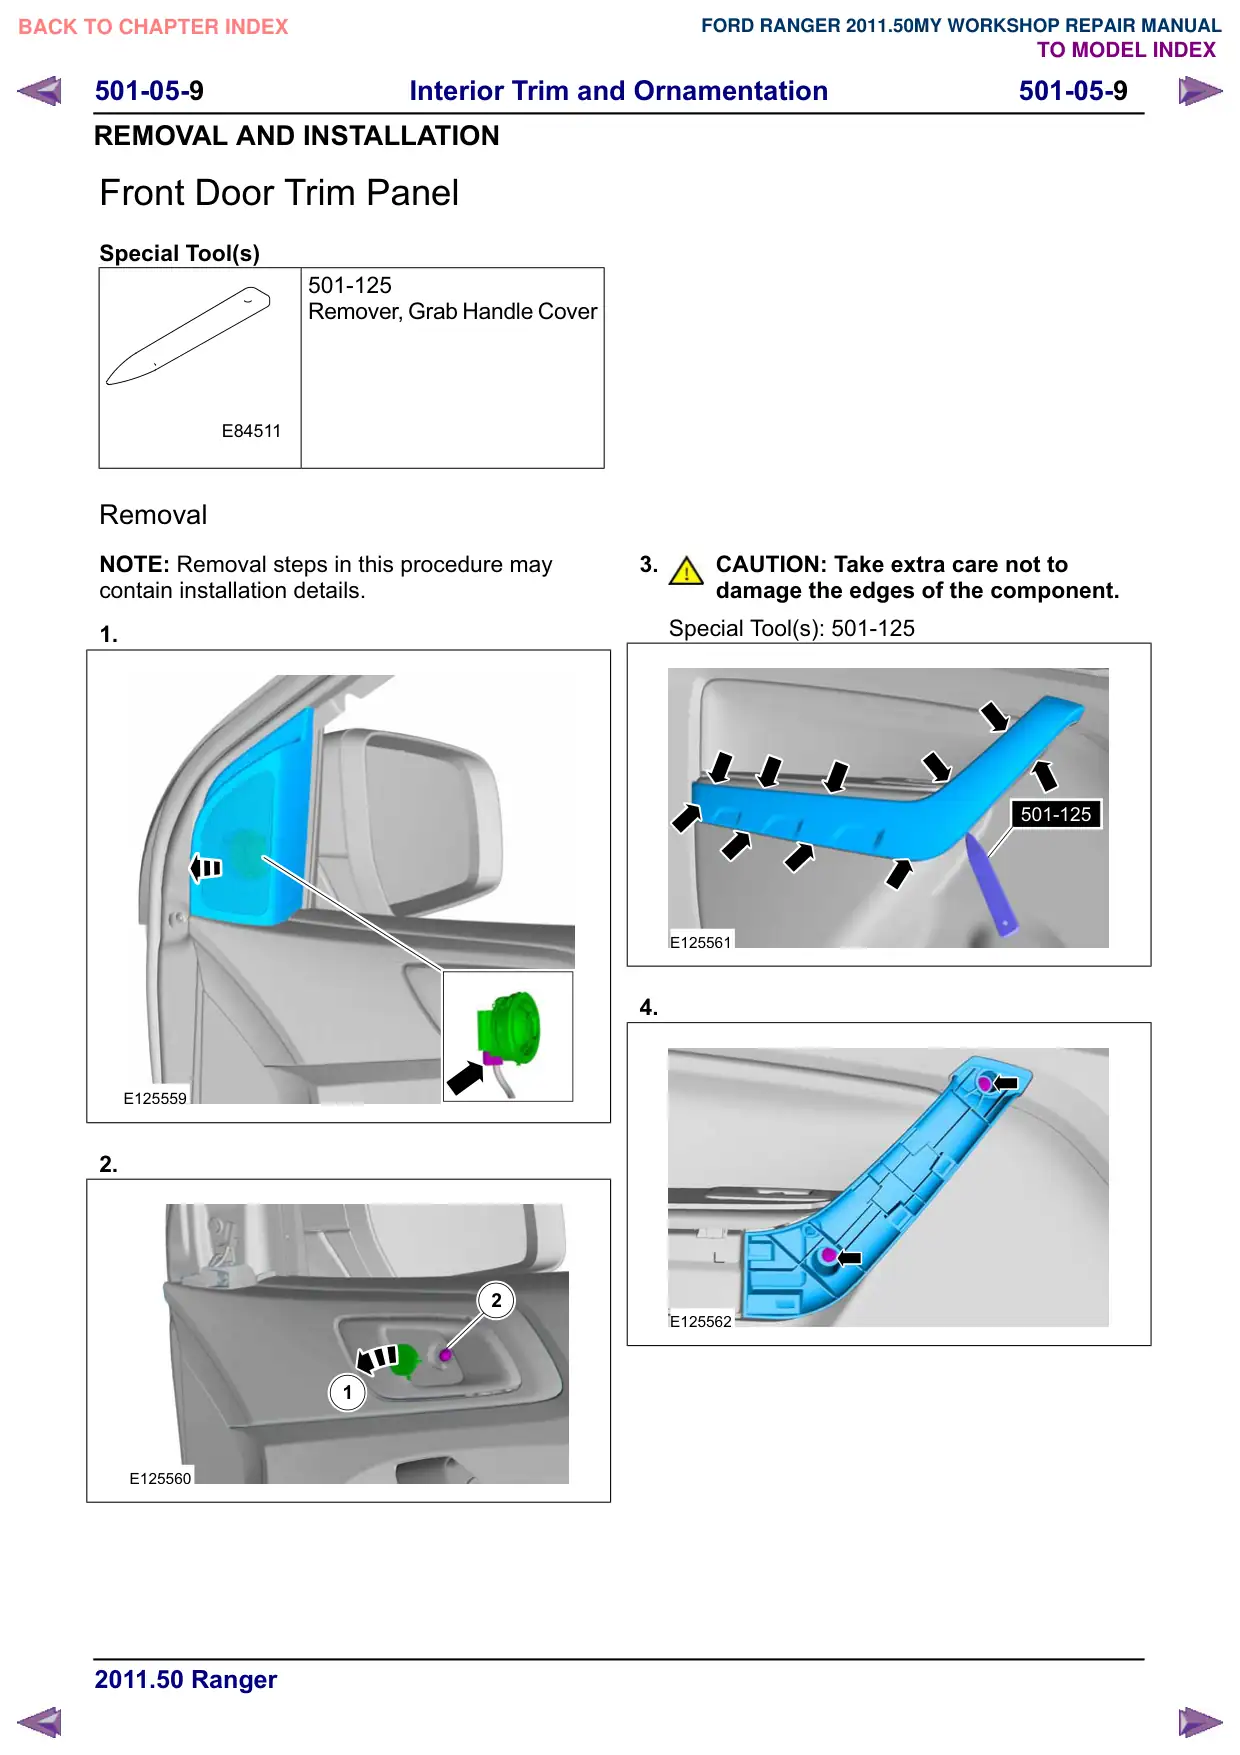
501-05-9 501-05-9 Interior Trim and Ornamentation REMOVAL AND INSTALLATION Front Door Trim Panel Special Tool(s) 501-125 Remover, Grab Handle Cover E84511 Removal NOTE: Removal steps in this procedure may contain installation details. 1. E125559 2. 2 1 E125560 3. CAUTION: Take extra care not to damage the edges of the component. Special Tool(s): 501-125 501-125 E125561 4. E125562

Página 1372 · Forro da porta dianteira

Front Door Trim Panel

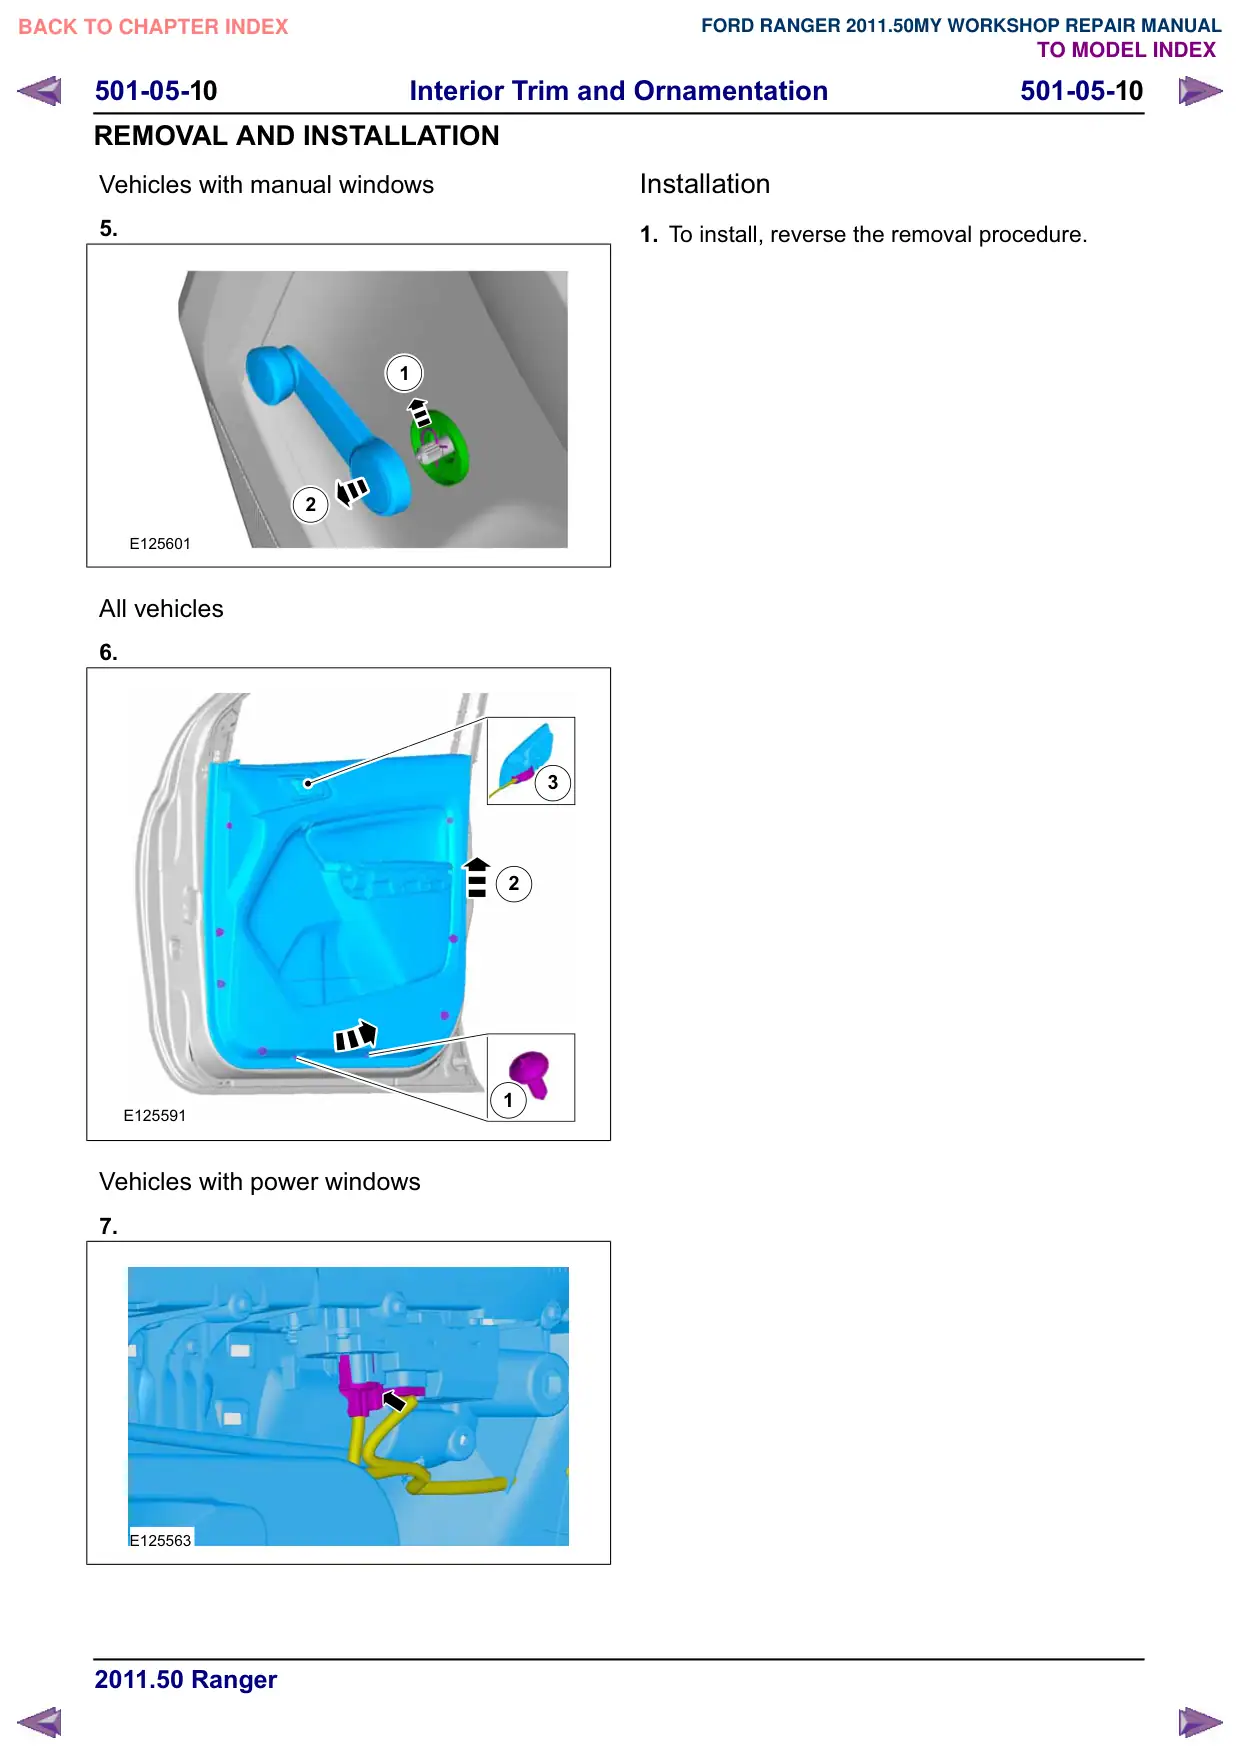
501-05-10 501-05-10 Interior Trim and Ornamentation REMOVAL AND INSTALLATION Vehicles with manual windows 5. 1 2 E125601 All vehicles 6. 3 2 1 E125591 Vehicles with power windows 7. E125563 Installation 1. To install, reverse the removal procedure.

Página 1373 · Painel de acabamento da porta traseira – Cabine dupla

Rear Door Trim Panel – Double Cab

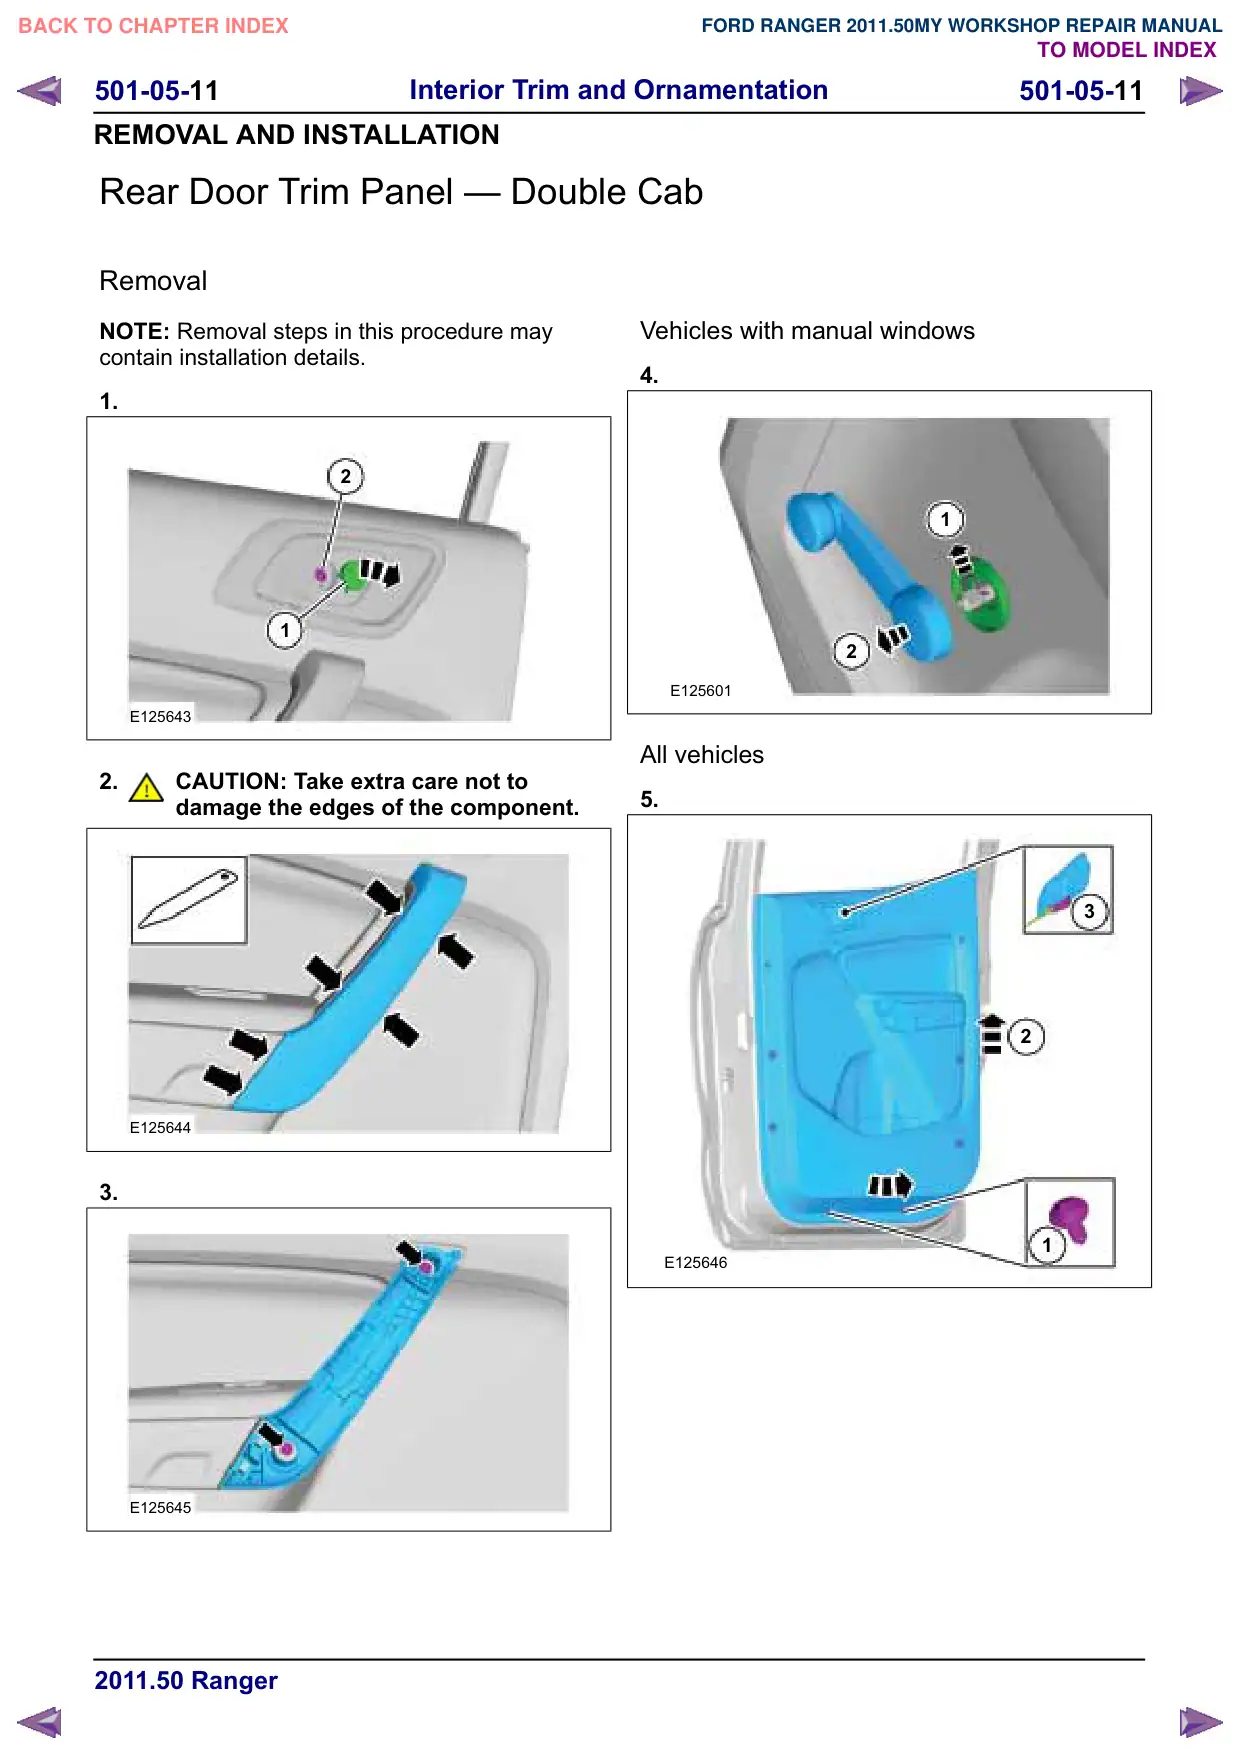
501-05-11 501-05-11 Interior Trim and Ornamentation REMOVAL AND INSTALLATION Rear Door Trim Panel – Double Cab Removal NOTE: Removal steps in this procedure may contain installation details. 1. 2 1 E125643 2. CAUTION: Take extra care not to damage the edges of the component. E125644 3. E125645 Vehicles with manual windows 4. 1 2 E125601 All vehicles 5. 3 2 1 E125646

Página 1374 · Painel de acabamento da porta traseira – Cabine dupla

Rear Door Trim Panel – Double Cab

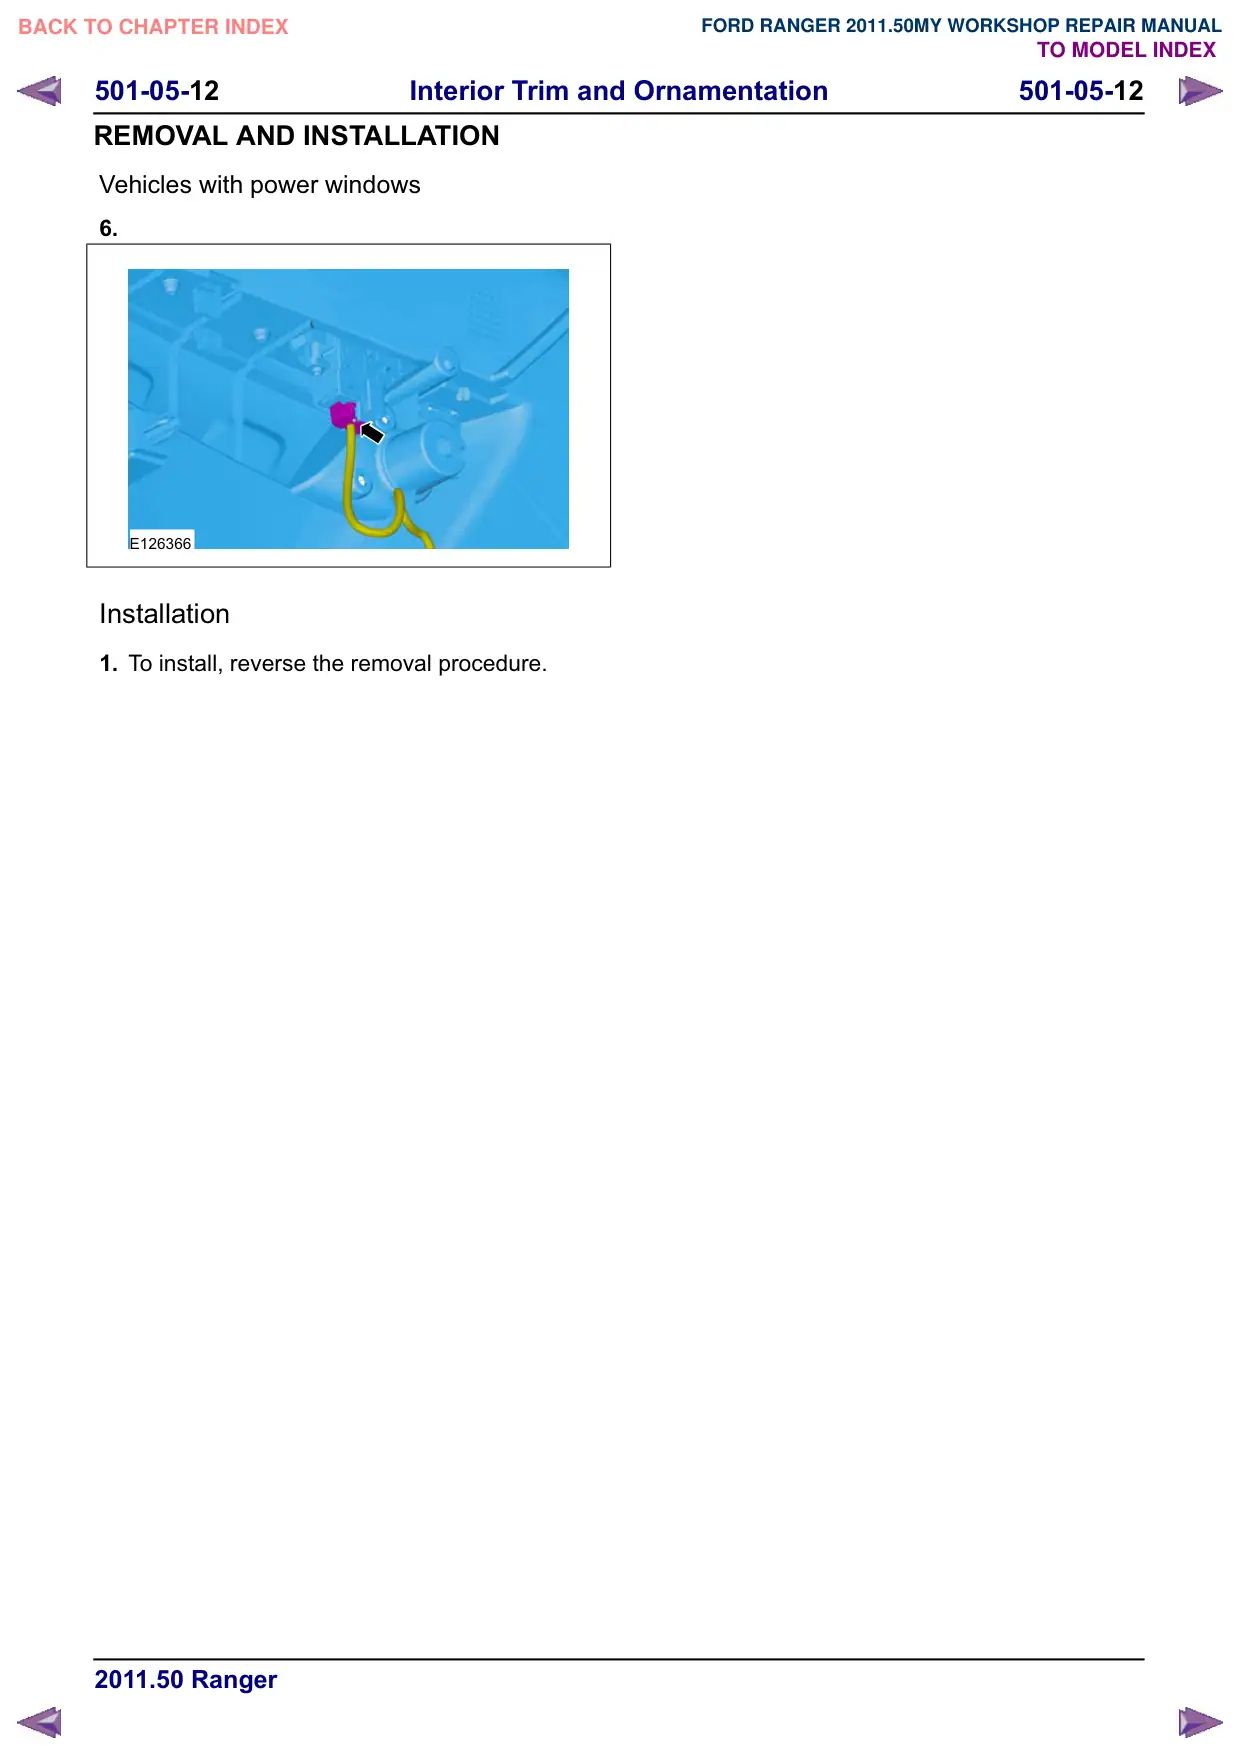
501-05-12 501-05-12 Interior Trim and Ornamentation REMOVAL AND INSTALLATION Vehicles with power windows 6. E126366 Installation 1. To install, reverse the removal procedure.

Página 1375 · Painel de acabamento da porta traseira – Cabine estendida

Rear Door Trim Panel – Super Cab

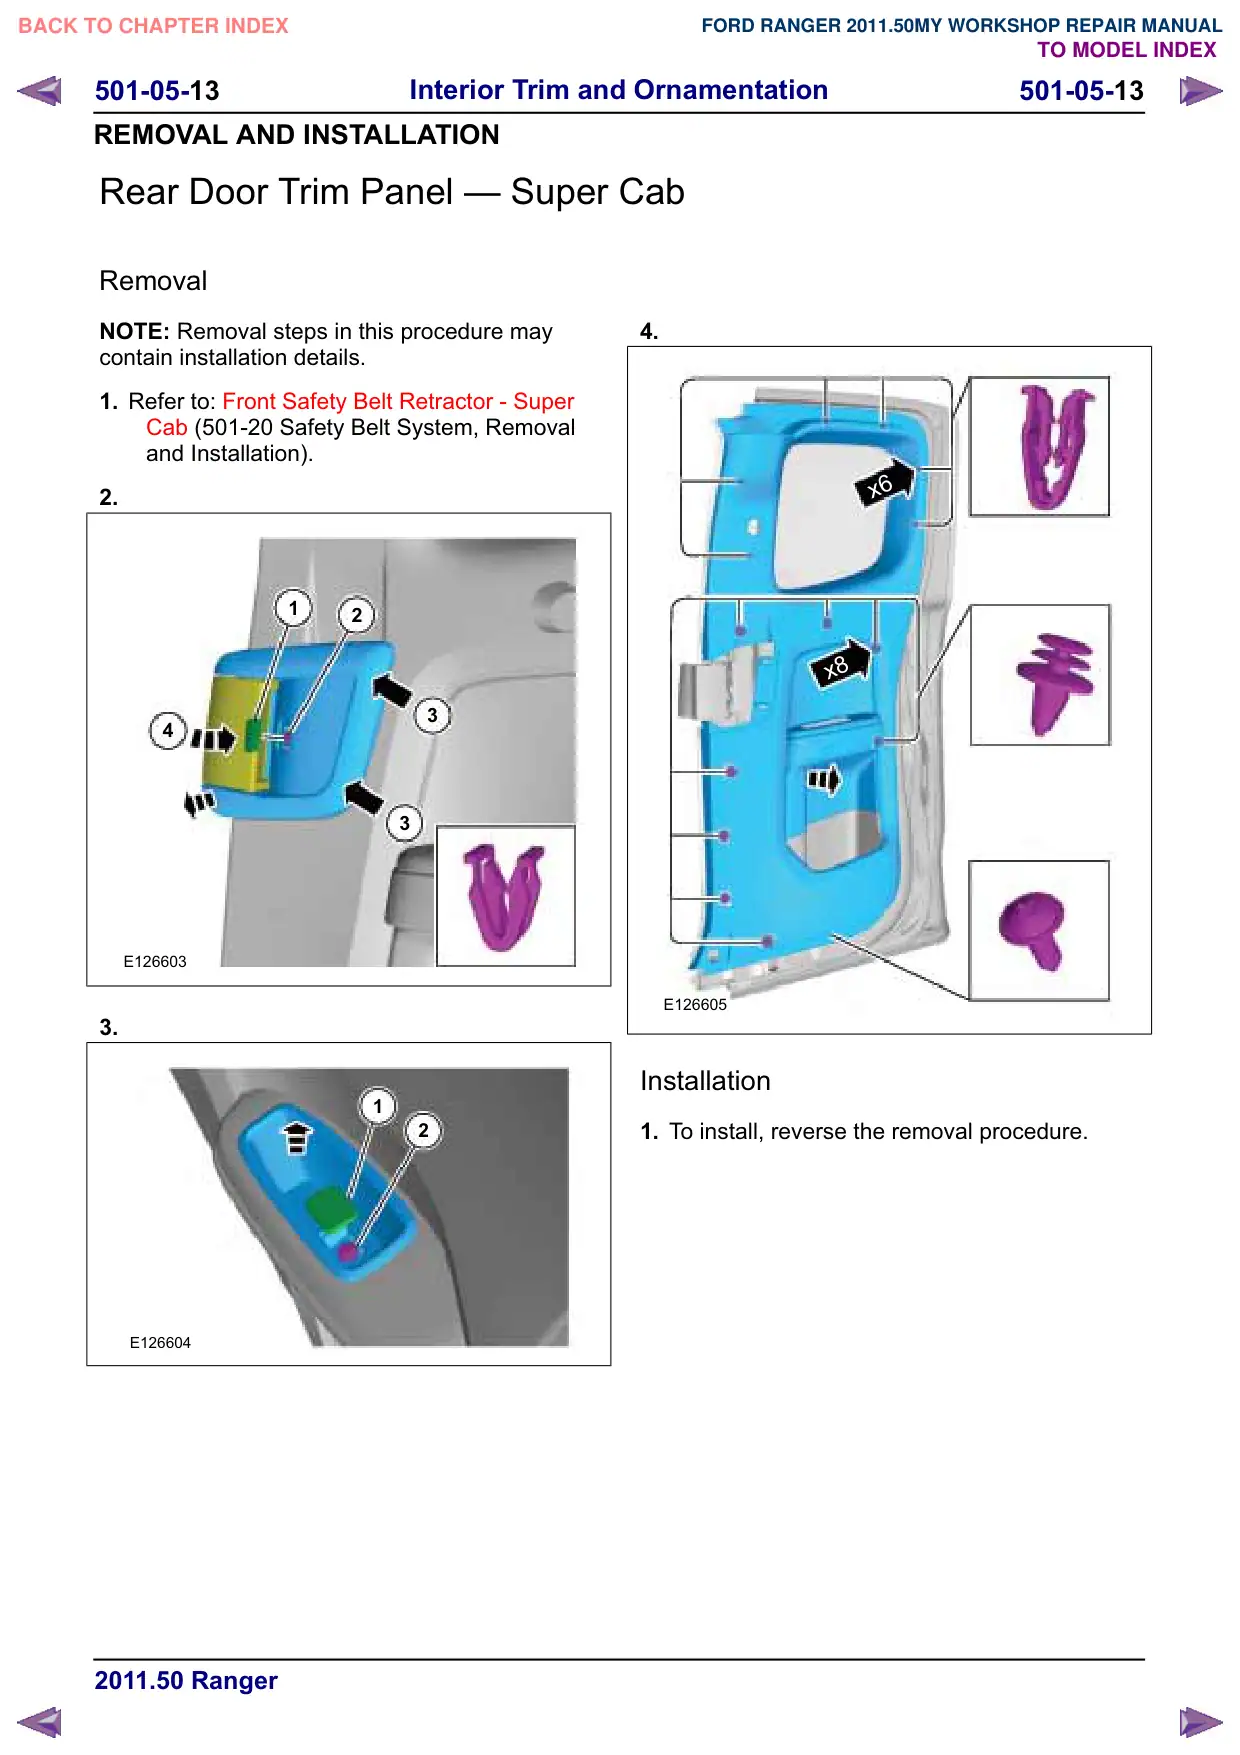
501-05-13 501-05-13 Interior Trim and Ornamentation REMOVAL AND INSTALLATION Rear Door Trim Panel – Super Cab Removal NOTE: Removal steps in this procedure may contain installation details. 1. Refer to: Front Safety Belt Retractor - Super &DE (501-20 Safety Belt System, Removal and Installation). 2. 1 2 3 4 3 E126603 3. 1 2 E126604 4. x6 x8 E126605 Installation 1. To install, reverse the removal procedure.

Página 1376 · Acabamento da soleira dianteira

Front Scuff Plate Trim Panel

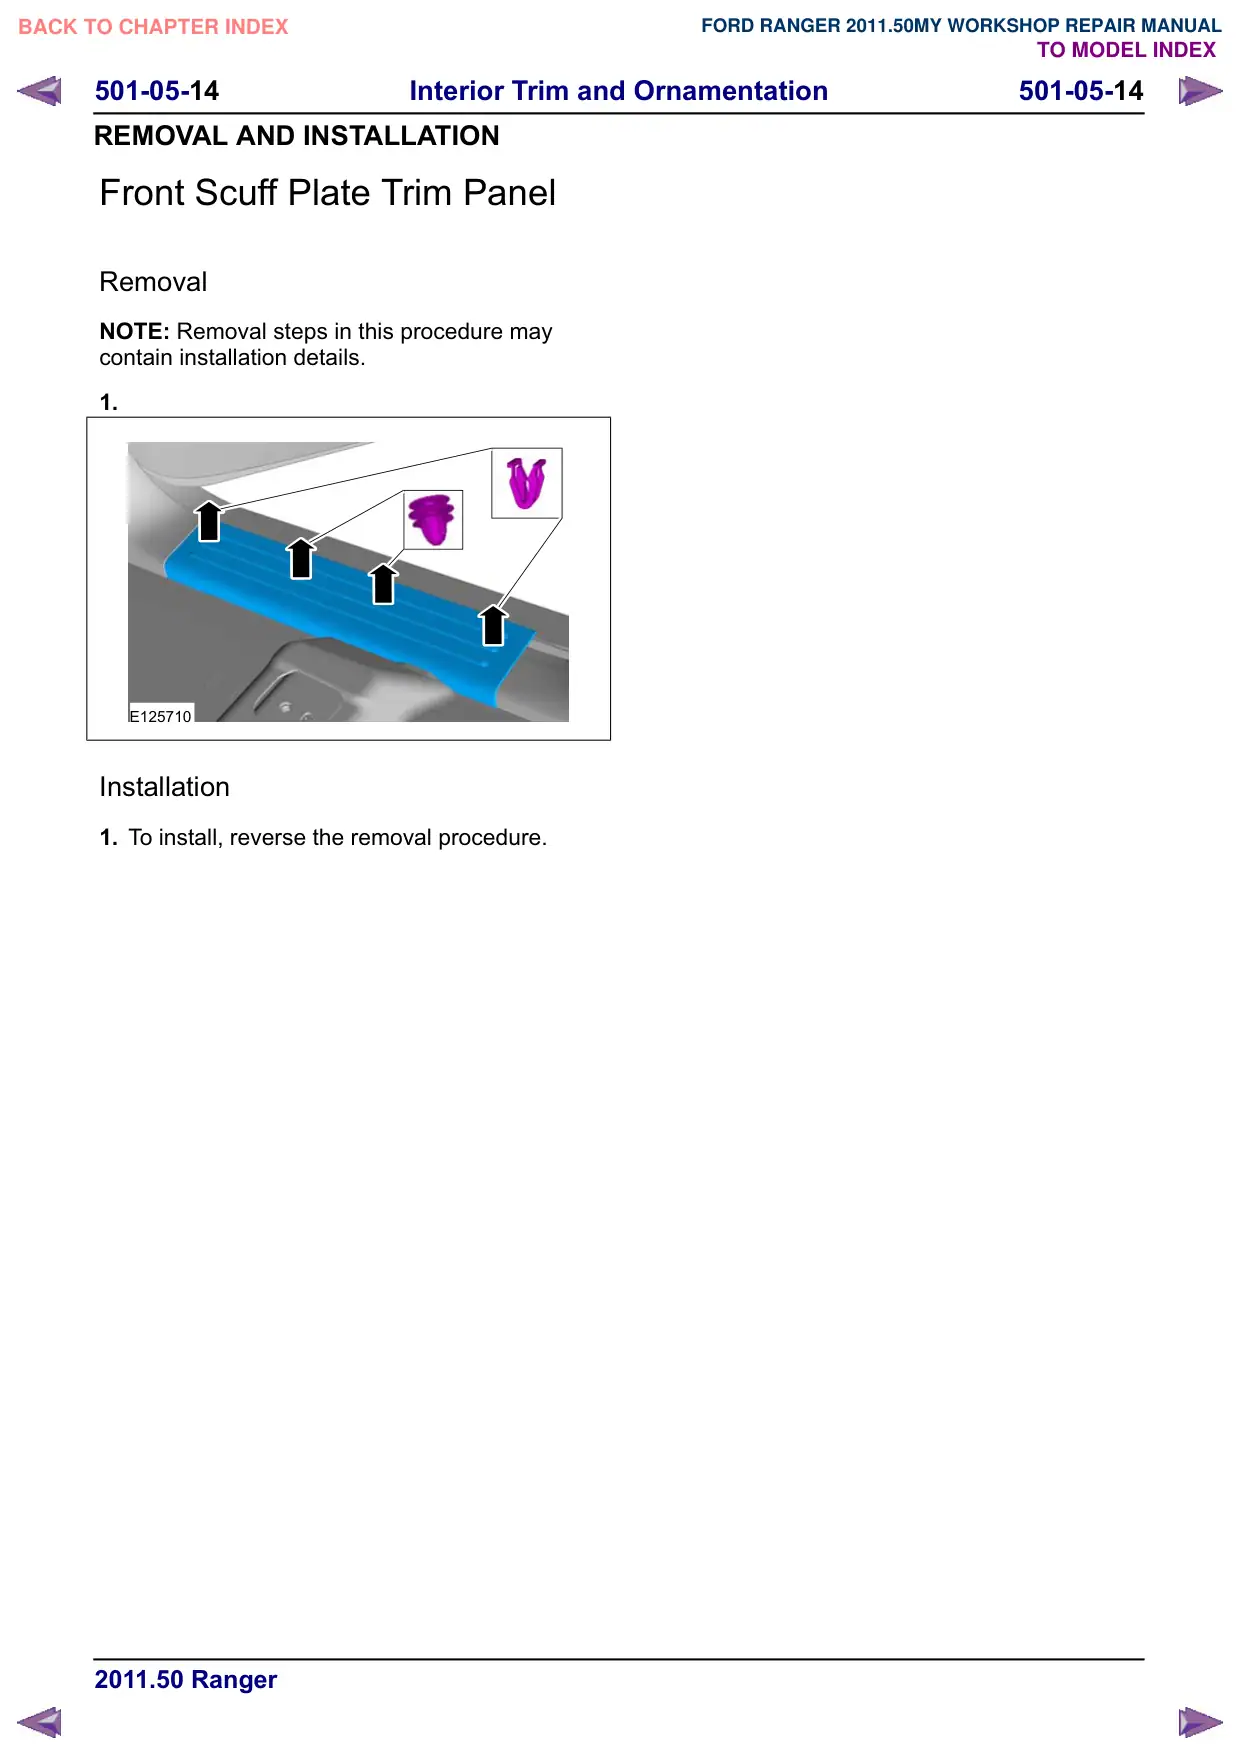
501-05-14 501-05-14 Interior Trim and Ornamentation REMOVAL AND INSTALLATION Front Scuff Plate Trim Panel Removal NOTE: Removal steps in this procedure may contain installation details. 1. E125710 Installation 1. To install, reverse the removal procedure.

Página 1377 · Painel de acabamento da soleira traseira

Rear Scuff Plate Trim Panel

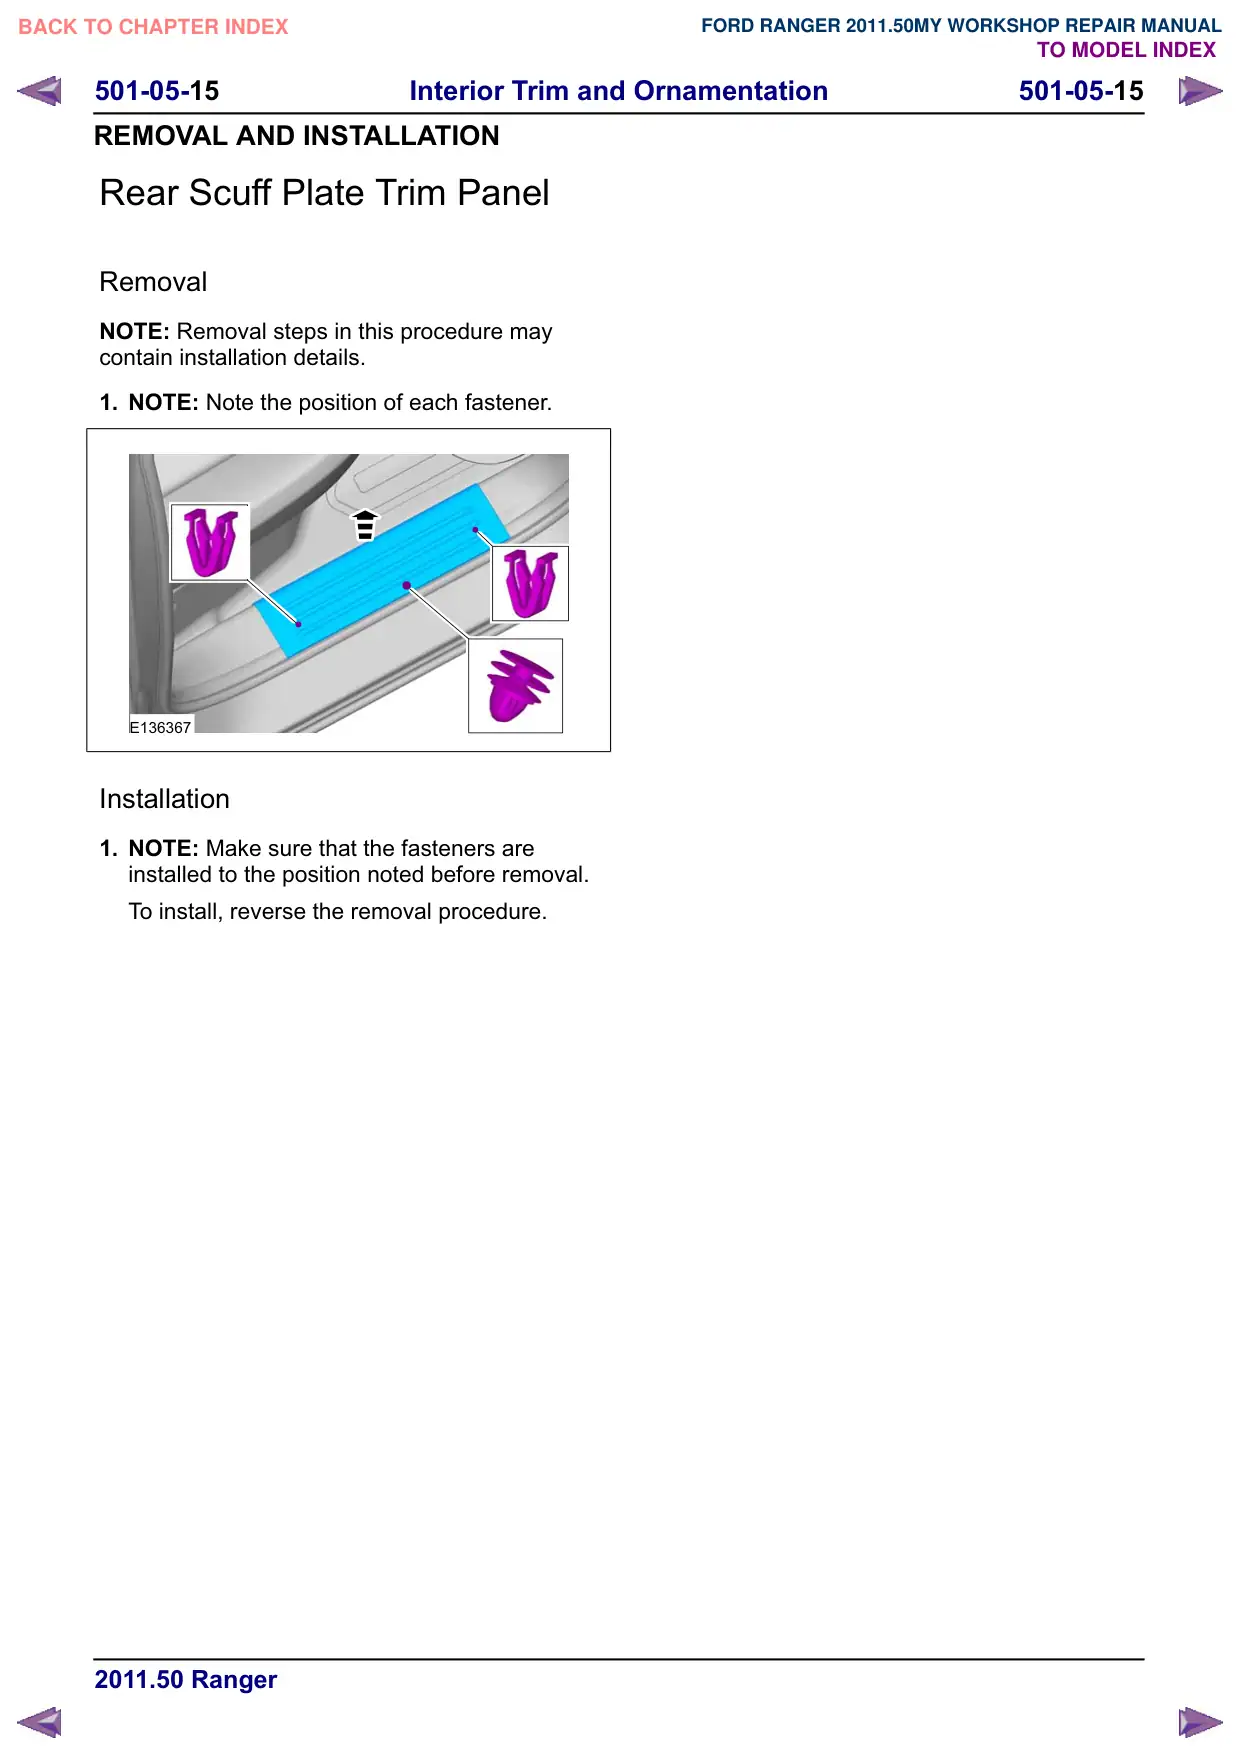
501-05-15 501-05-15 Interior Trim and Ornamentation REMOVAL AND INSTALLATION Rear Scuff Plate Trim Panel Removal NOTE: Removal steps in this procedure may contain installation details. 1. NOTE: Note the position of each fastener. E136367 Installation 1. NOTE: Make sure that the fasteners are installed to the position noted before removal. To install, reverse the removal procedure.

Página 1378 · Forro do teto

Headliner

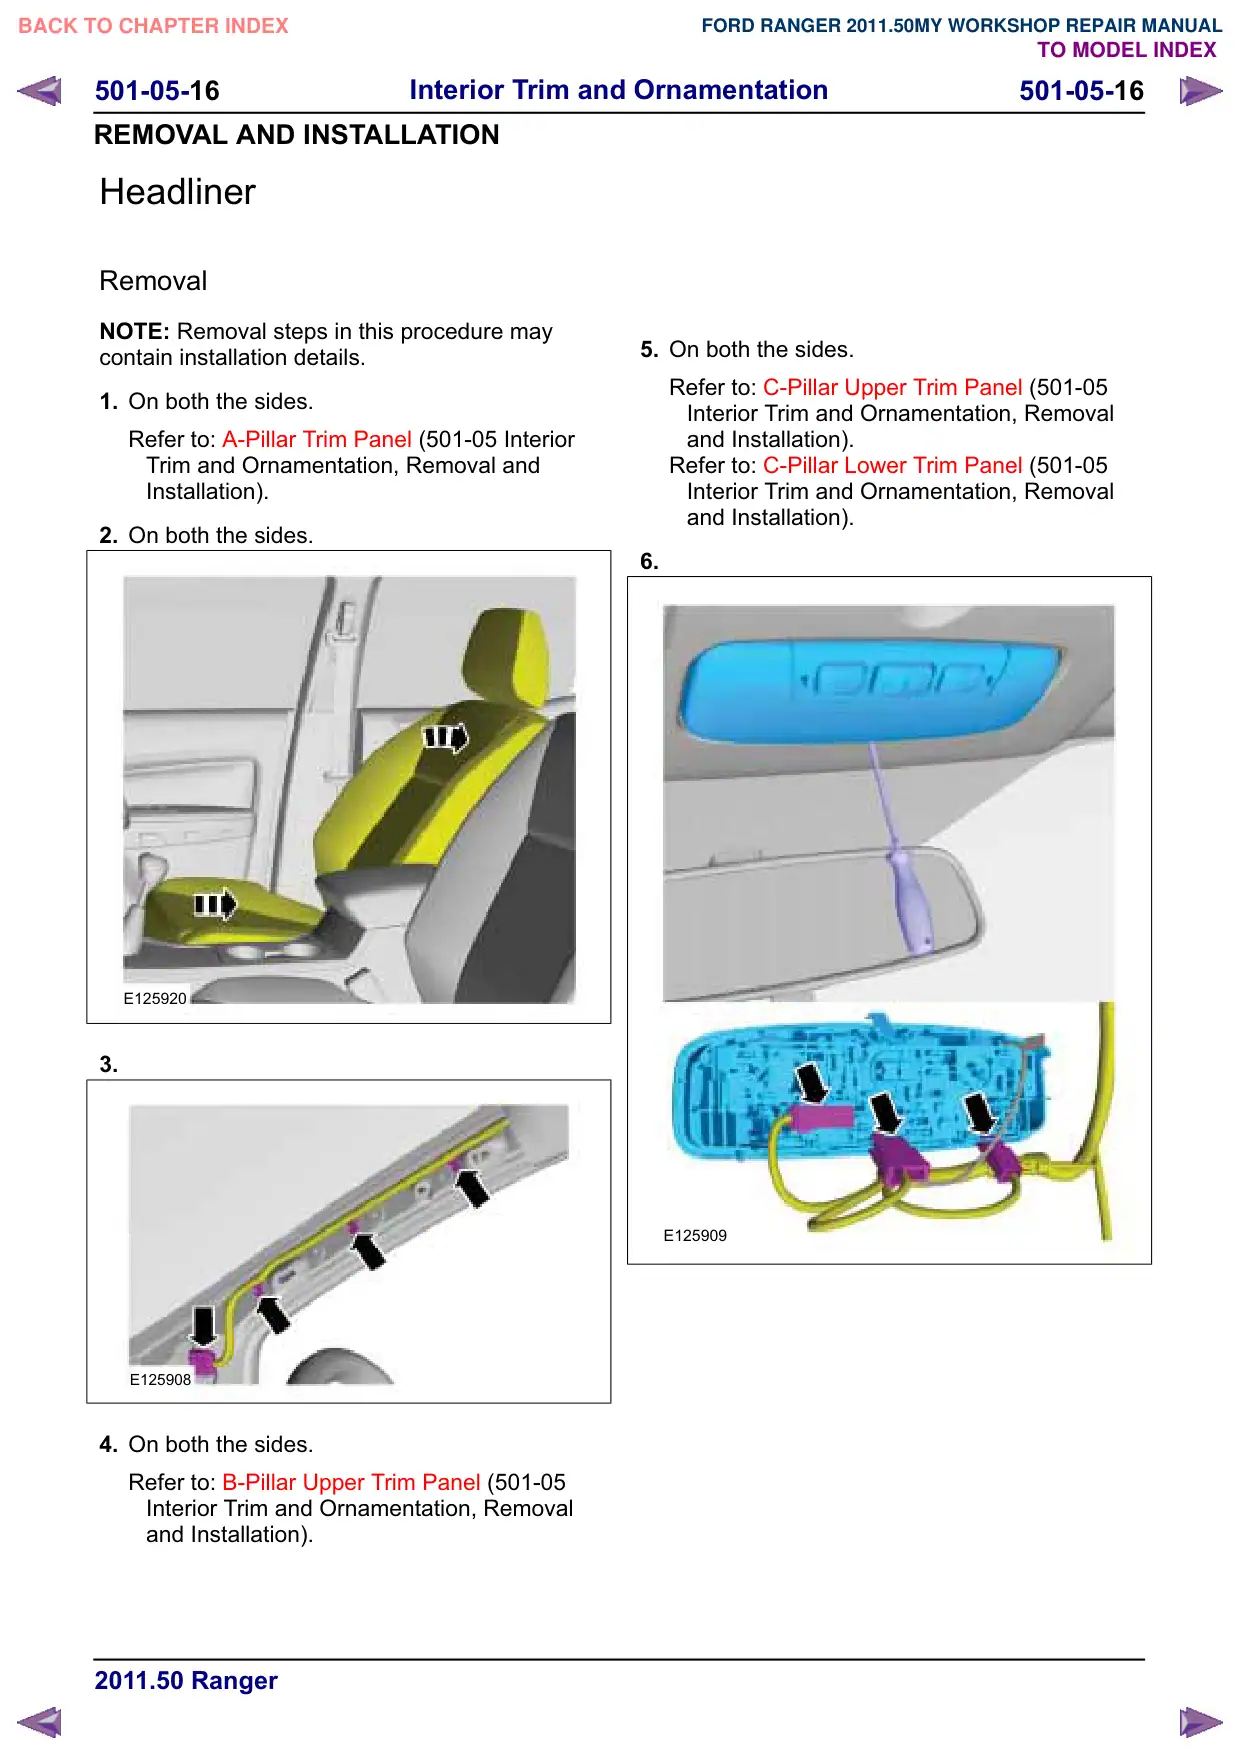
501-05-16 501-05-16 Interior Trim and Ornamentation REMOVAL AND INSTALLATION Headliner Removal NOTE: Removal steps in this procedure may contain installation details. 1. On both the sides. Refer to: A-Pillar Trim Panel (501-05 Interior Trim and Ornamentation, Removal and Installation). 2. On both the sides. E125920 3. E125908 4. On both the sides. Refer to: B-Pillar Upper Trim Panel (501-05 Interior Trim and Ornamentation, Removal and Installation). 5. On both the sides. Refer to: C-Pillar Upper Trim Panel (501-05 Interior Trim and Ornamentation, Removal and Installation). Refer to: C-Pillar Lower Trim Panel (501-05 Interior Trim and Ornamentation, Removal and Installation). 6. E125909

Página 1379 · Forro do teto

Headliner

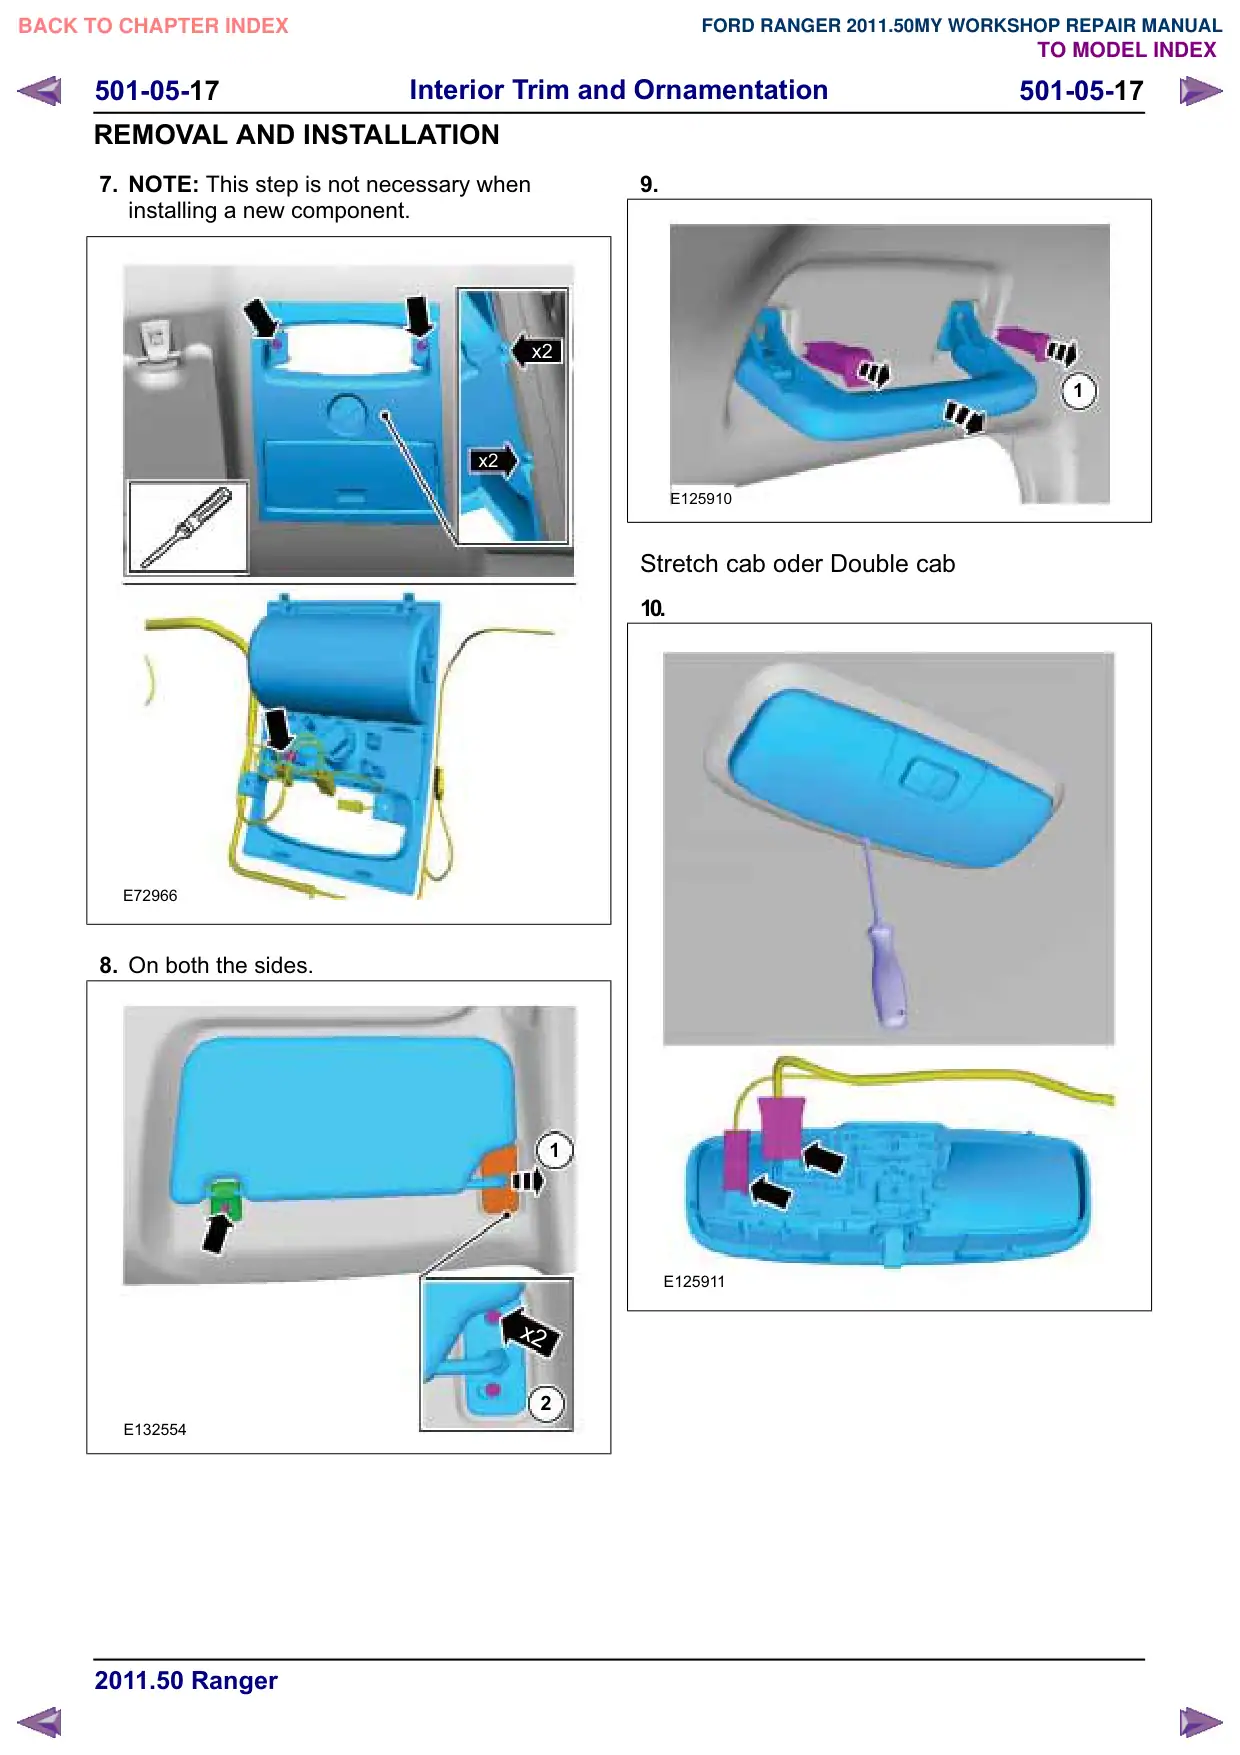
501-05-17 501-05-17 Interior Trim and Ornamentation REMOVAL AND INSTALLATION 7. NOTE: This step is not necessary when installing a new component. x2 x2 E72966 8. On both the sides. 1 x2 2 E132554 9. 1 E125910 Stretch cab oder Double cab 10. E125911

Página 1380 · Forro do teto

Headliner

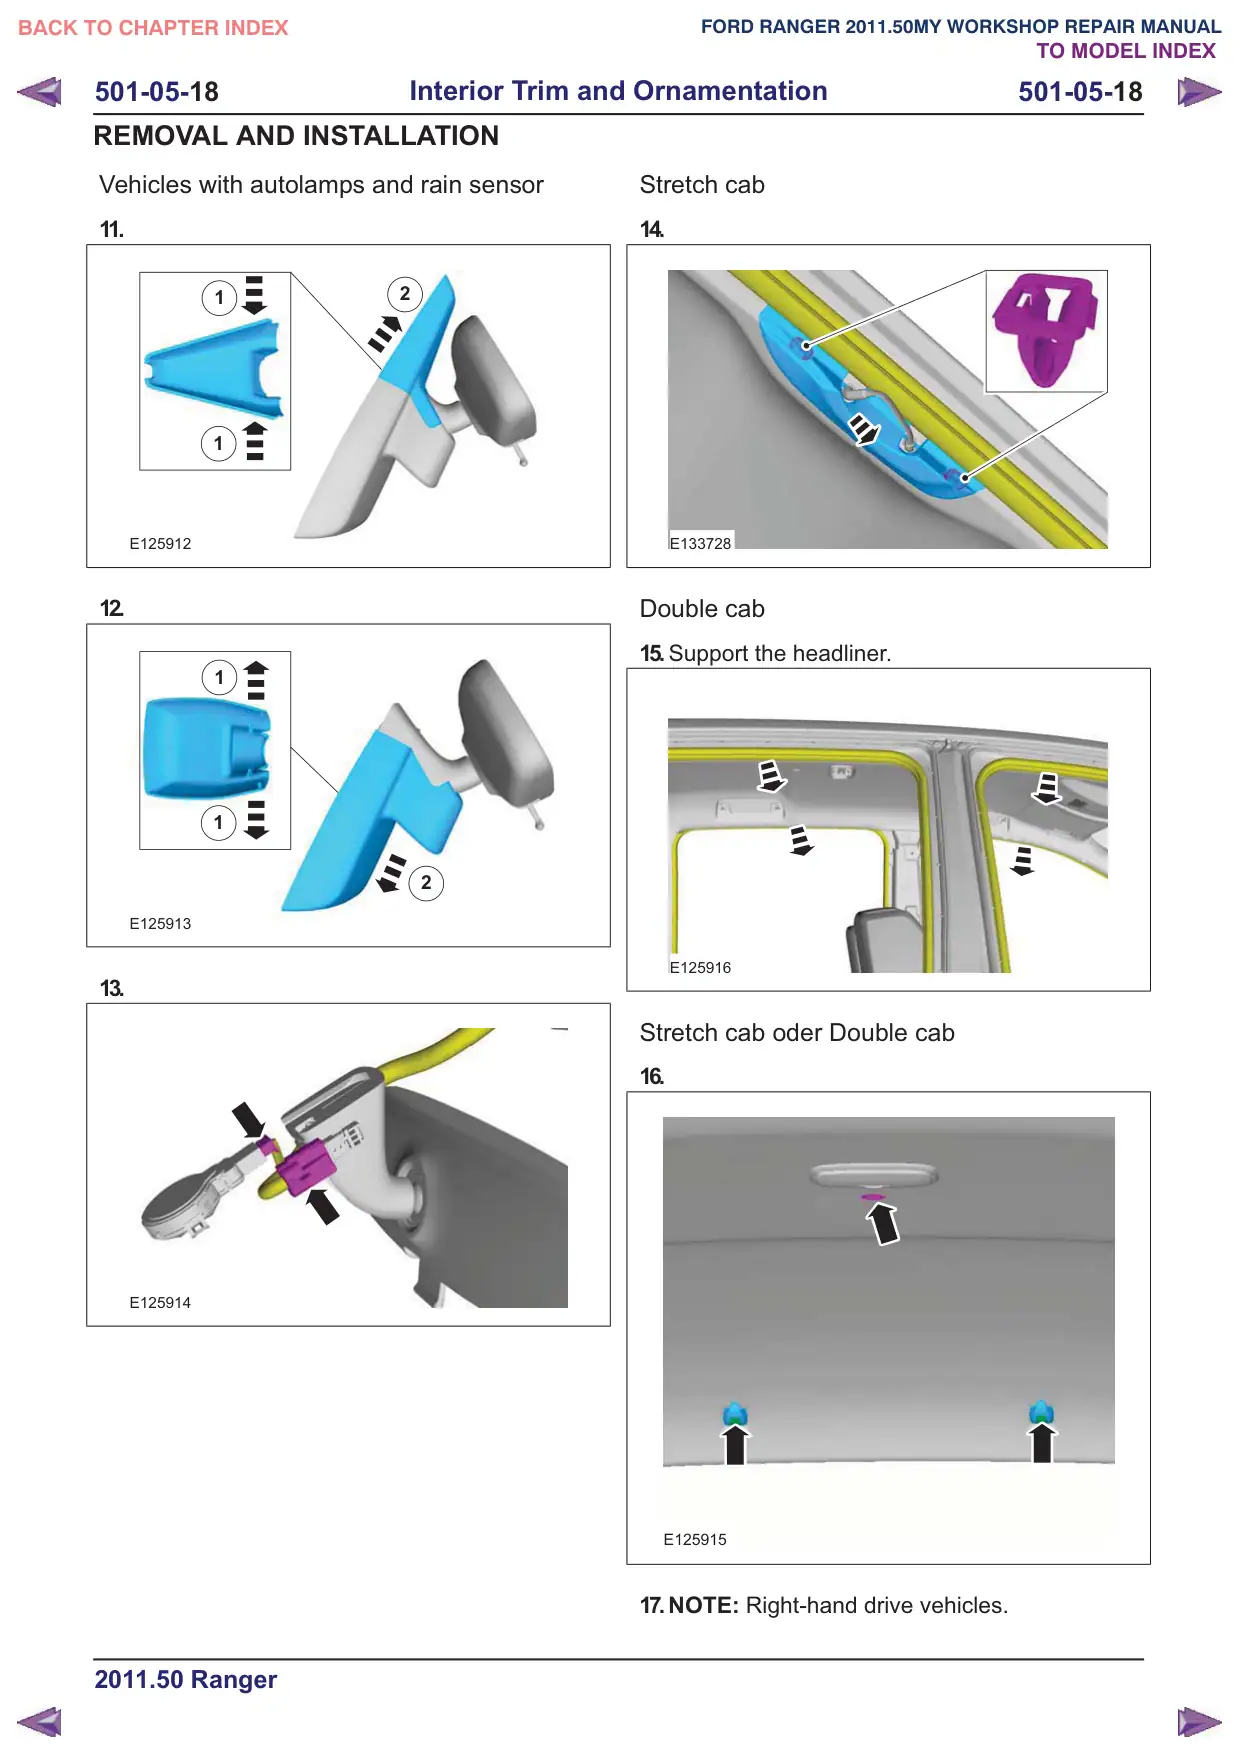
501-05-18 Interior Trim and Ornamentation 501-05-18 REMOVAL AND INSTALLATION Vehicles with autolamps and rain sensor 11. 1 2 1 E125912 12. 1 1 2 E125913 13. E125914 Stretch cab 14. E133728 Double cab 15.Support the headliner. E125916 Stretch cab oder Double cab 16. E125915 17.NOTE: Right-hand drive vehicles.

Página 1381 · Forro do teto

Headliner

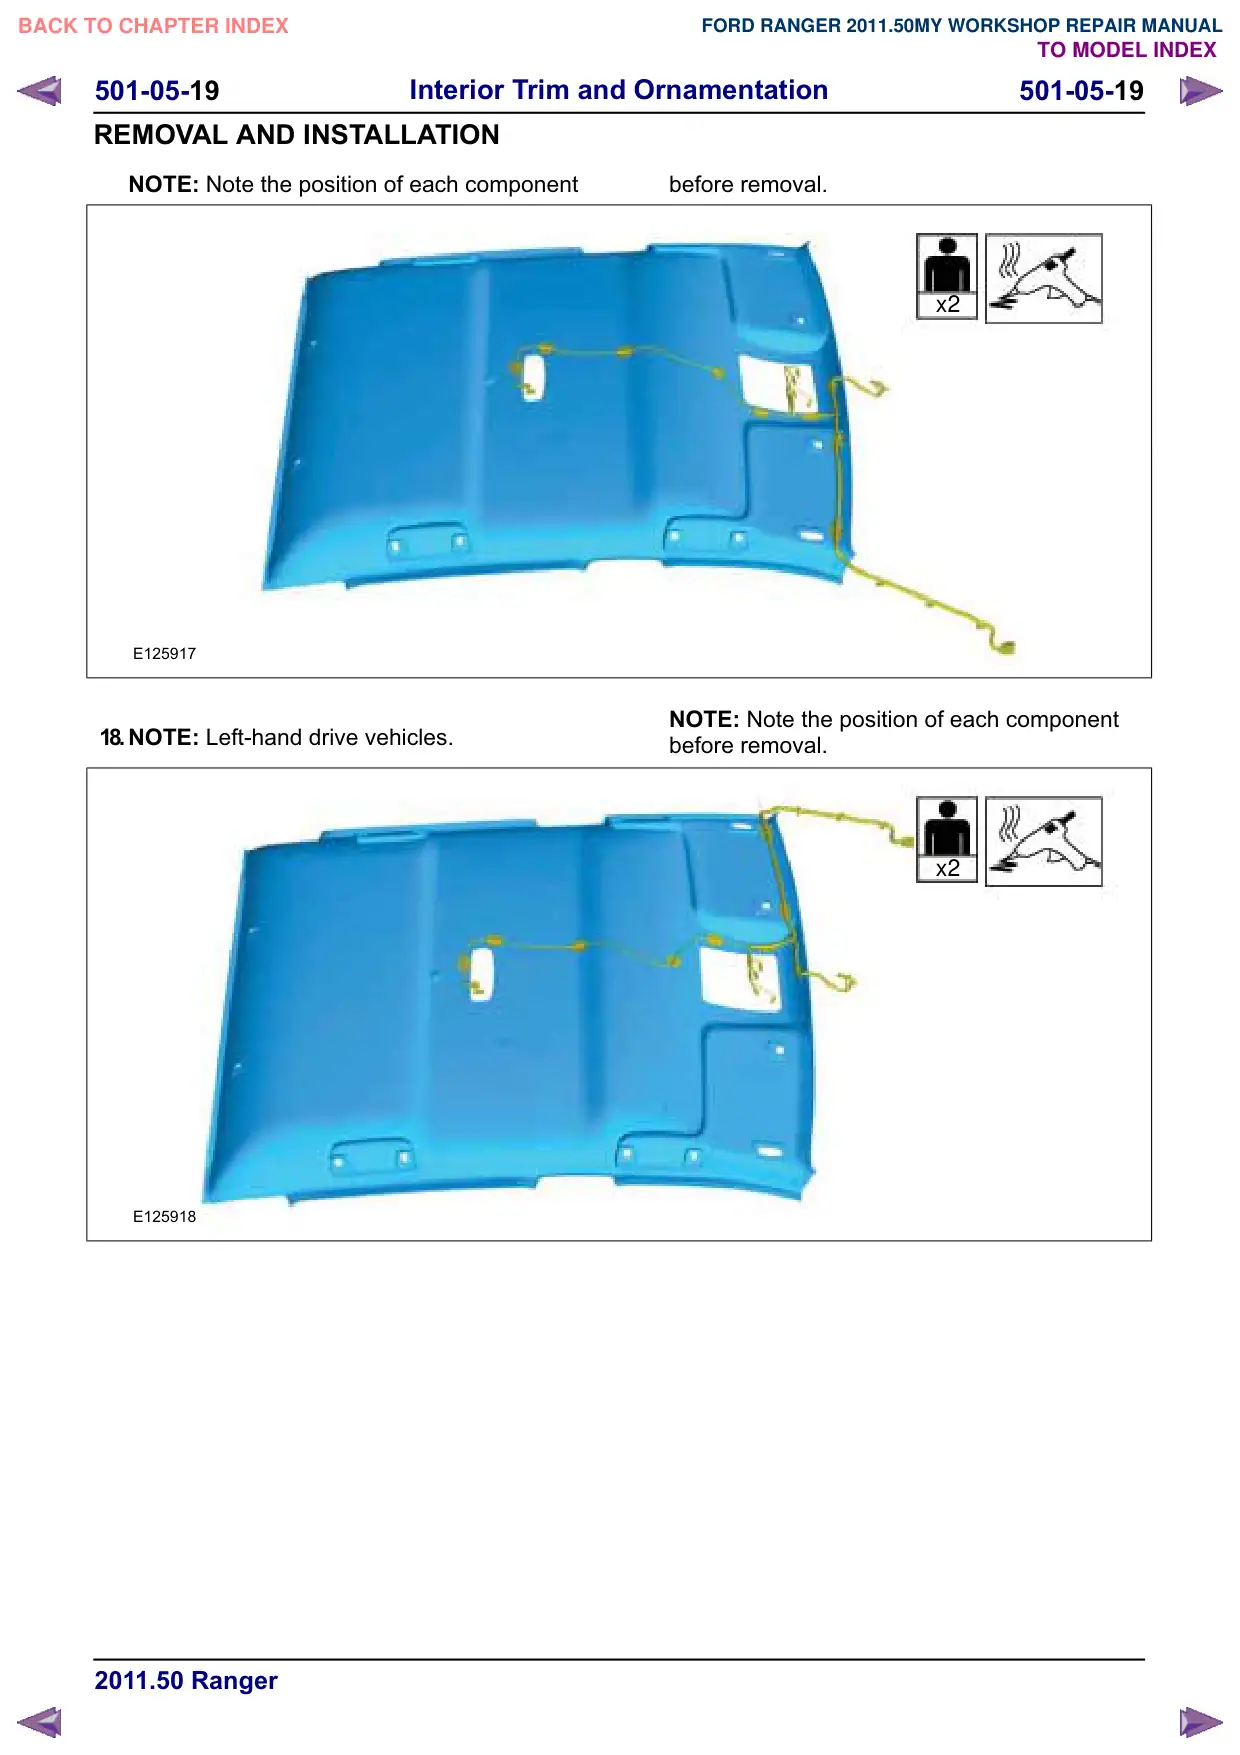
501-05-19 501-05-19 Interior Trim and Ornamentation REMOVAL AND INSTALLATION NOTE: Note the position of each component E125917 18.NOTE: Left-hand drive vehicles. E125918 before removal. x2 NOTE: Note the position of each component before removal. x2

Página 1382 · Forro do teto

Headliner

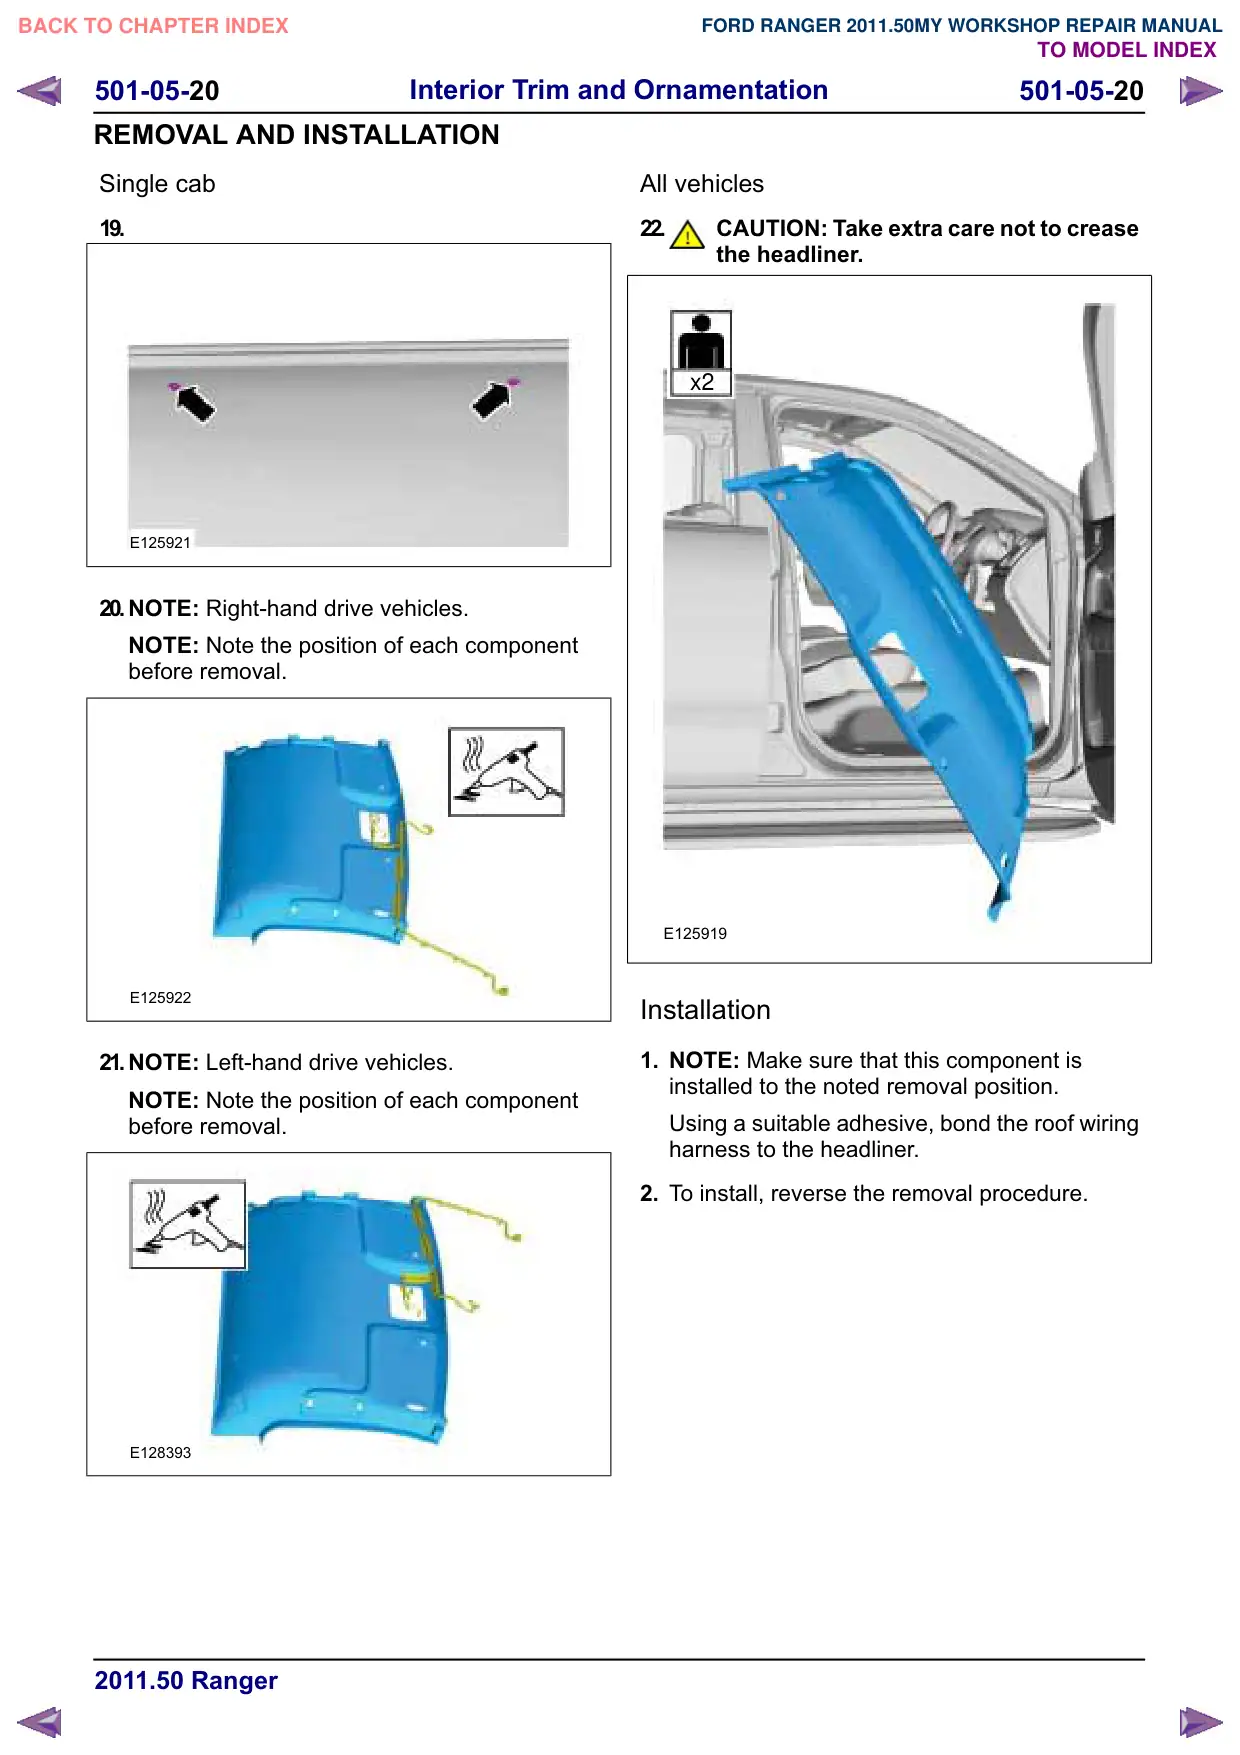
501-05-20 501-05-20 Interior Trim and Ornamentation REMOVAL AND INSTALLATION Single cab 19. E125921 20.NOTE: Right-hand drive vehicles. NOTE: Note the position of each component before removal. E125922 21.NOTE: Left-hand drive vehicles. NOTE: Note the position of each component before removal. E128393 All vehicles 22. CAUTION: Take extra care not to crease the headliner. x2 E125919 Installation 1. NOTE: Make sure that this component is installed to the noted removal position. Using a suitable adhesive, bond the roof wiring harness to the headliner. 2. To install, reverse the removal procedure.